Software Engineers need to be expert in their tools. You can’t Google or AI everything and call yourself an expert. Your job interviews will not entail these resources anyway.
1.1 - Week 2
Refresher on important 131 concepts.
For all of the following, write both the function and some code that calls and tests the function.
Complete the following without using ANY outside aid. If necessary, refer only to the python help() command or the official documentation at https://python.org.
Use your preferred programming environment (IDLE, Pycharm, Visual Studio Code, etc.)
Write a function with two parameters: a string and an integer n. Using a for loop, print the string n times.
Write a function with one parameter: a list. Print each element of the list using a for loop.
Write a function with two parameters: a list and a target. Using a for loop, count the number of times target appears in the list and print the total.
Write a function with two parameters: a list and a target. Using a while or for loop, print the first index in the list where target appears. Print not present if it does not exist in the list.
Write a function with one parameter: a list of integers. Using a loop, count the number of even and odd integers in the list. Print the total count of evens and odds.
Solutions
There are a few ways to solve each problem. Here are a few: week2-soln.py
Submission
Submit your .py file to Canvas for a check. You are not graded on completeness or correctness – this is for learning and feedback.
Key Skills
Function definition with parameters.
Function calling.
Selection using if-else.
Iteration using a for loop and working with the list index.
Combining iteration and selection.
1.2 - Week 3
Reinforcing selection, iteration, and function calling.
Instructions
For all of the following, write both the function and some code that calls and tests the function.
Complete the following without using ANY outside aid. If necessary, refer only to the python help() command or the official documentation at https://python.org.
Use PyCharm to complete this task. I know that PyCharm has a built-in AI Assistant. I strongly recommend that you disable it. You are going to be quizzed on these skills in class, and you will not be allowed to use any outside assistance.
Write a function named multiply() with two parameters, a and b, that returns the result.
Verify that both a and b are integers.
Return nothing if either a or b is not an integer.
Write a function named divide() with two parameters, a and b, that returns the result of a / b.
Verify that both a and b are either integers.
Return nothing if either a or b is not a number.
Return nothing if b equals 0.
Write a calculator function
The function must contain an “infinite” while loop that does the following until the user chooses to ’exit'.
Prompt the user to make a choice of either multiply, divide, or exit.
Do not allow or handle an invalid choice.
If the user picks exit, the program must end.
Prompt the user to enter two values, a and b.
Based on their choice, call either your multiply() or divide() function.
If either multiply() or divide() returns nothing, print an error message.
Otherwise, print the result in the format, e.g, 4 * 5 = 20 or 2.4 / 1.2 = 2.0.
Round the divide result to the tenths place using the built-in round() function when printing.
Submission
Submit your .py file to Canvas for a check. You are not graded on completeness or correctness – this is for learning and feedback.
Key Skills
Function definition: parameters and returns.
Logical selection using if.
Type checking using isinstance().
Functions calling functions.
2 - 01. Intro to the CLI
This lab introduces essential Command Line Interface (CLI) commands for the OS.
You are responsible for knowing all the CLI commands in this lab.
By the end of the lab, you should be able to navigate your OS’s file system, manage files and directories, manipulate text files, and utilize process management commands.
Pro tips before you get started
Mega important:There is no notion of “undo”, a “trash can”, or a “recycle bin” in the CLI. You run a command, it’s done. So you have to be careful when you do things like delete or move files in the CLI.
Press the Tab key to autocomplete the command or filename you are typing. Big time saver.
Use the up arrow on your keyboard to cycle through the most-recently used commands you typed in. Good for re-running things.
Program going crazy and the CLI is not responding? Stuck typing and can’t get out? Press Control+C or Command+C. This sends a signal to the OS to kill the running process.
Class introduction
2.1 - Launching a Terminal
The terminal is the program that lets users access an OS’s Command Line Interface (CLI).
Launching a terminal on Mac
The terminal program on Macs is simply called “Terminal”. You can open it in two ways:
Finder → Applications → Utilities → Terminal
Press Command+Spacebar. Type “terminal” in the Spotlight Search popup and you will see an option to open the Terminal.
CMD+Spacebar is a great way to open apps quickly on Mac.
You may wish to drag the Terminal application to your Dock at the bottom.
The terminal on Mac will look something like this.
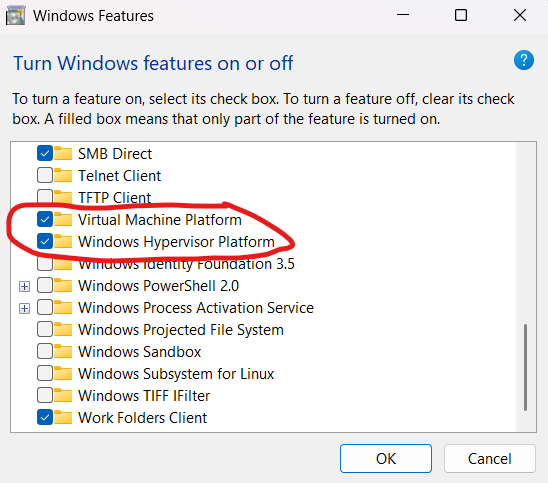
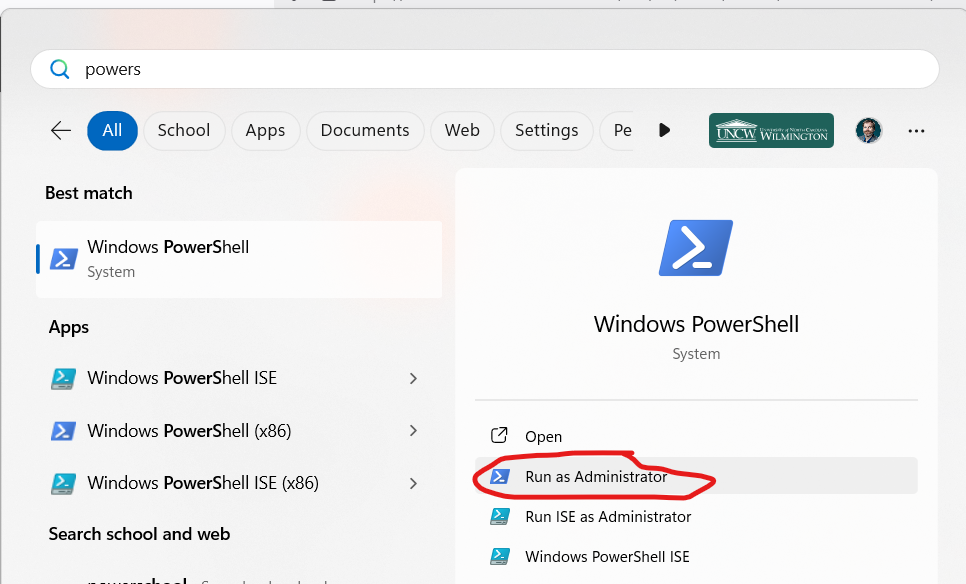
Windows
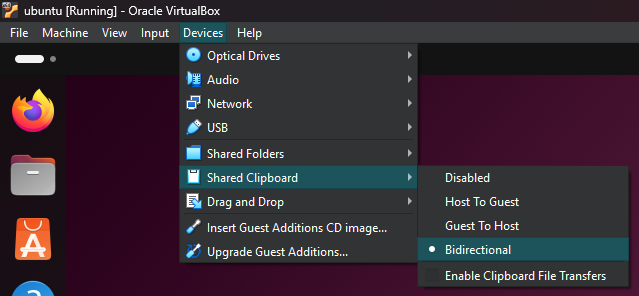
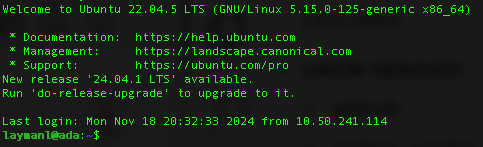
Windows has several terminal programs. Windows PowerShell and Command Prompt are for interacting with Windows CLI directly. We want to open an Ubuntu terminal for interacting with the Ubuntu OS you installed in the previous lab.
This is PowerShell. The rest of the CLI labs assume you are using PowerShell on Windows as it allows for more *nix style comamnds than the old-school Command Prompt.
Course Note: You need to know terms and concepts that look like this.
Directories hold files and other directories. When you use the term subdirectory, you are talking about the directories listed inside the current working directory.
Files represent programs, pictures, audio, video, word processing docs, etc. Files can be run by the operating system (in the case of programs) or opened by another piece of software, like Photoshop, Microsoft Word, or Python.
The file system has a root directory. On Mac (and Linux), this directory is named /. On Windows, it is typically C:\.
Mac & Linux uses forward slashes (/), whereas Windows uses backslashes (\). Use forward slashes (/) when in POwerShell and it will automatically transform them. Most software programs use /.
A user’s home directory is where their user-specific content lives, like documents and pictures that you save. On your personal computer, you probably only have one user. A lab machine will have many different users.
On Linux, the home directory for the user named ‘alice’ is /home/alice/
On Mac, it would be /Users/alice/
On Windows, it would be c:\Users\alice\
You can use the Terminal/CLI to navigate the file system, like you would graphically using the Windows Explorer or Mac Finder. As you navigate with the CLI, you are “in” one directory at a time. The directory that you are currently “in” is called the working directory. Commands run in the context of the working directory.
Explore the root directory using the ls and cd commands.
Open a Terminal for Mac or PowerShell for Windows.
Type in the following CLI commands one at a time and see what happens. The commands below have a # character, which indicated the beginning of a comment. # comments are there for clarification and you do not type them.
pwd# Print the path of the working directory.ls # List the files in the current directory.cd .. # Go "up" one level in the file tree.pwd# Print the path of the working directory.ls # This should now list different things.ls / # List the files in the root.cd / # Change working directory to root.ls # list files.cd .. # Go up... But it won't go anywhere because you can go higher!ls # You're still in the root. List root's files.
None of these commands change anything on your computer. They give you information and let you navigate between directories.
Mac users: If you encounter a Permission Denied error while running the ls / or cd / commands, try running sudo ls / or sudo cd /. It will prompt you to enter your password. The sudo command makes you an “administrator” in the eyes of the CLI. Mac is protecting the sensitive / directory, and wants to make sure you have permission to do what you’re trying to do.
Key Commands
pwd - Print Working Directory - what is the name of the directory you are currently “in”. Use then when you don’t know where you are.
ls - List contents. Will show both subdirectories and files in the working directory.
ls <target> - List the contents of target directory, e.g., ls /usr/
ls -l (Mac only) - Lists contents and gives you additional information, like the file type. May also do ls -l <target>
ll (Mac only) - Shorthand for ls -l. Can do ll <target>
cd - Change Directory. This is how you navigate.
cd / changes to the root directory
cd ~ or simply cd will navigate to the user’s home directory.
cd .. go “up” one level to the parent of the current directory
cd <target> changes to the <target> directory.
You can “jump” directories by putting the directories full name, like ls /usr/bin/. A directory’s full name is called its path.
You can also specify relative paths, which we will discuss more later.
The terminals are capable of autocompleting. Type cd to change to your home directory, then type cd D then hit the Tab key. What happens? The terminal will find all subdirectories (if any) of your working directory that start with capital D.
Extremely important point on Mac, Linux, and in most programs: file system names are case-sensitive. For example, you can have files named user.txt and User.txt and or a directory /usr/ and /Usr/ they are different. Capitalization matters in software development. Windows doesn’t care about capitalization (sometimes), but you should care.
Exercise:
(Mac) Navigate to the /usr/ directory.
(Windows) Navigate to the C:\Users directory.
Use the pwd command to display your current directory.
Type ls. What do you see?
(Mac only) Now type ls -l or ll. What do you see?
Use cd ~ to navigate to the home directory. Use ls to display the files and folders. What do you see?
Knowledge Check:
Question: What does the pwd command do?
Question: How do you navigate to the root directory?
Question: How do you navigate to your home directory?
By the end of the lab, you should be able to navigate the file system using the CLI, manage files and directories, manipulate text files, understand basic file permissions, and utilize process management commands.
Part 2: File and Directory Management
Reminder: All file system names a case-sensitive.
Now, let’s practice adding and removing files and directories using the CLI.
Creating and Removing Directories
mkdir - Make Directory
rmdir - Remove Directory
rm -r - Remove Directory and its contents recursively. WARNING: This is going to delete the directory and everything below it recursively. Linux does not have ‘undelete’, so be very careful with this command!
The commands below have a # character, which indicated the beginning of a comment. # comments are there for clarification and you do not type them.
cd# switch to your home directorymkdir MyLab
ls # You should see the new MyLab/ directory.cd MyLab
ls # You will not see anything. The directory is empty.cd ..
rm -r MyLab
ls # MyLab should now be gone
Creating, Copying, and Deleting Files
cp - Copy Files and Directories
rm - Remove Files
mv - Move or Rename Files
cd ~ # go to your home directoryls
touch sample.txt # Create blank filels
cp sample.txt sample_copy.txt
ls
mv sample.txt renamed_sample.txt
ls
rm sample_copy.txt
ls
cd ~# go to your home directoryls
echo "hello">sample.txt# create a text file containing the string "hello"ls
cp sample.txtsample_copy.txtls
mv sample.txtrenamed_sample.txtls
rm sample_copy.txtls
Exercise
Create a new directory named LabDirectory
Navigate into this directory using the cd command
Create a new file named LabFile.txt inside this directory. Use touch
Copy this file to a new file named LabFileCopy.txt. Use cp
Use the CLI to manipulate and print text files (like source code).
Part 3: Text File Manipulation
You can use the CLI to do simple or complex text manipulation. As developers, you will use an IDE like PyCharm or Visual Studio Code to do such tasks most of the time. However, it can be handy to do from the CLI sometimes. Many scripts used to compile and build software these CLI text-manipulation techniques.
Important concepts
Most CLI commands, including the ones you have already seen like ls and pwd have an output that is printed to the terminal. Some commands, like cp, do NOT have an output printed to the screen.
Below you will see the special > and >> operators.
> is the redirect operator. It takes the output from a command and writes it to a file you specify, e.g., echo "hello" > file.txt. It will create the file if it does not exist, and will overwrite the file if it does exist!
>> is the append operator. It will create the file if it does not exist, and will append to the end of the file if it does exist!
Viewing and Editing Text Files
echo - Display a line of text
cat - Concatenate and display file contents
more - View file contents one screen at a time
echo"Hello, CLI" > hello.txt
cat hello.txt
echo"Another line" >> hello.txt
cat hello.txt
seq 1110000 >> numbers.txt # making a big file - no need to learn. cat numbers.txt
more numbers.txt # Spacebar goes forward, b goes back, q to quit.
echo "Hello, CLI">hello.txtcat hello.txtecho "Another line">>hello.txtcat hello.txt1..10000|Out-Filenumbers.txt# making a big file. Don't worry about learning this command.cat numbers.txtmorenumbers.txt# Spacebar goes forward, b goes back, q to quit.
Exercise
Use echo to create a text file with some content. Try echo "this is my first file" > myfile.txt
Use cat will print all of the file’s contents to the screen all at once.
Use echo to append text to the file.
Use more to view the file content one screen at a time. Hit q to exit.
Knowledge check
Question: How can you append text to an existing file using echo?
Question: What command would you use to search for a specific word in a file?
We discussed what a process is when we introduced Operating Systems concepts. Below you will see a reference to PID - Process ID. This is an integer that uniquely identifies the process to the OS. As a user, you use the PID to specify which process you are talking about.
Run the following:
ps
top  # (Mac/Linux only) hit q or Control+C to quit the program.
Monitoring and Controlling Processes
ps - Report a snapshot of current processes
top - (Mac/Linux only) Display processes and how much memory or CPU they are using. Similar to the Activity Monitor on Mac and the Task Manager on Windows. Hit q to exit.
Use the keyboard combo Control+C to kill/quit the current process.
kill - Send a signal to a process
Exercise
We are going to install Python and create a wild task.
Open a second Termina by clicking the + button next to the tab in the menu of the current Terminal. You should see a second “fresh” terminal pane.
Now run python3 or python and create the following infinite loop. You can also do this in IDLE or other editor if having trouble running python from the command line.
python
whileTrue:print("hello there")
We should now have an out of control Python process gobbling up CPU cycles.
Switch back to the other Terminal tab and run the following commands.
ps
top # (Mac/Linux only) find the PID of the python process that is gobbling all the CPU# If using Windows, open the Task Manager programkill <PID> # Replace <PID> with the actual process ID
The terminal will not say anything, but run top again. The runaway Python process should be gone. Switch back to the Terminal tab where you had that Python process and it should say terminated or something similar.
Knowledge Check
Question: How can you view real-time process activity?
Conclusion
Anything you can do with your OS’s GUI, you can do on the command line. It just looks different. Become comfortable with the CLI – you will find that it can be MUCH faster for certain tasks, and will be indispensable to you as a software engineer.
Final Knowledge Check
Question: Summarize the steps to create a new directory, navigate into it, create a text file, and view it using less.
Question: From the CLI, how would you find the runaway process with a memory leak (probably using the most memory) and terminate it?
You will install a popular code editor, PyCharm, in your Linux-ish environment.
The most useful tool for a software developer, other than the brain, is an integrated development environment (IDE). You may have used IDEs in your classes, such as IDLE (which is bundled with Python), PyCharm, IntelliJ, Visual Studio, or XCode. IDEs usually have the following capabilities at a minimum:
Text editing for writing source code
Running the code
Debugging (more on this in the future)
Browsing files
Searching through files
Navigating through code structures easily
Most IDEs have many more capabilities. Software developers develop a preference for an IDE based on its capabilities, its ease-of-use, and the programming languages it supports.
In this class, we will use PyCharm, an IDE published by JetBrains. It has many handy features to support Python programming.
PyCharm works on Windows, Mac, and graphical Linux-based operating systems. If you are using Windows, we want to run it from our Linux environment
Choose the section corresponding to your Linux environment for instructions on installing PyCharm.
3.1 - for Mac
Instructions for installing PyCharm on Mac
This lab is for those who are installing PyCharm on Mac machines.
You will now see the Nano text editor in your terminal. Type or paste in the following:
#!/bin/shopen -na "PyCharm.app" --args "$@"
Hit Control+O to save, then Enter to accept the filename.
Hit Control+X to exit the text editor.
Run the following command in the Terminal:
sudo chmod +x /usr/local/bin/pycharm
You will now be able to type pycharm . in the Terminal to open PyCharm to edit the current directory’s contents.
Test drive
We are going to create a sample project directory using the Terminal, then open PyCharm and edit files in that directory. A video follows the steps.
Open the Terminal application.
Run the following in the Terminal:
cd ~ # make sure in your home directorymkdir seng-201 # This directory will hold all our code for the coursecd seng-201 # change to the new directorymkdir pycharm-test # Make a new subdirectory for a test project.cd pycharm-test # change into the subdirectorypycharm . # launch PyCharm in the current directory
The pycharm command launches the PyCharm program. The command pycharm . says launch Pycharm and have it open the current working directory. The symbol . always means the working directory. Sometimes it will be necessary to explicitly tell the CLI we are referring to the working directory; more on those situations as they arise.
A PyCharm window will open after a moment.
You may be asked if you “trust the authors of the files in this folder”. Click the checkbox and then pick “Yes, I trust the authors.”
Here is the process in a video:
Creating a new file
Let’s create a file in the Terminal in our project directory. We should see it immediately in PyCharm.
Go back to your Terminal and make sure you are in the pycharm-test directory.
Type the command touch hello.py to create an empty Python file.
Go back to PyCharm. You should see the file hello.py in the directory here. Click on it and it will open an empty editor pane.
In the code editor, type print("Hello World").
Go back to the Ubuntu Terminal and type cat hello.py. You should see the code.
Next
So you now have PyCharm successfully editing files and interacting with directories on Mac.
Locate the downloaded .exe file and double-click to run.
Choose the following options:
Finish the installation and run Pycharm.
Close any PowerShell or other terminal windows you have open.
Test drive
We are going to create a sample project directory using PowerShell, then open PyCharm and edit files in that directory. A video follows the steps.
Open the Terminal (PowerShell) application.
Run the following in PowerShell:
cd ~# make sure in your home directorymkdirseng-201# This directory will hold all our code for the coursecd seng-201# change to the new directorymkdirpycharm-test# Make a new subdirectory for a test project.cd pycharm-test# change into the subdirectorypycharm64.# launch PyCharm in the current directory
The pycharm64 command launches the PyCharm program. The command pycharm64 . says launch Pycharm and have it open the current working directory. The symbol . always means the working directory. Sometimes it will be necessary to explicitly tell the CLI we are referring to the working directory; more on those situations as they arise.
A PyCharm window will open after a moment, and you will be asked if you want to “trust” the directory. Select the top option and, if using your own computer, the bottom option:
PyCharm will finish opening, and you will see a code editor with a boilerplate main.py file.
Creating a new file
Let’s create a file in the PowerShell in our project directory. We should see it immediately in PyCharm.
Go back to PowerShell and make sure you are in the pycharm-test directory.
Type the command echo "print('Hello World')" > hello.py to create a Python file.
Go back to PyCharm. You should see the file hello.py in the directory here. Click on it and it will open an empty editor pane.
In the code editor, add the line print("How are you?").
Go back to the Powershell and type cat hello.py. You should see the code.
Next
So you now have PyCharm successfully editing files and interacting with directories on Mac.
This lab provides the minimum introduction to PyCharm needed to write programs. PyCharm has similar functionality to other professional IDEs, such as Visual Studio Code, IntelliJ, or XCode.
4.1 - Keyboard shortcuts
Accessing common commands quickly
Keyboard shortcuts
Everything you can do with a menu and a mouse has a keyboard shortcut. Menu+mouse is easier to learn, but keyboard shortcuts will make you about 30% more productive once you master them.
Rule of thumb: If you use the same mouse+menu commands over and over, learn the keyboard shortcut instead. Try to learn a shortcut or two each week.
I’ve highlighted my most-used keyboard shortcuts in the official cheatsheets from PyCharm:
I have created a seng-201/ subdirectory in my home directory symbolized by the ~. The tilde (~) is understood by your Terminal to mean “the current user’s home directory”.
Inside seng-201/, I have created subdirectories for each project.
Rule #2: Open the specific project directory in PyCharm, not the parent directory. Suppose you want to work on assignment1, then you need to open the assignment1/ directory. You open a folder in PyCharm in two ways:
Use your Terminal/CLI to cd into the project folder, then type (Windows) pycharm64 . or (Mac) pycharm .. Note that the . is important.
Open PyCharm first, then do File → Open. Select the project directory, then click OK.
The folder you open serves as the working directory for PyCharm. Do not open the parent directory, seng-201/, as it may create challenges running the Python code in the various subdirectories.
Project pane
The Project pane is where you browse and manage files. Open it by clicking on the foldier icon in the left sidebar:
Things you can do here include:
Create new files and subdirectories.
Double-click files to open.
Right click files and directories for a variety of tools, like renaming and deleting.
Exercise
Click on the pycharm-test name. You created this folder when following the labs to install PyCharm.
Now right-click the directory name, then New → Python File. Give it a name like foo.py.
You will see an editor tab pop open on the right with the name foo.py at the top.
Knowledge check:
Question: (True/False) Each coding project should have its own directory on the filesystem?
Question: (True/False) It’s okay to open the parent directory holding multiple projects in PyCharm?
Question: What CLI command do you run to open PyCharm from the current directory?
4.3 - Editing code
Tips and tricks for editing code with PyCharm
Editing
An Editor pane will automatically open every time you open a file. Things to know about the Editor windows:
PyCharm automatically saves your files. No need to explicitly save.
The line numbers on the left side are used to identify individual lines of code in error messages and elsewhere.
Familiar text editing features like Cut and Paste are available in the Edit menu at the top or Right-Clicking in an editor window. Learn those keyboard shortcuts!
CMD+/ (Mac) or Ctrl+/ (Windows, Linux) toggles comments on the current line or selected lines. This is one of my favorite keyboard shortcuts!
Suppose your code calls a function defined elsewhere. Hold down Cmd (Mac) or Ctrl(Windows, Linux) and hover over the function call. It will turn blue like a link. Left click the link and the function definition in the editor. Very handy! Look up the Go back keyboard shortcut to return your cursor to where you were.
Not happy with a variable or function name? Right-click it > Rename... It will be renamed everywhere in scope!
Use the arrow keys to move the cursor one character at a time. Hold down Ctrl (Windows, Linux) or Option (Mac) while tapping the left- or right-arrows. You will skip entire “words”. Again, very handy. Hold down Shift as well to select those words!
Exercise
Create a new file called fib.py in your pycharm-test folder and paste in the following code:
deffibonacci(n):"""
Computes and returns the Fibonacci sequence of length n.
Assumes n >= 1
"""ifn==1:return[1]ifn==2:return[1,1]result=[1,1]foriinrange(2,n):result.append(result[i-1]+result[i-2])returnresultprint(fibonacci(1))print(fibonacci(2))print(fibonacci(6))print(fibonacci(10))
Hold down Cmd (Mac) or Ctrl (Windows, Linux) and mouse over one of the fibonacci() calls at the bottom. Click the link and watch the cursor jump.
Using the keyboard shortcut, comment out the first three print(...) calls at the bottom all at once.
Now uncomment them all at once.
Right-click a fibonnaci() call and rename the symbol. Where does it change in the code?
Hit Ctrl+Z or Cmd+Z to undo the rename.
Knowledge check:
Question: How do you comment/uncomment a block of code with your keyboard?
Question: What does holding down Cmd or Ctrl + left-clicking on a name in the editor window do?
Exercise: Add a second function to your fib.py file named hello() that simply prints Hello World when called. Now, try to rename (as described above) the hello function to fibonacci, which already exists. Describe what happens.
4.4 - Running code and the integrated terminal
How to run Python code and leverage PyCharm’s terminal.
PyCharm uses tools installed on your computer to run programs. PyCharm should automatically find the Python you have installed on your computer if installed in a “standard” location.
Running code
There are multiple ways to run a program file:
In the editor window, Right-click anywhere in the code to open the context menu, then select Run [filename] or Debug [filename].
If necessary, select the Python Debugger popup, and select default options of subsequent pop-ups until you see the program run in the interactive Terminal at the bottom.
We will discuss the difference between Debug and plain Run in the future.
Use the run shortcuts at the top of the PyCharm window. You select the file you want to run from the dropdown, and then either the Run or Debug button. By default, PyCharm will run the most recent program run.
Use keyboard shortcuts to re-run the most recent program:
Shift+F9 (Windows, Linux) or ^D (Mac) to Debug
Shift+F10 (Windows, Linux) or ^R (Mac) to Run without debugging.
Exercise
Create hello.py in the pycharm-test directory if needed and add print("Hello World")
Run hello.py using the the context window.
Run it using the PyCharm toolbar.
Run it using keyboard shortcuts.
When you run your hello.py program, you should see output in the Debug or Run pane at the bottom. The exact output differ from mine, but you should see Hello World in there.
The Integrated Terminal
PyCharm also has an Integrated Terminal, which is an embedded version of the Command Prompt (Windows) or Terminal (Mac). You can use CLI commands like cd, ls, mkdir, etc.
Open the Integrated Terminal by either:
Clicking the Terminal icon in the bottom left
Using the PyCharm menu, View → Tool Windows → Terminal
Using the keyboard shortcut Alt+F12 (Windows, Linux) or Option+F12 (Mac)
When you ran your hello.py program, you should have seen a flurry of output in the Integrated Terminal window at the bottom. What just happened?
PyCharm opened a Terminal CLI, like you did in the Launching a Terminal lab, except this one is embedded in PyCharm.
PyCharm issued the CLI command python with your file as an argument.
python runs in the Terminal and prints output.
I find it convenient to use this integrated Terminal rather than switching to a another window. Or you may prefer to keep them separate. Do what works for you.
Exercise
List directory contents in the integrated Terminal using the ls command.
Type cd ~ in the integrated Terminal to switch to your home directory. Notice how the contents of the Project pane do not change. You are only changing the working directory in the Terminal.
Use the Terminal to navigate to your pycharm-test directory using cd commands.
Run the command touch hello2.py. Does it appear in the Explorer pane?
Run the command rm hello2.py. What happened? What happened in the Project pane?
Knowledge check:
Question: What is the keyboard shortcut for debugging/running your program?
Question: How do you open the integrated Terminal in PyCharm?
Question: How can you print the name of the current working directory in the integrated Terminal?
Question: If you have a runaway process in the integrated Terminal, how do you cancel/kill it so that you regain control of the Terminal? (The answer is the same as for the regular Terminal.)
5 - 04. Debugging
Debugging strategy and the basic features of the PyCharm debugger.
This class recording here is the companion to the Terms and Concepts and PyCharm Debugger labs below.
5.1 - Terms and concepts
Vocabulary you need to know plus what debugging really is.
Setup
Open your Terminal:
Terminal app on Mac
PowerShell on Windows
Use the Terminal to create a directory called debugging-lab/ in the same place you are gathering all your code for this class.
Download bad_math.py and save it to the debugging-lab/ directory.
Open the debugging-lab/ directory with PyCharm.
Select the bad_math.py file, then Run it WITHOUT DEBUGGING, either:
Right click in the editor and select Run 'bad_math'
Click the Play button next to bad_math in the toolbar
The program should crash with an error.
What is debugging?
Debugging is the process of understanding how a program arrived at a particular state.
Errors are incorrect calculations or bad states of a program. An error occurs while the program is running. Errors show as bad output, crashes, and the like. Debugging is often about comprehending how you arrived at an error.
Defects are programming mistakes, logic flaws, or problems with design that could lead to errors. What did you do wrong?
Defects are problems or mistakes, errors are the tangible result of running a program with a defect.
Colloquially, we conflate these two terms into the concept of a “bugs”, and hence the term “debugging”.“Bug” is an old term pre-dating computers, but Admiral Grace Hopper, who is the main reason we no longer program in Assembly Language, popularized the term “bug” in computing after she found one in the Harvard Mark II computer:
What is program state?
You have no doubt used print() statements to understand your program by printing variables, or printing here to see if a line executes is common. You are debugging using print statements.
Think about what these print statements tell you. They tell you:
What are the variable values at a point in time?
Which lines of code are getting executed when?
These two pieces of information are the essence of debugging. Let’s formalize them:
step: the program statement (often a single line of code) that was just executed.
state of a program is comprised of:
the variable values at the step.
the call stack at the step. We will explain this in a moment.
Debugging is trying to understand how you arrived at a state. Sometimes that state is an error, sometimes you want to figure out how you get to a certain point.
Debugging from an exception
Let’s examine some debugging info assuming you follow the Setup at the top of the lab.
If the program crashes due to an exception, the stack trace will usually point you to the line of code that exploded:
There is a lot of useful information in this stack trace to start the debugging process.
It tells you that the error is in bad_math.py, line 4 and even shows you the offending line of code.
Don’t fix any bugs yet. We want them for the next lab.
The error is an IndexError: list index out of range. So the program tried to execute numbers[i] but likely i was too big.
The other lines show the call stack, or the chain of function calls that are active in memory. In Python, the top-most function was called first, and the bottom-most function was called last (it is the reverse in Java):
Line 30 of <module> called the main() function.
- <module> represents the file bad_math.py itself and any code in the file that is not in a function or class.
Inside main() on line 18, largest_number = find_largest(numbers) was called.
Finally, inside find_largest(), the buggy line was called that generated the exception and crashed the program.
So the call stack is the chain of active functions that are waiting for something to be computed and returned. <module> -> main() -> find_largest(), which errored out. Look at the code itself to confirm the chain of function calls.
Congratulations! You have found some essential debugging information: the step at which the error occurred and the call stack portion of the state. What key debugging information are you missing?
The variable values! Now go to line 4. Add print(i) and print(numbers) right before that line to see what values i and numbers when the crash happens. That should give you a strong hint on what happened and how to fix it.
Don’t fix any bugs yet. We want them for the next lab.
Debugging is a process
A good software engineer follows a structured process. Use the exception message or your knowledge of the program to say, “Well, the problem could be this.” Form a hypothesis. Then add print statements to help determine state around the problematic step. Try different input values to confirm your hypothesis.
Maybe you will discover your hypothesis is incorrect. No problem! Maybe the error is actually due to something earlier in the call stack. Move your print statements up the stack and try again.
Whatever you do, build and refine your hypotheses. Do not just try something to see if it works. You may get lucky and fix the problem, but if you don’t understand the fix, how do you really know? You will also be doomed to make the same mistake again if you don’t understand what happened.
A better way?
You can debug just fine with print statements, but managing them is tedious. You will also have times where it would be useful to pause execution of the program at a certain point say, on the first iteration of a loop.
You can get state with print and control steps with code, but modern debugging tools will simplify this process while keeping your code clean.
We illustrate how to use PyCharm’s debugger in the next lab.
Knowledge check
Question: What two elements comprise the state of a program at a particular step?
Question: Suppose you use a constant value that never changes in your program, like pi = 3.14159. Do you think the variable pi is part of the program state? Why or why not?
Question: When do you see a stack trace? What information does it contain?
Question: Explain the difference between an error and a defect. Give an example of a defect and its resulting error.
Question: What information about the running program is contained in the call stack?
5.2 - The PyCharm debugger
Use the power of the IDE to understand your code.
Debugging support tools have been around since the 70s. All modern IDEs let you control the steps of program execution while showing the program state. Debugging tools, properly used, are much more efficient than print statements.
Open the debugging-lab/ directory and open bad_math.py in an editor.
Run the program in debug mode by doing one of:
Hit your F5 key.
Right click in the code editor and select Debug 'bad_math'.
Click the Bug button at the top of PyCharm.
The PyCharm debugger should now launch. Notice that you are now in the Debugging pane of PyCharm, which is accessible anytime from the left sidebar. This pane will open any time you Run a program with debugging.
You should see something similar to the following:
The bad_math.py program should crash with an exception. Here are the essential elements you see:
The editor highlights the line where the program crashed. The red lightning bolt in the left indicates an exception was thrown. You can see the full exception text by clicking the “Console” tab.
These are the step controls. PyCharm automatically paused on the step that caused the crash. More on the controls below.
The variable pane shows the values of all variables in scope at the current step. Variable values are one part of the program state.
The call stack is the other part of the program state. It shows the stack of function calls that arrived at the current step.
Using the step controls, hit either the green “play” icon or the red “stop” icon. Stop will cancel execution and produce nothing, play will continue execution of the program, resulting in the exception printing in the Terminal (where the program is running) and the program will crash.
Breakpoints and stepping
The PyCharm debugger will automatically break (pause) execution on steps that throw an exception. You can look at the variable pane and call stack to understand the state of the program and hopefully gain insight into what happened.
However, you will often want to break execution at step of your choosing, not just when an exception happens. Maybe want to see how a value was computed and what the variables were well before the crash happened. Or maybe your program doesn’t crash at all, but simply produces the wrong output.
You add breakpoints in the IDE to tell the debugger on which step(s) to pause execution. To set a breakpoint:
Set a breakpoint by left-clicking on the line number in the code editor. A red dot will appear to indicate the breakpoint. Set a breakpoint on line 3.
Click the breakpoint again to remove it.
You can set multiple break points.
You cannot set a breakpoint on a blank line of code.
Launch the debugger by pressing F5 or right-clicking and Debug 'bad_math'.
The debugger will break (pause execution) on line 3 or on whichever line you placed the breakpoint.Notice how PyCharm puts the current values of the variables largest and numbers in both the editor and the variable pane.
Use the step controls to control the execution of the program. All of these controls have a keyboard shortcut as well.
- Resume execution until the next breakpoint or the program ends.
- Step Over the current line, which means evaluate the line and go to the next one.
- Step Into the current line. If the current line calls a function like if my_fun(x) == True, the debugger will step into the my_fun() function and step through it. If you did step over, the debugger would evaluate the entire line including the my_fun() call without pausing.
- Step Into My Code. The same as the previous Step Into, but only step into source code files in your project. Suppose you call random.randint(0,10) which is a function imported from a Python library. Step Into will take you to the implementation of randint(). Step Into My Code will skip it because you did not write that code.
- Step Out of the current function. This will immediately complete all lines of the current function and pause at the line that called the current function in the call stack.
- Restart the debugging on the program. Just like re-running it. All your breakpoints will be retained.
- Stop the debugger without further execution of the code.
Use the controls to Step Over a few lines. Notice that the variable pane, watch pane, and call stack update with each step.
Using breakpoints and the step controls, you can precisely control the execution of the program to more methodically track down what is going on.
Adding a watch variable
The Threads & Variables pane shows all variables in scope at each step. In bigger programs, the variable list can be huge and you won’t care about most of them. To help, you can specify watch variables and watch expressions that always display at the top of the Threads & Variables pane.
To set a watch variable:
Set a breakpoint and start debugging the program
Select the variable in the editor or in the threads & variables
Right Click and Add to Watches
Now you will see your watched variables update as you step through the program. You can add as many watch variables as you like.
Adding a watch expression
You can also watch a complete expression, such as a boolean comparison. This can be particularly useful for debugging if-else statements and loops.
To set a watch expression:
Select the expression you want to evaluate in the editor.
The expression must be valid. So if you have the line if numbers[i] > largest:, select only the numbers[i] > largest portion of the statement.
Right click and Add to Watches.
Conditional breakpoints
You will also find it useful to only have a breakpoint trigger under certain conditions.
For example, you are reading file of 10,000 hospital patient records and you figure out that the program crashes when it gets to the record belonging to “Alice St. John”. Unfortunately, Alice is record 342. You don’t want to set a breakpoint on the offending line and have to hit the Continue control 341 times to figure out what’s going on with Alice’s data.
Enter the conditional breakpoint, which is a breakpoint that only pauses execution when an expression you specify evaluates to True. Try it with our bad_math.py sample:
Set a regular breakpoint on line 3 and Debug the program. It stops on the first iteration.
Right click on the breakpoint on line3. A textbox will appear. Type largest == 12 in the textbox.
Note: You can also add conditional breakpoints without creating a plain breakpoint first by right-clicking in the gutter.
Now hit the Continue control or restart the program in Debug mode. The conditional breakpoint will only pause when largest == 12.
Conditional breakpoints are extremely useful for refining your hypothesis as to what’s going on. Note you can enter any Python expression that evaluates to True or False, for example:
largest == 12 and i < 8
largest >= 5
Starting with vs. without debugging
When running your program, you have the option to Debug or Run. What’s the difference?
Run will not pause on breakpoints or exception, nor will variable values be tracked. Your breakpoints and watch variables will remain in PyCharm, but they are not updated.
Debug will do everything we showed, but significantly slows down the execution time of your program. This is because to enable debugging your code must be instrumented to enable the debugger to control execution and evalute variable or expression values. Think of instrumentation as adding an if breakpoint is True before every line of code as well as a print statement. Running debug mode for a large, complex system, can be costly.
Exercise
There are 4 bugs present in the initial bad_math.py that can be triggered based on which value the numbers variable has. The various calls to main() at the bottom of the file are sufficient to reveal all the bugs.
Find and remove them. There are multiple ways to squash the bugs. You may squash two bugs at once depending on how you fix the first bug that causes the exception we have seen in our examples.
Your output should look like the following if you gracefully fix the bugs:
Numbers: [2, 8, 1, 6, 3, 12, 5, 9]The largest number is: 12The average is: 5.75
✅ All calculations are correct.
--------
Numbers: [32, 16, 8, 4, 2, 1, 0]The largest number is: 32The average is: 9.0
✅ All calculations are correct.
--------
Numbers: []The list of numbers cannot be empty.
--------
Numbers: [2]The largest number is: 2The average is: 2.0
✅ All calculations are correct.
--------
Numbers: [12, 12]The largest number is: 12The average is: 12.0
✅ All calculations are correct.
--------
Knowledge check
Question: How do you run a program in debug mode in Pycharm?
Question: How do you add a variable to the watch list from the editor view?
Question: How do you set a conditional breakpoint that pauses when x evaluates to False?
Question: What is the difference between Step Over and Step Into in terms of the next step of execution?
This program tells you what the nth Fibonacci number is.
Enter a number for n: 4Fibonacci number 4 is: 3This program tells you what the nth Fibonacci number is.
Enter a number for n: 7Fibonacci number 7 is: 13
Inventory Management System
1. Add item
2. Remove item
3. Check stock
4. Exit
Choose an option: 1Enter item name: apple
Enter quantity: 10Added 10 of apple. Total: 10Inventory Management System
1. Add item
2. Remove item
3. Check stock
4. Exit
Choose an option: 2Enter item name: apple
Enter quantity to remove: 15Error: Not enough stock of apple to remove. <--- note change!
Inventory Management System
1. Add item
2. Remove item
3. Check stock
4. Exit
Choose an option: 1Enter item name: orange
Enter quantity: 10Added 10 of orange. Total: 10Inventory Management System
1. Add item
2. Remove item
3. Check stock
4. Exit
Choose an option: 2Enter item name: orange
Enter quantity to remove: 10Removed 10 of orange. Remaining: 0orange is out of stock. <--- note change!
6 - 05. Testing
Introduction to testing concepts and automated unit testing.
Testing is integral to all forms of engineering. Software developers often write as much test code as they do product code! This set of labs introduces testing concepts and automated testing.
6.1 - Assertions
The building block of testing.
Class video from Spring 25
Ignore the slide about exams.
Software testing
Software testing is both a manual and an automated effort.
Manual testing is when a tester (or user) enters values into the user interface and checks the behavior of the system.
Automated testing is where test code is used to check the results of the main product code. Automated testing is an essential part of program verification, which is an evaluation that software is behaving as specified and is free from errors.
Automated testing is a necessity in real systems with thousands of lines of code and many complex features. Manual testing is simply infeasible to do thoroughly.
Code that verifies code?
Automated testing in this case means writing code. Developers and testers write code and scripts that executes and tests some other code.
Exercise
Create a directory named testing-lab in your seng-201/ directory.
Download sample.py and put it in the testing-lab/ directory.
Open the folder in PyCharm and run sample.py.
The function calls in the __main__ section of code are a semi-automated test. The calls are automated, but the verification is still manual – you, the developer, have to verify that the output is indeed correct.
To have automated testing, we need a programmatic indicator of correctness. Enter the assert statement.
The assert statement
Nearly all programming languages have an assert keyword. An assertion checks if a value is True or False. If True, it does nothing. If False, the assert throws a special type of exception. Assertions are commonly used in languages like C and Ada to verify that something is True before continuing execution.
In most modern languages, including Python, the assert is the basis of automated testing.
Exercise
Let’s explore the assert in Python.
Create a new file named test_sample.py in the testing-lab/ directory. Edit the file in PyCharm.
Add the following code:
test_sample.py
assertTrueassertFalseprint("Made it to the bottom.")
Run test_sample.py. Notice the following.
assert True does not produce any output. The program simply continues.
assert Falsegenerates an exception. This is expected.
The print(...) statement did not execute because the exception generated by assert False crashed the program.
Comment out the assert False line and run it again. The print(...) statement will execute.
This demonstrates the behavior of assert. Let’s add some more interesting assertions. Add the following lines to the bottom of test_sample.py:
test_sample.py
x=2**5assertx==32asserttype("Bob")==stry=16assertx-y==16andtype("Bob")==strandint("25")==25print("Made it to the bottom.")
The right-hand side of the assert statements now use comparisons and boolean operators. This looks a bit more realistic. The assert can have any simple or complex Boolean expression so long as it evaluates to True or False.
Quick Exercise: Change the operators or values in the expressions so they evaluate to False. Notice how the last assert can fail if any of the comparisons are false.
We’ll put our assertions to work testing program code in the next lab.
Knowledge check
Question: What two things are you trying to verify with program verification?
Question: Why do we need automated testing?
Question: What happens next if a Python program encounters the statement assert True?
Question: What happens next if a Python program encounters the statement assert False?
Question: What happens when the following executes: assert 16 == 2**4?
Question: What happens when the following executes? assert len('Bob') > 0 and 'Bob' == 'Alice'
6.2 - Unit testing
Using assertions to test a file.
Class video
Testing sample.py
Assertions are the basis of modern automated testing. Developers write test code in source files that are separate from the main program code. We have our program code in sample.py and the test code will be in test_sample.py. This is a common naming convention.
Now, let’s use our assert to test the correctness of the functions in sample.py.
Comment out all the code in test_sample.py
Add the line import sample. In Python, this makes the content of sample.py accessible to code in test_sample.py.1
Now let’s convert those print(...) statements from sample.py into assert statements in test_sample.py. test_sample.py should now have the following:
test_sample.py
importsample# We import the filename without the .pyassertsample.palindrome_check("kayak")# the function should return True, giving "assert True"assertsample.palindrome_check("Kayak")assertsample.palindrome_check("moose")isFalse# the function should return False, giving "assert False is False", which is Trueassertsample.is_prime(1)isFalseassertsample.is_prime(2)assertsample.is_prime(8)isFalseassertsample.reverse_string("press")=="sserp"# checking result for equality with expectedassertsample.reverse_string("alice")=="ecila"assertsample.reverse_string("")==""print("All assertions passed!")
Point 1: We access the functions in sample.py by calling, e.g., sample.palindrome_check(...). The prefix sample.X tells Python “go into the sample module and call the function named X.” We would get an error if we called only sample.palindrome(...) because Python would be looking in the current running file, which has no such function defined in it.
Point 2: In Python, you should check if a value is True or False using is. The is operator returns a boolean. You could also type x == True or x == False. Either form will work, but is is preferred2.
Point 3: Remember that palindrome_check() and is_prime() return True/False themselves. We are simply verifying that they are returning the correct value. reserve_string() returns a string value, so we need to compare using == to an expected value.
Point 4: The program will crash with an AssertionError if any of the assert statements are False. Mess up one of the assertions to verify this.
Exercise
Go to sample.py and define a function named power() that takes two parameters, x and y, and returns the computed result of xʸ.
Add assert statements to test_sample.py to verify your function behaves correctly.
Unit tests
The file test_sample.py is what software engineers call an automated unit test. A unit test is a group of test code (usually one file) that verifies a single class or source file3. Unit tests are usually written by the same developer who wrote the program code.
Our automated unit test now calls functions and use assert statements to verify that they are returning the expected results. If an assertion fails, the test fails.
What does it mean if a test fails? One of two things:
Either there is something wrong in the program code. Maybe there is a logic error.
The test code itself has a mistake in its logic.
Regardless, if a test fails, you need to figure out why. A good unit test will systematically exercise all the logic of the function or module under test. This can help uncover flaws in the program code. We will discuss strategies to do this in subsequent lessons.
We also need a way to run the test code and accumulate the results in a useful way. We will do this in the next lab.
Knowledge check
Question: Suppose you wanted to test a function named get_patient_priority(str) in hospital.py. What would you have to do to call the function from your test code?
Question: The right hand side of an assert statement can be any expression (simple or complex) as long as it evaluates to _____ or _____.
Question: Who writes unit tests?
Question: The name for a test that tests an individual module is a ______ test.
Question: Why do you think we write separate assert statements for each function input, rather than one assert statement that calls the function multiple times with different inputs? That is, why not do assert sample.reverse_string("alice") == "ecila" and sample.reverse_string("") == ""?
In Python parlance, a single file is called a module. You can create complicated modules that are collections of multiple source files. This is how many popular Python libraries like random work, as do third party libraries like pytorch and keras used for machine learning. It is a way to bundle functions and classes for convenient use in source code. ↩︎
If you are dying to know the difference between x is False and x == False, it’s because many other values are equivalent to True and False when using ==. Empty values, such as 0 or [] are == False (try it). But only False is False. Similarly, only True is True, but 1 == True. ↩︎
The unit is usually a single class. However, in our case, there is no class, but a collection of functions in a file. Some people treat a file as a unit. But a file can have multiple classes in it. The definition of a unit is a bit fuzzy, but usually refers to either a class or a single file. ↩︎
6.3 - Structuring test code
Organizing the test code has benefits, just like organizing program code.
Class video
Limitations to the current approach
In the previous lab, we gathered our assert statements into a test file that can be run. If the test file runs to completion, our tests have passed. If it fails with an AssertionError, we know that a test has failed and something is wrong (either with the program code or the test code itself). We have the beginnings of automated unit testing.
Our current goal
What we have so far is a good start, but we have two things to improve upon:
Currently, we can only fail one assert the test file at a time because a failed assertion throws an exception and halts the program. Ideally, we would like to run all tests and identify which individual ones are failing.
We would like to collect our test results in a human-friendly format. I run the test, I get a summary of passes and fails.
We can accomplish these both these things. First, we need to organize our test cases in our test file. Second, we will need help from developer tools.
importsample# We import the filename without the .pyassertsample.palindrome_check("kayak")# the function should return True, giving "assert True"assertsample.palindrome_check("Kayak")assertsample.palindrome_check("moose")isFalse# the function should return False, giving "assert False is False", which is Trueassertsample.is_prime(1)isFalseassertsample.is_prime(2)assertsample.is_prime(8)isFalseassertsample.reverse_string("press")=="sserp"# checking result for equality with expectedassertsample.reverse_string("alice")=="ecila"assertsample.reverse_string("")==""print("All assertions passed!")
Remember, we use the naming conventiontest_<file>.py to identify the unit test for <file>.py.
Organizing test code into test cases
To meet our goal, we will first organize our assert statements into test cases, which has a conceptual and a literal definition:
test case (concept): inputs and expected results developed for a particular objective, such as to exercise a particular program path or verify that a particular requirement is met. [Adapted from ISO/IEC/IEEE 24765].
test case (literal): a test function within a test file.
Let’s start simple. Let’s move the assert statements that test each function into their own functions in the test file like so:
test_sample.py
importsample# We import the filename without the .pydeftest_palindrome():assertsample.palindrome_check("kayak")# the function should return True, giving "assert True"assertsample.palindrome_check("Kayak")assertsample.palindrome_check("moose")isFalse# the function should return False, giving "assert False is False", which is Truedeftest_is_prime():assertsample.is_prime(1)isFalseassertsample.is_prime(2)assertsample.is_prime(8)isFalsedeftest_reverse():assertsample.reverse_string("press")=="sserp"# checking result for equality with expectedassertsample.reverse_string("alice")=="ecila"assertsample.reverse_string("")==""# run the test cases when executing the fileif__name__=="__main__":test_palindrome()test_is_prime()test_reverse()
We say now that each of test_palindrome(), test_is_prime(), and test_reverse() is a test case. We have three (3) test cases in one (1) unit test file.
Note the naming convention: all the test case functions begin with the string test_. This is a requirement of the developer tool in the next lab that will help us run multiple test cases even if one of them fails.
The block beginning with if __name__ == "__main__": allows us to run the tests by running the file. You should not see any output when you run the unit test because all of these assert statements should evaluate to True.
Diversifying our test cases
One test case for each function in your program code is where you should start. However, we often want more than one test case per program code function. Why?
Consider why we have multiple simple assert statements. Suppose we have the following valid assertion: assert sample.is_prime(1) is False and sample.is_prime(2). Now, suppose this assertion failed due to a bug in our program code. The bug could either be with the logic of dealing with the input 1 or 2. We put our checks in separate assert statements so we know precisely which input caused an error in the program code.
The same strategy applies when unit testing program code.
Program paths
A program path is a sequence of instructions (lines of code) that may be performed in the execution of a computer program. [ISO/IEC/IEEE 24765] Take a look at is_prime() in sample.py:
Giving the input 1 executes lines 5, 6 and 7. This path (5,6,7) deals with special cases where our input is ≤ 1. One (1) itself is not prime, and neither are 0 or negative numbers by definition.
Giving the input 4 executes lines 5, 6, 8, 9, and 10. This path (5,6,8,9,10) accounts for numbers > 1 that are not prime.
Giving the input 5 will execute lines 5, 6, 8, 9 and 11. This path (5,6,8,9,11) accounts for numbers > 1 that are prime. The input 3 is a special case of this that does not include line 8.
Path testing
Let’s group assert statements that test “a particular program path” or “a particular requirement” (see the test case definition) into separate test cases. Change test_is_prime() to the following:
These test cases both verify is_prime() but examine different program paths.
test_is_prime_special_cases() tests path #1 (previous subsection). We know something is wrong with the part of our algorithm that handles the special case of integers ≤ 1.
test_is_prime() tests paths #2 and #3. WE know something is with the part of the algorithm that checks if the input is divisible by a potential factor if that test case fails.
The ability to pinpoint where the algorithm is failing is very useful to the developer when they go to debug. Especially when you have many test cases and hundreds of lines of program code.
Some functions only have one program path, and so one test case may be sufficient.
Your testing strategy
Writing separate test cases for each program path or requirement is a testing strategy. But, it can be hard to know how much to identify the program paths or to know how many tests are “enough”.
For now, start with one test case per program function.
Then ask yourself, “are there sets of input where the program behaves differently than for other inputs?” If so, divide your test case to separate those input sets. In is_prime(), the program behaves differently if you give it inputs ≤ 1 vs. inputs > 1 that are prime vs. inputs > 1 that are not prime.
We will discuss how to analyze a program to create a good test strategy in future lessons, as well as quantify how good our tests are.
Exercise
Our test_is_prime() has lumped together the program paths where the number is prime and the number is not. Reorganize this test into two test cases: one for each program path. Write one test case asserting only prime numbers ≥ 1, and the other only non-prime numbers ≥ 1.
Knowledge check
Question: In test code, a single function is called what?
Question: How many program paths will a function with a single if-else statement have?
Question: What is a program path?
Question: Conceptually, what is a test case?
Question: Besides generally being more organized, why do software developers want to split up their tests into multiple test cases?
Question: Suppose you have a program file that defines the functions foo() and bar(). How many test cases should you have at a minimum in your test code? What should they be named?
6.4 - Control Flow Graphs
A simple but powerful analysis technique for understanding execution paths through source code.
One approach to systematically exercise the behavior of the system is through basis path testing: identify all program paths in the code and make sure we have at least one test case that exercises every path.
How do we identify all program paths? That is exactly what the control flow graph helps us to do. These graphs can help us to understand what our code does, and also gives us a powerful analysis tool for designing test cases as well as many other applications in computer science.
Definition and uses
A control-flow graph (CFG) is a representation of all program paths that might be traversed through a program during its execution. A program path is a sequence of execution steps like we learned about in debugging.
Frances (Fran) Allen was an IBM Fellow who devised the concept of control flow graphs in the 1960s. In 2006, she became the first woman to receive the Turing Award for her contributions to computer science.
Control flow graphs represent different blocks of code. A basic block is a sequence of non-compound statements and expressions in a program’s code that are guaranteed to execute together, one after the other.
Here are some examples and non-examples of basic blocks:
# A single statement is a basic block.x=1# A sequence of multiple statements and function calls is a basic block.x=5y=x+2z=f(x,y)print(x+y+z)# A basic block can end with a return or raise statement.x=5y=x+2returnf(x,y)# But a sequence of statements with a return/raise in the middle is# NOT a basic block, since the statements after the return/raise aren't# going to execute.x=5returnxy=x+2# Will never execute!# An if statement is not a basic block, since it is a compound statement.# The statements it contains aren't guaranteed to execute one after the other.ifx>5:y=3else:y=4
Typically we treat basic blocks as being maximal, i.e., as large as possible. So if we have a sequence of assignment statements (x = 5, y = x + 2, etc.), we treat them as one big block rather than consisting of multiple single-statement blocks.
Now let’s look at that if statement example in more detail. We can divide it up into three basic blocks: one for the condition (x > 5), then one for the if branch (y = 3) and one for the else branch (y = 4). We can now formalize this idea, and extend it to other kinds of control flow statements like loop.
Formally, a control flow graph (CFG) of a program is a graph \(G = (V,E)\) where:
\(V\) is the set of all (maximal) basic blocks in the program code, plus one special element represent the \(end\) of a program.
\(E\) is the set of edges, where:
There is an edge from block \(b_1\) to block \(b_2\) if and only if the code in \(b_2\) can be executed immediately after the code in \(b_1\).
There is an edge from block \(b\) to the special \(end\) block if and only if the the program can stop immediately after executing the code in block \(b\). This occurs if there is no code written after \(b\), or if \(b\) ends in a return or raise statement.
Building a CFG
Here are the rules:
When you draw a node, you will write either the actual statements or the line numbers inside the rectangle.
Decision nodes: Draw as a diamond or a highlighted rectangle. These are blocks that either (a) transfer control by performing a function_call(), or (b) make a decision with if-else, try-exceptfor, or while. You do not create a decision nodes for built-in functions like print() or input(). A try-except block is a decision node on the try; the except blocks are regular nodes (usually).
Regular nodes: Draw as a rectangle. These are blocks code that executes in sequence without jumping. You group multiple lines of code together into one regular node when they execute in sequence.
End node: Draw two concentric circles with the inner one filled-in. This represents the “end” of the control flow that you are modeling. It does not represent a line of code.
Edges: Draw a line with an arrow at the end to represent the control flow passing from one node to another.
Regular nodes will have a single incoming edge and a single outgoing edge indicating program control flows in and out of the code block.
Decision nodes will have a single incoming edge. They will have either two outgoing edges in the case of if-else, for, and while statements or one outgoing edge if a function_call() that activates a new function. Label the outgoing edge(s) of the decision node with the function_call() or the condition, e.g., x < 0 or x >= 0.
For try nodes, you have a single incoming edge. You have one outgoing edge to the internal nodes of the try, and one outgoing edge to each except and finally block.
The end node can have many incoming edges, and will have no outgoing edges.
We can model a CFG for an entire program, a selected block, or individual functions. CFGs can get lengthy quickly, so you are best off working with separate, small functions.
We will use line 1 def check_number(x): as our start point. It is a regular node because no decision is made. Draw a rectangle at the top of a sheet of paper. Write ether the line number or the entire line of code inside the node.
Below the first node, draw a diamond or highlighted rectangle box to represent a decision node for line 2. Decision nodes are used when you encounter if-else, for, or while loops or a call to a user-defined function(). Draw an edge connecting the first node to the second.
Draw a regular node for line 3 as a rectangle next to the line 2 node. Regular nodes represent blocks of code (in this case only one line) that executes in sequence with no decisions or calls to other functions. Draw an edge from line 2 to line 3 and label it with the condition that transfers control to line 3.
Draw another regular node representing line 5 below the line 2 node. Draw an edge from line 2 to 5 and label it with the condition that transfers control to line 5.Note that we DO NOT draw a node for the else on line 4. It is a part of the if decision node on line 2. However, if we have if-elif, we would draw another decision node. We are just capturing the if comparisons in our graph.
Finally, we need an end node to indicate the end of the program paths. Draw two concentric circles below the other nodes. Connect lines 3 and 5 to this end node. This node does not represent a line of code, but indicates the end of the execution we care about.
Now we have a CFG for a very simple block of code. Tracing the execution of the program becomes a matter of tracing your pen through the nodes and, when you reach decision nodes, determining how the variables values determine the flow of control.
Identifying unique program paths
One of the most important uses of a CFG is that it enables us to identify all the unique program paths in the code. Again, a program path is a sequence of execution steps like we learned about in debugging.
Question: Can how many unique program paths are indicated by the CFG? What are they?
To answer this question, you trace the set of nodes executed during a single “run” of the code block. A path is the set of nodes executed. Note that we have a decision node (line 2). So when the program executes, we have to choose a path, either going through 3 or 5 because the program makes a choice based on the value of x.
So the answer, then, is there are two unique program paths:
The path (1,2,3)
The path (1,2,5)
Now, in basis path testing we will write test code (assertions) with values that exercise all paths at a minimum. So for the above simple example:
Why do we care about the unique program paths? Because we can measure how good our unit tests are based on the number of unique program paths covered. So, our goal becomes to design our test cases so that the set of tests hits every unique program path. Sometimes this is easier said than done. Test coverage is a measure of how many program paths are covered by a test of test cases, and test coverage is used throughout the industry as a measure of test quality. We will use a tool to calculate the test coverage in a future lab.
Exercise: Multiple return paths
The following example has multiple ways to return out of the code block. You would treat raising an exception as returning.
Try to draw the CFG for this example. Some pointers:
Lines 2 and 4 are both decision nodes.
return statements are treated as regular nodes, but they all go to the end node.
Make sure to label your decision nodes’ outgoing edges with the condition.
Exercise: Loop example
Consider the following code that includes a loop.
1
2
3
4
 5
 6
 7
 8
 9
10
11
defprocess_numbers(nums):evens=0odds=0fornuminnums:ifnum%2==0:print(f"{num} is even")evens+=1else:print(f"{num} is odd")odds+=1returnevens,odds
Try to draw the CFG for this example. Some pointers:
A loop is a decision node. In the case of this for loop, if there are still num remaining in the list, you go to 3. Otherwise, the program block is ended because there is nothing left after the for loop.
Where do you go after lines 4 and 6? Back to the for loop.
Knowledge Check
Question: What is a program path, and how is a CFG related to program paths?
Question: What do you label the outgoing edges of a decision node with?
Question: How many unique program paths exist in the Loop example? What are they?
Question: Write one or more test cases that exercise all unique paths in the Loop example.
Question: Write a test case that exercises all the unique program paths the Multiple return paths example? What are they?
Question: We didn’t model an exception scenario. Apply your critical thinking and the rules at the top of this lab to create a CFG for the following function:
1
2
3
4
5
6
7
8
9
10
11
12
defanalyze_data(data):evens=0odds=0foritemindata:ifisinstance(item,int):ifitem%2==0:evens+=1else:odds+=1else:raiseValueError("Invalid data type")returnevens,odds
6.5 - pytest
Use a test framework, pytest, to run tests and collect results.
Test frameworks
We developed organized, thorough unit tests in in previous labs.. Our test code is looking good, but we still need to address two issues for it to be truly useful:
We would like to know if multiple test cases are failing.
We would like to collect our test results in a human-friendly format.
Automated test frameworks address these find and execute test code (often through naming conventions like test_*), capture assertion exceptions (test case failures), and generate summaries of which tests pass and fail.
Automated test frameworks are an integral part of modern software engineering.
Introducing pytest
We will use an automated test framework for Python called pytest. Test frameworks are language-specific. Java has JUnit, C++ has CPPUnit, JavaScript has multiple options, etc. Automated test frameworks exist for nearly every programming language and do largely the same things.
pytest is a library. Libraries are source code or compiled binaries that provide useful functions. They are almost always written in the same programming language as the program code. Professional software engineers use third-party libraries, often open source, to provide functions that they would otherwise have to write themselves.
In our case, we could write some try-except blocks to catch our assertion exceptions, create counters to track the number of tests passed or failed, and then print out the results. But why do that when we can use a library? No sense in reinventing the wheel.
Installing pytest with pip
We install pytest and another tool we will use later from the CLI. Choose your operating system below and follow the instructions:
pip3 install -U pytest pytest-cov
# Run in the PyCharm integrated Terminal pip install pytest pytest-cov
What is pip? It is basically the App Store for Python packages. A package contains one or more libraries or executable tools. pip was included when you installed Python on your computer. We will use pip again to install useful packages in future labs.
Running test code with pytest
Open your testing-lab/ directory as the top-level project in PyCharm. If you need them, grab sample.py and test_sample.py and put them in that directory.
Run pytest test_sample.py in the PyCharm integrated terminal. You should see console output similar to the following:
collected 3 items
test_sample.py ... [100%]================3 passed in 0.01s =================
pytest scans your test file looking for functions that follow the naming convention test_<function_name> and “collects” them. I had three test case functions in my code, but you may have more or less, so your “collected” number may be different. Test case function names must start with test_ for pytest to run them.
pytest then calls each test case separately and checks to see if the test case throws an AssertionError. If so, the test case fails. If not, the test case passes
Let’s introduce errors in our program code sample.py to show pytest collecting multiple test case failures, which is one of our improvements needed for automated unit testing.
Open sample.py and make the following changes:
1
2
3
4
5
6
7
8
9
10
11
12
13
defpalindrome_check(s):# cleaned_str = ''.join(s.lower()) cleaned_str=''.join(s)# this makes "Kayak" no longer a palindrome because of different case returncleaned_str==cleaned_str[::-1]defis_prime(n):# if n <= 1:ifn<=0:# the algorithm will now say that 1 is prime, which is incorrect by definitionreturnFalseforiinrange(2,int(n**0.5)+1):ifn%i==0:returnFalsereturnTrue
Now run pytest test_sample.py again. Your output should now look something like this:
collected 3 items

test_sample.py FF.                                                                                                                               [100%]

======================================================================= FAILURES =======================================================================
___________________________________________________________________ test_palindrome ____________________________________________________________________

    def test_palindrome():
        assert sample.palindrome_check("kayak")  # the function should return True, giving "assert True"
>       assert sample.palindrome_check("Kayak")
E       AssertionError: assert False
E        +  where False = <function palindrome_check at 0x1023494e0>('Kayak')
E        +    where <function palindrome_check at 0x1023494e0> = sample.palindrome_check

test_sample.py:5: AssertionError
____________________________________________________________________ test_is_prime _____________________________________________________________________

    def test_is_prime():
>       assert sample.is_prime(1) is False
E       assert True is False
E        +  where True = <function is_prime at 0x1023493a0>(1)
E        +    where <function is_prime at 0x1023493a0> = sample.is_prime

test_sample.py:9: AssertionError
=============================================================== short test summary info ================================================================
FAILED test_sample.py::test_palindrome - AssertionError: assert False
FAILED test_sample.py::test_is_prime - assert True is False
============================================================= 2 failed, 1 passed in 0.03s ==============================================================
We can see at the nice human-friendly summary at the end that 2 failed and 1 passed. The names of the test cases that failed are printed, as are the exact assert calls that failed.
Other ways of running pytest
You can run pytest without giving it a target file. pytest will scan the working directory looking for files with the naming convention test_<file>.py. It will collect and run test cases from all test_<file>.py it finds.
Try running pytest --tb=line to get a condensed version of the results if you find the output to be overwhelming.
Recap
We accomplished a couple significant things in this lab:
We installed the pytest package using pip. Again, you only need to do this once.
We ran pytest, which scans for files and functions named test_* and runs them.
pytest collects test case successes and failures independently from one another, allowing us to get more information with each run of our test code.
pytest displays a summary of the results in human-friendly format.
All popular programming languages have a test framework. You will need to seek out one for the language you are working in.
Knowledge check
Question: The Python tool we run to install Python packages is called _______.
Question: For pytest to find and execute tests automatically, the test files and test cases must begin with __________.
Question: (True/False) You can have multiple assert statements in a single test case?
Question: Create a file called math.py with the following function:
defcompute_factorial(n):ifn<0:return"Factorial is not defined for negative numbers."elifn==0orn==1:return1else:factorial=1foriinrange(2,n+1):factorial*=ireturnfactorial
Create a new, appropriately-named test file for math.py.
Implement one or more test cases that cover all program paths in the function.
Use pytest to execute your test code.
6.6 - Testing for exceptions
How to test for expected exceptions.
Before you start
If necessary, fix up your sample.py so that all your test cases pass.
Testing for exceptions
Sometimes, the expected behavior of a function is that it throws an exception. How do we test for expected exceptions given an input?
Suppose we want reverse_string() to work only for strings containing the letters [a–z] and to throw an exception if the string contains any other characters. Change reverse_string() in sample.py to the following:
This is appropriate given the requirements of reverse_string(). It returns a reversed str input under normal circumstances, but raises an exception under abnormal circumstances, a.k.a., exceptional conditions from our problem statement structure.
“Raising” and “throwing” an exception are the same thing. You will hear both terms in practice. The keyword in Python is raise, and exceptions in Python always end with the string Error, e.g., ValueError or IndexError.
Exercise
Define a new test case in test_sample.py named test_reverse_exception and add a call to sample.reverse_string with an input that will trigger the exception.
Run pytest. You should see a test summary similar to the following:
================================= short test summary info=================================FAILED test_sample.py::test_reverse - ValueError: letters a-z only
FAILED test_sample.py::test_reverse_exception - ValueError: letters a-z only===============================2 failed, 2 passed in 0.06s ===============================
I have two test failures: the new test case I created, and the original test_reverse. This is because test_reverse in my code contains the call assert sample.reverse_string(''). The empty string does not consist of the letters [a–z], so an exception is correctly raised.
This is an important lesson: as program code evolves, so too might the test code. Move the assert sample.reverse_string('') to the test_reverse_exception test case where it logically belongs.
Your test cases for reverse_string should now look something like this:
13
14
15
16
17
18
19
deftest_reverse():assertsample.reverse_string("press")=="sserp"# checking result for equality with expectedassertsample.reverse_string("alice")=="ecila"deftest_reverse_exception():sample.reverse_string("abc123")sample.reverse_string("")
Verifying expected exceptions with pytest
Our assert statements only check the return values of functions. pytest provides a convenient helper function to check if an exception was raised.
First, add the line import pytest to the top of your test code file test_sample.py.
Second, change test_reverse_exception to the following:
18
19
20
21
22
23
24
deftest_reverse_exception():withpytest.raises(ValueError):# the pytest.raises comes from the imported pytest modulesample.reverse_string("abc123")withpytest.raises(ValueError)aserr:# we can optionally capture the exception in a variablesample.reverse_string("")assertstr(err.value)=="letters a-z only"# convert the exception to a str and verify the error message
A few things of note:
pytest.raises(...)requires that you specify the type of exception. In our case, we expect a ValueError to be raised.
We can optionally capture the exception itself. That’s what as err does on line 22. err is a variable (name it whatever you want) that captures the exception.
On line 24, we can call str(err) to convert the exception to a string. That error message should be "letters a-z only", which comes from the line raise ValueError('letters a-z only') in sample.py.
This test case would fail if reverse_string()did not raise an exception
Exercise
Comment out the if-statement and exception raising lines in reverse_string() and rerun pytest. How does the pytest output for an expected exception differ from a failed assert?
Checking exception values
Checking the exception message is useful because we may want our function to raise ValueErrors under different circumstances. For example, maybe we want to raise a ValueError for the empty string that says ‘string cannot be empty’, and a different ValueError for letters a-z only.
Why would you want to raise two different ValueErrors? Because it tells the caller of reverse_string() what they did wrong and how to fix it. It’s similar rationale to why we split our assert statements and our test cases into multiple instances to get more precise info.
Exercise
Put the if-statement and exception raising back in reverse_string(). Add an if-statement at the beginning of the function to check if the input parameter is the empty string. If so, raise ValueError('string must not be empty'). Re-run pytest. What happens?
Modify your test_reverse_string so that both with pytest.raises(...) calls capture the error as in line 22. Add/modify assert statements to verify that the appropriate error message is in the exception.
Recap
We accomplished a couple significant things in this lab:
We installed the pytest package using pip. Again, you only need to do this once.
We ran pytest, which scans for files and functions named test_* and runs them.
pytest collects test case successes and failures independently from one another, allowing us to get more information with each run of our test code.
pytest displays a summary of the results in human-friendly format.
Knowledge check
Question: (True/False) Raising and throwing exceptions are two different things.
Question: Why should you not exception logic in the same test case where you test “normal” logic?
Write a code block using pytest that checks that the determine_priority(str) function correctly throws a TypeError when passed anything other than a string.
Question: What happens when running pytest and the program code raises an exception that you do not expect?
Software engineers need some measure of the quality of the tests they write. This is not a simple question to answer.
Does a good test find bugs? Hopefully, but also, we should be writing our code to not have bugs!
Do we count how many lines of test code we have? Is it more than source code? Maybe, but that doesn’t mean we are testing the right things.
Do our tests check independent things in the code? How can we determine that automatically if so?
Measuring test case quality is not straightforward, but there is one generally agreed-upon measure used as a baseline: test coverage.
Test coverage
Test coverage is a measure of how much of source code is executed when the tests run. There are three measures of “how much”:
Line coverage or statement coverage is the percentage of source lines of code executed by your test cases. We do not include test code lines when counting the percentage of code.
Branch coverage is the percentage of program paths executed by your test cases.
Conditional coverage is the percentage of Boolean conditions executed by your test cases.
Consider the following (very poorly designed and implemented) code snippet:
This test case has 100% line coverage because all lines of code are executed.
This test case has 50% branch coverage because only one program path is executed: the path where the if-statement evaluates to True.
This test case has 33% conditional coverage because only one boolean conditional is checked (is_authenticated is True), but the other expressions user_id.startswith('admin') and caller == privileged are not.
Line coverage is the least precise, and conditional coverage is the most precise.
Test coverage is computed over the union of all source lines, branches, and conditions executed by our test cases. So we can easily write additional test cases that, collectively, reach 100% statement, branch, and condition coverage.
You want to target 100% condition coverage, but achieving 100% of any coverage can be challenging in a real system. Exception handling and user interface code in complex systems can be hard to test for a variety of reasons.
In practice, most organizations aim for 100% line coverage as a target.
Using pytest-cov to compute test coverage
Most test frameworks, like pytest and Junit (for Java), also have tools for computing test coverage. Manually computing these measures would be too tedious. These tools compute line coverage, but not always branch coverage, and almost never condition coverage because of the technical challenges of automating that calculation.
We installed the pytest-cov tool when we installed pytest. Refer to the instructions for installing pytest and pytest-cov
Open a Terminal in the directory where you were working on your unit testing examples. Run the following:
Running pytest-cov
Run the following command from your Terminal in the directory with sample.py and test_sample.py from the previous labs.
pytest --cov . - This tells pytest to run tests in the current directory, ., and generate the coverage report. You should see something similar to the following:
=============================================================test session starts==============================================================platform darwin -- Python 3.12.2, pytest-8.3.3, pluggy-1.5.0
rootdir: /Users/laymanl/git/uncw-seng201/content/en/labs/testing/coverage
plugins: cov-5.0.0
collected 4 items
test_sample.py .... [100%]---------- coverage: platform darwin, python 3.12.2-final-0 ----------
Name Stmts Miss Cover
------------------------------------
sample.py 236 74%
test_sample.py 233 87%
------------------------------------
TOTAL 469 80%
==============================================================4 passed in 0.03s ===============================================================
pytest executes your tests as well, so you will see test failures outputted to the screen. Note that failing tests can lower your test coverage!
The general format for the command is pytest --cov <target_directory>
To get branch coverage, run the command pytest --cov --cov-branch <target-directory>
Generating a coverage report
You can also generate an HTML report with pytest --cov --cov-branch --cov-report=html <target-directory>. This will create a folder named htmlcov/ in the working directory. Open the htmlcov/index.html file in a web browser, and you will see an interactive report that shows you which lines are and are not covered.
Knowledge check
Test coverage is a measure of how much _________________ is executed when the __________________ runs.
Explain the difference between branch coverage and conditional coverage.
Give an example of a function and a test case where you have 100% branch coverage but <100% conditional coverage.
(True/False) Branch coverage is more precise than statement coverage.
7 - 06. Comprehensive example
A working example of that touches every topic so far.
We have covered quite a bit. Let’s go through an example from problem statement to implementation to test using what we’ve learned so far.
Class recording
Setup
Create a new project directory named comp-example/ or something similar. Open that directory using PyCharm as usual.
Download each of the sample input files below and place them in the project directory:
We’ll start with this high-level description of the problem:
You are tasked with writing a program that can read in a text file where each line has the name of a species of bird. Your program needs to count the number of times each species appears. An example of the input is below. Ask the user to type in the name of the file they wish to be processed.
Your program must handle any text file in this format.
Implementation
We’ll start by doing the simplest thing that meets the requirements of the problem description.
Writing pytest code
Finally time to test. When you write test cases and assertions, you are checking the actual computed result against the expected result for a given input.
8 - 07. Code Readability
Making code easier to understand.
Motivation
Learning to program often focuses on syntax and semantics – avoid errors and get the correct answer.
You probably also learned about rules to follow for how your code looks. You were probably also told that you should write good comments. Why?
A tremendous amount of research in programming language development and in software engineering focuses on program comprehension a.k.a., understandability. How much effort does it take to understand your source code? Software engineers care deeply about understandability because most of the effort in software development is spent fixing bugs or adding functionality to existing code. To do that without breaking everything, you need to understand what the existing code does!
Understandable code is a function of several things:
The programming language syntax and semantics. Python is objectively more human-friendly than assembly language.
Coding conventions and documentation.
Design and organization of the code.
We are going to focus on #2 first.
Both coding conventions and code documentation promote readability: how difficult is it for someone to read your source code and understand it. Let’s look at these topics separately.
8.1 - Coding conventions
Readability is a function of names and style.
Motivation
“Readability counts.”
– Tim Peters, long-time Python contributor, The Zen of Python
You were probably taught to give your variables descriptive names, such as total = price + tax, as opposed to t = p + tax. But, sometimes, you are told there are traditional variable names, like
foriinrange(1,4):# i is the outer loop indexforjinrange(1,4):# j is the inner loop indexprint(i,j)
Consider the following code with poor variable names and improper spacing:
As a developer, it would certainly take me a minute to figure out what this function does. Better names would go a long way for sure. But also, the improper spacing makes it needlessly difficult to see what each line is doing. In Python, every operator should have a single space around it. For example, lst=mid-1 should be lst = mid - 1.
Now compare to a properly named, properly spaced solution:
Coding conventions are the rules for naming, spacing, and commenting adopted by an organization. These conventions are often language-specific. Google has coding conventions for many languages that they expect their developers to follow, for example. Many organizations will use their own conventions. One of the nice things about coding conventions is that they can be checked by tools in the IDE to let you know if you’re violating them.
The creators of Python have published a set of coding conventions for the whole language, called PEP 8 - Style Guide for Python Code, which we will follow in this class.
The sections below are a subset of the rules that I consider the most impactful on readability.
Naming rules
Variable and function names are lowercase_with_underscores only.
Function names are verbs or begin with a verb, e.g., compute_risk()
Variable and class names should be nouns, e.g., body_mass_index = 20.0
Class names are PascalCase beginning with an uppercase letter, e.g., PatientRecord
File names (modules) are lowercase letters. You may use _ if it improves readability.
Blank lines
Top-level function and class bodies are followed by two blank lines.
Method definitions inside a class are surrounded by a single blank line.
Use blank lines in functions, sparingly, to indicate logical sections.
Otherwise, avoid unnecessary blank lines!
Whitespace within lines
Do not put whitespace immediately inside parentheses, brackets, or braces.
Do: spam(ham[1], {eggs: 2})
No: spam( ham[ 1 ] , { eggs: 2 } )
Do not put whitespace immediately before a comma, semicolon, or colon:
Do: if x == 4: print(x, y); x, y = y, x
No: if x == 4 : print(x , y) ; x , y = y , x
Most operators get one space around them.
Otherwise, avoid unnecessary whitespace!
Other
Do not initialize multiple variables on one line unless necessary.
Use Python’s type hints to indicate the intended type (if known) of class variables, function parameters, and function return types. Read the official documentation for examples.
Summary
Consistently applying coding conventions makes your code easier to understand.
We can use tools to help enforce coding conventions, and we will do so soon. For now, concentrate on learning the Python naming and spacing conventions above.
Knowledge check
Define coding conventions.
What are the PEP8 violations in the following code block? How do you fix them?
Properly commenting your code goes a long way toward understandability.
Motivation
Comments in code provide a way for you to leave notes to yourself and others about what your code does. These are very useful, if not essential, in a team setting. The term code documentation in general refers to the set of comments in source code that, hopefully, explain something about that code.
Code documentation is a double-edged sword. Done well, it helps you and others understand your code. Done poorly, it provides no value and can even mislead. Further, code documentation needs to be updated when the code is updated!
Three simple rules
We want our code documentation to be clear and concise, just like the code itself. Here is what we will focus on documenting.
Code should be self-documenting to the greatest extent possible.
Document the purpose of classes and modules (files).
Document the purpose, parameters, return values, and exceptions of functions.
You can apply these rules to almost any language you encounter, and you will find that the recommendations for creating class and function comments different per language.
Self-documenting code
Self-documenting code is a popular term for “I can look at the code and understand it’s purpose.” How do you achieve that?
Naming
Use descriptive variable, function, and class names according to your team’s coding conventions.
Variables and classes should be nouns that describe the data.
Keep them short and concise, say, 16 characters max. Shorter is better.
Use plural nouns to represent lists, sets, and other collections.
Do not use built-in names for variables, like max, min, sum.
Examples:
for name in birds: where birds is a list of strings.
total = sum(scores)
Functions should be verbs or start with a verb. They should describe what the function does.
Again, strive to be concise.
If a phrase better describes the function, split the words with underscores (Python convention), such as compute_average_score(). In Java, you would use camelCase
Comments
In-line comments are useful but should not be abused. Use in-line comments to:
Summarize a complex block of code.
Explain an implementation or design choice.
Do not write a comment for every line. A programmer proficient in the programming language should be able to understand your code if you use good variable names and your logic is clear. In cases where the logic is unclear or convoluted, a code comment is warranted to explain your implementation.
Docstrings
In Python, we document modules (.py files), classes, and functions with docstrings. Docstrings are part of the Python language syntax.
IDEs like PyCharm and Visual Studio Code look for docstrings to provide information about a module, class, or function:
Creating docstrings for a module/file or a class
On the first line of the file, put something similar to the following:
"""This module contains functions useful for counting birds."""
That’s it. You can add multi-line docstrings where needed like so:
1
2
3
4
5
"""
This module contains functions to load a bird observation file and count it.
It is used by the ornithologist package to load data for further processing.
"""
You do the same thing for classes. Provide a short summary just below the class name:
1
2
3
4
5
classPatient:"""An object representing a Patient's vital information."""def__init__(self,name:str,age:int,weight:float,height:float):# More code here
Creating docstrings for a function
Place a blank line below the function name and type """. PyCharm will prepare a template for you.
PyCharm’s docstring template understands the following:
A blank area at the beginning to explain the purpose of the function.
(If present) :param <name> for you to describe purpose of each parameter if you have them.
(If present): :return: for you to describe what your function returns, if anything.
(If present): :raises <ErrorType>: Where you can manually enter the various Exceptions your function might raise.
Fill in the contents like so.
def__init__(self,name,age,weight,height):"""
Class constructor.
:param name: the patient's full name
:param age: age in whole years
:param height: height in inches
:param weight: weight in pounds
"""self.name=nameself.age=ageself.height=heightself.weight=weight
Now with your docstrings set up, you will see helpful pop-ups in your IDE when you type class and function names!
Knowledge check
When are the two cases where an in-line comment is appropriate?
In Python, why is sum a bad variable name?
Why is doc() a bad function name?
For which three Python program elements do you write docstrings?
What are the four possible elements of a function docstring?
Does the docstring go inside or above the program element?
Exercise: Fill in the docstring for the compute_risk() function.
Exercise: Write a function called calculate_area() that takes a list of numbers as its only parameter. If there are three elements in the list, compute and return the area of a triangle (assume it is a right triangle). If there are two elements, return the area of a rectangle. Otherwise, raise a ValueError.
Enforce all coding conventions.
Provide the type hints for the function’s parameters and return value.
Create a docstring containing a summary, all param: values, and a raises: value.
9 - 08. Version Control
Creating a history of code changes and sharing code with your team.
Coding is an incremental activity. You write code, it’s a little broken, you fix it. You work on the next thing, it’s a little broken, you fix it. And so forth until you’re “done”.
During the coding process, you have probably done the following:
Saved a copy of the file at a point when you know it just works. Then you keep coding.
Wanted to go back in time to a point when everything did work so you can start over.
Had to email or otherwise share your code files between computers.
Version Control Systems (VCSes) are systems that manage changes to source code, documents, and other files over time. VCSes are also how all teams store and share their code on a shared project. VCSes are essential to software engineering.
A VCS is a computer application, the most prolific of which is called Git and was created by Linus Torvalds, the creator of Linux. All VCSes, including Git, have the following features:
The ability to make a version: a snapshot of the project files at the current time.
The ability to revert to an earlier version.
The ability to compare versions of the project files to see their differences.
The ability to share versions with a central repository that multiple people can access.
Importantly, it is up to the programmer to decide when to create a version, when to revert, and when to share. This is in contrast to your OS or an app like OneDrive or Google Drive, which do some of these things automatically.
We will use Git and GitHub in this class as our VCS. We will start by setting up these tools on your computer.
9.1 - Git and GitHub setup
Setting up Git and GitHub utilities
Git is the world’s most popular version control system. GitHub is a cloud service that hosts shared code repositories.
We will setup these and then delve further.
Git installation
Git is available for all operating systems.
On Mac: Open a Terminal and run git --version. If git is already installed, you will see something like git version 2.39.5 (Apple Git-154).You will be prompted to install git if you do not have it.
Lab computers: Should already have git installed. Run git --version from a Terminal and you should see a verison number like git version 2.49.0.windows.1. If not, let the instructor know.
Close any open Terminals. Run the following in a new Terminal.
git config --global user.name "John Doe"# Put your real namegit config --global user.email johndoe@example.com # Put a permanent email here
You only run these once when you install Git.
GitHub set up
We will use GitHub in this class to remotely store versions of our code. Many organizations use GitHub to store their code, including many popular open source projects.
Use a permanent, personal email account to register for a free GitHub account at https://github.com. You will eventually lose access to your UNCW email, but you will want to access your GitHub account long after you graduate.
That’s all you need to do for now. We will use GitHub soon.
9.1.1 - Git setup for Windows
These instructions are to set up Git on a personal Windows computer.
Run the installer. You will keep the default options, except for the following:
On the Choosing the default editor for Git screen, I recommend that you pick an editor that you are somewhat familiar with, like Notepad.
On the Adjusting the name of the initial branch in new repositories screen, select the bottom option:
Leave the remaining options set to their defaults. When done, return to the Git Configuration section in the Git install lab.
9.2 - Git basics
Basic Git concepts and commands
The Git Verson Control System (VCS) stores versions in repositories. You will typically have one repository for each project. For example, you would have a repository for Assignment 2, a separate repository for Assignment 3, etc.
Git divides the world into three parts to facilitate tracking and sharing versions.
The workspace or working directory is the directory on your computer where the project resides, e.g., seng-201/assignment3/. You work on your files in this directory as usual.
A local repository is a hidden directory within the workspace where Git stores the version history and other information. The local repository is created by the Git program. You interact with the local repository using git commands to create new versions, compare files, and revert back to earlier versions.
A remote repository is a copy of the local repository on a computer somewhere else. In this class, the copy will be kept on GitHub, but software companies may have their own servers. The remote repository enables teams to share project changes and to restore the project if something terrible happens to someone’s computer.
You must learn and understand the relationship between these entities to master Git. Tools like OneDrive and Google Drive have similar concepts, but what distinguishes Git from those tools is that you decide when to save and share changes to your project between these entities.
Keeping a version history
We will start with the most simple use case for a VCS: we want to kept a historic timeline of versions. A version is a snapshot of files in the workspace at a point in time.
Step 1. Start with a directory
Create a subdirectory called speakeasy in your seng-201/ directory. Change into the speakeasy directory
Open the directory in your code editor. Create a file named main.py with the following:
main.py
print("Welcome to the Speakeasy!")print("Did you know? The term 'speakeasy' was coined during Prohibition in the United States.")mocktails=["Cucumber Lemonade","Pineapple Ginger Beer","Berry Spritzer"]print("\nToday's Mocktail Menu:")fordrinkinmocktails:print(f"- {drink}")print("\nThank you for visiting! Come again soon.")
We have created only the workspace – no Git yet:
Conceptual model
Step 2. git init
We need to initialize each project to use Git. In the Terminal:
Make sure you are in the speakeasy/ directory.
Run the command git init
You will see output like Initialized empty Git repository in /Users/laymanl/seng-201/speakeasy/.git/
This command initializes the local repository within the working directory. The local repository is created within a hidden .git/ subdirectory. Run the command:
(Mac/Linux) ls -al
(Windows) dir /a
to see the .git/ subdirectory. You will not see it in the file browser of your IDE by default.
You may see the .git/ subdirectory in your Mac Finder or Windows Explorer depending on your settings.
Conceptual model
Git is now monitoring the workspace for changes to files and subdirectories. You only need to run git init once to track a new project and any subdirectories under that project.
A word about git directories
First, you should not keep Git repositories in directories that are in OneDrive, Google Drive, or the like. You can run into weird authentication errors.
Second, do not nest Git local repositories, i.e., do not run git init on a directory, then run git init later on a subdirectory of the original.
If you ran git init in the wrong place, find that hidden .git/ directory and delete it. This will remove the Git repository (and all of its history), but will not change the workspace files.
Checking where you are: git status
Run the command git status. You should see something like:
On branch main

No commits yet

Untracked files:
  (use "git add <file>..." to include in what will be committed)
	main.py

nothing added to commit but untracked files present (use "git add" to track)
git status is useful for understanding the state of your workspace and local repository. Breaking down the contents:
On branch main: we will discuss branches in a future lab. Ignore for now.
No commits yet: Git is telling us we have not created a version yet. We have to do this manually.
Untracked files...: Git says there are files that have been added, changed, or removed that we have not versioned yet.
Step 3. Creating the first version
Creating a version entails two steps. Run the following in the Terminal:
git add main.py
git commit -m "First commit of main.py"
git add [file]: Adds a changed file to the index.
The index is the list of files that will be saved to the version.
It is possible to edit, say, 10 files, but only save 5 of them to the version. The index lets you be selective if you need to.
git commit -m "<message>": Commit your changes to a new version.
Conceptual model
We have just created a new version: a snapshot of project files at a point in time. We have added and committed main.py to a new version in Git local repository. We can now, if we want, restoremain.py to this version in the future.
Step 4. Creating another version
Let’s make some edits to our project. First, the following line to main.py:
print("Don't forget to tip your server!")
Second, create a new file named README.md in your IDE:
This is my first project!
Go to the Terminal and run git status. You will see something like:
On branch main
Changes not staged for commit:
(use "git add <file>..." to update what will be committed)(use "git restore <file>..." to discard changes in working directory) modified: main.py
Untracked files:
(use "git add <file>..." to include in what will be committed) README.md
no changes added to commit (use "git add" and/or "git commit -a")
This is the current status. We have added a file, but we have not added it to the index nor committed it yet. We also haven’t added or committed our changes to main.py yet. Remember, everything in Git is manual and this is by design.
The Changes not staged for commit: section tells us which files have changed in the workspace, but we haven’t added to the index. We also see the Untracked files: section, which is telling us that README.md is a new file with no version history.
Let’s commit them both at once. Run the following:
The command git add . tells Git to add ALL changes, additions, and deletions in the current directory. This is how you should get a snapshot of all changes to your project.
We have now created a new version. Our Git looks like this:
Differences
It is important to understand that Git does not store entire copies of files. You cannot go into the hidden .git/ directory and simply copy “version 1” of your files.
Git stores file differences. It compares Version 2 of your files to Version 1 to see what has changed, and stores the set of changes. This set of changes is called a difference, or a diff for short. Storing only the differences makes Git more space efficient, and also enables some useful comparison functionality that we will use in a future lab.
Step 5: Viewing history with git log
Type git log in your Terminal. You will see something like this:
commit b424cc472f7276dc35493abbd186563a191ca25b (HEAD -> main)
Author: Lucas Layman <laymanl@uncw.edu>
Date:   Mon Oct 21 15:21:44 2024 -0400

    Added message and README file

commit 8356ea035b8d6538f9ea4eabe2393d6cd6016553
Author: Lucas Layman <laymanl@uncw.edu>
Date:   Mon Oct 21 15:13:00 2024 -0400

    First commit of main.py
(END)
Press q to exit the log viewer.
Each block is a version. The versions are not numbered 1, 2, 3, etc. but are identified by a unique hash like b424cc472f7276dc35493abbd186563a191ca25b. They are shown in reverse chronological order.
git log shows you the version history of the local repository. git log useful to see what work has been done recently. The log output also highlights the importance of a meaningful, succinct commit messages.
Important concept review
The workspace is the directory on your filesystem that your project lives in. You code here. When you make changes to files, they are immediately saved in the workspace because the workspace is synonymous with your filesystem.
The local repository is Git’s history of versions. Versions are snapshots of the workspace files at a point in time. The developer must manually add and commit changes to create a version.
Git does not store entire copies of files, but rather the differences from one version to the next.
Summary of the process
To create a version history for a project (a directory), do the following:
Run git init to create the local repository.
Make changes to files: adding new files, editing existing files, deleting files.
git add . to stage all changes in the index.
git commit -m "<message>" to save the version to the local repository.
Repeat steps 2–5.
Knowledge Check
(Question) Explain the purpose of the local repository and how it differs from the workspace.
(Question) What is the function of a remote repository in Git?
(Question) Describe the significance of the .git/ directory.
(Question) What happens when you run git init in a directory?
(Question) What does the git status command show you?
(Question) What is the purpose of the Git index (staging area)?
(Question) What command do you run to add something to the staging area?
(Question) What command do you run to save a new version in the local repository?
(Question) What happens if you try to save a new version without staging first?
(Question) True or False: A version is a copy of the entire file that was changed?
(Question) Versions in Git are not stored sequentially as in Version1, Version2. How are versions uniquely identified in Git?
(Challenge) Create a new directory, initialize it with Git, and create a new file. Commit changes to track the file.
(Challenge) Add modifications to an multiple files and use git status to see the changes. Commit only a subset of the changes.
(Challenge) Describe how you would undo an incorrect git init operation.
9.3 - Undoing mistakes with Git
Resetting your work to a safe state
One of Git’s powers is being able to “go back in time” to a previous version to undo a terrible mistake or simply to start fresh.
How to identify the scenario that applies to you
We will walk through some common scenarios where you might want to undo your work and reset to a known safe state.
“Going back in time” depends on what you want to change and the current state of your repository in terms of (a) what’s changed in the workspace, (b) what is staged in the index, and (c) what has been committed to the local repository.
Use the git status command to identify staged and unstaged changes, and git log to check the local repo version history.
Starting state
In Lab: Git Basics, we created a Git repository for a simple speakeasy/ project. We added two files, main.py and README.md, and committed two versions:
We will pick up our example from this point.
Oops #1: Deleted something from the workspace
Open Visual Studio Code for the speakeasy/ folder.
Now delete main.py
Let’s say you want to recover what you just deleted. This scenario may involve one file, many files, directories, or anything in the project folder. So when I use the word “file” below, I mean any of those things.
Your options depend on whether the file has been staged with git add or committed at some point in the past.
If the file has been staged before
First try using your IDE’s undo feature: CTRL+Z or CMD+Z. If you see the file reappear, you are good to go.
If undo doesn’t work, use git restore [name]. Git will place a copy in the workspace.
If the file has not been staged
Try using your IDE’s undo feature.
If that doesn’t work, check your operating system’s “trash can”.
Sorry. It’s gone.
Oops #2: Undoing unstaged changes
Suppose you’re editing a file tracked by Git. You don’t like what you’ve done, and want to start over from most recent version.
Make sure main.py is back in your workspace.
Add the following code to main.py:
importrandomdefsilly_compliment():compliments=["You're as useful as a screen door on a submarine, but twice as fun!","Your brain is like a sponge... except it soaks up memes more than facts!","You're as rare as a unicorn at a hotdog stand."]returnrandom.choice(compliments)
Save the file.
Add the line I like working on it! to README.md and save the file.
Make a new file hello.py and add print("Hello world!") to it.
Run git status
git status tells you that main.py and README.md have been modified but are not staged, and it tells you that blah.py is new and untracked:
Our changes are only in the workspace, they are not staged in the index yet.
Now, let’s undo some changes:
Run the command git restore main.py to reset to the file to the most recent version, in this case, the version b424cc.
The contents of main.py will change in the editor.
Notice that hello.py and README.md are unchanged. This is because we specified main.py as the target of git restore
Restore the changes to main.py by undoing with CTRL+Z or CMD+Z.
Now run the command git restore .
Notice that both main.py and README.md reset to their previous version. This is because we specified the target ., which is shortcut for “the current working directory”. Both main.py and README.md are tracked by Git, so they both reset.
However, hello.py is untracked by Git so it is unaffected.
After running these commands, we are in the state below where hello.py is a new file but not being tracked by Git. Both README.md and main.py are as they were in the most recent committed version.
Now what if you want to get rid of an untracked, unstaged file like hello.py? Just delete the file!
The restore command replaces the workspace files with the most-recently-committed versions of those files in the local repository, i.e., the files as they were in b424cc.
Oops #3: Undoing staged changes
Suppose you are adding, editing, or deleting files and you have run the git add . command to stage the changes in the index. You realize that you made a mistake, and you do not want to save those changes. You either want to work on them some more, or you simply want to start over.
We will start at the end of the previous scenario: main.py and README.md are unchanged and look like they do in the most recent version b424cc, while we added added a new file hello.py that is not staged yet.
Run the following:
Re-add the following code to main.py:
importrandomdefsilly_compliment():compliments=["You're as useful as a screen door on a submarine, but twice as fun!","Your brain is like a sponge... except it soaks up memes more than facts!","You're as rare as a unicorn at a hotdog stand."]returnrandom.choice(compliments)
Run git add . to stage the changes to both main.py and the new hello.py file.
Run git status
main.py and hello.py are now in the index of changes we want to save to a new version, but we haven’t committed that new version to the local repository yet.
Suppose at this point that we need to do more work in hello.py and main.py. Maybe we’ve made a mistake, and we’re not ready record these changes.
Run the command git reset hello.py. This will unstage the file, meaning it will not be included in the commit until you run git add again.
You can also run git reset . to unstage any staged changes. The files will be unchanged in your working directory.
The files still have all their changes in the workspace. You are ready to edit and fix up whatever you need.
Oops #4: Completely restart from the last version
This is a common scenario. You work for a bit and then decide that all the changes you have made are bad, and the easiest thing is just to start over.
You want to wipe out all the changes in both your workspace and the index. Be careful: once you do this, you can’t undo it.
Let’s start where we ended in the previous figure: we’ve changed main.py and added the new file hello.py. These changes are not staged in the index yet.
Do the following:
Run git status to see that we have unstaged and uncommitted changes.
The git reset --hard HEAD
HEAD is a special reference that means “the most recent committed version”.
--hard argument tells Git “destroy changes to tracked files in the workspace and the index”
You should see output like
HEAD is now at b424cc4 Added message and README file
b424cc4 is the most recent committed version in the local repository, and “Added message and README file” was the message for that version.
Run git status:
Notice that untracked files are unaffected. We have not added or committed hello.py, so it remains untouched. But main.py has been reset to its most recent version.
All together, git reset --hard HEAD says “reset the tracked files in the workspace by replacing (--hard) the workspace contents with the most recent version (HEAD)”
Again, this is a destructive action. You cannot undo it once done. But, it is very useful for starting fresh. Your local repository is unaffected by the command.
Oops #5: Undoing the most recent commit
You have run git add . and then a git commit -m "<message>". Committing saves a new version to the local repository.
Maybe you are unhappy with the version and you want to edit your work. Maybe you forgot to add a file that needed to be there. In these cases, the simplest thing is often to make the changes and just make another commit.
You committed version should be “good code”. Bug free, compiles, works. However, sometimes you commit a mistake. You find a terrible bug in your code. Or you committed a syntax error and didn’t notice. These scenarios call for you to undo the commit.
Starting from the previous scenario, we have hello.py in the workspace but untracked. Let’s introduce a bug to main.py:
Open main.py and add the line tip = float(input("Enter a tip amount: "))
Make sure to save main.py
Run git add .
Run git commit -m "Enable user to type a tip amount"
You will see output like:
[main 81a55e5] Enable user to type a tip amount
 2 files changed, 3 insertions(+)
 create mode 100644 hello.py
We should now have three versions in our local repository. Run git log to see them:
We realize that we have committed a bug. tip = float(input("Enter a tip amount: ")) will crash the program if the user types in a non-numeric number for the tip, like "one dollar". We want to undo the commit so we can fix the bug and to keep our version history containing only “good code”.
You have two options here:
You may have some changes to your workspace that you want to keep. Like you want to keep hello.py. Or maybe your code in main.py is pretty good, and you just want to fix it up a little bit.
Your last commit was a total disaster. You don’t want to keep any changes you made to main.py or hello.py. You want to completely throw away the most recent version and go back to the one before it.
Option 1: Preserve your work, fix it, then make a new commit.
Run the command git reset HEAD~1. You will see output like:
Unstaged changes after reset:
M       main.py
Now run git log. You will see something like:
commit b424cc472f7276dc35493abbd186563a191ca25b (HEAD -> main)Author: Lucas Layman <laymanl@uncw.edu>
Date: Mon Oct 21 15:21:44 2024 -0400
Added message and README file
commit 8356ea035b8d6538f9ea4eabe2393d6cd6016553
Author: Lucas Layman <laymanl@uncw.edu>
Date: Mon Oct 21 15:13:00 2024 -0400
First commit of main.py
Notice that git log only shows two versions! What have we done? Your current Git state is like this:
The command git reset HEAD~1 tells the local repository to “forget” the most recent version. It’s like it never happened.
However, the files in your workspace and index are unchanged! All the edits and additions are still there for you to work with, they are just not committed.
Now you have the opportunity to fix up those files, add them, and commit them.
Option 2: Disaster! Delete the last version and reset all the files
This is just like Oops #4 where you reset the tracked files, but you also want to destroy the most recent commit.
The command to do this is git reset --hard HEAD~1. This command is destructive and you cannot undo the consequences.
Assuming you have changes to main.py and hello.py from the previous scenario:
Do git add . and git commit -m "Enabling the user to enter a tip" to stage and commit a new version
Run git reset --hard HEAD~1
Run git log to see the version history
hello.py is unaffected because it is untracked, however, main.py and README.md are reset to their version 2 status. We’ve also deleted the bad version.
Recap
Git has even more functionality for “going back in time”, such as going back two, three, or more versions in the past. Or undoing multiple commits at once. Those use cases can be tricky to do correctly without unintended consequences.
For now, the “Oops” scenarios above will be sufficient 95% of the time as you develop your Git skills:
Deleted a file from the workspace: Undo (CTRL+Z/CMD+Z) or git restore <filename>
Undoing unstaged changes: git restore <filename>
Undoing staged changes: git reset <filename>
Completely restart from the last version: git reset --hard HEAD. This is destructive!
Undoing the most recent commit:
and keep your work: git reset HEAD~1
and throw away work: git reset --hard HEAD~1. This is destructive!
Knowledge check
(Question) Describe how git status and git log help identify a repository’s state.
(Question) What command would you use to recover a deleted file that was previously staged or committed?
(Question) Explain how to undo changes that are staged but not committed.
(Question) What happens to untracked files when you run git restore .?
(Question) Which command do you run to completely reset your working directory to the most recent version?
(Question) Which command do you run to destroy/remove the last version in the local repository?
(Challenge) Simulate deleting a file and use Git commands to recover it.
(Challenge) Experiment with staging changes, then undo them.
9.4 - GitHub CLI setup
Prepare to work with remote repositories on GitHub
Signup to GitHub
Sign up for a free GitHub account if you haven’t already. I recommend that you use a permanent, personal email.
Install the GitHub CLI
Let’s install the GitHub CLI, which will make working with remote GitHub repositories easier.
On MacOS
Install Homebrew if you do not have it already. Run the following in the Terminal and follow the on-screen instructions:
Open the new directory. Click until you find the bin directory inside. Drag that bin directory to the C:\Users\YOUR_ID\gh\ directory you created.
Hit the Windows key and search for environment variables. Select the program “Edit the user environment variables for this account”
Select the Path variable then click the Edit button.
Click the New button, then Browse
A File Explorer will appear. Navigate inside the C:\Users\YOUR_ID\gh\bin directory. Click “Okay”.
Now open a new Terminal window. Run the command gh and you should see a list of available commands.
Login with the GitHub CLI
Run gh auth login and follow the onscreen instructions to register your computer with GitHub.
Leave the default options selected in the CLI. You will hit Enter to open a web browser. Sign into GitHub with your GitHub credentials.
If the browser does not open: manually open a browser to https://github.com/login/device. Sign into GitHub with your GitHub credentials if needed.
Enter the code shown in the Terminal window.
Complete the authorization and leave the default options as-is.
Once you have finished, your Terminal and Browser should look like this:
That’s it. We are now ready to work with Git and GitHub.
9.5 - Branching and Merging, Part 1
Working concurrently
Class video
Introduction
One of Git’s main features is branching: the ability to create parallel timelines in version history, and then merge them together later.
The circles in the illustration represent versions. The lines indicate different branches. We will build a similar diagram below while introducing branching concepts.
Why branching? It allows version histories to be a little dirty, or only incrementally complete. Then we share when we’re happy and done.
This feature is essential for working on a team, and also by yourself to preserve a “clean” main branch while updating functionality in parallel.
The active branch
Git has a notion of the active branch, which is the branch you are currently committing to. So far, you have only been committing to the main branch in our examples.
The main branch
Let’s create a new project:
Create a directory git-branching in your seng-201/ directory.
Change into the git-branching directory and run git init to initialize a new Git repo.
Create the file app.py with the following content:
defmain():print("Welcome to the main branch!")if__name__=="__main__":main()
Run git add .
Run git commit -m "first version"
Every Git repository has a default branch called main (or master prior to July 2020). This branch is created for you when you run git init.
In the Terminal window, you may see the text (main) in the command prompt indicating that main is the active branch:
Your IDE also displays the active branch in the bottom left:
Most software groups treat the main branch as the place where only robust, finished, shippable code lives. You are not allowed to commit directly to main in many organizations. Instead, the expectation is that you work in a different branch and integrate with main when finished and approved.
Committing directly to main is fine for small personal projects that you don’t expect anyone else to use or that won’t live long. Most short class assignments fall into this category.
But, you should use branches for any other scenario, even if working by yourself!
What is a branch?
Remember how we said that the special variable HEAD in Git is a pointer or reference to a specific version in the commit history? Usually, the HEAD is pointing to the most recent version of the active branch.
Branches, including the main branch, are additional named variables that point to a specific version. When you run git init, creates a named main variable that points to a specific version. When you make your first commit, main will point to the first version in your repository:
To branch or not to branch
Before you create a branch, you must decide what to do with any unstaged and staged changes.
When you create a new branch, un-committed changes (unstaged and staged) are brought into the new branch. This is often desirable.
Suppose you start working on code and you realize “this is more complicated than I thought and going to take a lot of effort.” You can move these changes to a new branch, and the version history of your current branch will be unchanged.
You may also want to save all your currently unstaged and staged changes to the active branch. You have three options:
If you have no changes in the working directory, then you’re good to create a new branch.
Stage and commit changes if you want to create a new version in the active branch.
Create a new branch if you want your staged and unchanged changes to appear in the branch, but you want the old branch, e.g., main, to be unchanged for now.
Run the command git switch -c feature-1. You will see something similar to:
You have created a new branch named feature-1, and you have set the active branch to feature-1. The switch -c command tells the HEAD to point to feature-1, which makes feature-1 the active branch.
This means any committed changes will be saved to the version history of feature-1 but not to main. Your workspace state looks like the following:
We have not yet committed a new version, so all three variables are pointing the first version.
Remember: Why do we want to use branches? It allows version histories to be a little dirty, or only incrementally complete. Then we share when we’re happy and done. This feature is essential for working on a team, and also by yourself to preserve a “clean” main branch while updating functionality in parallel
Committing a new version to the branch
Change app.py to the following:
defmain():print("Welcome to the main branch!")feature_1()deffeature_1():print("Feature 1 activated!")if__name__=="__main__":main()
Run git log, and you will see something like this:
commit 89c5985701b1a6b188d1c23fef3b0196dd17b34e (HEAD -> feature-1)Author: Lucas Layman <laymanl@uncw.edu>
Date: Tue Oct 29 11:29:37 2024 -0400
Add feature 1functioncommit e436c51cd2760e9ef0d49a65472a404044c2d3c0 (main)Author: Lucas Layman <laymanl@uncw.edu>
Date: Tue Oct 29 11:19:05 2024 -0400
first version
You are looking at the version history of the feature-1 branch. Note that the history is based on the first version from main.
Conceptually, our branch history looks like this:
The local repository looks like this:
A second commit
Let’s make another change and commit it to the feature-1 branch. Do the following the following code:
Replace app.py with the following:
importrandomdefmain():print("Welcome to main!")feature_1()deffeature_1():print("Feature 1 activated!")print(f"Your random number is {random.randint(1,100)}.")if__name__=="__main__":main()
git add .
git commit -m "adding random number generation"
We now have two new versions in our feature-1 branch. Our repo and branch history look like this:
Switching between branches
Run the command
git switch main to switch back to the main branch. Notice there is no -b.
Question: What happens to the code in your IDE?
You should see that the contents of app.py are replaced with the contents as they were in the first version. Here is the current state of the repo:
Several things happened:
switch tells HEAD to point to the same version as the main variable. This makes the main branch the active branch again.
Git replaces the contents of the workspace with the files as they were at the main version.
feature-1 is unaffected. The version committed to feature-1 is still in the local repository, so we can go back to the files at that version by checking out the feature-1 branch.
Exercise: Switch to feature-1 to verify that all your changes have been saved in that branch. Switch back to main when you are done.
Merging
Our repo reflects the most common use case for branches: you work on something in a branch for a while, you make it perfect, and you are now ready to bring your work into main. Remember, main should only contain clean, complete, “good” code.
You want now to merge your feature-1 branch into the main branch. Merging is the process of combining the histories of two branches.
Run the following:
git switch main to ensure that main is the active branch.
git merge feature-1 to merge the feature-1 versions into main
You will also see that your IDE’s editor contents for app.py contain all the changes from the most recent version of feature-1. Run the git log command and you will see that HEAD, main, and feature-1 all point to the most recent version from feature-1.
Here is the state of our repo:
Conceptually, we have created a new version of main that includes all the changes from the feature-1 branch. I say conceptually because have not actually created a new version in the repo, but have updated the main variable to point to the same version as feature-1.
The feature-1 branch is still alive and well, and we can check it out and code against it. How does merging work?
Find most recent common ancestor: Git first identifies the most recent common ancestor (base commit) of the two branches. This is where both branches diverged from each other. In the illustration, this was the first commit e436c5.
Analyze changes: Git then looks at the changes that have been made in both branches since that common ancestor.
Apply Changes:
If the changes are non-conflicting (meaning they don’t overlap), Git automatically combines them. This is what happened here.
If there are conflicting changes (meaning the same parts of a file have been modified differently in each branch), Git pauses and marks the conflicts. You’ll need to resolve these conflicts manually before completing the merge.
(Sometimes) Create a Merge Commit: Once all changes are applied, Git creates a new commit (called a “merge commit”) on the active branch. This merge commit has two parents—one from each branch being merged—and represents the integration of both sets of changes.
I say “sometimes” because in cases where main has not changed, like in this lab example, a merge commit on main is not created. main is simply “fast-forwarded” (that is the actual Git term) to the latest version of feature-1 by moving the main pointer.
However, if changes were made to both main and feature-1, we would see a merge commit.
In our case, we had a non-conflicting merge. This is the best case scenario. In a real project involving multiple engineers editing the same parts of code, you will very likely have conflicting changes.
We will discuss handling merge conflicts in the next lab.
Exercise
Create a new practice branch.
Make at least three separate commits to the practice branch. Add code of your choosing. It can be trivial or non-trivial. You can modify existing lines or delete then. Follow the rules of good commit behavior:
Commit early and often, but only commit working code. Comment out code that has syntax or semantic errors.
Write a concise, descriptive commit message.
Merge the practice into the main branch.
Make a commit to the main branch.
Merge the main branch into the practice branch
Summary and Key Commands
Git enables you to create branches, and switch between them. When you switch branch, Git replaces the contents of your working directory with the most recent version in the branch. The version history of all branches are kept separately in the local repository. This allows you to work on different things in parallel.
Create a new branch: git switch -c [name]
Switch between branches: git switch [name]
Merge [branch-name] into the active branch: git merge [branch-name]
Knowledge Check
Question: What is the purpose of branching in Git, and why is it useful?
Question: What are two ways that you can identify the active branch you are currently working in?
Question: What is the name of the default branch created when you initialize a new Git repository?
Question: When you change the code in a branch, is main affected?
Question: Briefly describe what the special HEAD variable in Git refers to.
Question: Suppose you make have three branches: main, dev, and release. Fill in the blank: the branch names are __________________ inside Git that point to specific _____________________ in the repository.
Question: When you run git switch feature-1, you are making the _____________ variable point to the ________________ variable.
Challenge: Create a new Git project, create and switch to a new branch, and modify a file with a new feature. Commit the change to this branch.
9.6 - Branching and Merging, Part 2
Handling merge conflicts
The previous lab explained the concept of branching, which creates parallel version histories. Merging is the process of unifying parallel version histories back into a single history.
One example is you create a branch to implement a long and complicated feature. Once the feature is complete and tested, you merge it back into the main branch.
Merge conflicts occur when Git cannot automatically resolve differences between branches. This usually happens when:
Two branches modify the same line in a file.
One branch deletes a file while the other modifies it.
Merge conflicts occur frequently in real projects. Our goal is to learn how to recognize a conflict and resolve it.
Example 1: Simple Text Conflict
Do the following:
Make a new subdirectory called merge-conflicts in your seng-201/ directory.
Run git init to initialize a new Git repository.
Create the file stats.py and paste in the following code:
Now we have a conflicting change. We changed the last few lines of calculate_stats() differently in each branch.
stddev is the active branch, but we have changes to stats.py in both branches that edit the same lines.
Understanding a merge conflict
Now, let’s merge in an attempt to join our two branches. Make sure you are in the main branch, and run git merge stddev.
You will see output similar to the following in the Terminal:
Auto-merging stats.py
CONFLICT (content): Merge conflict in stats.py
Automatic merge failed; fix conflicts and then commit the result.
(3.12.2) ➜  merge-conflicts git:(main) ✗
Git has attempted to merge the two version histories, but this process failed because both branches edited the same lines of code. We are now in a conflicted state. You can think of the conflicted state as an unfinished commit. You can either discard the changes with git reset, or you can resolve the issues and finish the new commit.
If Visual Studio Code is configured as your Git editor, you will see a screen similar to the following:
Notice that the content of stats.py has physically changed! Git has inserted special characters into the code. The code will no longer compile.
To resolve a merge conflict, you must decide what to keep. Our example has 3 conflicting lines. The lines in the main branch, pointed to be the HEAD, are marked with:
Remember, we ran the command git merge stddev, so HEAD is the main branch and the “incoming change” is from the stddev branch.
Resolving a merge conflict
To resolve a merge conflict entails three things:
Edit the code to keep what you want.
Remove any lingering Git lines beginning with <<<<<<<, =======, or >>>>>>>.
Add and commit the changes.
Most IDEs provide you with some shortcuts and a merge editor. I find these to be dangerous. You really want to think about the code and what you want to keep in most cases.
Let’s resolve the merge conflicts manually. Here stats.py currently the entire code:
As the developer, I actually want to keep both changes because I want the min, max, and standard deviation values.
I leave lines 8-9 (min and max) and lines 12-13 (standard deviation) as-is. I’ll delete lines 7, 11, and 15 containing the Git special characters.
Now the problem is with the return lines: I want a combination of them. There is no shortcut to do this. I will simply create my own return line that amalgamates the old ones.
My code looks like this after resolving the conflicts:
git commit -m "Resolving merge conflicts with min, max, and stddev"
I now have a new merge commit on the main branch that contains these changes. This version acts like any other version in your local repo, and the HEAD will be pointing toward it. You will notice that all the angry red and ! markers are gone from your IDE. I now have three versions in main’s history.
Example 2: Conflicts in multiple files
Let’s work through merge conflicts in multiple files.
Create a new file
In the main branch, create the file app.py with the following:
So we now have conflicting, concurrent changes in main that will cause a problem with the changes in the mode branch.
Resolving merge conflicts in multiple files
Now, let’s create and deal with the inevitable merge conflicts:
git switch main
git merge mode to merge the mode branch into main.
Both the Terminal and your IDE will indicate that you have conflicts in multiple files. You simple need to deal with them one at a time.
First, let’s open main.py. Notice how the rename happened automatically from app.py to main.py. If you’re unhappy with this change, simply right-click and rename it back.
Let’s look first at main.py:
We have a conflict because the sample lines were changed concurrently. Remember the process:
Edit the code to the be way you like
Remove the special Git characters
I like more samples, so edit the file to keep both numbers and print them both out. Your final result should look like this:
Now let’s go to stats.py, which looks like this:
Most IDEs provide you with some shortcuts for resolving merge conflicts:
Accept Current Change: Keep only the changes in main.
Accept Incoming Change: Keep only the changes in stddev
Accept Both Changes: Keep all the changed lines from both branches.
Compare Changes: Provide another text view of the changes.
Resolve in Merge Editor: I recommend skipping this.
In this case, I decide that I don’t care at all about the median and mode any more. I just want to keep the streamlined version.
Click on the “Accept Current Change” link. You will see only the changes to main (the HEAD) are kept, and all incoming changes from mode are discarded.
P.S. If you make a mistake, remember that all you’re doing is editing text files at this point. Just hit CTRL+Z/CMD+Z to undo.
Finally, make sure all your files are saved, stage, and commit the changes. Our final branch history looks like this:
Summary
Merge conflicts don’t have to be scary, but they can be annoying.
Keeping your commits in all branches small and incremental will make merging easier.
The process for resolving merge commits is:
Look for the conflicting changes and decide what to do.
remove the Git special characters.
Save, stage, and commit the merge conflict resolution.
Take your time with merge conflicts. Just quickly hitting “Accept Incoming Changes” or “Accept Current Changes” without a thought is what gets you in trouble.
This may mean you manually edit the code, and that’s not a bad thing.
I strongly encourage you to avoid GUI-based merge editors, of which there are a few, until you master the process. It’s just text editing. Editing the code manually will help ensure each decision you make is intentional and easy to undo in the text editor. Once you have mastered merging manually, then feel free to move onto the GUI programs.
Knowledge Check
What causes a merge conflict in Git?
Suppose you want to merge a branch named bug-fix into the main branch. What git command do you run to perform the merge?
How can you identify merge conflicts using Git commands?
Describe the purpose of the conflict markers <<<<<<<, =======, and >>>>>>>.
(True/False) You can have multiple conflicting regions in a single file?
(True/False) You can have multiple files with conflicts?
Suppose the branch delicious is created from the main branch. The file cheese.py exists in both branches. cheese.py is editing in the delicious branch, and deleted in the main branch. Will there be a merge conflict if main is merged into delicious? Will there be a merge conflict if delicious is merged into main?
What are the three steps to resolving a merge conflict?
9.7 - Remote repos
Sharing your version history through a server
Remote repositories in Git are repositories stored elsewhere than on your computer, usually on a site like GitHub or a private enterprise server for your company. Remote repositories have a few key purposes:
Remote repositories are the mechanism by versions can be shared between computers, e.g., between a lab and home computer or between the computers of multiple teammates collaborating on code.
Remote repos maintain a copy of your version control history so that if disaster strikes your computer, you have a backup of your project.
Remote repositories are a hub to which multiple local repositories are linked. They function the same as a local repo, but the user takes extra steps to share changes with the remote and to retrieve changes, perhaps made by teammates, from the remote.
9.7.1 - Scenario 1 - Sharing a new project
You make a new project on your computer that you want to save to GitHub
Scenario: You are on your computer. You make a new project and begin working. You decide you want to keep the project under version control with Git.
Create the local repo and save an initial version
Create a new directory called remote-sample in your seng-201/ directory.
Open the remote-sample/ directory in Visual Studio Code.
Create a file named test.py. Put some code in there, like print("We are going to share our new repository")
Run git init to create a local repository.
Now stage and commit the changes.
You now have one version in the local repository, and the main branch (as well as the HEAD) are pointing to that version. I have left the INDEX and the HEAD out of the illustrations since we will not need them for this lab.
Find and click the green button to Create a New Repository:
On the “Create a new repository” form, enter remote-sample for the Repository name:
Leave all the rest of the options as-is.
Click the green Create repository button at the bottom.
You will see a page that looks like this:
Make a note of the URL in your browser bar. Your repo can be accessed from this address.
Leave the browser window open. We will return to it in a minute.
Public vs. Private Repos: You have the choice to make your repo Public or Private when creating it, and you can change this setting later.
Public repos are visible on the Internet. Anyone can view the website and checkout your code. Only you can commit code however.
Private repos are only visible to you when signed in. Only you can checkout and commit to the repo.
You can control more finely if you want specific users to have read or write access to your repo through the Settings tab on the GitHub repo website.
Connecting the local repo to the remote repo
We have created a local repo with git init and created a “bare” remote repo using the GitHub website, but the two are not yet connected!
On your GitHub page in the browser, you have a section that looks like the following:Copy that code for your repo and paste it into the Terminal. Run those instructions in the Terminal.
You should see output similar to the following:
Enumerating objects: 3, done.
Counting objects: 100% (3/3), done.
Writing objects: 100% (3/3), 260 bytes | 260.00 KiB/s, done.
Total 3(delta 0), reused 0(delta 0), pack-reused 0To https://github.com/llayman/remote-sample.git
* [new branch] main -> main
branch 'main'set up to track 'origin/main'.
That means you are good and your local repo is connected to the remote repo on GitHub.
If you see an error like this:
error: src refspec main does not match any
error: failed to push some refs to 'https://github.com/llayman/remote-sample.git'
You forgot to git add and git commit your first version.
Viewing the remote repo
Refresh the GitHub page in your web browser. You should see something like this now:
This is GitHub’s rendering of your remote repository! In Git, the remote repo looks just like the local repo on your computer. This is just how GitHub chooses to display it.
You can click on test.py to see the code.
Note that we are in the main branch as indicated in the top left dropdown.
You can click on the commit version, e.g., fb080da, to see all the changes in the most recent commit.
You can click on the history-clock icon next to the version name to see the main branch’s version history. There’s only 1 version right now.
Understanding the commands
You pasted three separate commands in the Terminal.
git remote add is what actually create a link between your local repo and the remote repository. Creating the remote repo link does not automatically share any version history or changes.
git branch -M main made sure the name of your default branch was main as opposed to master.
git push is what shared the version history from your local repo to the remote repo:
A few things happened to the repo state during this process.
Your local repo now has a notion of an “upstream” remote repo that it is linked to.
The version history of your local repo was pushed to the remote repo, including the branch name main.
The remote repo on GitHub now has the entire version history of the main branch, and knows which version main refers to.
Again, the remote repo is behaves exactly the same as your local repo internally. It’s just that it saved to a GitHub server, and you need to run an additional command, git push to share your changes with the remote repo.
Knowledge Check
(Question) What is the purpose of running git init?
(Question) How do you connect a local Git repository to a remote repository?
(Question) Explain the function of git remote add.
(Challenge) Create a local repository and link it to a newly created GitHub remote repository.
(Challenge) Stage, commit, and push an initial version of a project to a remote repository, verifying success through the GitHub interface.
9.7.2 - git push
Manually sending changes from the local to the remote
We showed in Scenario 1 that the git push command was necessary to share the version history from the local repo to the remote repo.
Sending changes to and pulling changes from the remote repo is always manual, just like staging, committing, and merging are. This is a good thing because it allows you to decide when to share changes or integrate changes from your teammates.
Let’s illustrate the sharing process.
Create a second version
Edit your test.py file. Make a change to the code. What is up to you.
Save the file, stage, and commit your change.
Run git log
The repos now look like this:
Your git log clearly shows the new version saved to the local repo.
However, open your remote repository’s GitHub page in your browser. You will see that it is still showing the previous version. Your local main branch is linked to the remote main branch, but the latter is not up-to-date.
Again, sharing with and retrieving from the remote requires a manual command.
git push
Run the command git push. This sends any changes to your local repo to the remote.
Refresh the GitHub page in your browser, and you will see that the version name and the content of test.py are updated to the latest version. You will also see two versions now in the commit history.
Now everything is up to date!
Running git push always runs on the active branch, which is main in our case. Suppose you have two local branches, main and rand. If you have parallel commits to in multiple branches, you will either need to need to checkout and git push each branch , or run git push --all.
Knowledge Check
(Question) What does the git push command do?
(Question) Why is sending and pulling changes from the remote repository a manual process?
(Question) How does the local main branch stay linked to the remote main branch?
(Question) What happens if there are changes in the remote branch that are not present in your local branch before you push?
(Question) How can you verify that your push was successful?
(Challenge) Make a change to a file in your local repository, commit it, and then push it to the remote repository.
(Challenge) View the commit history and confirm changes appear both locally and on the remote.
9.7.3 - Scenario 2 - Clone an existing project
The remote already exists and you want the project
Scenario: A remote repository already exists, and you need a copy of the version history on your computer. You could be a part of a team working on the same project, or maybe you created a new project in lab and you need to check it out from your home computer.
git clone
Let’s start a new project to illustrate the process.
In your Terminal, navigate to your seng-201/ directory.
When you clone, it will create a new subdirectory for you. So you need to be in the parent of where you want the workspace to live. We want to be in seng-201/ for this example.
Run git clone https://github.com/llayman/git-remote-clone
You will also have a new subdirectory named git-remote-clone inside seng-201/.
What happened?
git clone went to the target URL looking for a repo. It found it, and made a copy of the version history on your local computer in the git-remote-clone/ subdirectory.
Git created a local copy of the main branch, which is linked to the remote main branch
Git checked out the main branch into the workspace folder git-remote-clone/.
You are now ready to open git-remote-clone/ in Visual Studio Code or other editor and start working. You edit, stage, commit, make branches, and push as usual.
Do not edit the files yet. Leave them in their initial version to illustrate the next lab.
Knowledge Check
(Question) What does the git clone command do?
(Question) How does git clone handle creating a subdirectory for the repository?
(Question) After cloning, what branch is typically checked out in your local copy?
(Question) Does git clone also copy files into your workspace?
(Question) How is the local main branch linked to the remote main branch after cloning?
(Challenge) Clone an existing repository to your local machine and verify the directory structure.
(Challenge) Open the cloned project in an editor and review its initial state without making changes.
9.7.4 - Scenario 3 - Retrieving changes
Manually retrieving sending changes from the remote to the local
Scenario: Your started work on an assignment in the computer lab and pushed your changes to the remote. You went home and cloned the repo, worked some more, then pushed your changes to the remote. Now you are back in lab, and you need to get the latest changes from the remote. Or, perhaps a teammate pushed changes to the remote and you need to retrieve them.
Remote changes
I will make some changes to and push them, so the repos now look like this:
The remote repo has a new version, but your local repo is not up-to-date. You need to manually retrieve the changes. This is a good thing! You don’t want changes to automatically be applied whenever someone else on your team sends them to the remote repo. They could conflict!
Super important point
Before you retrieve changes from the remote, you almost always want to either:
Stage and commit any unsaved changes you have.
Undo, reset, or discard any uncommitted changes you have.
Ideally, you should have a “clean” workspace before you retrieve changes. It will make life easier on you.
git pull
Run the command git pull. A few things happen:
The changes from the remote repository on the active branch, main, are fetched and integrated into your local repo.
Any changes are automatically merged into your workspace. This is why we wanted our workspace to be “clean.”
You now have the most recent version of main in your workspace. you are ready to edit it, commit, and push as usual.
Concurrent changes to the local and the remote
All of this is relatively straightforward when you are the only one working on a project. The version history of branches remains somewhat linear: you are the only one committing, pushing, and pulling, so you are always (probably) working on the latest version.
Life gets considerably more challenging when you have a team of developers all pushing and pulling from the same repo. If you commit a change to main to your local repo, but then Bob pushes a new version of main to the remote repo, what happens when you try to push or pull? Git will protect us from losing work, but we will likely end up with merge conflicts.
Team coordinator through Git remote repos can be smooth if we follow a good process. We will discuss this next.
Knowledge Check
(Question) What does the git pull command do?
(Question) Why is it important to have a “clean” workspace before running git pull?
(Question) What happens if there are conflicting changes on the local and remote repositories when using git pull?
(Challenge) Create a scenario where you make changes locally and have conflicting changes on the remote repository. Use git pull and resolve any conflicts.
(Challenge) Demonstrate how to ensure your workspace is clean before pulling changes.
9.7.5 -
Scenario 1: Sharing a new project
Do GitHub CLI setup
[WORKSHEET] run through 1-3
create remote-sample/ and open in Visual Studio Code
Create test.py. print(“We are going to share our new repository”)
git init
git add . + git commit
Create a “blank remote repo”. Go to github.com, new, remote-sample as name
Show “success” page
Comment on public vs. private
copy the “…push an existing repository from the command line”
View the remote repo in the browser
[WORKSHEET] run through 4-6
Subsequent versions
test test.py
add and commit
git log. Point out local repo vs. remote repo
[WORKSHEET] add local main and remote main to pg 2 top picture
git push
[WORKSHEET] add 2nd version to remote, update main refs, label git push arrow
Right to left. Cloned version into local. Link remote main to local main.
Clone Version into workspace.
[WORKSHEET] Fill in bottom.
DO NOT EDIT FILES YET.
Scenario 3: Retrieving changes.
[WORKSHEET] Explain the scenario at top.
Or, scenario where a teammate makes a change.
[YOU CODE] Edit git-remote-clone/hello.py and push a new version.
Have students refresh the repo in their browser.
[WORKSHEET] add main refs to the top.
Have everyone run git pull. Point out how the code changes.
Run git log
[WORKSHEET] Fill out the middle bullet points and the bottom diagram.
10 - 09. Low-level Design
Best practices for organizing functionality.
Motivation
We make references to “writing code the right way”, but that is secondary to getting the correct answer. After all, how can you get a good grade if it doesn’t work?
In software engineering, everything needs to work, but doing it the right way is equally important. Why?
Because you are on a team, and someone else may have to understand and edit your code. Including your future self. We call this understandability.
Poorly-implemented solutions are more difficult to change without introducing bugs. We call this maintainability.
Poorly-implemented solutions may work with small data, but become intolerable with millions of records. We call this efficiency.
Overly-specific solutions that make assumptions about the data will break when encountering “the real world”. Avoiding this is called robustness.
The Rules
These characteristics are the result of your code design. The labs in these sections will go through code-level design principles that you, the developer, are responsible for when writing code.
Write these down! We will explore them in-depth in turn. We will start by creating a simple game, then applying design rules to it.
Click below to get started.
10.1 - pygame setup
Getting started with a game.
Example event-driven program using pygame
We’ll have some fun by creating a very simple game using the pygame library. Our example program comes from a very excellent YouTube tutorial called “The Ultimate introduction to Pygame” by Clear Code. I highly recommend his channel as his tutorials are clear and to the point.
We will implement the code as in his tutorial, but we will re-design the code by applying the rules above. His code works just fine, but our re-design will help improve the understandability, maintainability, efficiency, and robustness of the software.
Setup
Open a Terminal and use cd to get into your seng-201 directory.
Run the command git clone https://github.com/UNCW-SENG/pygame-design. This will create a subdirectory named pygame-design.
Open PyCharm. Go through the menus: File -> Open. Find and open the pygame-design/ folder, then hit the Open button. You should see the following structure:It is essential that the root folder is pygame-design/
Click in the bottom right of your PyCharm window where it either says Add interpreter... or Python 3.x (something).
Then select Add Interpreter -> Add Local Interpreter. You should see something similar to the following:
Make sure Generate New is selected. The pre-populated location should be fine. Then hit OK.
Open the Integrated Terminal in PyCharm. Type the command pip install pygame to download the pygame library.
Open runner.py and run it. A black screen should pop-up and you should see Hello from the pygame community in the integrated Terminal.
You should now be good to go.
Class recording
Code at the end
You must have cloned the project from the setup section. Here is the code at the end of class:
A magic literal is a raw value (number, string, None, etc.) that appears in code without a name explaining its meaning or origin. They harm readability, hide intent, and make changes risky—because the same value might be duplicated in many places.
Rule of thumb: If a value has domain meaning (tax rate, role name, error code, feature flag, file path, regex, etc.), name it once and reuse that name everywhere.
Benefits
Clear intent (self-documenting)
Single source of truth (change in one place)
Fewer bugs during refactors
Easier testing & configuration
Example 1 - numeric literal
Problematic code
deffinal_price(subtotal):# Why 0.085? City tax? Promo? Future me has no idea.returnsubtotal*(1+0.085)
Problem: Where does the value 0.085 come from? Why is it there? Not knowing this harms maintainability.
Fixed with a constant that conveys intent
Constants are variables that don’t vary. They are set once and not changed. In Python, the convention is to name Python constants as ALL_UPPERCASE_AND_UNDERSCORES.
CITY_SALES_TAX_RATE=0.085# 8.5% city sales taxdeffinal_price(subtotal:float)->float:returnsubtotal*(1+CITY_SALES_TAX_RATE)
Why this is better: The constant gives the number meaning, centralizes the value, and invites documentation and tests around that concept. Keep constants close to where they’re used (module-level), or in a dedicated constants.py if shared broadly.
Again, the meaning of each string is hidden. Typos (“vetran”) will silently break the logic. And, finally, if category labels change, you must update multiple places.
The constants clearly express intent and centralize both string values and their corresponding numeric meanings. If a new category or discount rate is added, it only needs to be defined once.
For larger systems, consider moving these constants to a separate constants.py module to avoid duplication across files.
When a literal is not magic
Sentinel/obvious values: 0, 1, -1, True, False, "" used in generic math or indexing (e.g., arr[-1]) are usually fine.
Short-lived throwaway code/tests: Inline values in extremely small, clear scopes can be acceptable.
Data structure examples: Literals inside illustrative examples or test fixtures are usually okay unless they are likely to change.
Knowledge Check
Question: Why are magic literals risky in larger code bases?AnswerBecause you need to update the literal values everywhere they appear in code if the value needs to change.
Question: Which of the following is least likely to be a magic literal?
"admin"
0.075
arr[-1]
"https://api.example.com/v1"
Answer3 — Sentinel and language-specific values like 0, 1, True, False, and -1 are not considered magic literals. In Python, arr[-1] is a shortcut to get the last element of a list.
AnswerThe "admin" and "guest" strings are magic literals. The messages themselves are probably not magic literals since they are likely used only once. However, if your app had internationalization where it supports multiple languages, you would replace those messages with variables.
Question: True or False: It’s acceptable to use a literal directly in code when its meaning is obvious and universally understood, such as 0 in range(0, 10) or True in a simple condition.AnswerThis is True, similar to the answer of Question 2.
The Single Responsibility Principle is that functions should have a single responsibility—i.e., they should be cohesive. Group together into a function statements and logic that have a single, simple goal.
The Single Responsibility Principle is often stated as “each function has one clear reason to change.”
Benefits
Each function has a clear purpose and answers one “what does this do?” question.
Narrow behaviors are easier to unit test.
A change to that single purpose only affects one function rather than requiring changes across unrelated code.
Small, focused functions are easier to compose to solve bigger problems.
Red flags (violations):
The function name needs “and” to describe it.
It touches multiple domains (I/O, parsing, business rules, UI) at once.
It has many parameters or returns mixed/compound results that signal different concerns.
It has multiple try/except blocks for different activities.
It both decides and acts (e.g., computes a result and prints/saves/sends it).
Example 1 - Decision logic mixed with formatting
Problematic code
defdescribe_temperature(celsius:float)->str:ifcelsius<0:color="blue"label="Freezing"elifcelsius<20:color="green"label="Cool"else:color="red"label="Hot"# Mixing presentation logic herereturnf"{label} ({celsius}°C) shown in {color.upper()}"
Problem: This function both categorizes a temperature and formats a human-readable message. If we change color conventions or output format, unrelated logic breaks.
Fixed to separate out unrelated purposes
defclassify_temperature(celsius:float)->str:ifcelsius<0:return"Freezing"elifcelsius<20:return"Cool"return"Hot"defcolor_for_temperature(label:str)->str:return{"Freezing":"blue","Cool":"green","Hot":"red"}[label]defformat_temperature_message(label:str,celsius:float,color:str)->str:returnf"{label} ({celsius}°C) shown in {color.upper()}"defdescribe_temperature(celsius:float)->str:label=classify_temperature(celsius)color=color_for_temperature(label)returnformat_temperature_message(label,celsius,color)
Why this is better: Each helper has a single reason to change — classification rules, color mapping, or formatting.
Example 2 - Data validation mixed with transformation
Each function has one clear reason to change — validation rules vs. formatting rules.
How to refactor toward SRP
Name first. Write a function name that states a single outcome; split if you need “and.”
Separate concerns. Isolate I/O, parsing, validation, business rules, formatting, and presentation.
Extract functions. Pull distinct blocks into helpers with clear inputs/outputs.
Push side effects outward. Keep core logic pure; print/save at the edges.
Knowledge Check
Which function best follows SRP?
process_and_save_and_print_order()
compute_total(items, tax_rate)
read_validate_compute()
do_everything()
Answer2 — the names of the others all imply that they have multiple responsibilities.
A common SRP smell is:
One return statement
Short parameter list
A function that both validates input and writes files
A pure function with docstring
Answer3 — Validating input (from a user, from a file) and writing data to a file are distinct responsibilities within a program.
A good SRP-based refactor typically involves:
Extracting cohesive operations into new functions.
Reducing the number of function calls.
Merging similar code into a single larger function.
Avoiding helper functions.
Answer1 — refactoring an SRP problem almost always will result in more functions in the program.
The SRP is violated when a function changes for more than one reason. “Reason” here refers to:
Multiple developers editing the same code.
Multiple sources of change tied to distinct responsibilities.
The number of commits per week.
The number of test cases.
Answer2 — thinking of "responsibility" as "one task the program performs", if something about that task changes (e.g., getting input, validating input is correct, writing output) it should ideally only affect one function in the code that is separate from the other tasks.
Rule #3: DRY — Don’t Repeat Yourself (and the Rule of Three)
Don’t Repeat Yourself! Commonly called the DRY rule, it simply means don’t write the same code in multiple places.
Why not? Because when you must fix or update the logic, you have to do it everywhere it’s copied—this multiplies effort and risk of bugs.
The Rule of Three is helpful to identify when DRY is being violated. If the same (or nearly the same) code shows up in three or more places, extract it into a function (or module). Two copies feels suspicious, but three is definitely an indicator to refactor.
If the copies differ slightly, find the part that varies and control that via a parameter.
Benefits
One place to fix or improve.
Fewer missed patches and inconsistent behaviors.
Less surface area to understand/review.
Better-named functions document intent.
Example 1 — Obvious repetition → function
Problematic code
# apply discounts in three placestotal_a=subtotal_a-(subtotal_a*0.10)# 10% offtaxed_a=total_a*1.07total_b=subtotal_b-(subtotal_b*0.10)# 10% offtaxed_b=total_b*1.07total_c=subtotal_c-(subtotal_c*0.10)# 10% offtaxed_c=total_c*1.07
The only thing that changes here is the variable acted upon. This is a clear call for a function. There are also magic literals here.
Better code (extract once)
# Note the use of default parameters below. These should DEFAULT_DISCOUNT=0.10DEFAULT_TAX_RATE=0.07defapply_discount_and_tax(subtotal,discount=DEFAULT_DISCOUNT,tax_rate=DEFAULT_TAX_RATE):discounted=subtotal*(1-discount)returndiscounted*(1+tax_rate)taxed_a=apply_discount_and_tax(subtotal_a)taxed_b=apply_discount_and_tax(subtotal_b)taxed_c=apply_discount_and_tax(subtotal_c)
Now we have one function and the repeated code is gone. Even better, that function is now flexible by taking the discount amount and tax rate as parameters. We also cleaned up magic literals!
Example 2 - Hidden duplication (structure, not lines)
Duplication isn’t always copy-paste; sometimes two blocks share a shape. Do you see the similarities and differences? We should refactor the common elements into a reusable helper function, and then create additional functions to provide the specifics to that helper (this will help with SRP too)!
We extracted the common logic of sending the SMTP mail but parameterized the message. Now the send_welcome_email and send_password_reset_email use the helper.
Common Pitfalls
Parameter bloat. Too many knobs can make the function unclear. If it grows unwieldy, split into cohesive variants or use a small strategy object.
Premature abstraction. Don’t over-abstract on the first duplication. Two copies are a smell, the third justifies the refactor.
Duplicating data transformations. Push conversions (e.g., parsing, formatting) to the boundaries. Write functions that work with one canonical representation internally, and make other functions for dealing with particular formats (like in Example 2).
Knowledge Check
What’s the best trigger to refactor for DRY?
The very first time code is written.
When you see two copies anywhere.
When substantially the same code appears three or more times.
Only when performance suffers.AnswerC — Use the **Rule of Three** as a practical trigger (two is a smell, three is a must).
You find three similar blocks differing only in a constant (e.g., a rate). What’s the cleanest DRY fix?
Copy the block and change the constant.
Extract a function and make the constant a parameter.
Add three separate functions.
Inline everything into one giant function.AnswerB — Extract and parameterize the variation.
Two blocks share setup/teardown but build different messages. Best approach?
Leave as is; they’re “not identical.”
Extract just the setup/teardown into a helper and pass the message (or a small builder) as the parameter.
Merge both into one if/else ladder in-place.
Use copy-paste with a TODO.AnswerB — Extract the shared structure; parameterize the varying message.
Your new helper now takes 7 parameters and is hard to read. What next?
Add more parameters.
Revert to duplication.
Split the helper along cohesive responsibilities.
Ignore it.AnswerC — Avoid parameter bloat by grouping or splitting to maintain cohesion.
Handle errors where they can be meaningfully addressed; otherwise, re-raise them.
Example and class note
The class recording below uses the project bank-accounts.zip for an example. The beginning of the recording applies Design Rules 1-3 to the project, including multiple code updates. The discussion of design rules 4-5 begins around 45:30.
Handle Errors at the Lowest Sensible Level
The rule Handle errors at the lowest sensible level, and re-raise/re-throw them otherwise means that you should catch and handle exceptions where you can meaningfully address them, and let them propagate upward when you cannot.
What is sensible? Do not gobble up errors just to hide problems. Catch and fix them if you can, otherwise, raise the error and let the calling function deal with it.
What does it mean to meaningfully address or fix an error? A function can meaningfully address an error when it has the context and capability to either resolve the issue or convert it into a recoverable state. For example, a function that reads user input can handle a ValueError by prompting for valid input again, or a network function can retry a failed connection. However, if a function encounters an error it cannot resolve (like a missing configuration file that the function doesn’t have permission to create, or a badly-formatted input file in a function that only processes data), it should re-raise the exception so a higher-level function with more context can handle it appropriately. The key is: if you can fix it or work around it meaningfully at your level, do so; otherwise, let it propagate.
Benefits
Functions become more robust and clearly defined: “I handle these situations, but not these.”
Error-handling logic is simplified because you only handle what you can fix.
Errors are not hidden; they propagate to where they can be properly addressed.
The user interface layer is responsible for displaying error messages, keeping business logic separate from presentation.
Red flags (violations):
Functions that catch all exceptions and silently return None or default values, hiding real problems.
Catching exceptions at too high a level when they could be handled more specifically at a lower level.
Swallowing exceptions with empty except: blocks or except: pass.
Functions that catch exceptions only to re-raise them without adding context or handling.
Mixing error handling with business logic instead of handling errors where they occur.
Displaying error messages or logging from deep within business logic functions.
Example 1 - Swallowing errors to hide problems
Problematic code
defread_config_file(filename:str)->dict:try:config={}withopen(filename,'r')asf:forlineinf:if'='inline:key,value=line.strip().split('=',1)config[key]=valuereturnconfigexcept:return{}# Silently fails, caller doesn't know what went wrongdefprocess_user_data(config:dict)->list:users=[]foruser_idinconfig.get("user_ids",[]):try:user=fetch_user_from_database(user_id)users.append(user)except:pass# Silently skips users, no indication of failurereturnusers
Problem: These functions swallow errors, hiding real problems. The caller has no way to know if the config file was missing, corrupted, or if the database call failed. Errors are hidden rather than being handled or propagated.
Fixed to handle or re-raise appropriately
defread_config_file(filename:str)->dict:try:config={}withopen(filename,'r')asf:forline_num,lineinenumerate(f,1):line=line.strip()ifnotlineorline.startswith('#'):continueif'='notinline:raiseValueError(f"Invalid format in {filename} at line {line_num}: missing '='")key,value=line.split('=',1)config[key.strip()]=value.strip()returnconfigexceptFileNotFoundError:# Can't handle this at this level - file missing is a real problemraiseexceptValueErrorase:# Could provide more context, but still re-raiseraiseValueError(f"Invalid config format in {filename}: {e}")fromedefprocess_user_data(config:dict)->list:users=[]failed_ids=[]foruser_idinconfig.get("user_ids",[]):try:user=fetch_user_from_database(user_id)users.append(user)exceptConnectionError:# Network error - can't fix here, but we can track itfailed_ids.append(user_id)exceptValueErrorase:# Invalid user ID format - can't fix hereraiseValueError(f"Invalid user_id {user_id}: {e}")fromeiffailed_ids:# Re-raise with context about what failedraiseConnectionError(f"Failed to fetch users: {failed_ids}")returnusers
Why this is better: Errors are either handled meaningfully (with context added) or re-raised so callers can decide how to respond. No errors are silently swallowed.
Example 2 - Handling errors at too high a level
Problematic code
defprocess_order(order_data:dict)->bool:try:# All errors handled at top levelvalidate_order(order_data)calculate_total(order_data)charge_card(order_data)send_confirmation(order_data)returnTrueexceptExceptionase:print(f"Error: {e}")# UI concern in business logic!returnFalse
Problem: All errors are caught at the top level, mixing UI concerns (printing) with business logic. The function can’t distinguish between different types of errors, and the caller gets no information about what went wrong. Different errors might need different handling.
Fixed by handling at appropriate levels
defvalidate_order(order_data:dict)->None:if"items"notinorder_dataorlen(order_data["items"])==0:raiseValueError("Order must contain at least one item")if"card_number"notinorder_data:raiseValueError("Card number is required")# Validation errors are handled here, but they're fixable at input leveldefcalculate_total(order_data:dict)->float:total=0.0foriteminorder_data["items"]:if"price"notinitemor"quantity"notinitem:raiseValueError(f"Invalid item data: {item}")total+=item["price"]*item["quantity"]returntotal# Calculation errors handled here - data problems are fixabledefcharge_card(order_data:dict,amount:float)->None:try:# Payment gateway callpayment_api.charge(order_data["card_number"],amount)exceptpayment_api.InsufficientFundsErrorase:# Can't fix this here, but we communicate what happenedraiseValueError("Insufficient funds to complete the transaction")fromeexceptpayment_api.InvalidCardErrorase:# Can't fix this here eitherraiseValueError(f"Payment failed: {e}")frome# Network errors, etc. - let them propagatedefprocess_order(order_data:dict)->None:# There are no try-except blocks in this function, so it re-raises errors by default. Let the caller handle them. validate_order(order_data)total=calculate_total(order_data)charge_card(order_data,total)# Only send confirmation if everything succeededsend_confirmation(order_data)
Why this is better: Each function handles errors it can meaningfully address (validation, calculation) and re-raises errors it cannot fix (payment failures, network issues). The UI layer can then catch these and display appropriate messages to the user.
How to apply this rule
Handle what you can fix. If you can meaningfully recover from an error at a specific level, handle it there.
Re-raise what you can’t. If you can’t fix the problem, re-raise the exception (possibly with added context) so a caller can handle it.
Don’t swallow errors. Never use bare except: or except: pass unless you’re at the absolute top level (like a main event loop).
Add context when re-raising. Use exception chaining (raise ... from e) to preserve the original error while adding useful context.
Keep UI concerns separate. Displaying error messages or re-prompting the user to enter “good” input are the UI layer’s responsibilities, not the business logic layer’s.
Handle at the lowest level. If a low-level function can fix a specific error (e.g., retry a network call), handle it there rather than letting it bubble up unnecessarily.
Knowledge Check
A function that reads user input encounters a ValueError when parsing a number. The function can prompt the user to re-enter valid input. What should this function do?
Catch the exception and return None to indicate failure
Catch the exception, prompt the user for valid input, and retry the operation
Let the exception propagate to the caller without handling it
Catch the exception and print an error message to the console
Answer2 — since the function can meaningfully address the error by prompting for valid input, it should handle it at this level rather than propagating it upward.
You’re writing a function that processes data from a configuration file. The function encounters a FileNotFoundError but doesn’t have permission to create files. What should it do?
Catch the exception and return an empty dictionary as a default
Catch the exception and print “File not found” to the console
Re-raise the exception (possibly with added context) so a higher-level function can handle it
Use except: pass to silently ignore the error
Answer3 — since the function cannot meaningfully fix this error (it can't create the missing file), it should re-raise the exception so a caller with more context (like the UI layer) can handle it appropriately.
When re-raising an exception with added context, what is the best practice?
Use raise ValueError("New message") to replace the original exception completely
Use raise ValueError("New message") from e to preserve the original exception chain
Only re-raise the original exception without any modifications
Catch and log the exception, then return None
Answer2 — using `raise ... from e` preserves the original exception chain, which helps with debugging by showing both the original error and the added context.
Which of the following is a red flag that violates the “lowest sensible level” principle?
A validation function that raises ValueError when input is invalid
A payment processing function that catches InsufficientFundsError and re-raises it as ValueError with a user-friendly message
A data processing function that catches all exceptions and returns an empty list
A function that lets network exceptions propagate to the caller when it can’t retry the connection
Answer3 — catching all exceptions and returning a default value (like an empty list) hides errors and prevents callers from knowing what went wrong. This violates the principle by swallowing errors that should be handled or propagated.
10.6 - Raise Specific Errors and Define Your Own If Needed
Use precise exception types to indicate error causes clearly; create custom exceptions when built-in ones don’t fit.
Example and class note
The class recording below uses the project bank-accounts.zip for an example. The beginning of the recording applies Design Rules 1-3 to the project, including multiple code updates. The discussion of design rules 4-5 begins around 45:30.
Raise Specific Errors and Define Your Own If Needed
The rule Raise specific errors and define your own if needed means that you should use the most appropriate exception type for each error situation, choosing from built-in exceptions when they fit, and creating custom exception classes when they don’t.
Why specific errors? Specific exceptions precisely indicate what went wrong, making code more maintainable. When you catch a ValueError, you know the problem is with the value of the data. When you catch a FileNotFoundError, you know a file is missing. Generic exceptions like Exception or bare except: clauses hide the actual problem, making debugging and error handling much more difficult.
Built-in exceptions to use: Python provides many specific exception types. Choose the most appropriate one:
ValueError - often the most appropriate when called with “bad” data (wrong value, invalid format)
TypeError - for unsupported types of data (wrong type passed to function)
FileNotFoundError - when a file or directory cannot be found
PermissionError - when an operation is not permitted due to insufficient permissions
KeyError - when a dictionary key is missing
IndexError - when a sequence index is out of range
AttributeError - when an attribute (variable or function) doesn’t exist on the object, e.g., calling x.append('Bob') but x is a dictionary. Dictionaries don’t understand how to append() in Python.
And many more specific exceptions for different scenarios
When to create custom exceptions: When built-in exceptions don’t accurately represent your domain-specific errors, create your own exception classes. Custom exceptions make it clear that an error is specific to your application’s domain, not a general programming error. For example, if you’re building a payment system, a PaymentProcessingError or InsufficientFundsError is more meaningful than a generic ValueError.
Benefits
Precise error identification: callers can catch specific exceptions and handle them appropriately
Better maintainability: developers can quickly understand what went wrong
Improved debugging: specific error types make it easier to locate and fix issues
Clearer code intent: the exception type itself documents what can go wrong
Enables selective error handling: callers can catch only the exceptions they know how to handle
Red flags (violations):
Raising generic Exception instead of specific exception types
Using ValueError for everything, even when TypeError or other exceptions are more appropriate
Catching all exceptions with bare except: or except Exception: without distinguishing types
Using string error messages instead of exceptions when an exception is more appropriate
Creating custom exceptions that don’t add meaningful information beyond built-in exceptions
Example 1 - Using generic Exception instead of specific exceptions
Problematic code
defvalidate_age(age):ifage<0:raiseException("Age cannot be negative")ifnotisinstance(age,int):raiseException("Age must be an integer")returnagedefprocess_user_data(user_id):try:user=fetch_user_from_database(user_id)returnuserexceptException:returnNone# Caller doesn't know what went wrong
Problem: These functions use generic Exception instead of specific exceptions. Callers can’t distinguish between different error types, making it impossible to handle specific errors appropriately. For example, a caller can’t tell if read_config_file failed because the file was missing (FileNotFoundError) or because of a permission issue (PermissionError), so they can’t respond appropriately.
Fixed using specific exceptions
defvalidate_age(age):ifnotisinstance(age,int):raiseTypeError(f"Age must be an integer, got {type(age).__name__}")ifage<0:raiseValueError(f"Age cannot be negative, got {age}")returnagedefprocess_user_data(user_id):try:user=fetch_user_from_database(user_id)returnuserexceptConnectionErrorase:# Network issue - caller might want to retryraiseConnectionError("Could not connect to database.")fromeexceptValueErrorase:# Invalid user ID format - different from network errorraiseValueError(f"Invalid user_id format: {user_id}")frome
Why this is better: Specific exceptions allow callers to handle different error types appropriately. For example, a caller can catch FileNotFoundError to prompt for a different file, or catch PermissionError to display a permission-related message. The exception type itself communicates what went wrong.
Example 2 - Creating custom exceptions for domain-specific errors
Problematic code
defprocess_payment(card_number:str,amount:float)->bool:ifnotcard_numberorlen(card_number)<13:raiseValueError("Invalid card number")ifamount<=0:raiseValueError("Amount must be positive")ifamount>10000:raiseValueError("Amount exceeds daily limit")# Check if card is expiredifis_card_expired(card_number):raiseValueError("Card is expired")# Check if insufficient fundsbalance=get_account_balance(card_number)ifbalance<amount:raiseValueError("Insufficient funds")# Process paymentreturnTrue
Problem: All errors raise ValueError, even though they represent fundamentally different problems. A caller can’t distinguish between “invalid card format”, “card expired”, “insufficient funds”, and “amount exceeds limit” - all are treated as generic value errors. This makes it difficult to handle different payment errors appropriately (e.g., retry for insufficient funds vs. reject for expired card). You could inspect the error message, but that would be using a magic literal.
Fixed by creating custom exceptions
# Define custom exceptions for payment domainclassPaymentError(Exception):"""Base exception for payment-related errors"""passclassInvalidCardError(PaymentError):"""Raised when card number format is invalid"""passclassCardExpiredError(PaymentError):"""Raised when card has expired"""passclassInsufficientFundsError(PaymentError):"""Raised when account has insufficient funds"""passclassAmountExceedsLimitError(PaymentError):"""Raised when payment amount exceeds allowed limit"""passdefprocess_payment(card_number:str,amount:float)->bool:ifnotcard_numberorlen(card_number)<13:raiseInvalidCardError(f"Invalid card number format: {card_number}")ifamount<=0:raiseValueError("Amount must be positive")# Still ValueError - general validationifamount>10000:raiseAmountExceedsLimitError(f"Amount {amount} exceeds daily limit of 10000")# Check if card is expiredifis_card_expired(card_number):raiseCardExpiredError("Card has expired")# Check if insufficient fundsbalance=get_account_balance(card_number)ifbalance<amount:raiseInsufficientFundsError(f"Insufficient funds: balance {balance}, required {amount}")# Process paymentreturnTrue# Caller can now handle specific errors appropriatelydefhandle_payment_request(card_number:str,amount:float):try:process_payment(card_number,amount)print("Payment successful!")exceptCardExpiredError:print("Your card has expired. Please use a different card.")exceptInsufficientFundsError:print("Insufficient funds. Please try a smaller amount.")exceptAmountExceedsLimitError:print("Payment amount exceeds daily limit. Please contact support.")exceptInvalidCardError:print("Invalid card number. Please check and try again.")exceptPaymentError:# Catch any other payment-related errorsprint("Payment processing failed. Please try again later.")
Why this is better: Custom exceptions clearly communicate domain-specific errors. Callers can catch specific exceptions (InsufficientFundsError, CardExpiredError) and handle them appropriately, or catch the base PaymentError to handle any payment-related error. The exception hierarchy also allows for selective handling: catch PaymentError for all payment issues, or catch specific subclasses for granular control.
How to apply this rule
Choose the most appropriate built-in exception. When raising an error, use the most specific built-in exception that accurately describes the problem:
Use ValueError for invalid values or data formats
Use TypeError for wrong types
Use FileNotFoundError for missing files
Use PermissionError for permission issues
Use KeyError for missing dictionary keys
Use IndexError for out-of-range indices
And so on…
Create custom exceptions when built-in ones don’t fit. When your error is domain-specific and doesn’t match any built-in exception, create your own:
Don’t use generic Exception. Avoid raising Exception directly - it’s too generic and doesn’t help callers handle errors appropriately.
Don’t misuse ValueError for everything. While ValueError is common, don’t use it when TypeError, FileNotFoundError, or other exceptions are more appropriate.
Catch specific exceptions when possible. When catching exceptions, catch specific types rather than generic Exception:
try:process_data()exceptFileNotFoundError:# Handle missing fileexceptValueError:# Handle invalid data
Use exception hierarchies for domain errors. Create a base exception class for your domain, then subclass it for specific cases. This allows callers to catch either specific errors or all domain errors:
try:process_payment()exceptInsufficientFundsError:# Handle specific caseexceptPaymentError:# Handle any payment error
Knowledge Check
You’re writing a function that validates user input. The function receives a string when it expects an integer. What exception should you raise?
Exception("Expected integer")
ValueError("Expected integer")
TypeError("Expected integer")
AttributeError("Expected integer")
Answer3 — TypeError` is the most appropriate exception for when the wrong type is passed to a function. ValueError would be for an integer with an invalid value (like a negative age), not for the wrong type entirely.
Your function reads a configuration file, but the file doesn’t exist. What exception should you raise?
ValueError("File not found")
FileNotFoundError("config.txt")
Exception("File missing")
KeyError("config.txt")
Answer2 — FileNotFoundError is the specific built-in exception for missing files. It's more precise than `ValueError` or generic `Exception`, and allows callers to handle file-not-found errors specifically.
You’re building a payment processing system and need to indicate when a payment fails due to insufficient funds. The built-in exceptions don’t accurately represent this domain-specific error. What should you do?
Raise ValueError("Insufficient funds") since it’s a value problem
Create a custom exception class like class InsufficientFundsError(Exception)
Raise Exception("Payment failed") to be generic
Return False instead of raising an exception
Answer2 — when built-in exceptions don't accurately represent your domain-specific errors, create custom exception classes. This makes the error type clear and allows callers to catch and handle InsufficientFundsError specifically, which is more meaningful than a generic ValueError.
Which of the following is a red flag that violates the “raise specific errors” principle?
Using TypeError when a function receives the wrong type
Creating a custom DataProcessError exception for data processing failures
Raising Exception for all errors instead of specific exception types
Using FileNotFoundError when a file is missing
Answer3 — raising generic Exception for all errors violates the principle because it doesn't help callers distinguish between different error types. Specific exceptions like ValueError, TypeError, FileNotFoundError, or custom exceptions allow for precise error handling.
11 - 10. Installing a *nix operating system
In this lesson, you will set up an operating system in the Unix family.
Most commercial software runs on Linux. Linux is derived from an OS called Unix. So are Android, macOS, and iOS.
Windows and Unix-derived operating systems do the same things, but the specific commands you type and the way you set up your user environment differ between the OS families.
Mac users
You don’t need to do anything. macOS is derived from Unix, so everything we do in Linux you should be able to do in macOS. There will be a few minor differences.
Just don’t tell anyone that you’re using Linux on a Mac, because you are not! macOS is not Linux, but they speak the same language and have many of the same command line tools.
Windows users
You will install Ubuntu Linux, which will require 18-30GB of disk space.
You will continue to run Windows, but we will use virtualization tools to install Linux and make it think that it is running on actual hardware, when in reality it is running “inside” Windows. The virtualization tools pass OS commands from Linux to Windows, and Windows ultimately controls the hardware. Linux will act like a “computer within a computer”.
This tutorial includes downloading VirtualBox, downloading an Ubuntu .iso image, and installing Ubuntu inside a VirtualBox Virtual Machine.
Important Note: In Step 2 of the tutorial, do not put create “machine folder” inside of folder that is backed up by OneDrive or Google Drive. Mine defaults to c:\Users\laymanl\VirtualBoxVMs, which is fine.
The VM should start automatically.
An Ubuntu installer application should be running inside the VM with a screen like the following:Allow this program to finish Copying files... It may take a long time.
Once the installer application finishes, you will be prompted to login using the username and password you created while following the tutorial.
You should see the Ubuntu desktop and a Welcome application. You can skip through the Welcome application without installing anything it recommends.
Finally, in the VirtualBox menu bar at the top, select Device → Shared Clipboard → Bidirectional for a quality of life improvement. You are now good to go!
If you use a personal computer
You will enable a virtualization feature called the Windows Subsystem for Linux (WSL) and install a Linux distribution.
Press the Windows key and search for “windows features”. Select the “Turn Windows features on or off” option.
Scroll down and ensure that “Virtual Machine Platform” and “Windows Hypervisor Platform” are both checked. Hit “OK”.
Reboot your computer if prompted to do so.
Hit your Windows key, search for PowerShell. Right click it and “Run as Administrator”.
In Powershell, run the command wsl --install. This may take a while to complete.
Reboot your computer.
Open the Microsoft Store app on your computer. Search for “Ubuntu” and get the “Ubuntu 24.04 LTS” app. This will take some time to complete.
Ubuntu will then be installed on your machine. Once installed, you can either launch the application directly from the Microsoft Store or search for Ubuntu in your Windows search bar.
Follow the instructions in the Ubuntu terminal to create a username and password for Linux. Note that Linux will not show the password as you type.
Once everything is complete, you should see a prompt similar to “username@computer_name” on your screen, e.g.:
12 - 11. Remote Servers
Working with remote servers
Most software that you use is a combination of a client software system and a server software system. “The cloud” is a generic term for a group of servers that do the same thing.
For example:
You use the TikTok app on your phone, which performs searches and recommends videos in the cloud.
You play a multiplayer game on your XBox, but a server controls people entering and leaving, tracking scores, and managing lag.
You have used pip to install Python libraries, but pip talks to a remote server to find the package and retrieve the bytes.
In the final weeks of SENG 201, we will connect to a remote server to host a network application. You will edit and deploy the application.
12.1 - Connecting to ada
Instructions for connecting to ada and installing a VPN for offsite work
We will use an on-premises (on-prem) server called Ada, named after Ada Lovelace, who wrote the first algorithm for the precursor to modern computers, Babbage’s Analytical Engine.
WHEN OFFSITE - use the VPN client
The ada server is accessible only from the UNCW network.
You will need to use UNCW’s Virtual Private Network (VPN) client software to reach the server while offsite.
Install the VPN client software. You can only install the VPN client while offsite.
Native Linux: Point your web browser at https://vpn.uncw.edu and follow the prompts.
Open the Cisco AnyConnect VPN program and connect to the pre-configured UNCW VPN.
I recommend that you disconnect from the VPN when you don’t need it because it can slow your connection.
Connecting to ada via SSH
We will use the Secure Shell (SSH) program to connect to ada. SSH is a program for creating client-server connections. SSH will connect you to ada’s Linux CLI, which will function like a WSL or MacOS Terminal.
SSH is pre-installed on Windows, MacOS, Ubuntu, and WSL. Open a Terminal and enter the following:
ssh <your-uncw-id>@ada.cis.uncw.edu
# for example, ssh laymanl@ada.cis.uncw.edu
Enter your UNCW login password when prompted. Choose “yes” when prompted to trust the connected machine. The initial login may take several seconds as your account is loaded from UNCW systems.
You should see something like the following after successfully signing in:
You are now logged into the ada server. ada is running Ubuntu Linux, and understands all the standard Linux CLI commands.
There are many commands at your disposal, including python and git.
Type pwd to see your home directory location.
Rules for using ada
ada is a shared server. As such:
Do not read, write, or edit files outside your home directory.
Do not change the permissions on your home directory using chmod or any other command.
Do not intentionally do anything to harm the server, such as fill up the hard disk or overload the CPU.
Activity on the server is logged. Any intentional or negligent violation of these rules will result in a grade of 0 for the course and a violation of the Student Code of Conduct reported to the Dean of Students.
When in doubt if you are allowed to do something, ask the instructor first.
Understanding the basics of files, disks, processes, and programs on Linux
Class recording
Starting out
ada is running Ubuntu Linux, and understands all the standard Linux CLI commands. There are additional commands at your disposal, including python and git.
Open a Windows PowerShell, WSL Terminal, or MacOs Terminal and type the following to connect to ada:
ssh <your-uncw-id>@ada.cis.uncw.edu
# for example, ssh laymanl@ada.cis.uncw.edu
Navigating the file system
Make sure you are connected to ada using SSH. Type the following commands:
pwd# where am I?ls # list filesls -l # list with permissions and sizesls -lah # human-readable sizes, show hiddencd / # root of filesystemls
cd ~ # back to their home
The commands above provide the basics of navigating through the file system.
Linux commands accept OPTIONS, which are the parts beginning with a hyphen, e.g., -lah
Most Linux commands also accept ARGUMENTS that specify the target of the command. For example:
cd ~: the ~ is the argument.
cd /: the / is the argument.
You can also give ls an argument, e.g., ls /usr/bin to list the contents of the usr/bin
Question: What is a hidden file? Why do they exist, do you think?
Question: Which option to ls gives you the sizes, owner, and permission?
What’s happening on the system?
Just like working on your computer, you may run out of disk space or a process may be using all your memory or CPU power. How do check these?
Run the following one at a time:
df -h # disk free — storage usage across mounted filesystemscd ~
du -h # list the size of the current directory and all subdirectoriescd /
du -sh # summarize size of current directory and all subdirectoriesdu -sh ~ # summarize size of your home directory directory and all subdirectories, but using an argument
The df (disk free) and du (disk used) commands are complimentary, show information about files on disk. You use ls -l to see the size of individual files.
What about processes using CPU or memory? You have a few options for that.
Run the following one at a time:
free -h # memory: total, used, availabletop # live process viewer (press q to exit)ps aux # snapshot of ALL processesps u # more compact, shows %CPU, %MEM of YOUR processes
Curious to know who else is on the server? Run the who command.
Exercise: Use top or ps to find the PID (process id) of the most CPU or memory intensive process. Write the PID down. Then run kill <PID>. What happens?
Downloading files and piping
Linux offers a convenient command-line tool for downloading files. All you need is the URL. Run the following command to download our meteoric dataset from the class website.
Run the following one at a time:
wget https://llayman.github.io/seng-201/labs/remote-server/exploring/meteors.zip
ls -l # Note that meteors.zip is downloadedunzip meteors.zip # decompress the filels -l # You should see both meteors.zip and meteorite_landings.csv
Now suppose you want to view the contents of that file. You can use commands we learned from CLI Lab: Text files:
cat meteorite_landings.csv # Print an entire file at oncemore meteorite_landings.csv # Paginate. Use SPACE to advance, and `q` to quit
Writing code remotely
When connected to a server like ada, you typically only interface through the CLI. In ada’s case, there is no window-like GUI.
Before creating files, let’s make a directory to work in inside our home directory. Run the following commands:
cd ~ # Go to your home directorypwdmkdir dev # Make a subdirectory named dev/cd dev # change into the dev directory within your homepwd
Linux uses the ~ character as shorthand for your home folder, i.e., /home/<your_id>. So ~/dev is shorthand for /home/<your_id>/dev.
Make sure you are in your ~/dev folder. Do the following:
nano hello.py
a text editor called Nano will open in the Terminal looking like this:
type in print("Hello World!")
Hit CTRL+X to exit, then Y to save the changes.
You have now created the file. Primitive, huh? Run the following:
ls -al # You should see your hello.py file.python3 hello.py # Python will run an execute the file
Note we use python3 on the server. You may also want to refresh yourself on how to copy, move, and delete files and directory in Lab: File and directory management.
Exercise: Use nano to create another Python file that prints out the numbers from 0 to 9. Run it from the CLI.
Code locally, then upload
The Nano editor is quite handy for editing files on the server quickly. But, we are spoiled by the power of IDEs like Visual Studio Code and PyCharm.
Most of the time, software engineers develop on their own machines and deploy their software programs to servers. One way to accomplish this is to directly transfer files from your computer to a server. To do this requires a program often bundled with ssh called scp – secure copy.
On your local computer: open one of your seng-201/ projects and create a file named process_info.py. Paste in the following:
On your local machine, open a new PowerShell or Terminal window. Use the cd command to navigate to the directory you created process_info.py. Once in that directory, enter the following:
This will copy the file securely to your ~/dev/ directory. Now, switch back to the Terminal where you are connected via SSH. Use python3 to run the file you just uploaded, which should be in your dev/ directory.
You will see output like the following:
laymanl@ada:~/dev$ python3 process_info.py
Python executable: /usr/bin/python3
Current working directory: /home/laymanl/dev
My PID: 348335My parent PID: 347328USER env var: laymanl
SHELL env var: /bin/bash
PATH env var (first 60 chars): /home/laymanl/.local/bin:/usr/local/sbin:/usr/local/bin:/usr...
The scp command is the key here. You can upload multiple files or entire directories at once with it as well. It is great for infrequent use.
As developer, or a team of developers, a much more convenient way to get your source code on a server for testing or production is to use git. We will do this in the next lab.
Key Takeaways
You’ll connect to the remote server ada via SSH (e.g., ssh <your‑uncw‑id>@ada.cis.uncw.edu).
Basic file‑system navigation on Linux includes commands such as pwd, ls, ls -l, ls -lah, cd /, cd ~.
Understanding disk usage and processes:
Use df -h to check mounted filesystem usage.
Use du -h or du -sh to check directory sizes.
Use free -h, top, ps aux (or ps u) to inspect memory/CPU and running processes.
Use wget to download files by URL, unzip to extract archives, and cat / more to view text files on the server.
When writing code on a server with no GUI:
Use a simple editor like nano (e.g., nano hello.py → write code → python3 hello.py).
Or develop locally with an IDE and upload via scp (or use version control like git) for more advanced workflows.
The tilde ~ represents your home directory (/home/<your_id>), so ~/dev is shorthand for /home/<your_id>/dev.
Knowledge Check
What command would you use to show hidden files and human‑readable sizes in your home directory?
Suppose your home directory is filling up. Which command(s) would you use to identify large subdirectories?
How can you see a live view of processes using the most CPU on the system? What key do you press to exit that view?
You have a Python file on your local machine named process_info.py. How would you securely upload it to the server into your ~/dev directory?
In the context of a remote server, why might you prefer editing code locally in an IDE and uploading it rather than using a terminal editor like nano? (Provide two reasons.)
12.3 - Deploying a networked application
Writing a simple server application that listens for network connections and deploying it to ada
Networked applications are any program that listen for data to arrive over a network socket. Several networked applications are running on your computer right now that are part of your operating system. Web browsers, games, video chat apps are all examples of network applications.
What is the data that arrives over the network? Initially it is treated as raw bytes, but those bytes could represent text that you process as strings, numbers, file data, or other things. The software engineer writes code that processes the bytes into whatever type they represent, and then writes normal program logic to operate on that data. The basics of working with data from a network is quite simple, actually, but what programs can do with that data can be enormously complex.
Some important terms:
Server: The computer or program that is waiting for connections.
Client: The computer or program that is initiates connections. Once connected to a server, they can exchange data.
Socket: the combination of network address and logical port that a program uses to send and receive data, e.g., 152.20.12.250:25555.
127.0.0.1: this IP address is “home” and is shorthand for your local computer
Creating a local server application
We will write in class a simple server application in Python that:
listens for network data on a specified socket.
sends a random question to a client that connects to the socket.
Deploying software to ada
Deployment is the act of making your software available for use. You could deploy your software to your own computer (you do this while testing). For other people to use your software, you need to make your computer accessible via a network and make sure the program is running all the time and ensure that your computer has enough resources to handle thousands of people using it all at once.
Hence, servers. Servers are network accessible and all they do (usually) is serve software programs that users can connect to.
So, how can you get a program to ada? You can use file transfer tools like scp, but we will use git.
Create a new GitHub repository
We will place your quote-server project on GitHub.
You should see in the ada Terminal a “Logged in as ” message. You are done.
Cloning and running the app on the server
Now you can use git on ada to clone the project and pull any changes.
On ada, run git clone <YOUR_REPO URL> to clone your repo.
cd into the cloned directory
run python3 quote_server.py
If successful, you should see a startup message saying the server is running. You are good to proceed to the next section.
If you see an error message, it may mean that someone else has chosen the same PORT number as you. No problem.
If so, run nano quote_server.py and change the port number to something unique between 10,000-60,000 that is unique.
Hit CTRL+X then Y to save and exit.
Run python3 quote_server.py again.
If you still get an error, go to Step 1 or ask the instructor.
Remember to git add, commit, and push any changes!
You can stop the server app by hitting CTRL+C or closing the connection to ada.
Testing the server
On your local computer:
Run git pull if you pushed changes to your server code!
Run the quotes_client.py script.
Hit c to connect.
Enter 152.20.12.250:PORT where PORT is what you set in the quote_server.py on ada
Hit r a few times. Your quotes are now streaming from your server application on ada to the client application on your computer!
Connecting to ada’s quote server registry
I created a web application that lists all the quote servers running on ada. You can see it here if on the UNCW network or VPN: http://152.20.12.250:22222/
You can add your application to the registry. To do so, you need code that talks to the registry when your server app starts.
Do the following with your quote_server.py in your computer.
Paste the following function into quote_server.py:
deftransmit_server_info():"""Connects to a predefined IP and port and transmits the server's ipaddress, port, and server_name."""try:# Connect to predefined targetclient_socket=socket.socket(socket.AF_INET,socket.SOCK_STREAM)client_socket.connect((TARGET_IP,TARGET_PORT))# Prepare data to transmitdata=f"{PORT},{SERVER_NAME}"# Transmit the informationclient_socket.send(data.encode())print(f"Transmitted server info to {TARGET_IP}:{TARGET_PORT} - {data}")client_socket.close()exceptExceptionase:print(f"Error transmitting server info: {e}")
Invoke transmit_server_info() before your while loop.
Git add, commit, and push.
Connect to ada, pull your changes.
Run your server again with python3 quote_server.py. Your quote server should appear in the registry within a few seconds.
You can use quote_client.py to connect to answer server in the registry (use their IP+PORT address) so long as you are on the campus network or VPN. Nifty!
Note that your server will shutdown when you logout. You may cancel it manually with CTRL+C.
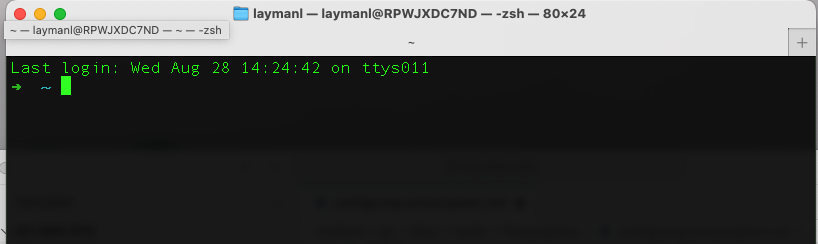

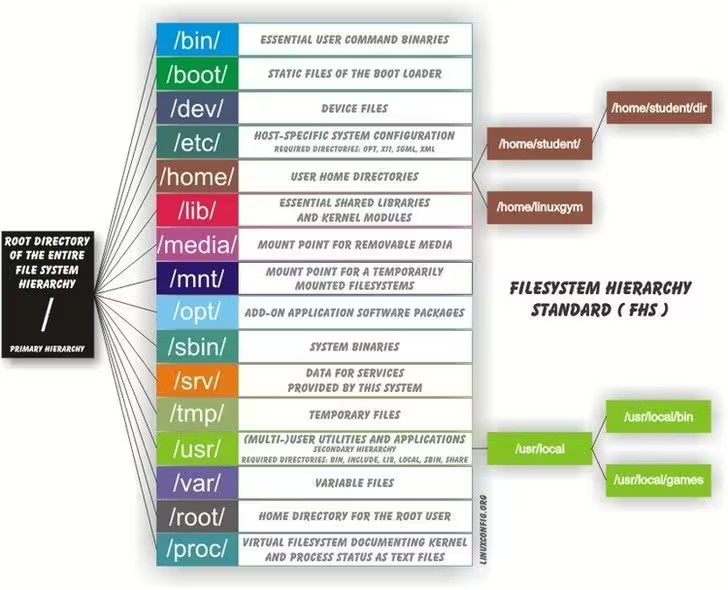
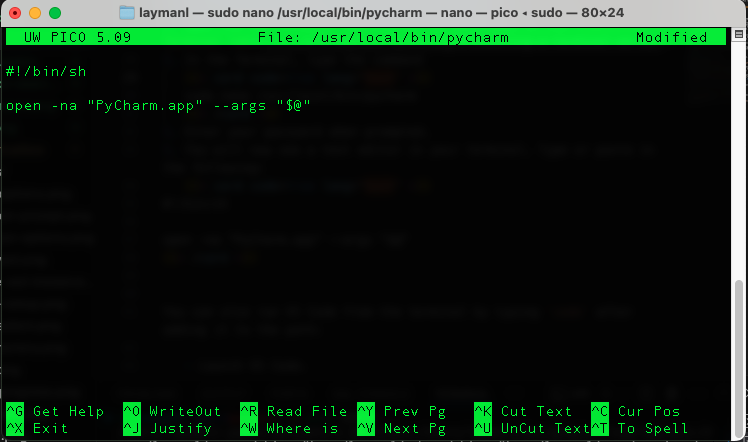
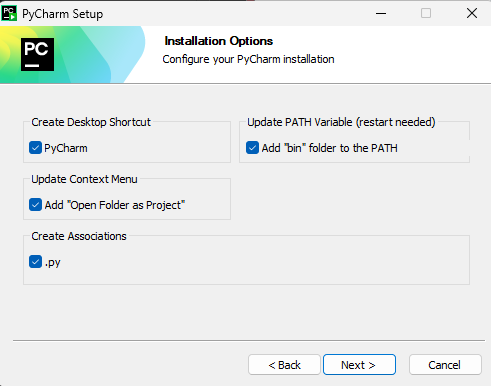
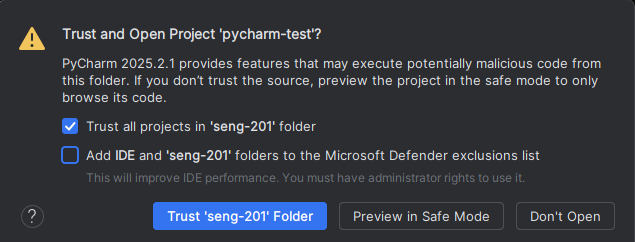
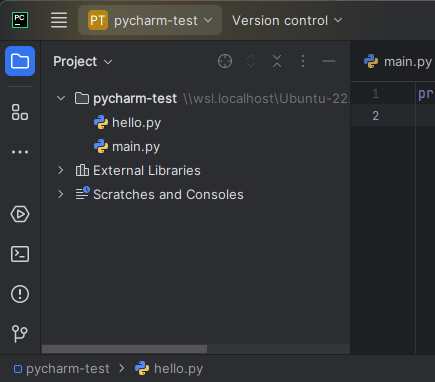
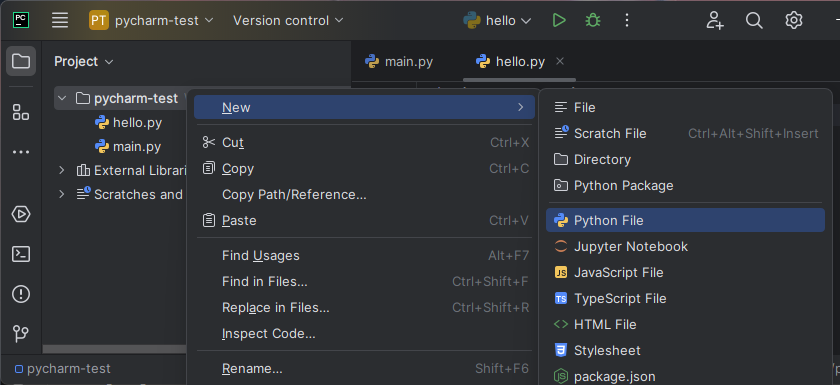

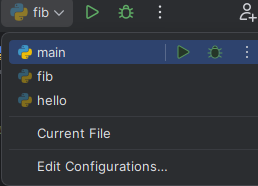
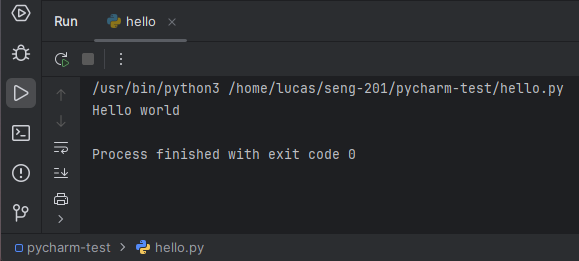
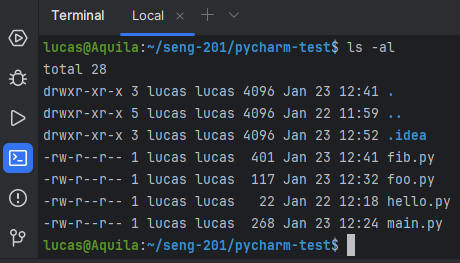

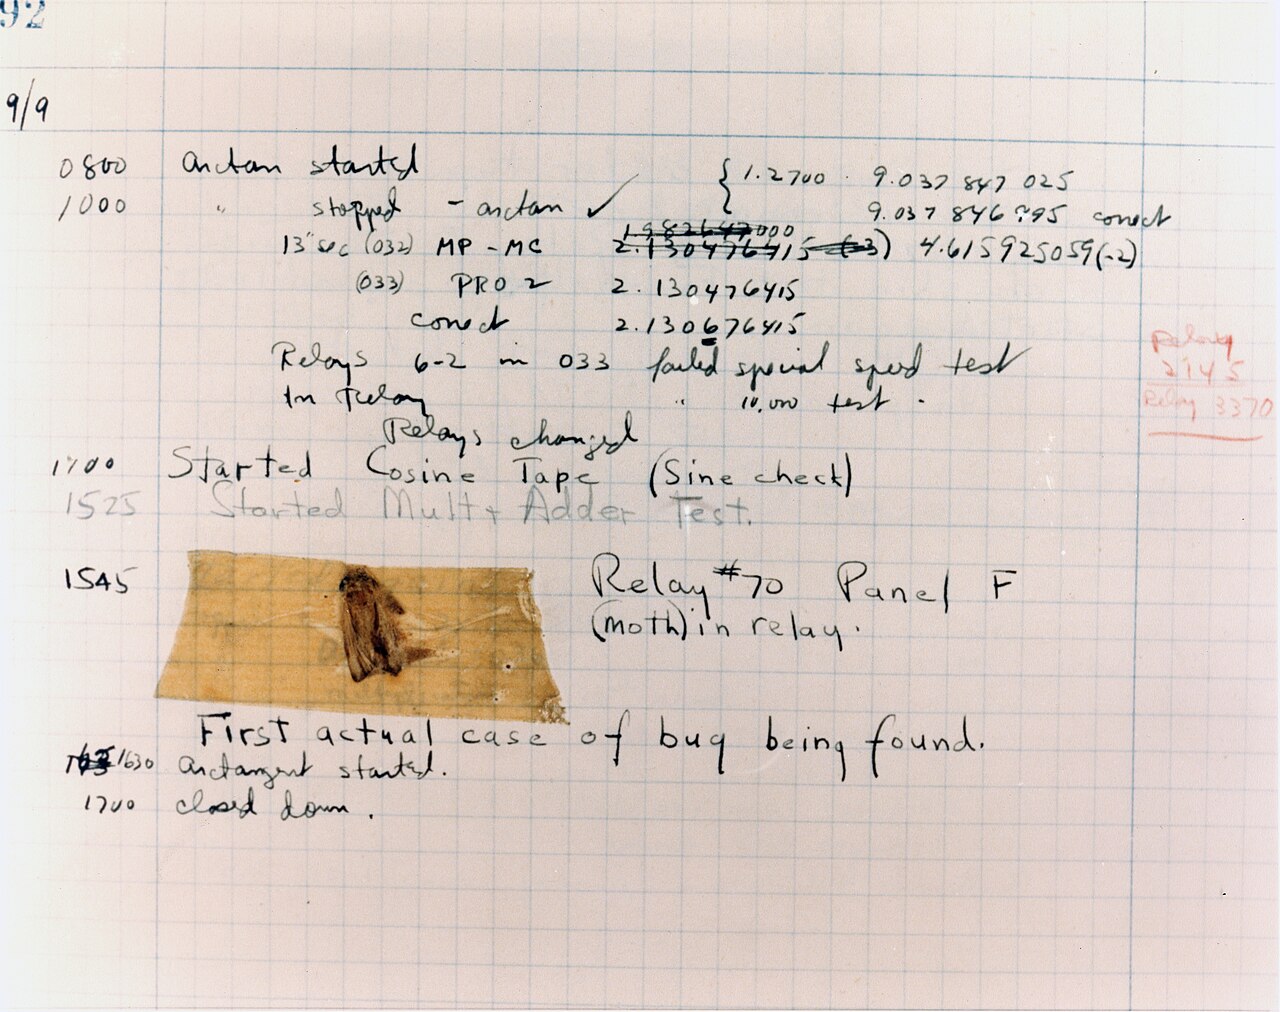
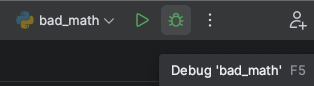
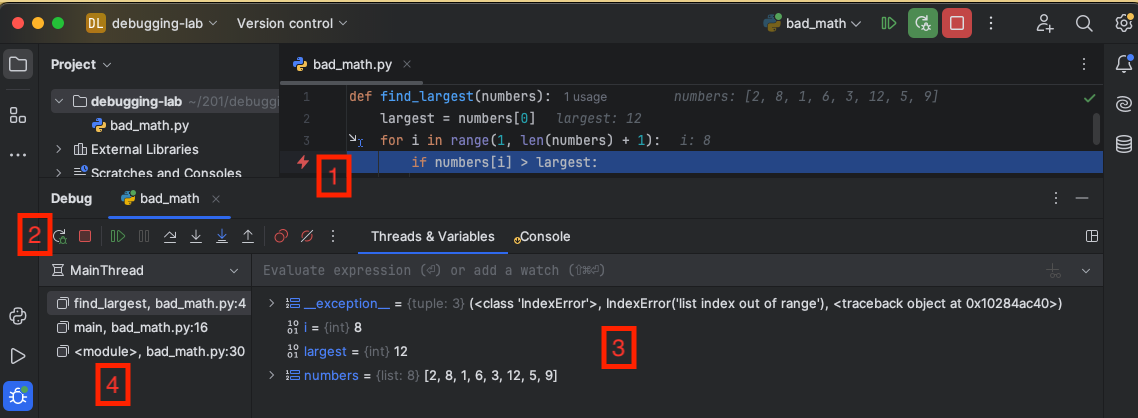
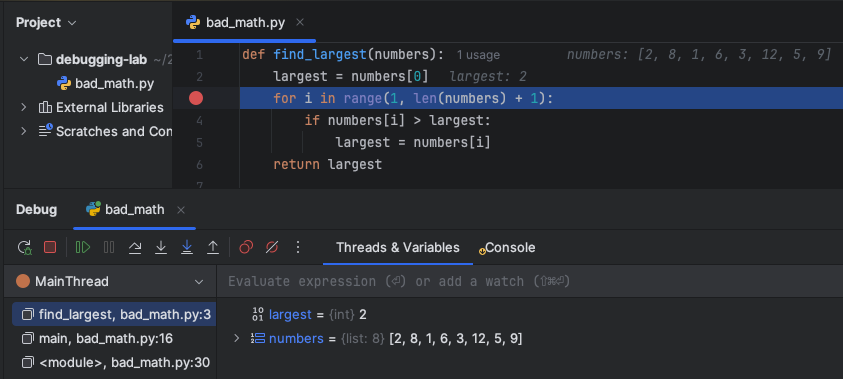
 - Resume execution until the next breakpoint or the program ends.
 - Step Over the current line, which means evaluate the line and go to the next one.
 - Step Into the current line. If the current line calls a function like
  - Step Into My Code. The same as the previous Step Into, but only step into source code files in your project. Suppose you call
  - Step Out of the current function. This will immediately complete all lines of the current function and pause at the line that called the current function in the call stack.
 - Restart the debugging on the program. Just like re-running it. All your breakpoints will be retained.
 - Stop the debugger without further execution of the code.


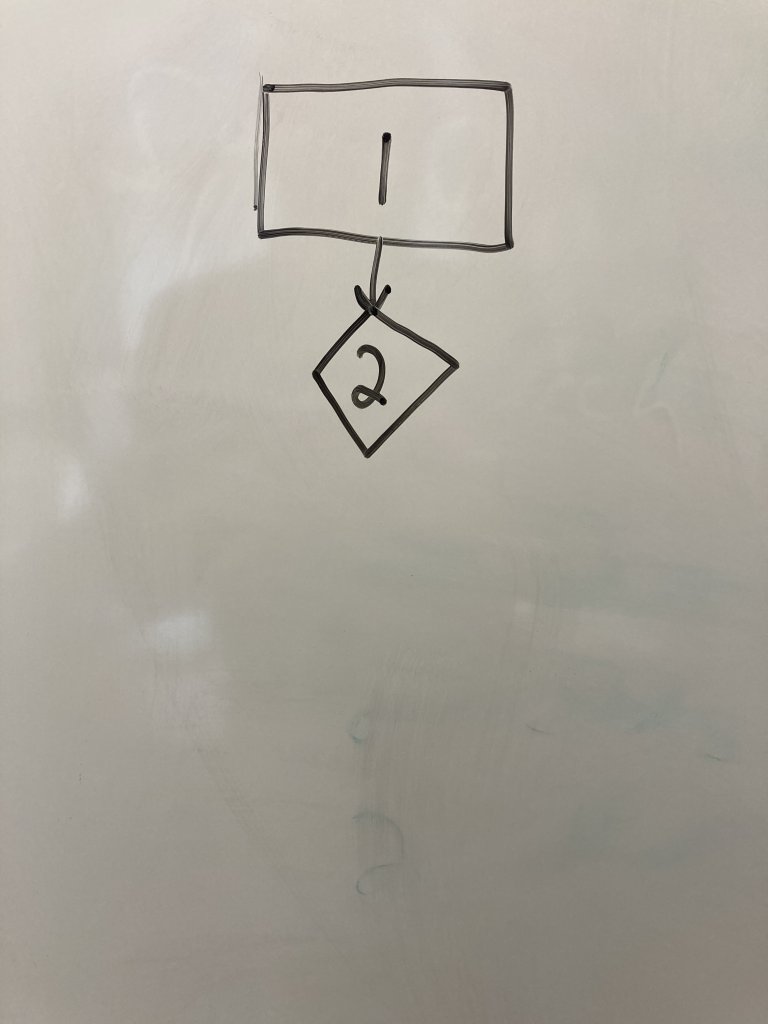
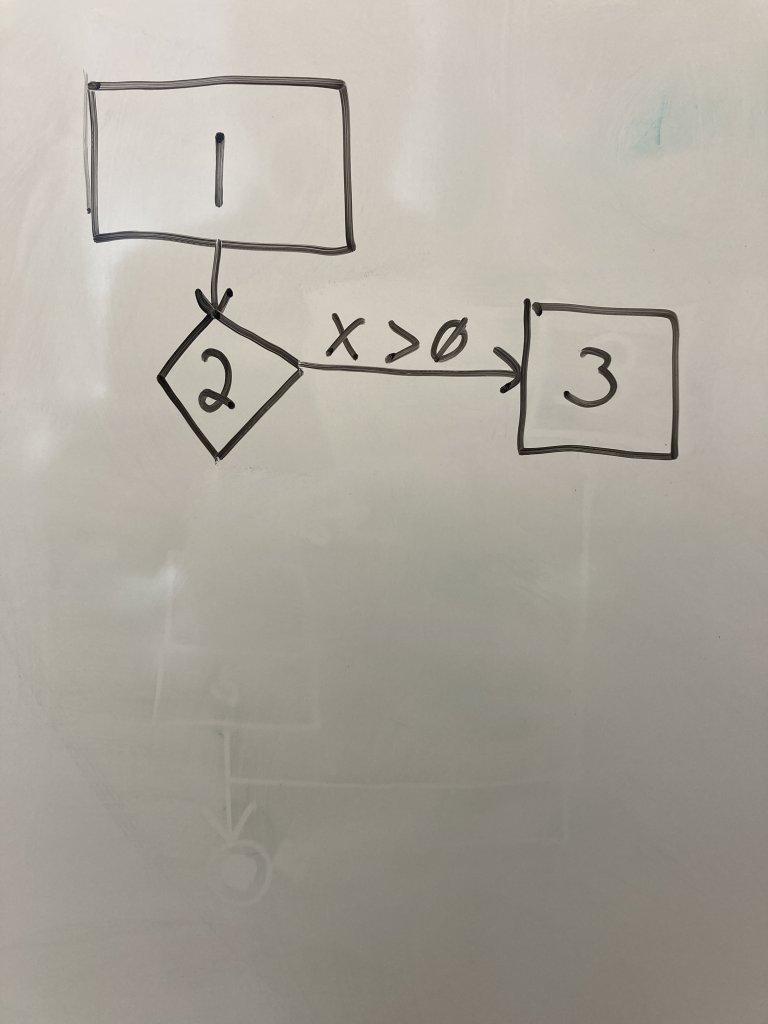
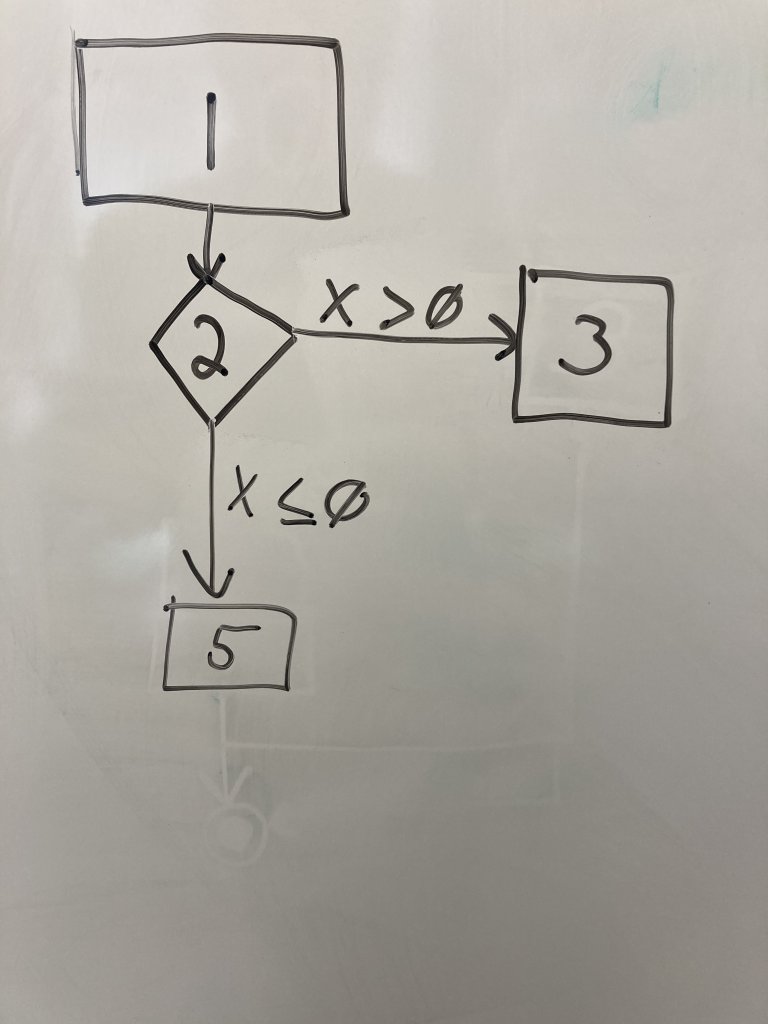
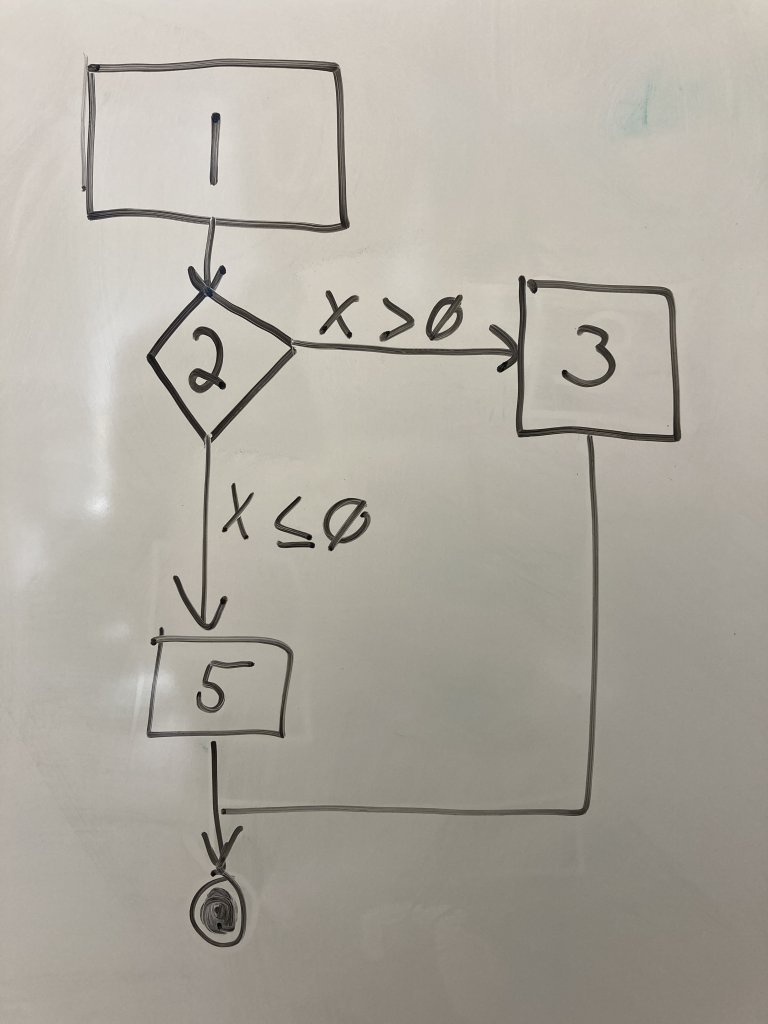
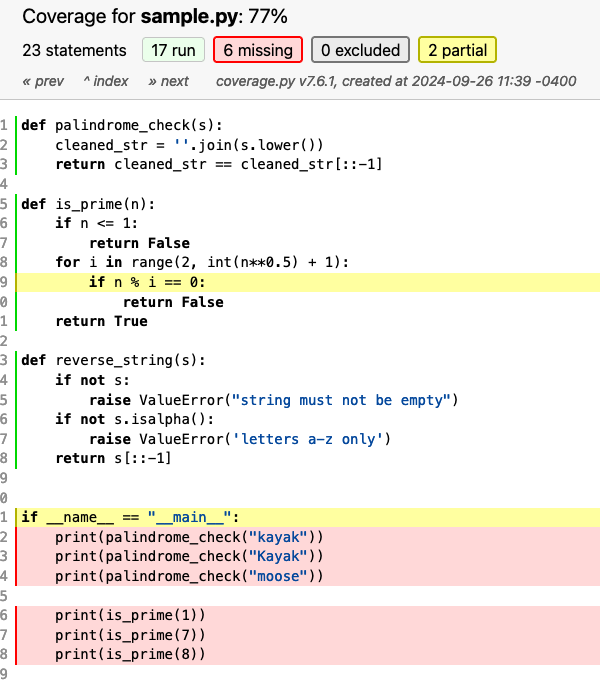
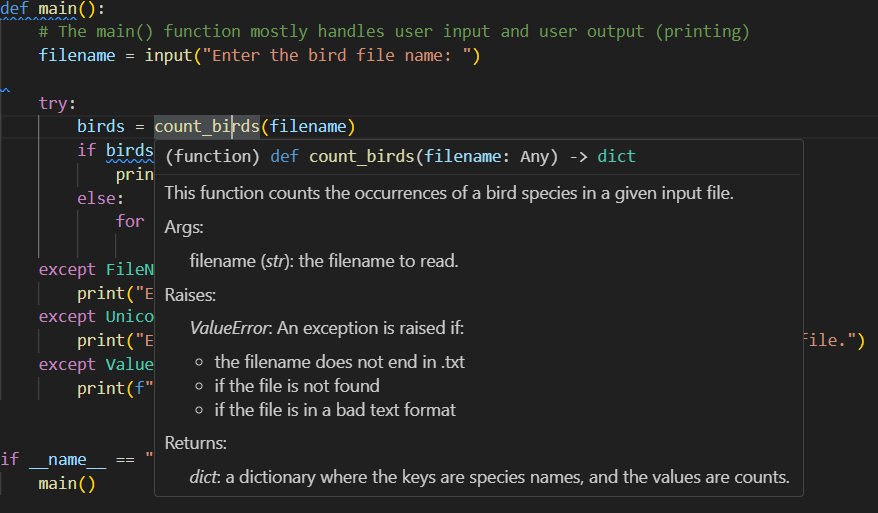
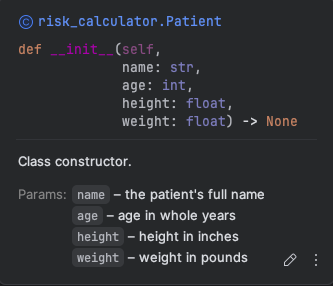
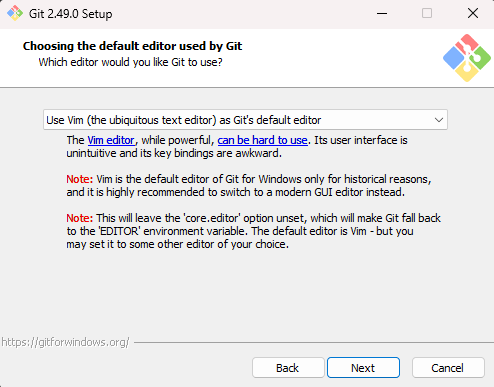
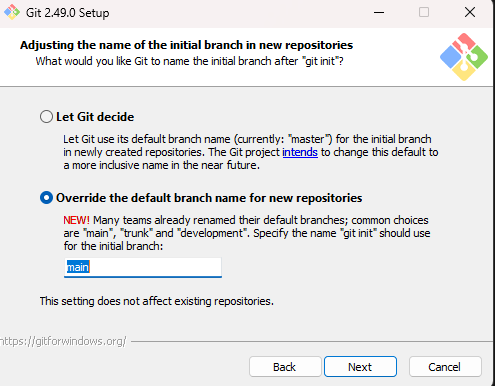


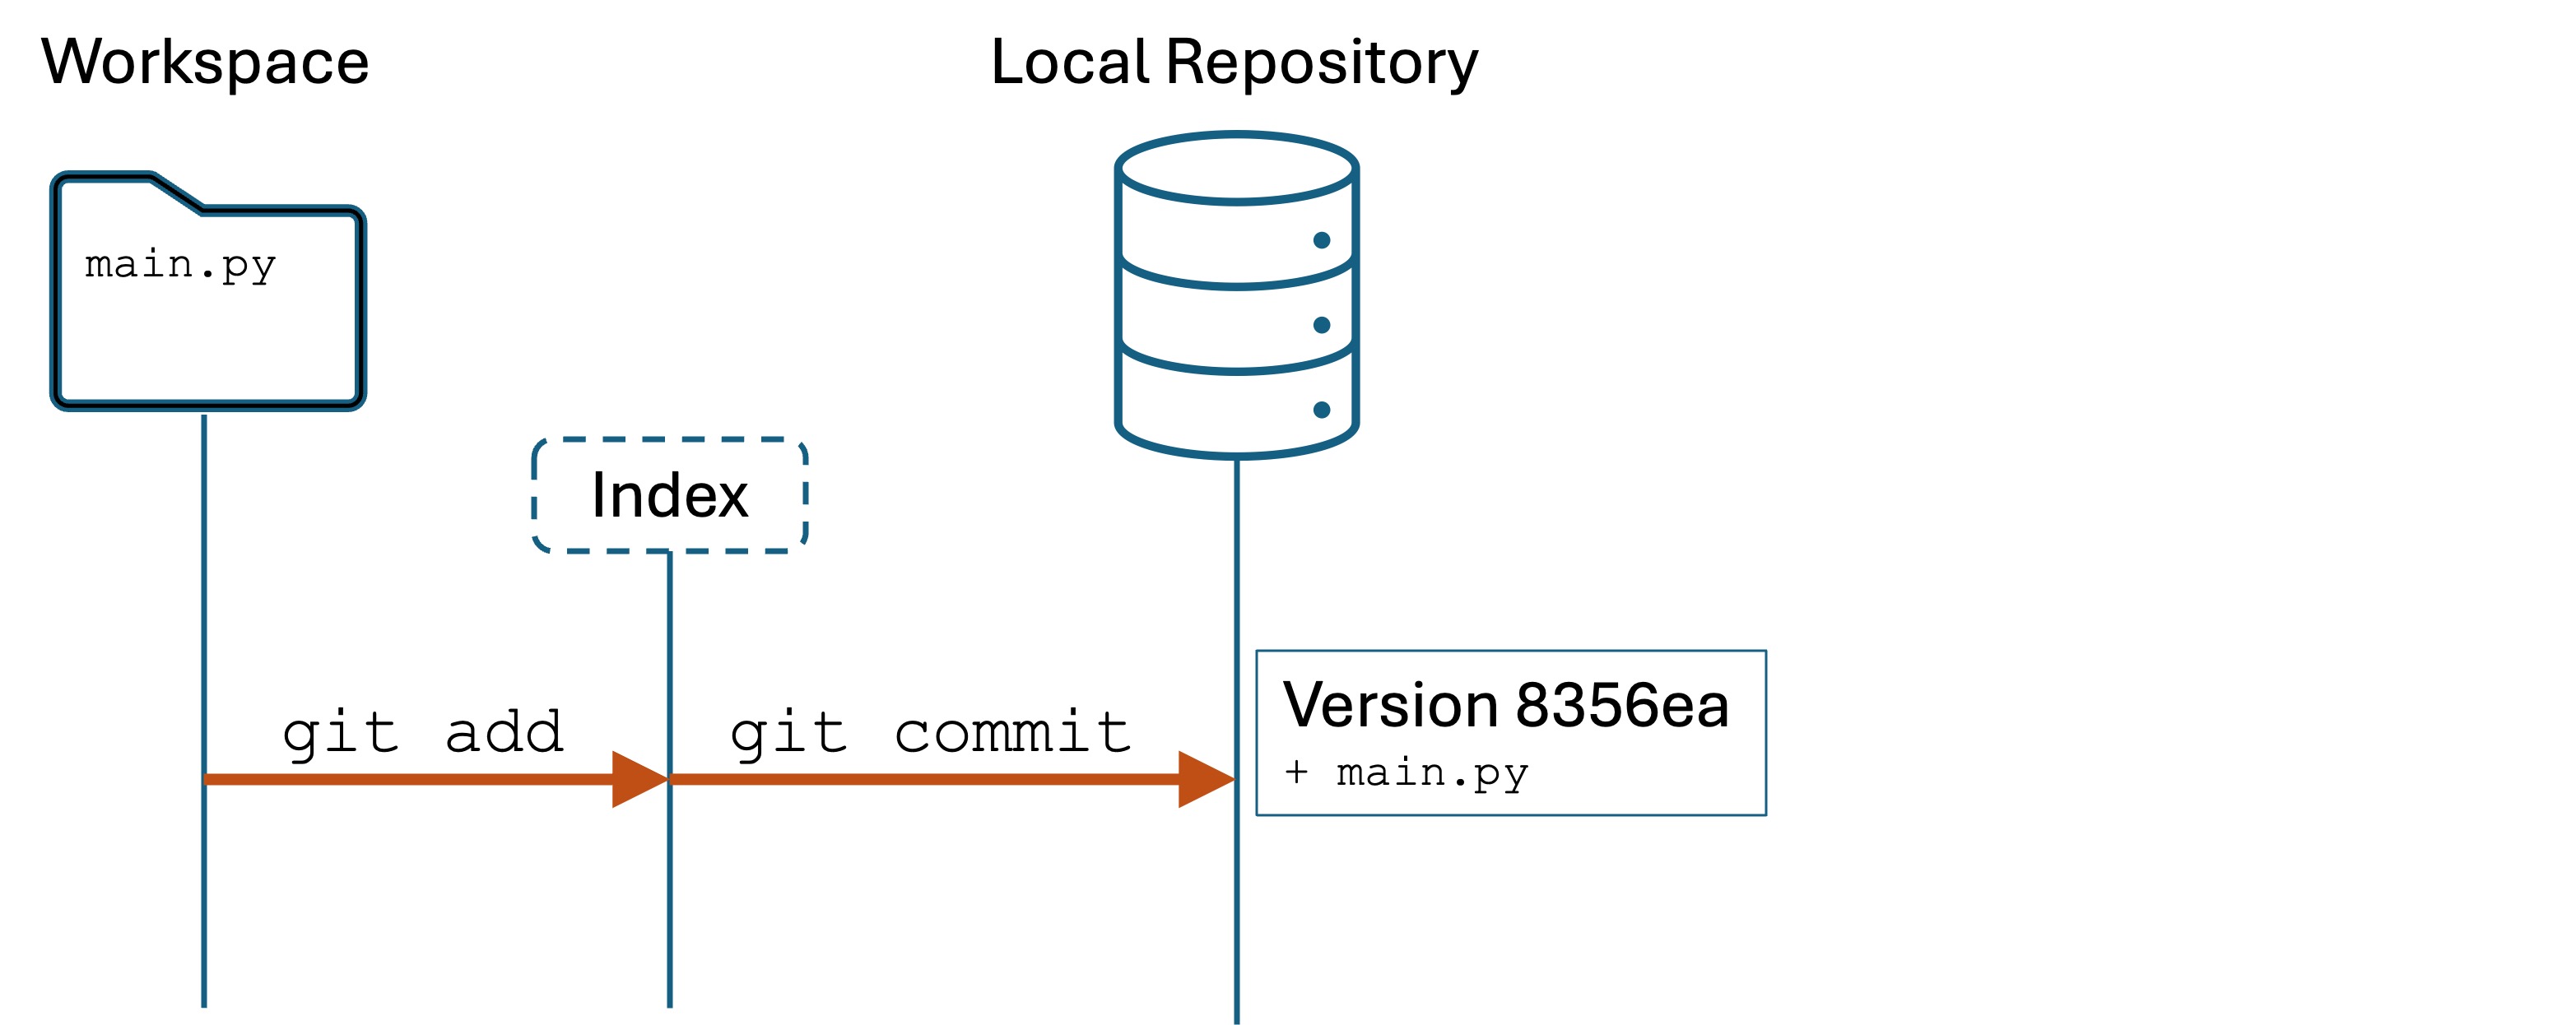
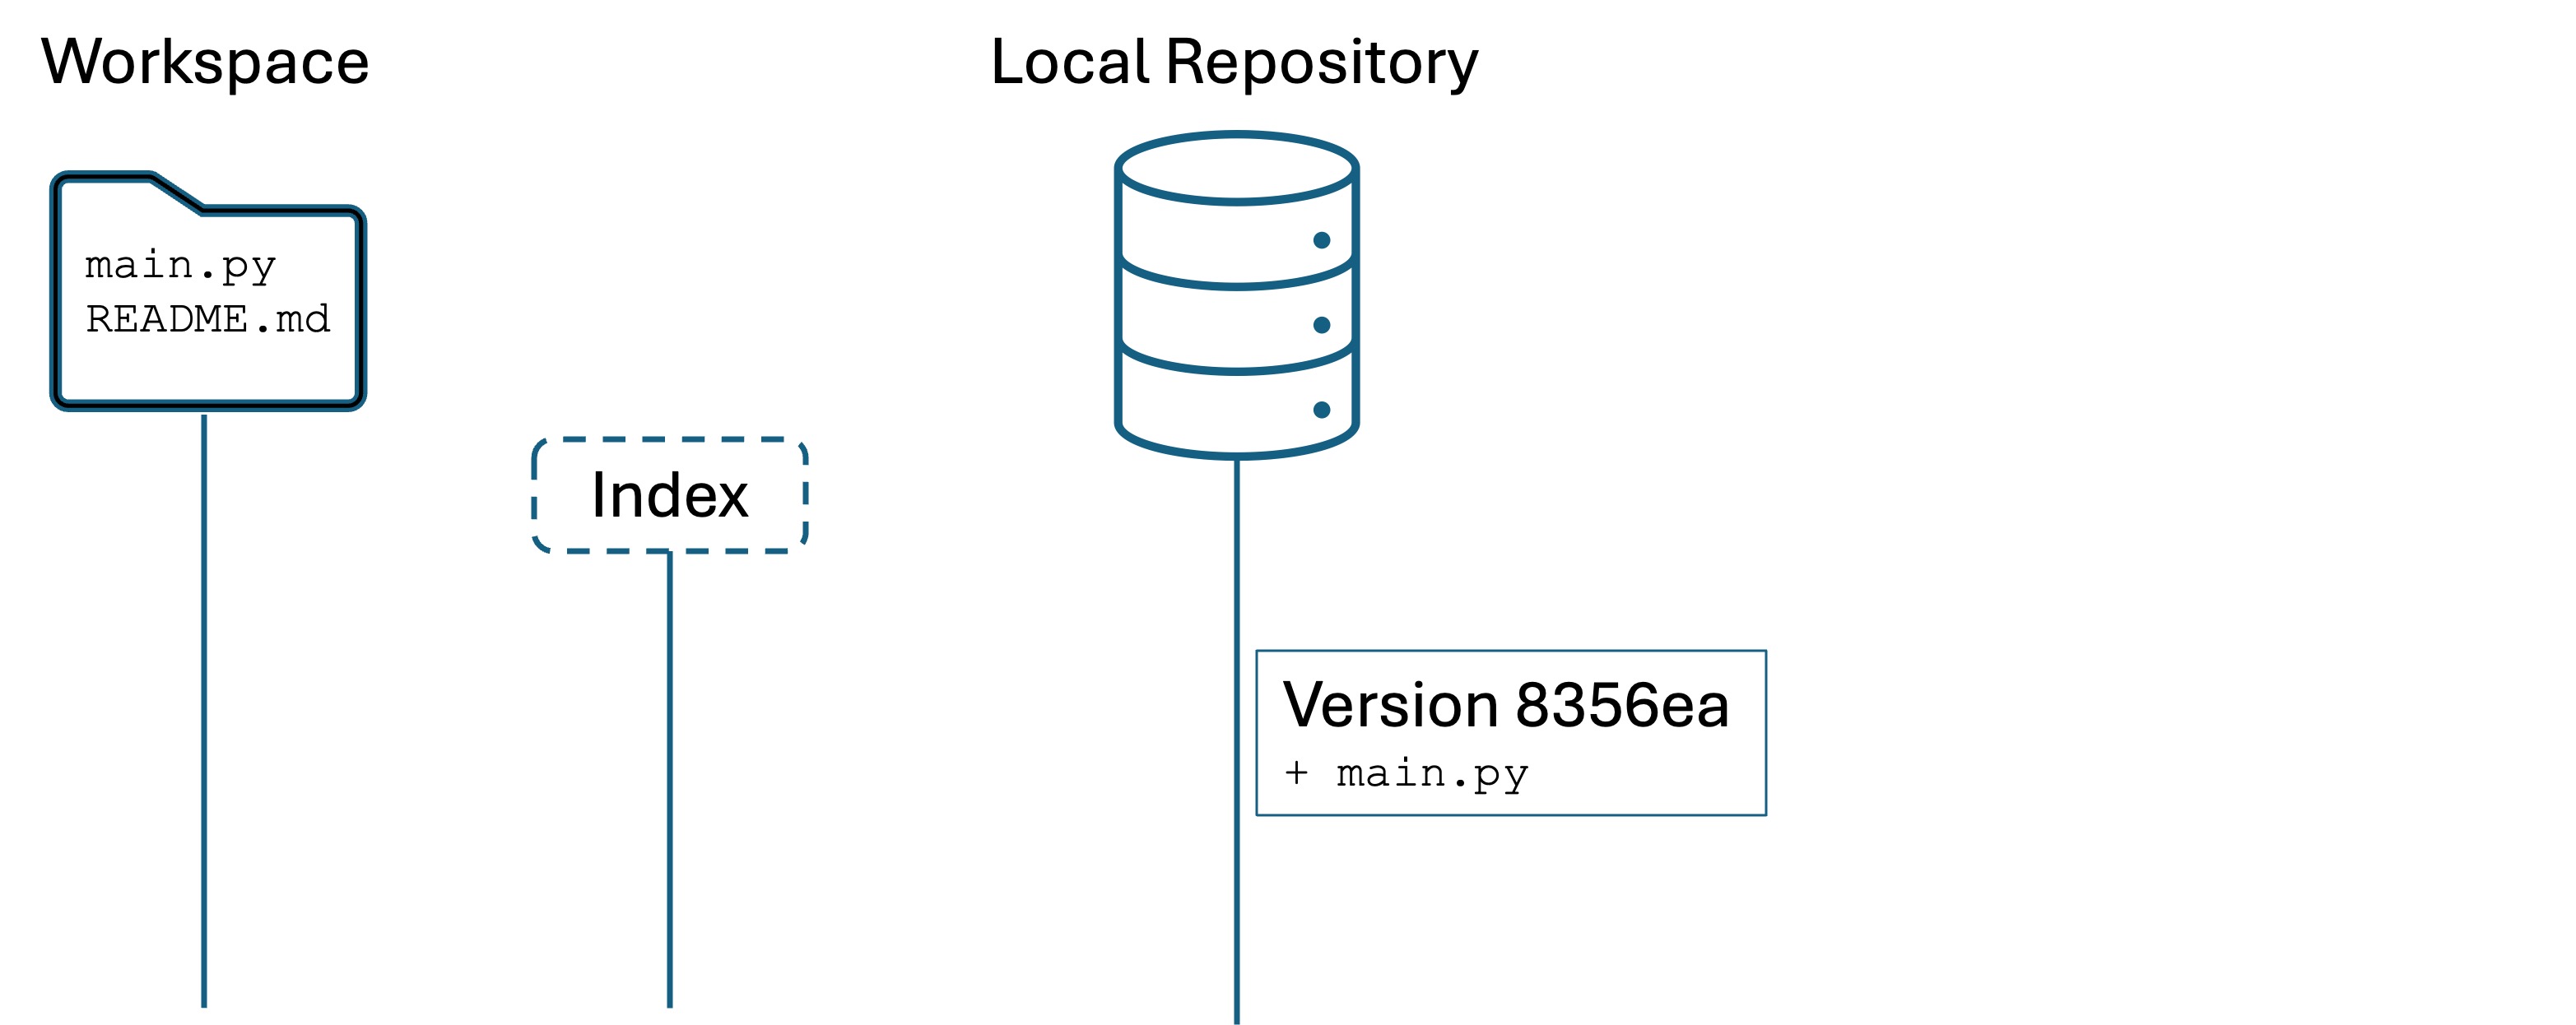
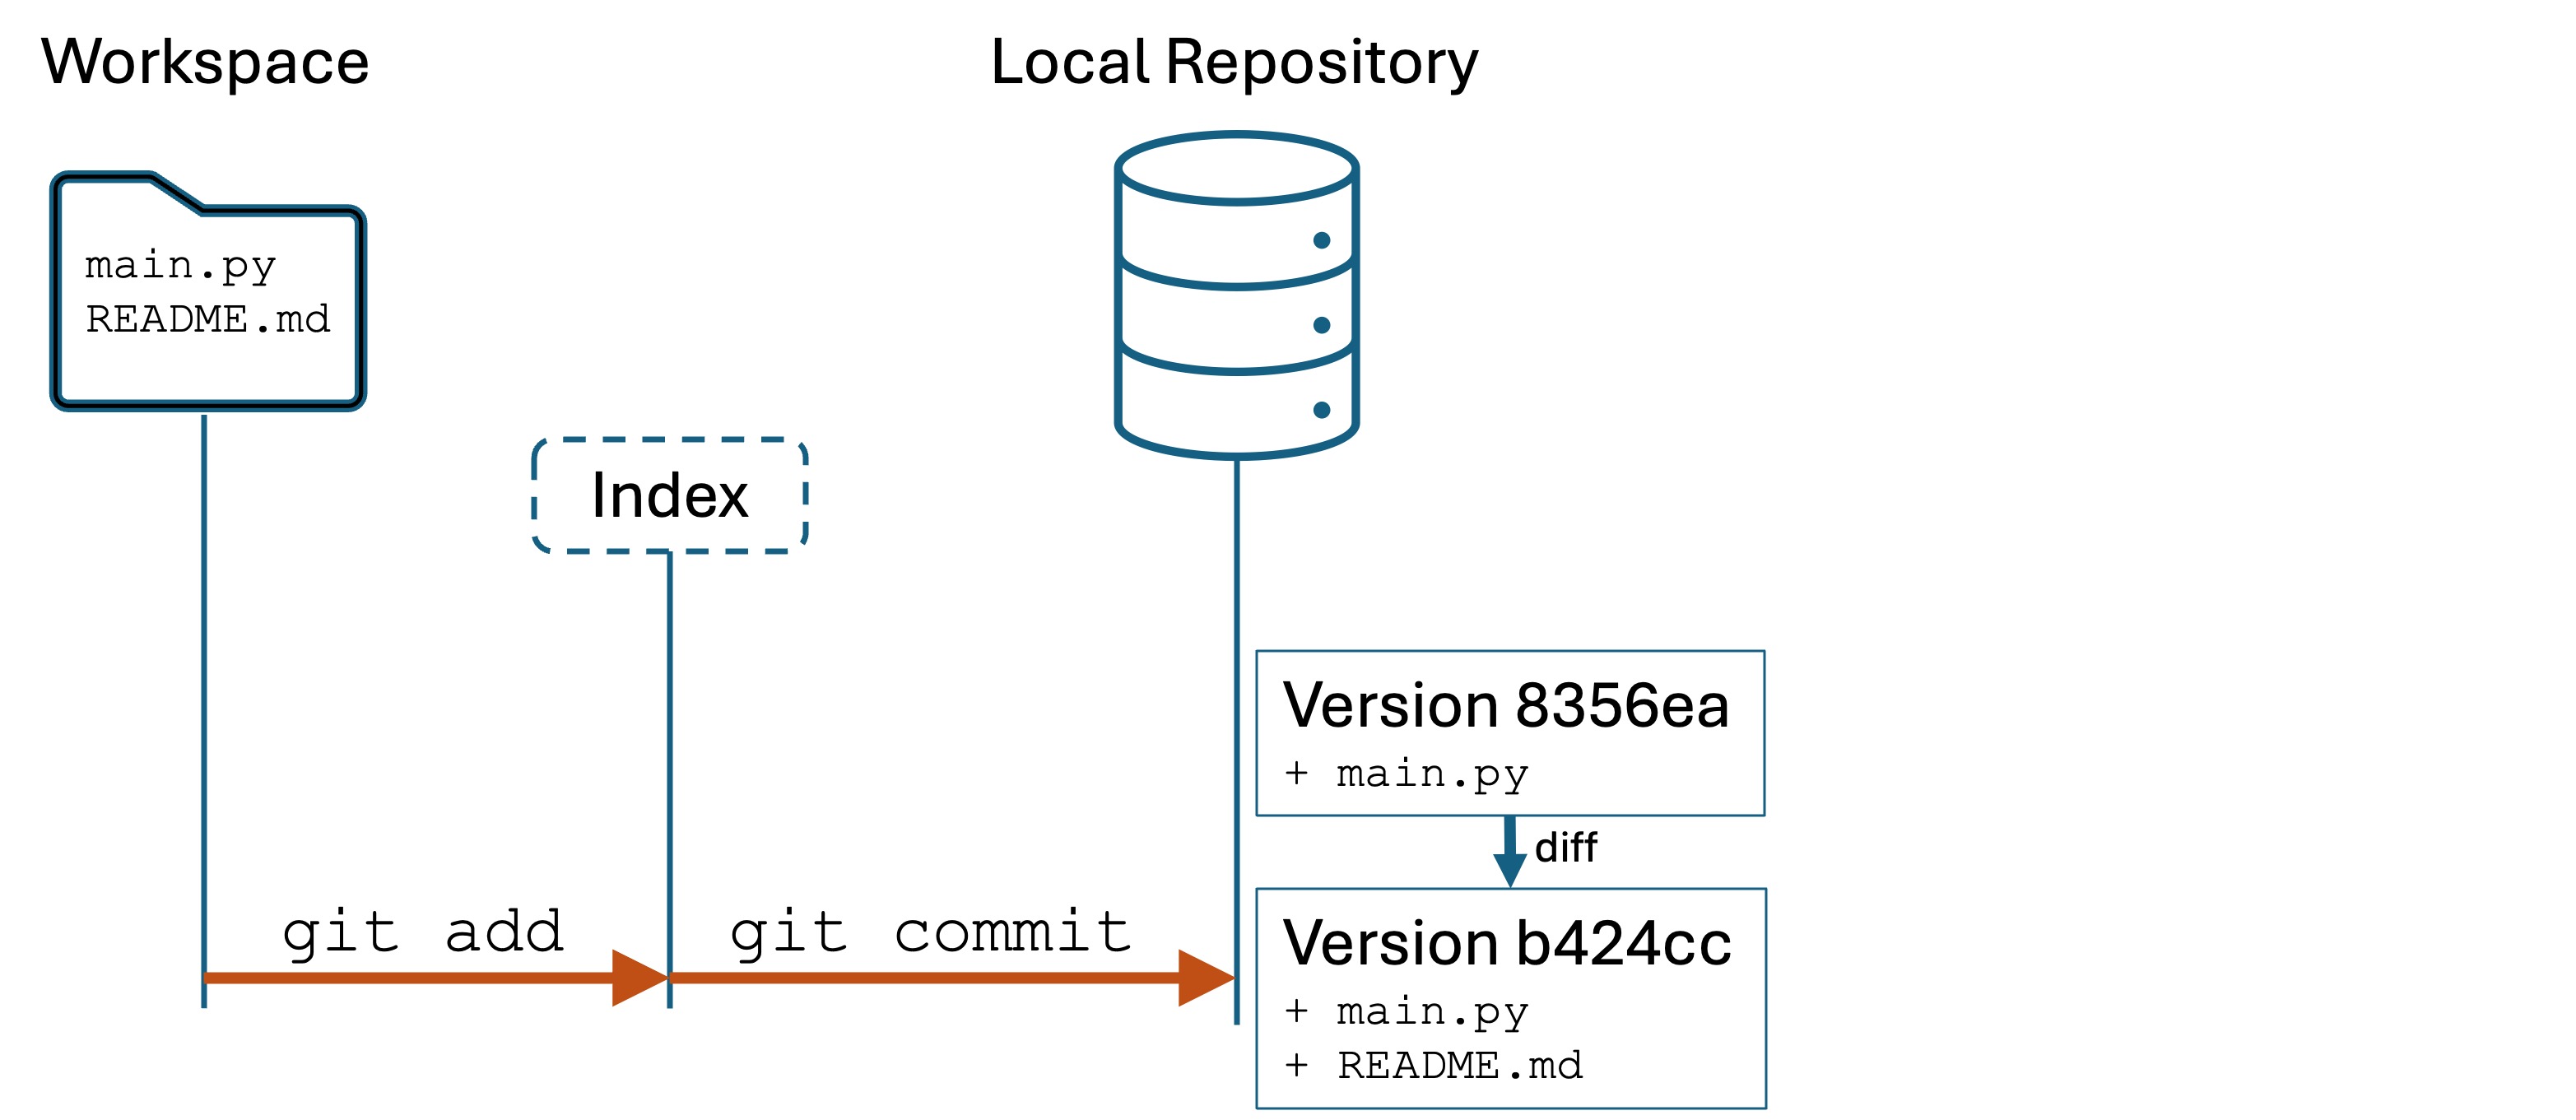
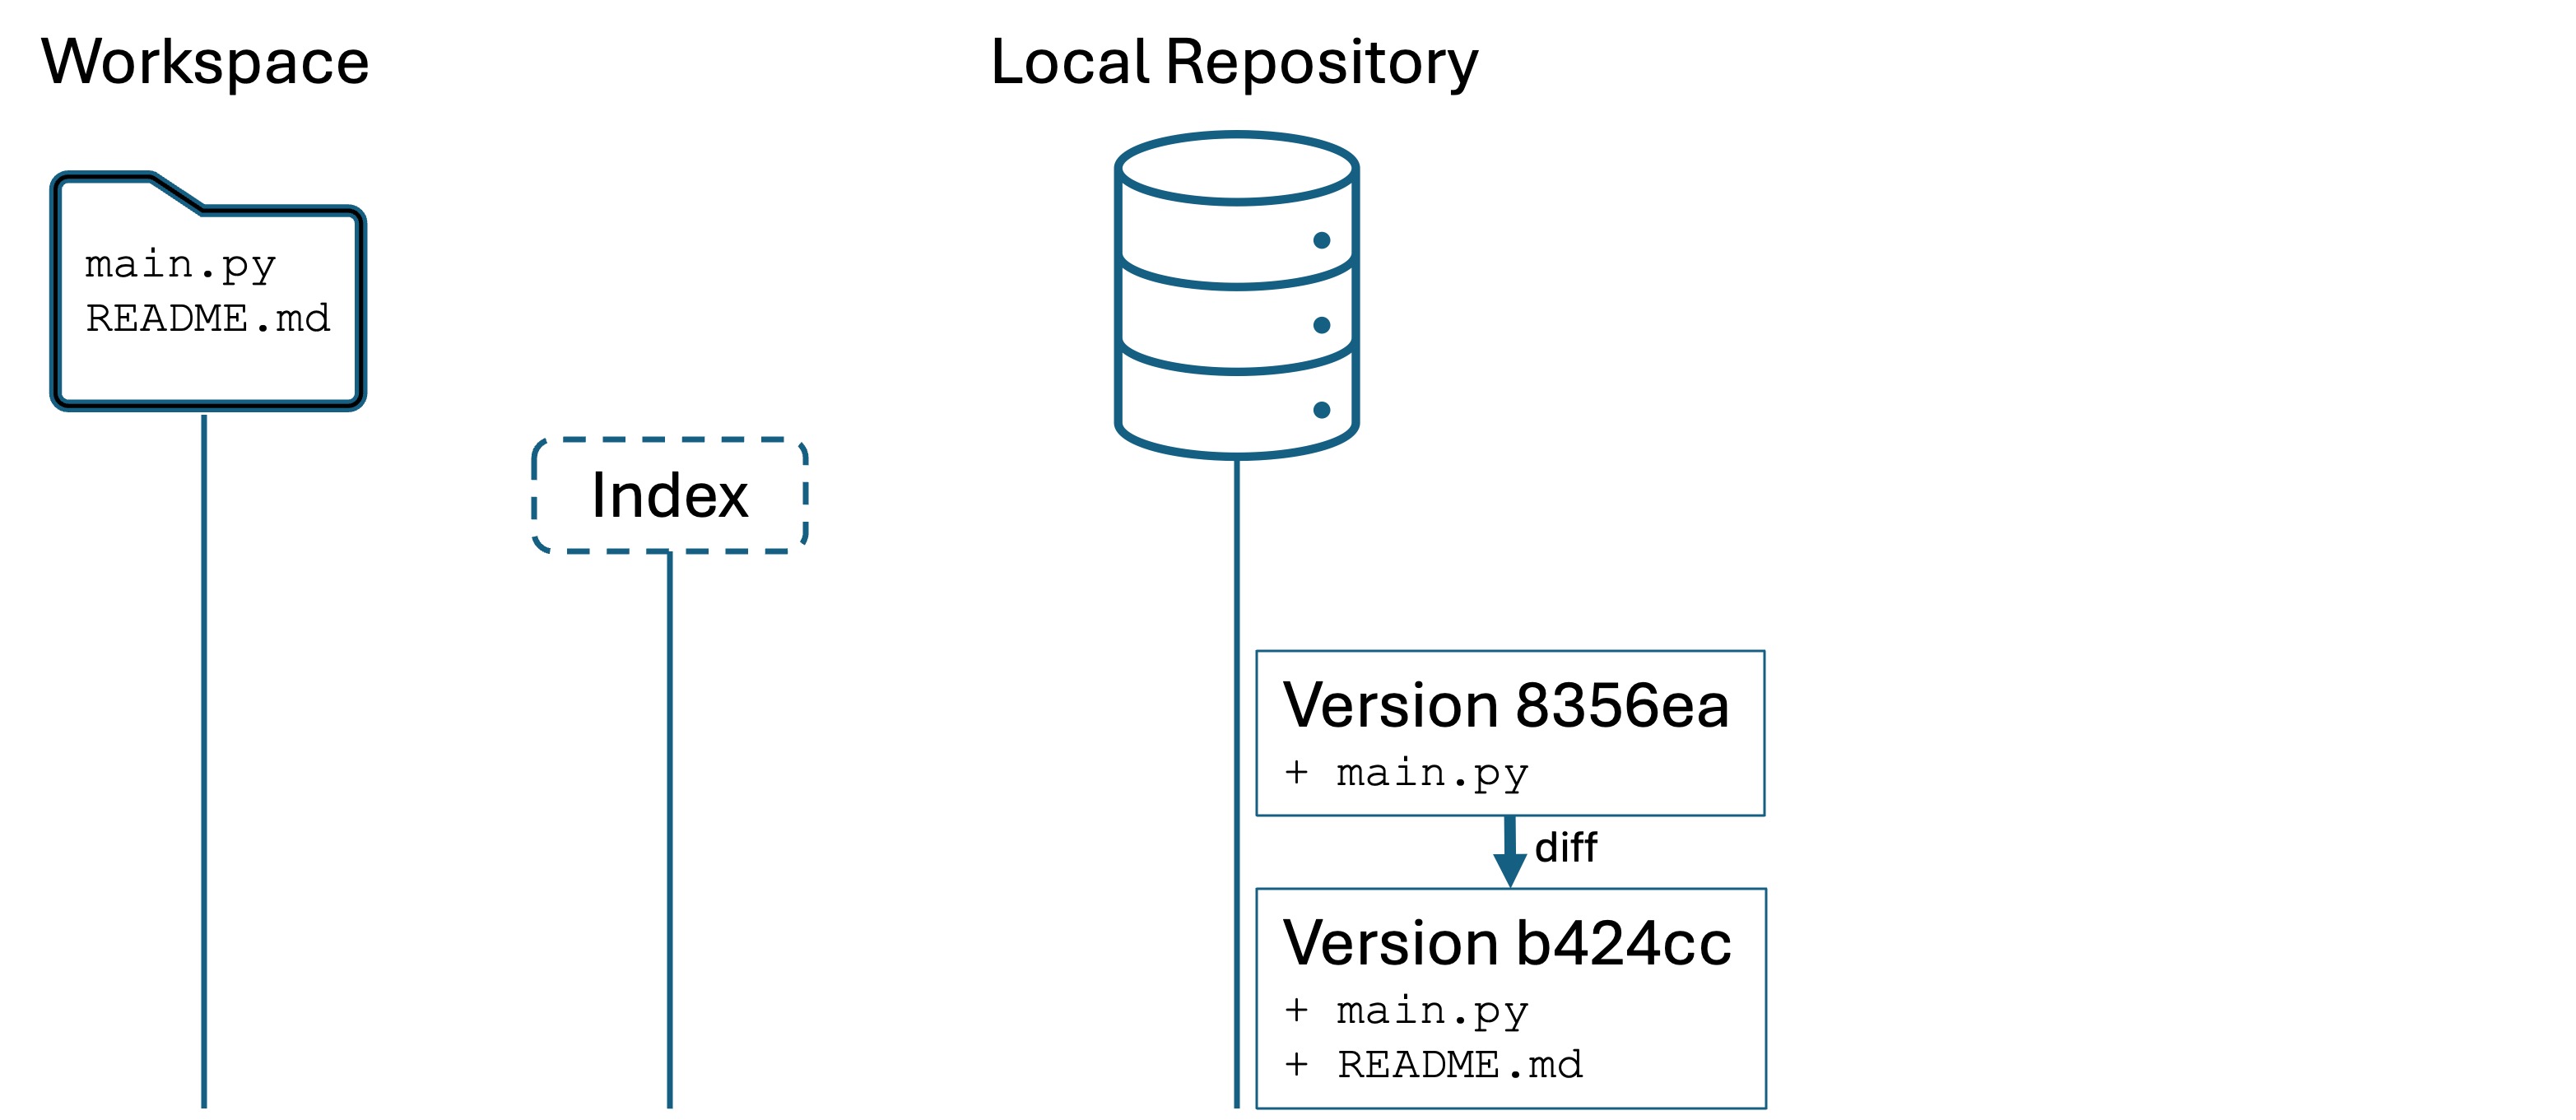
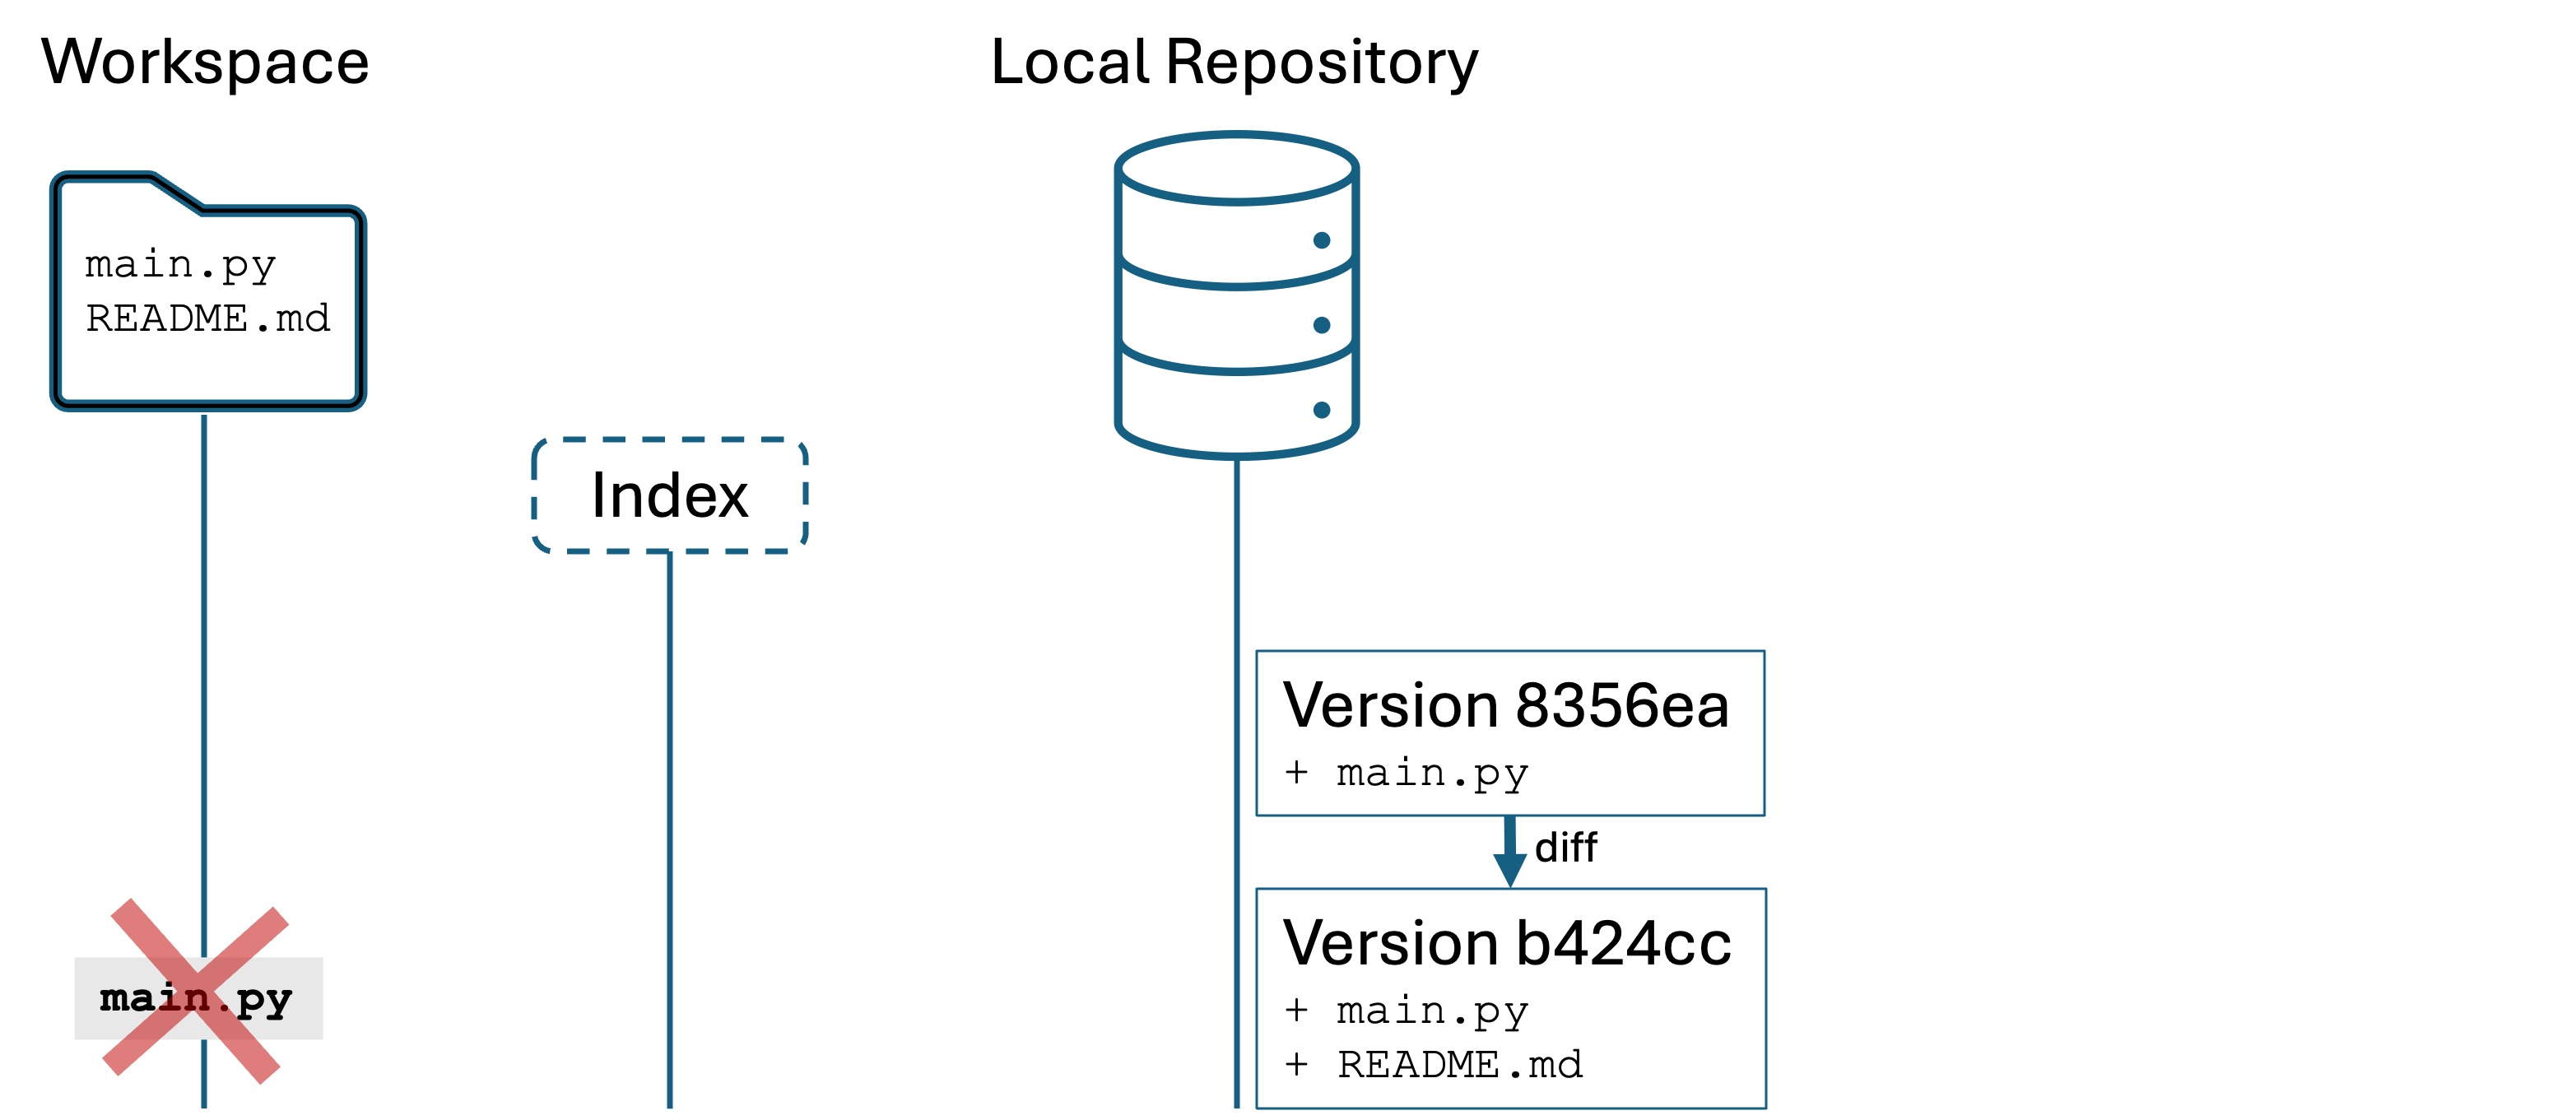
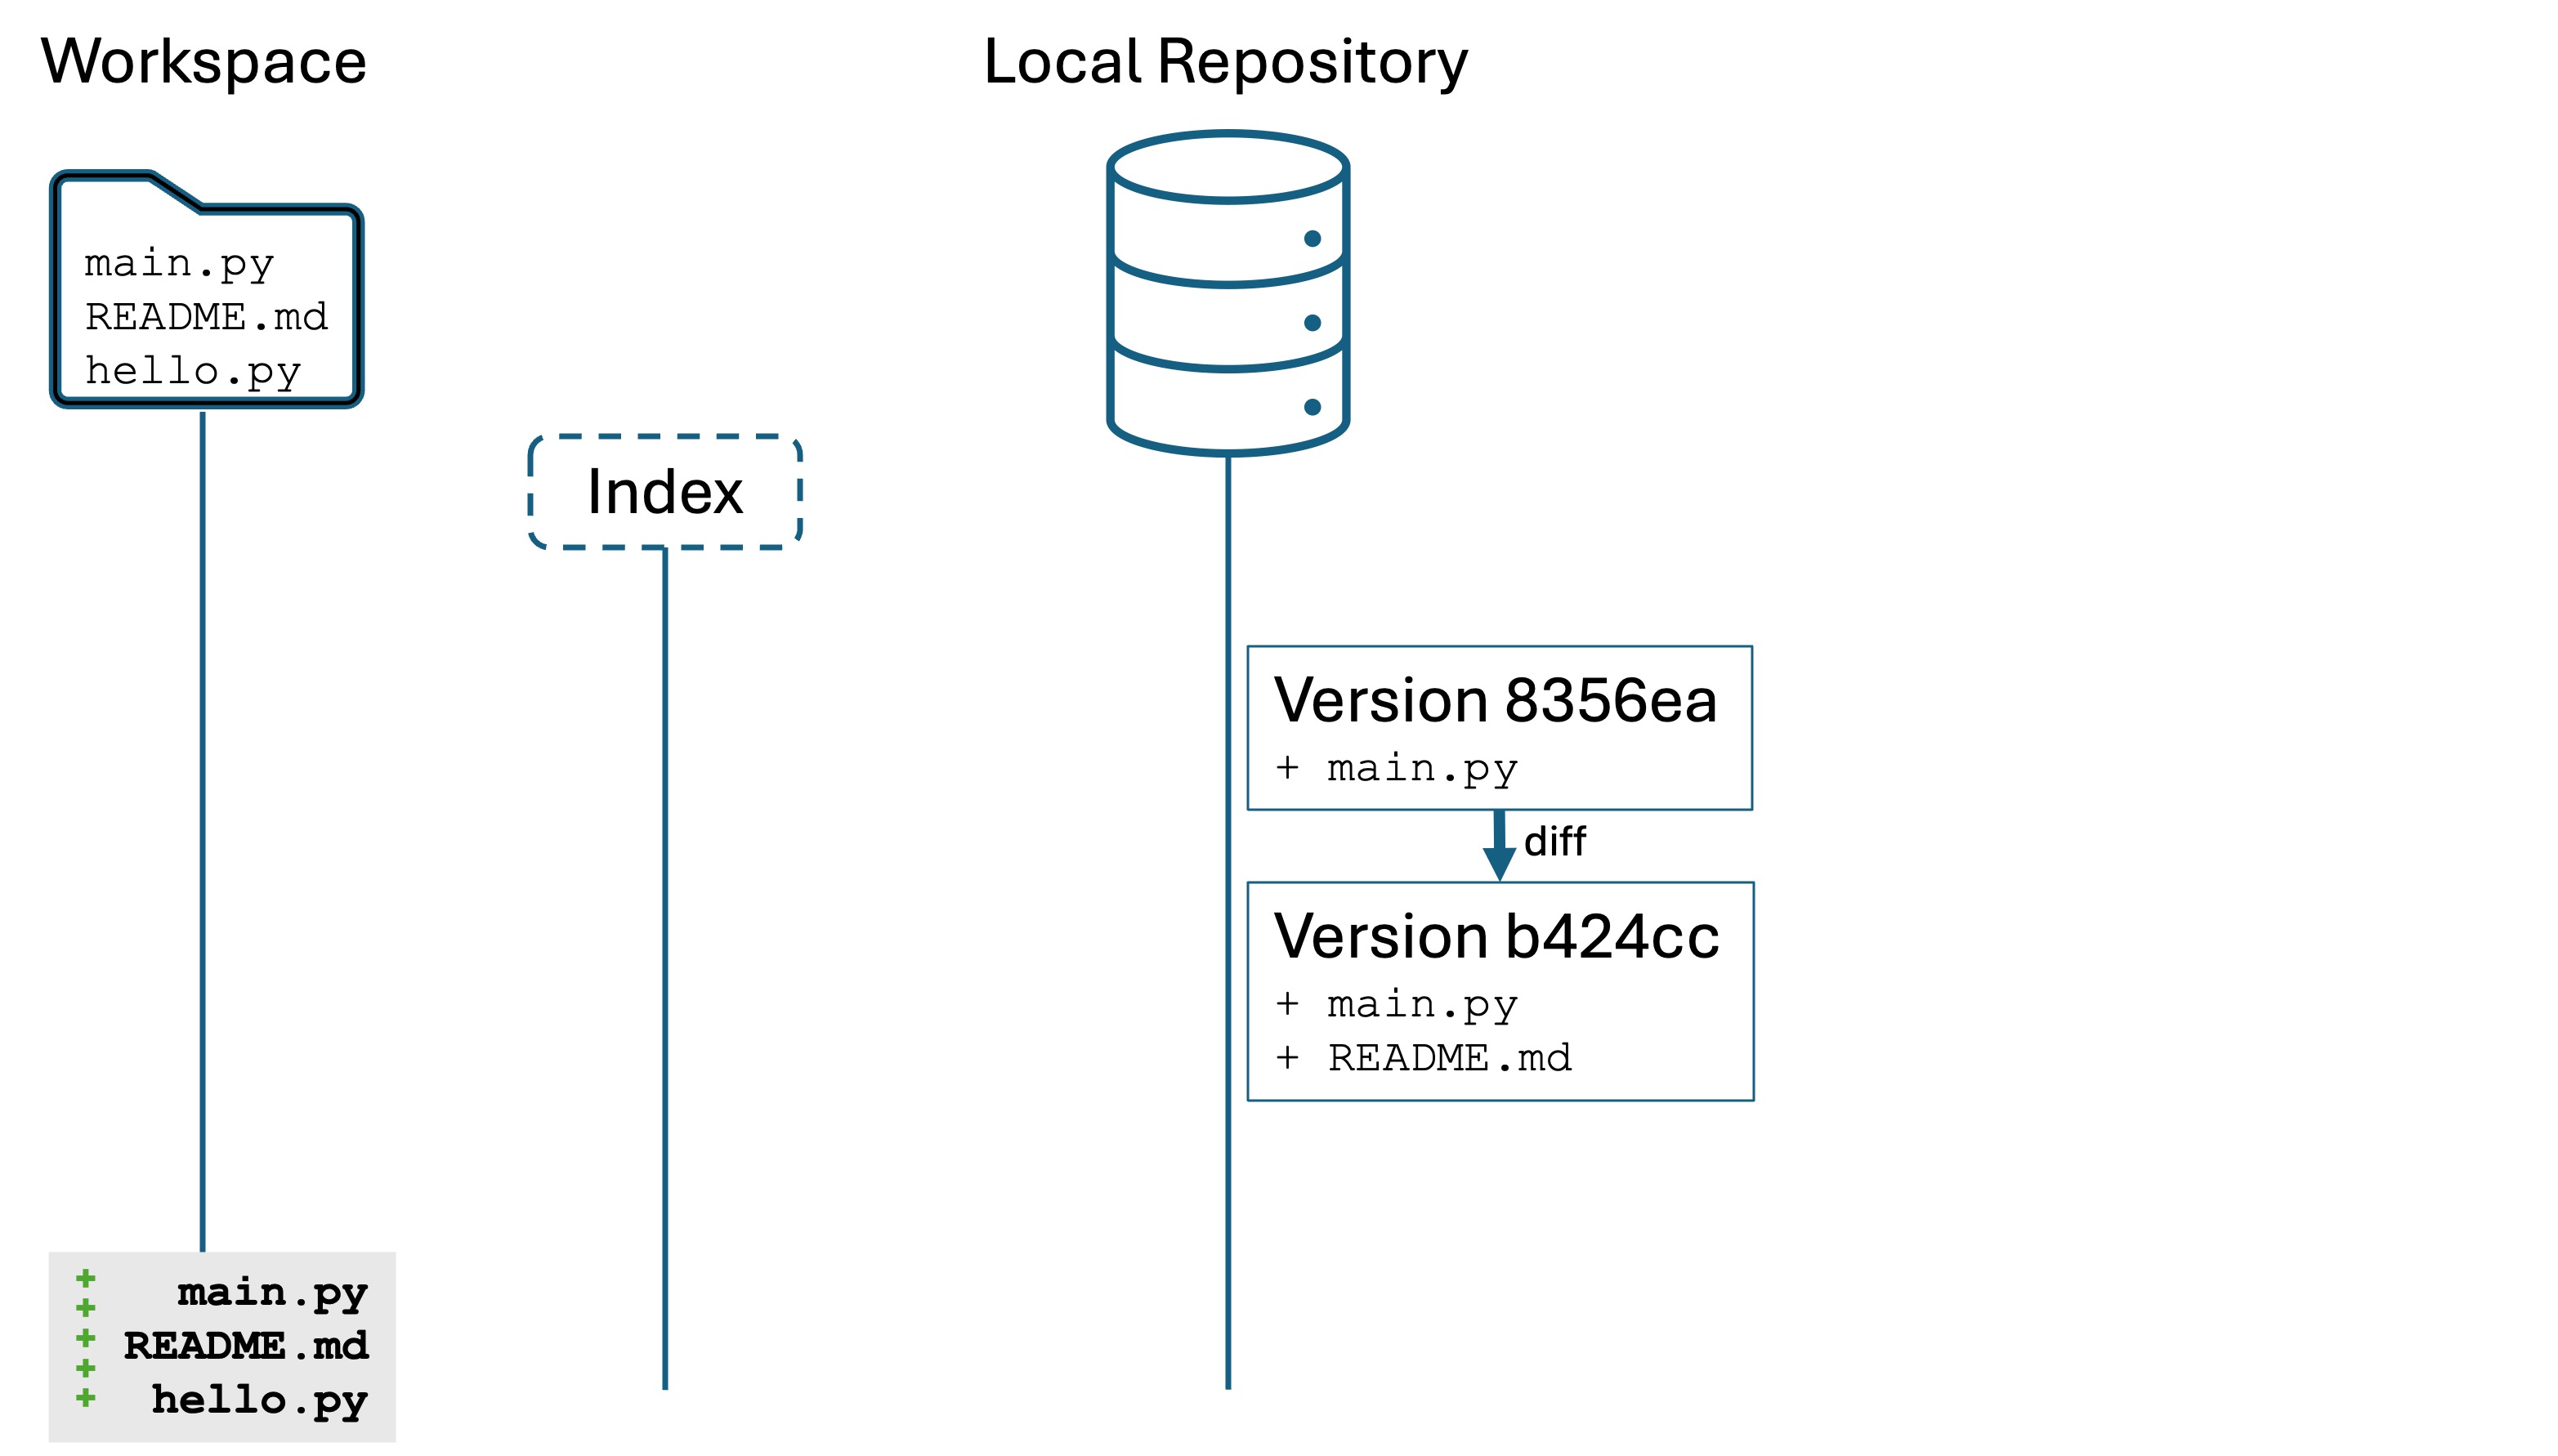
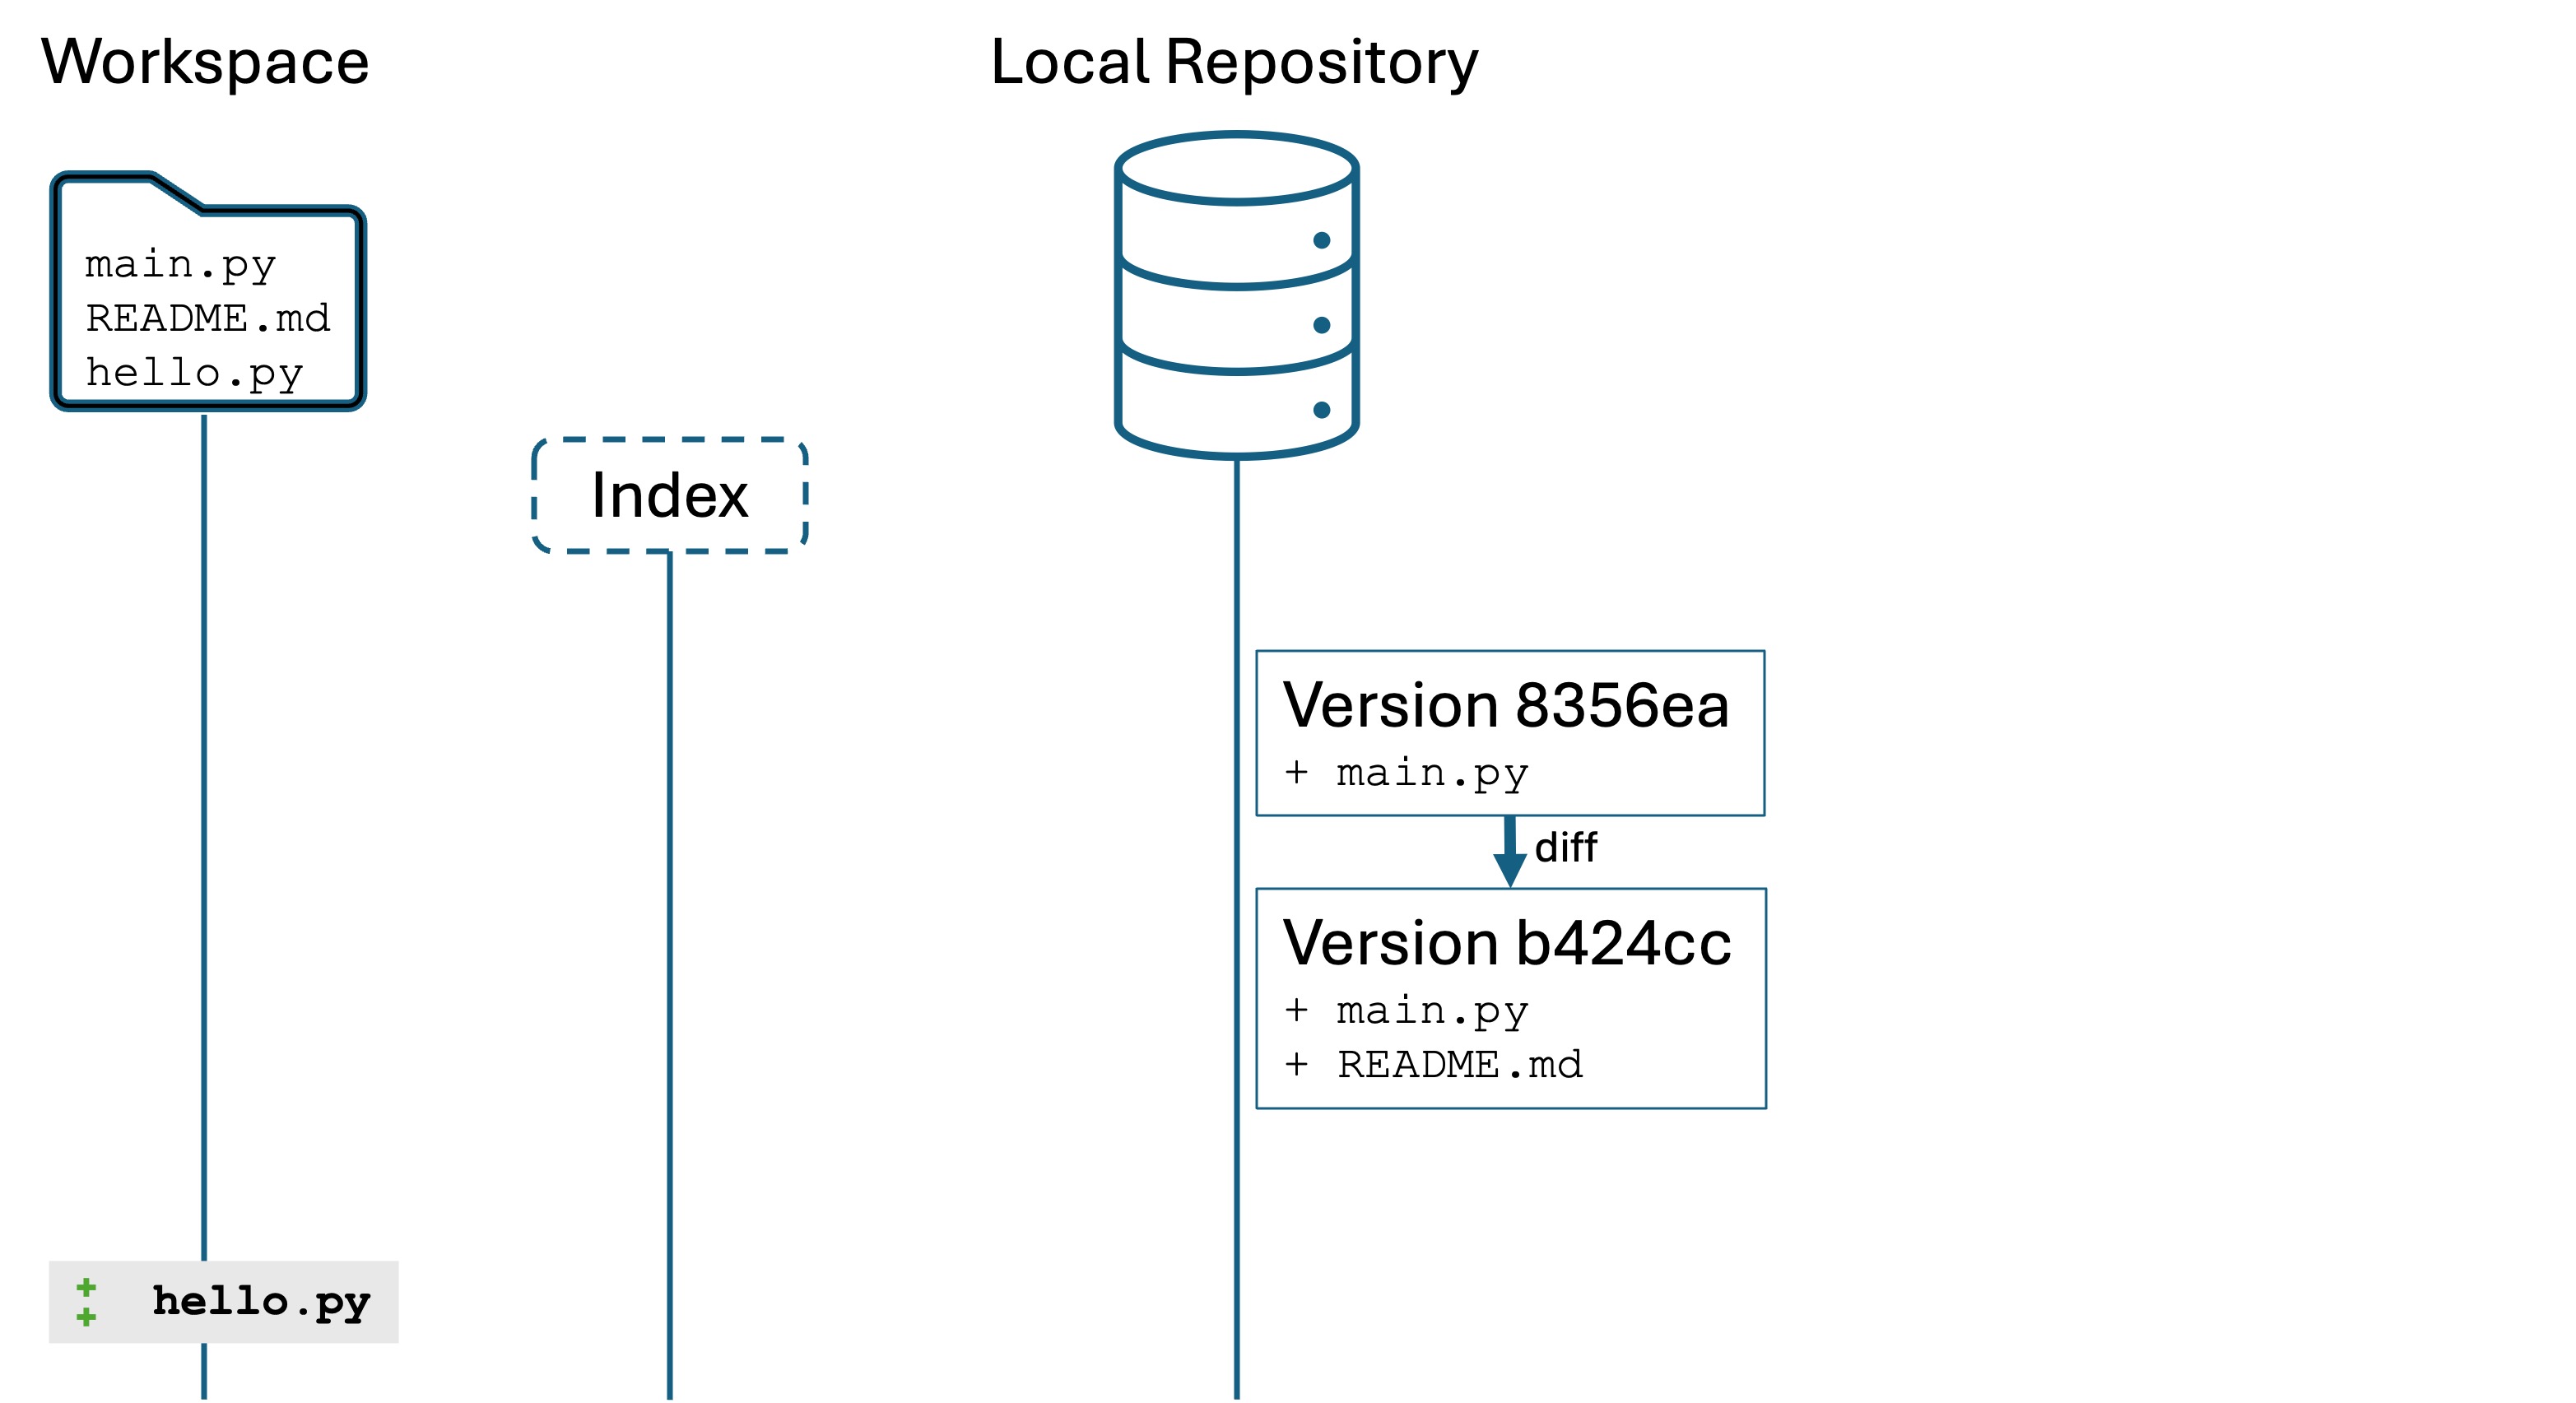
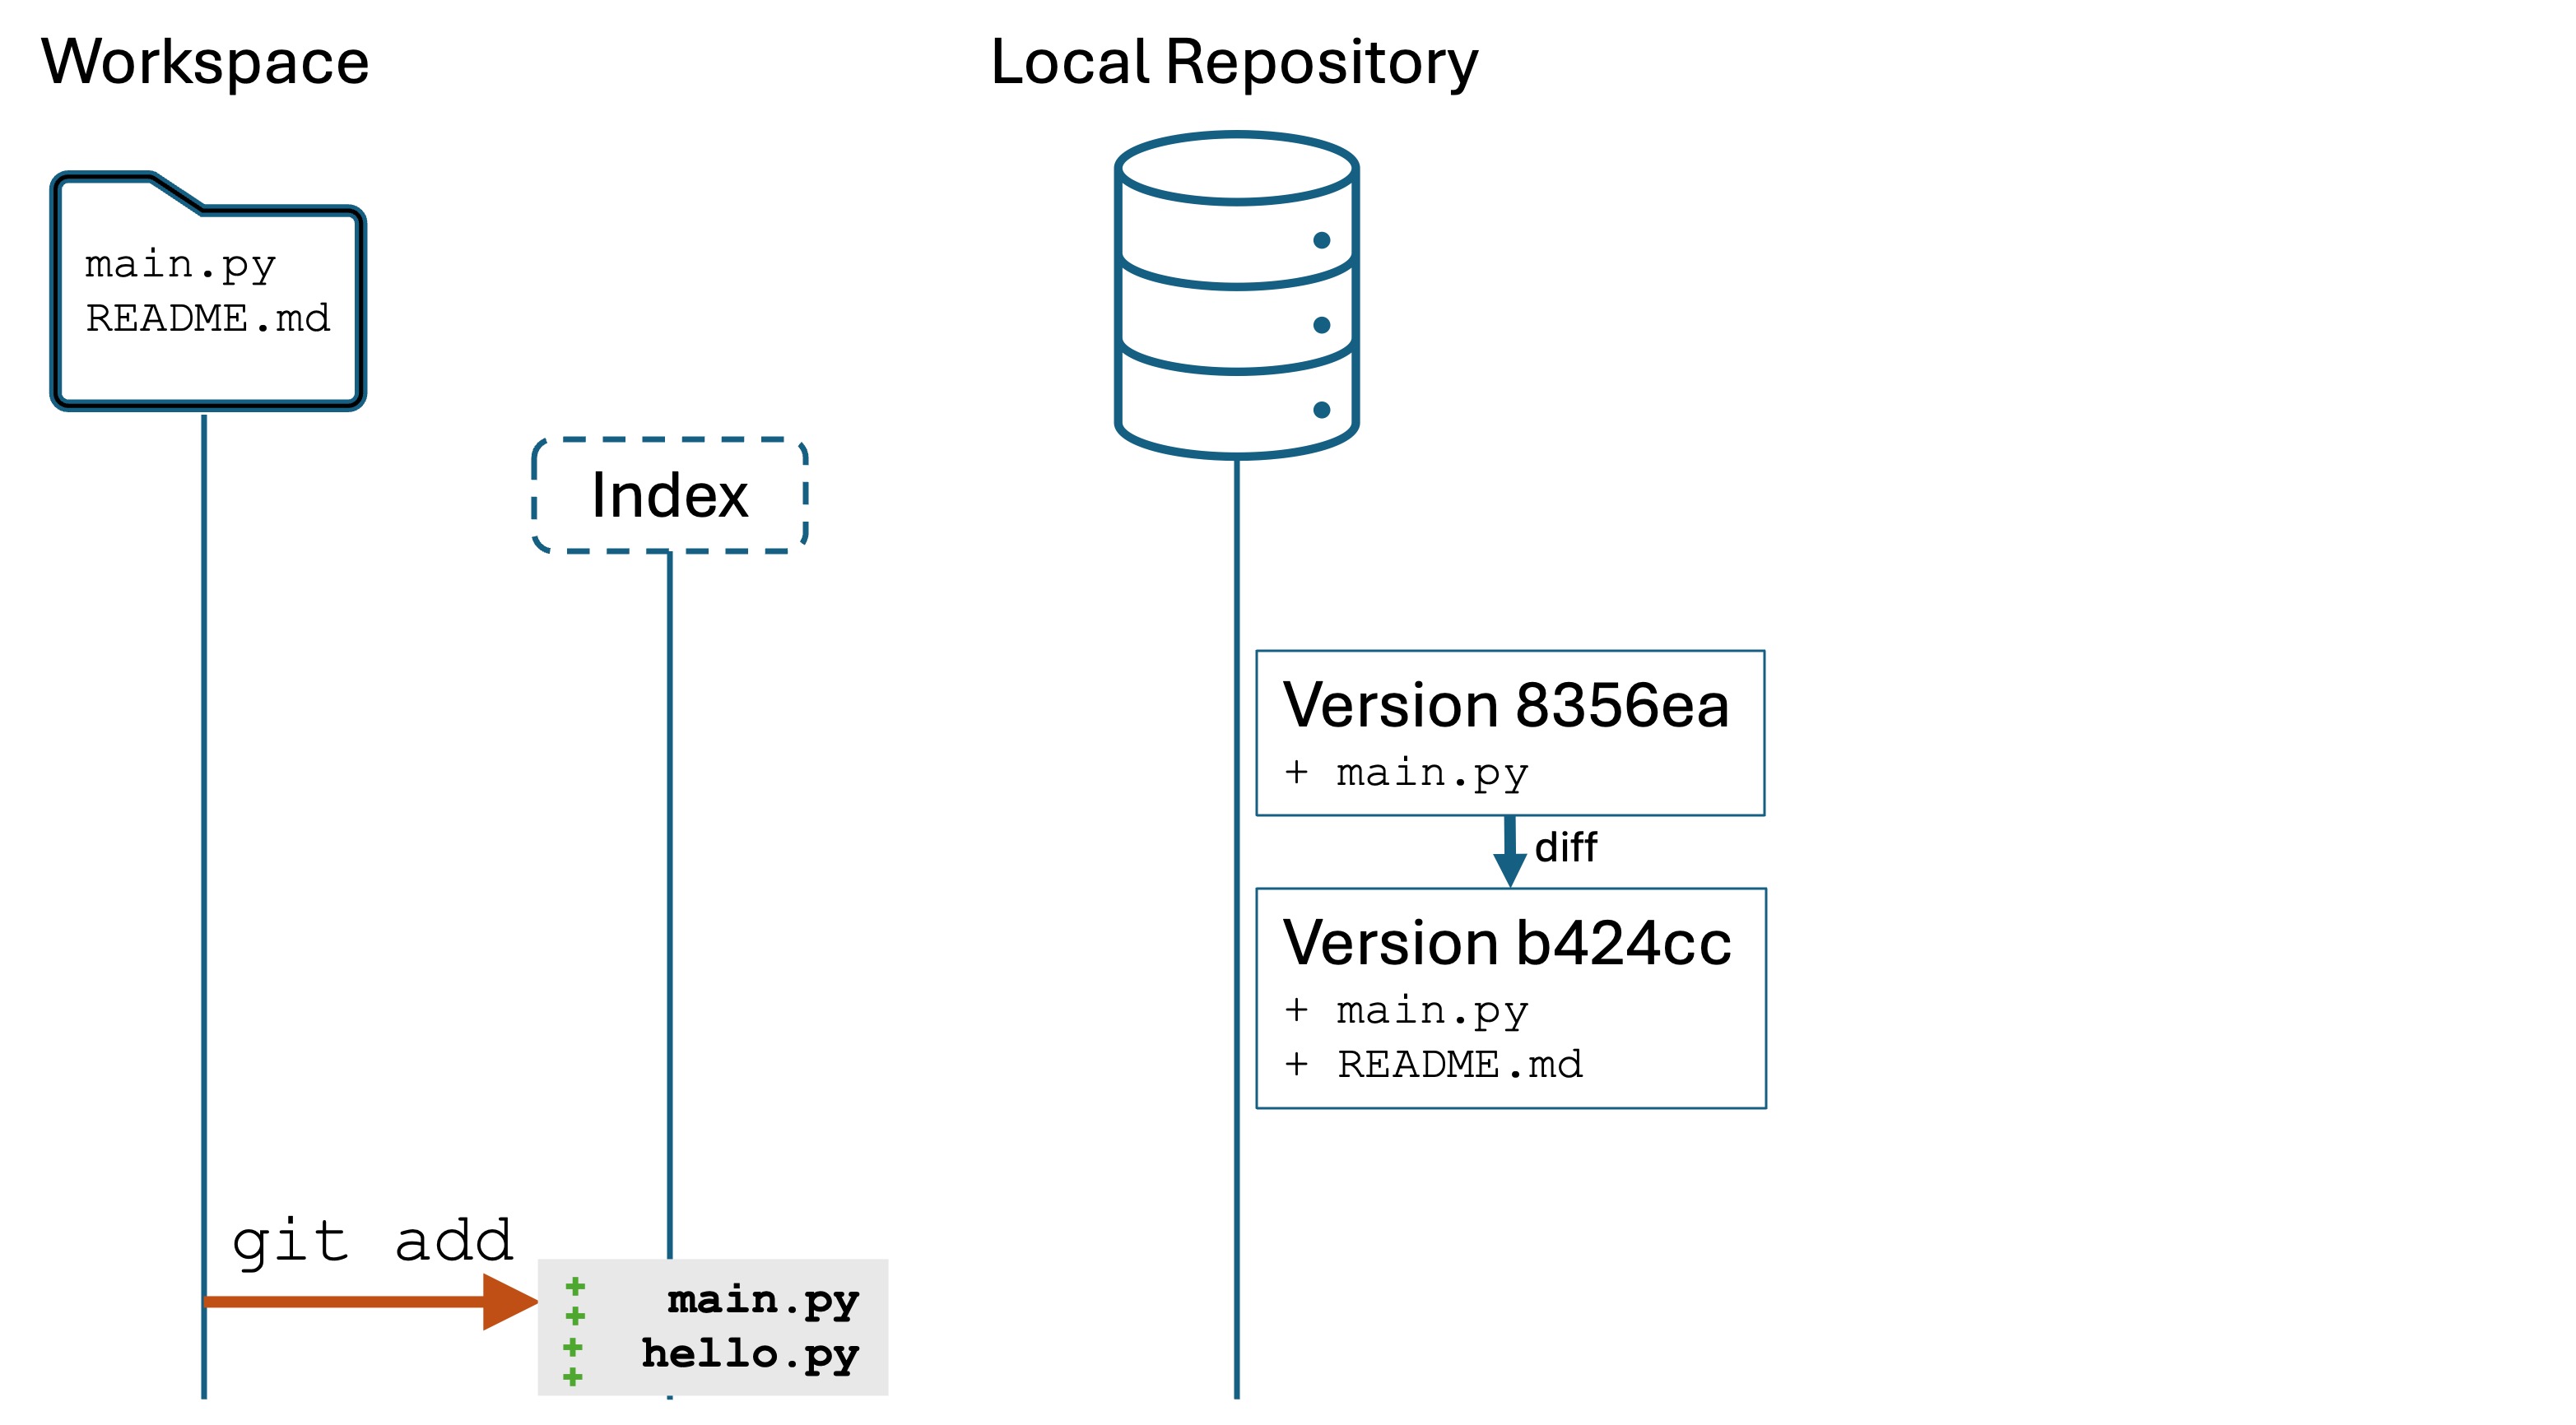
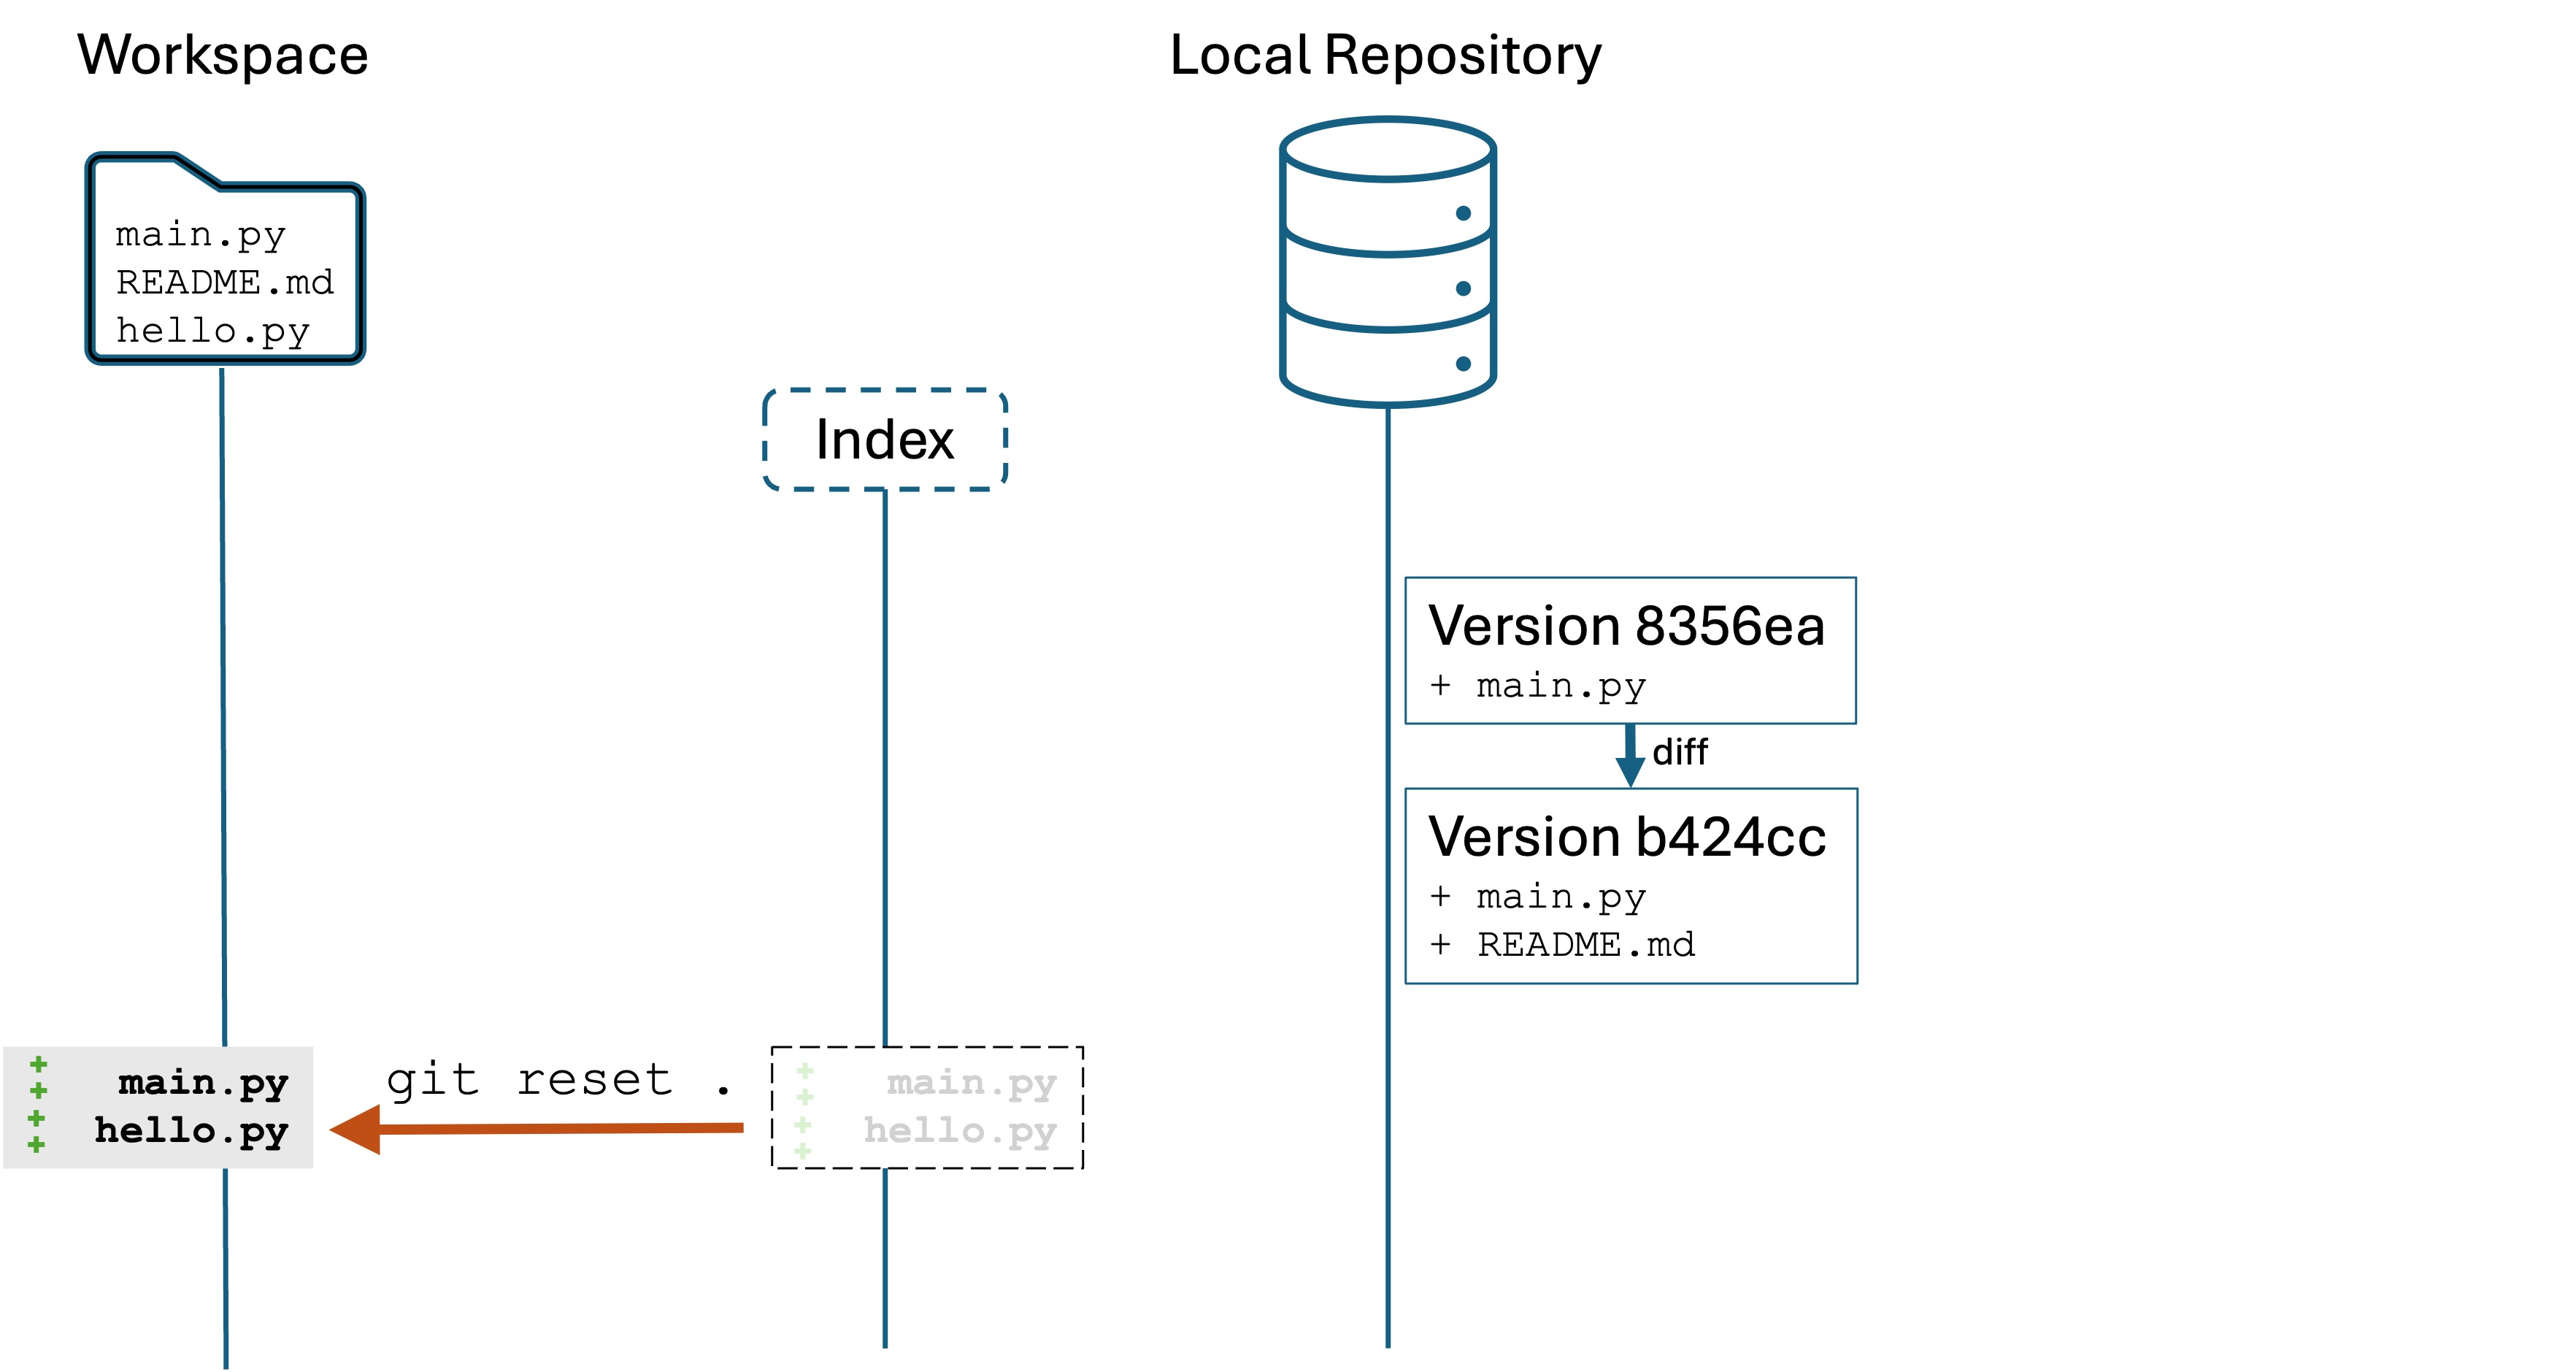
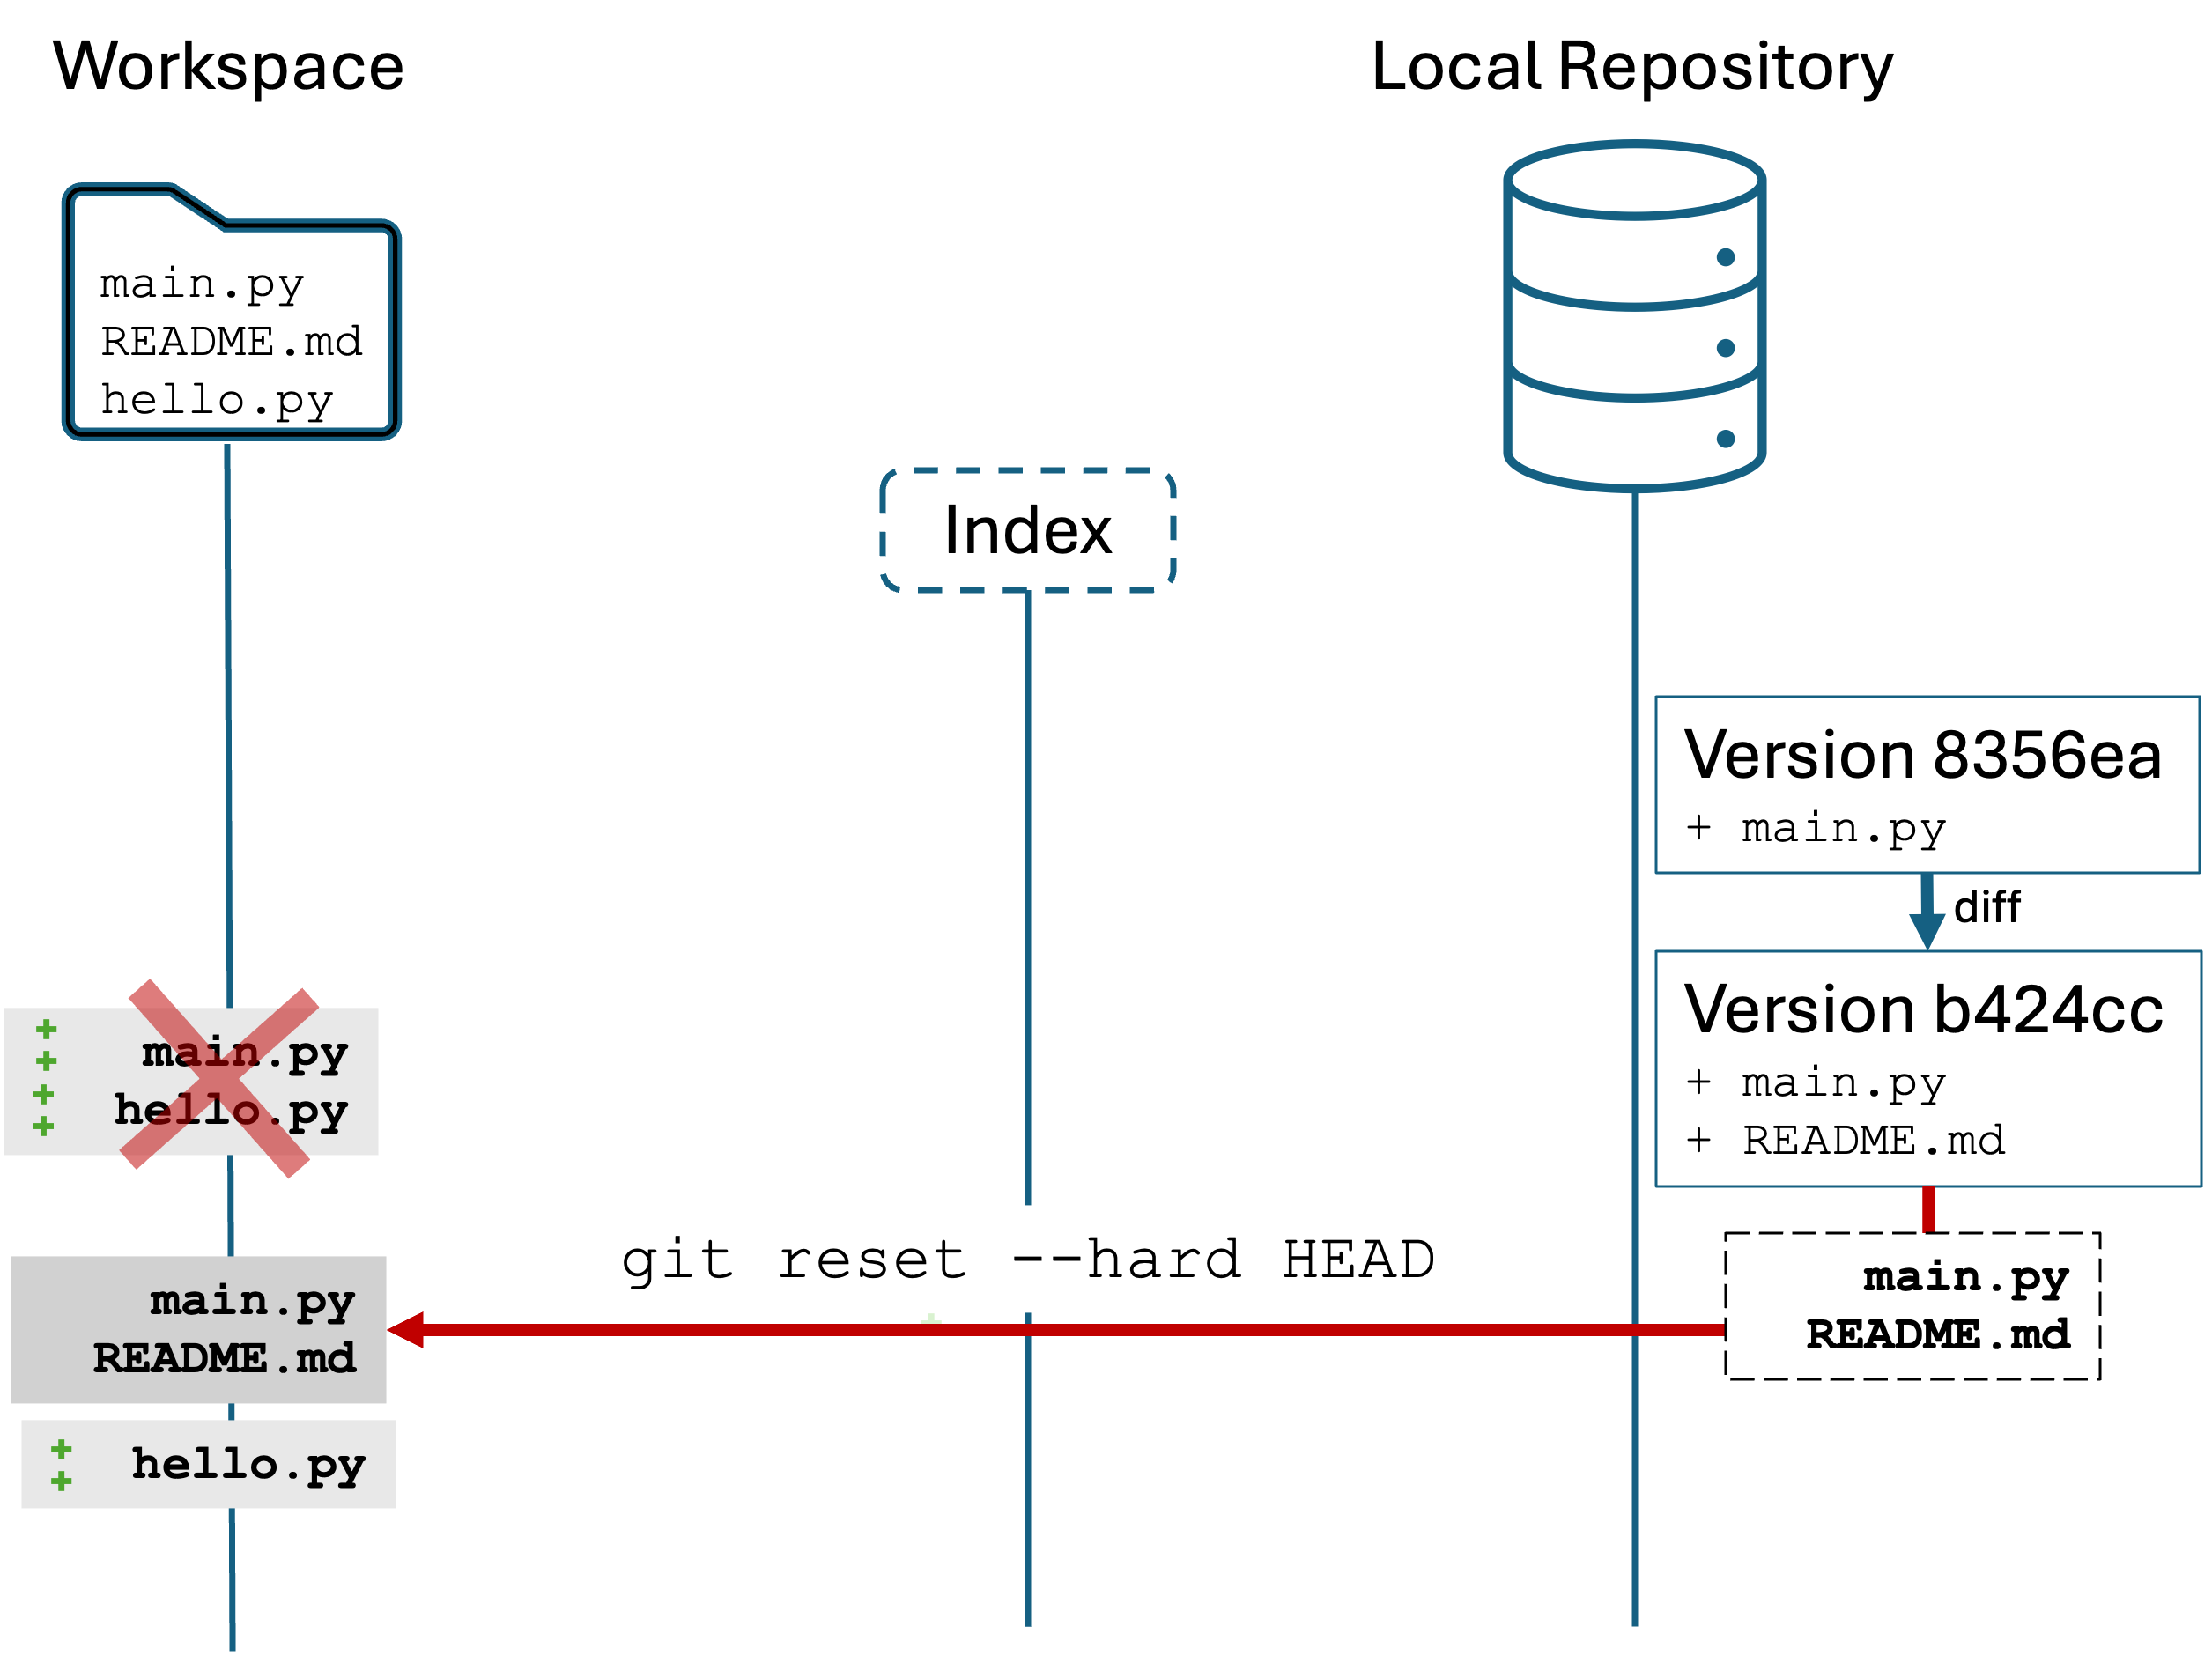
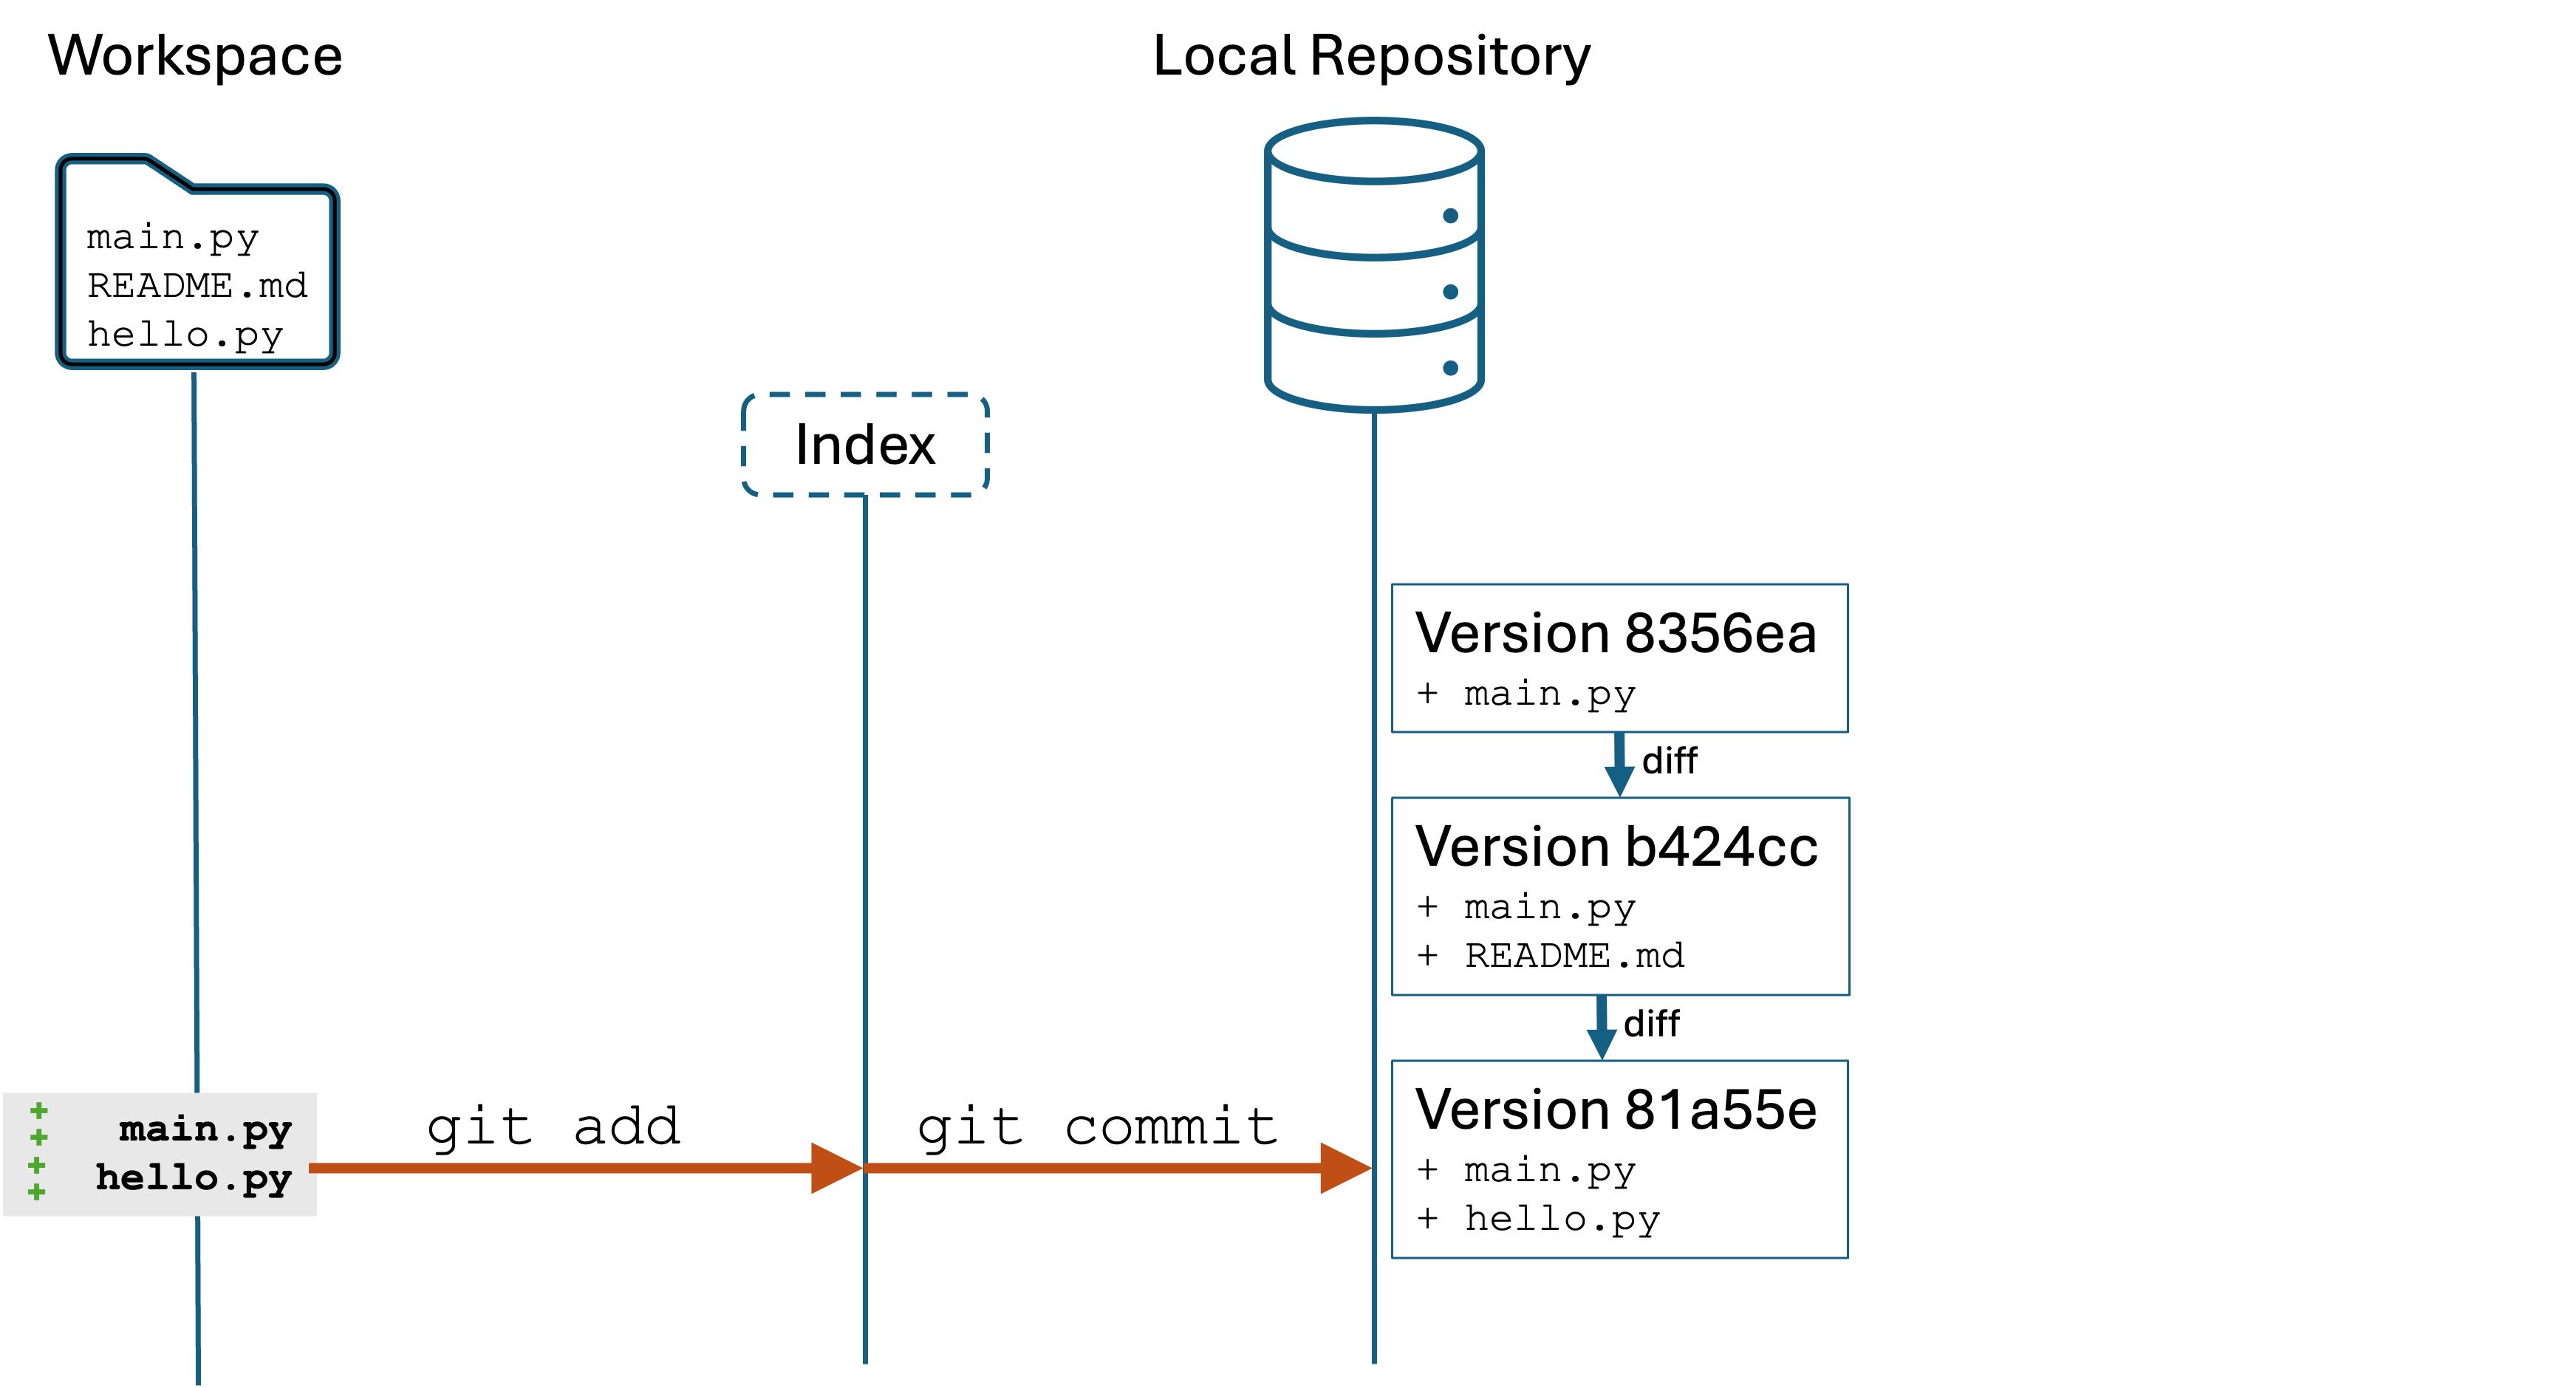


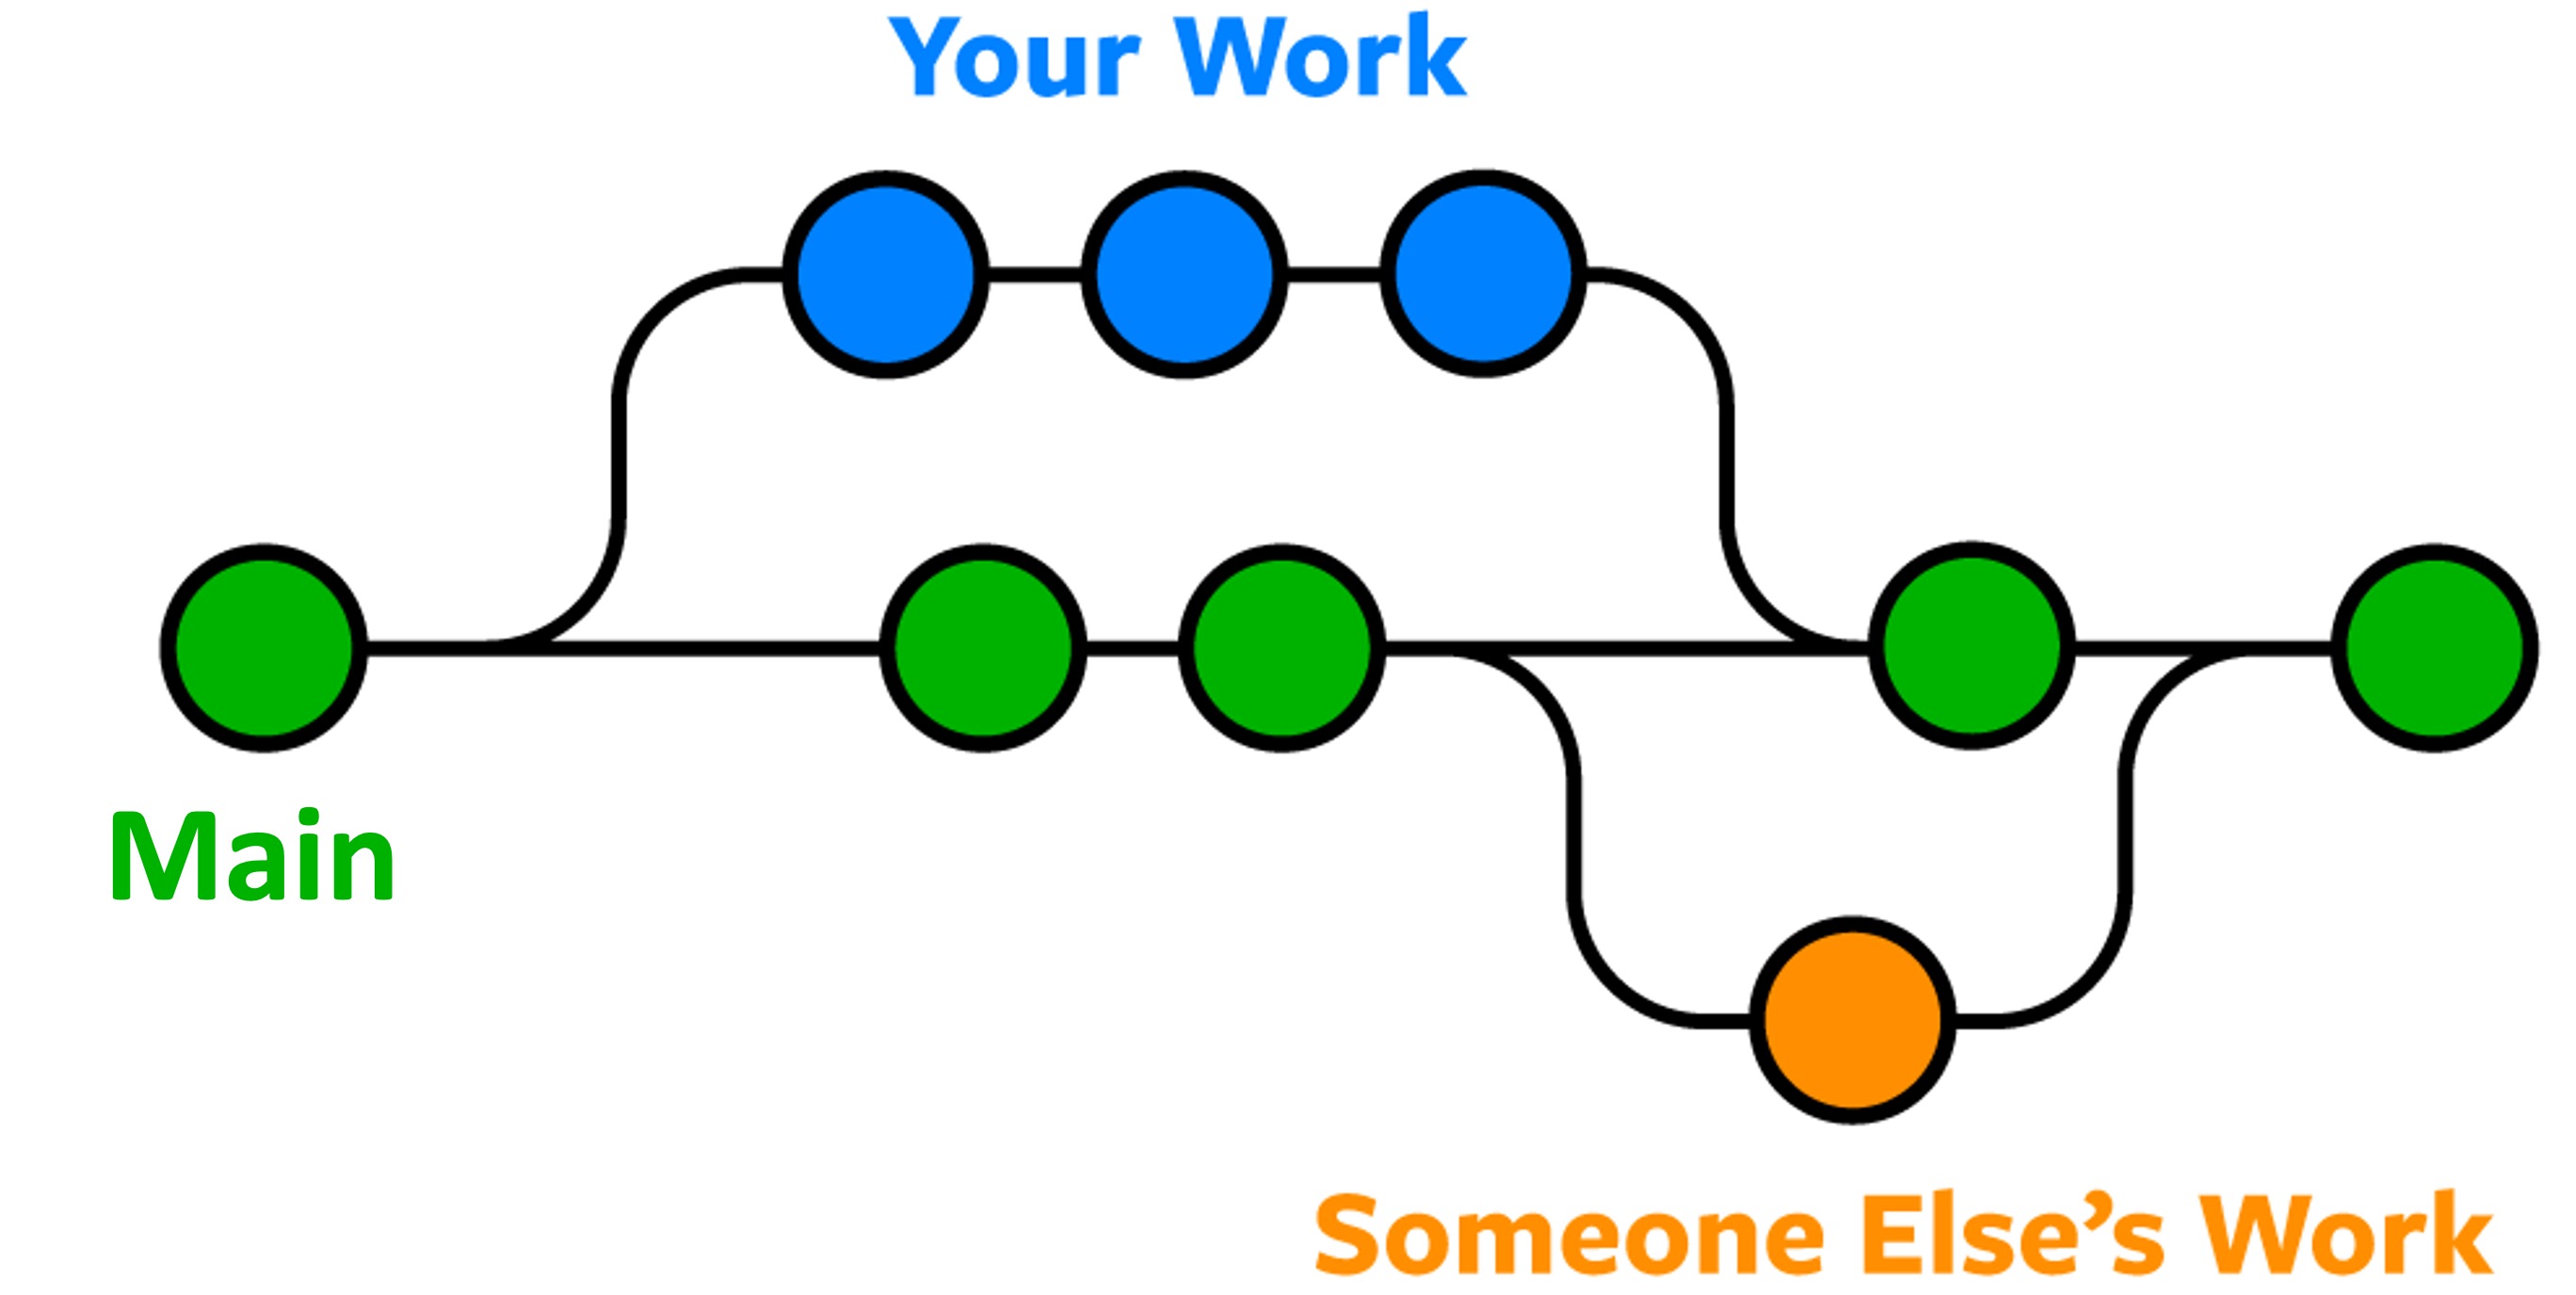


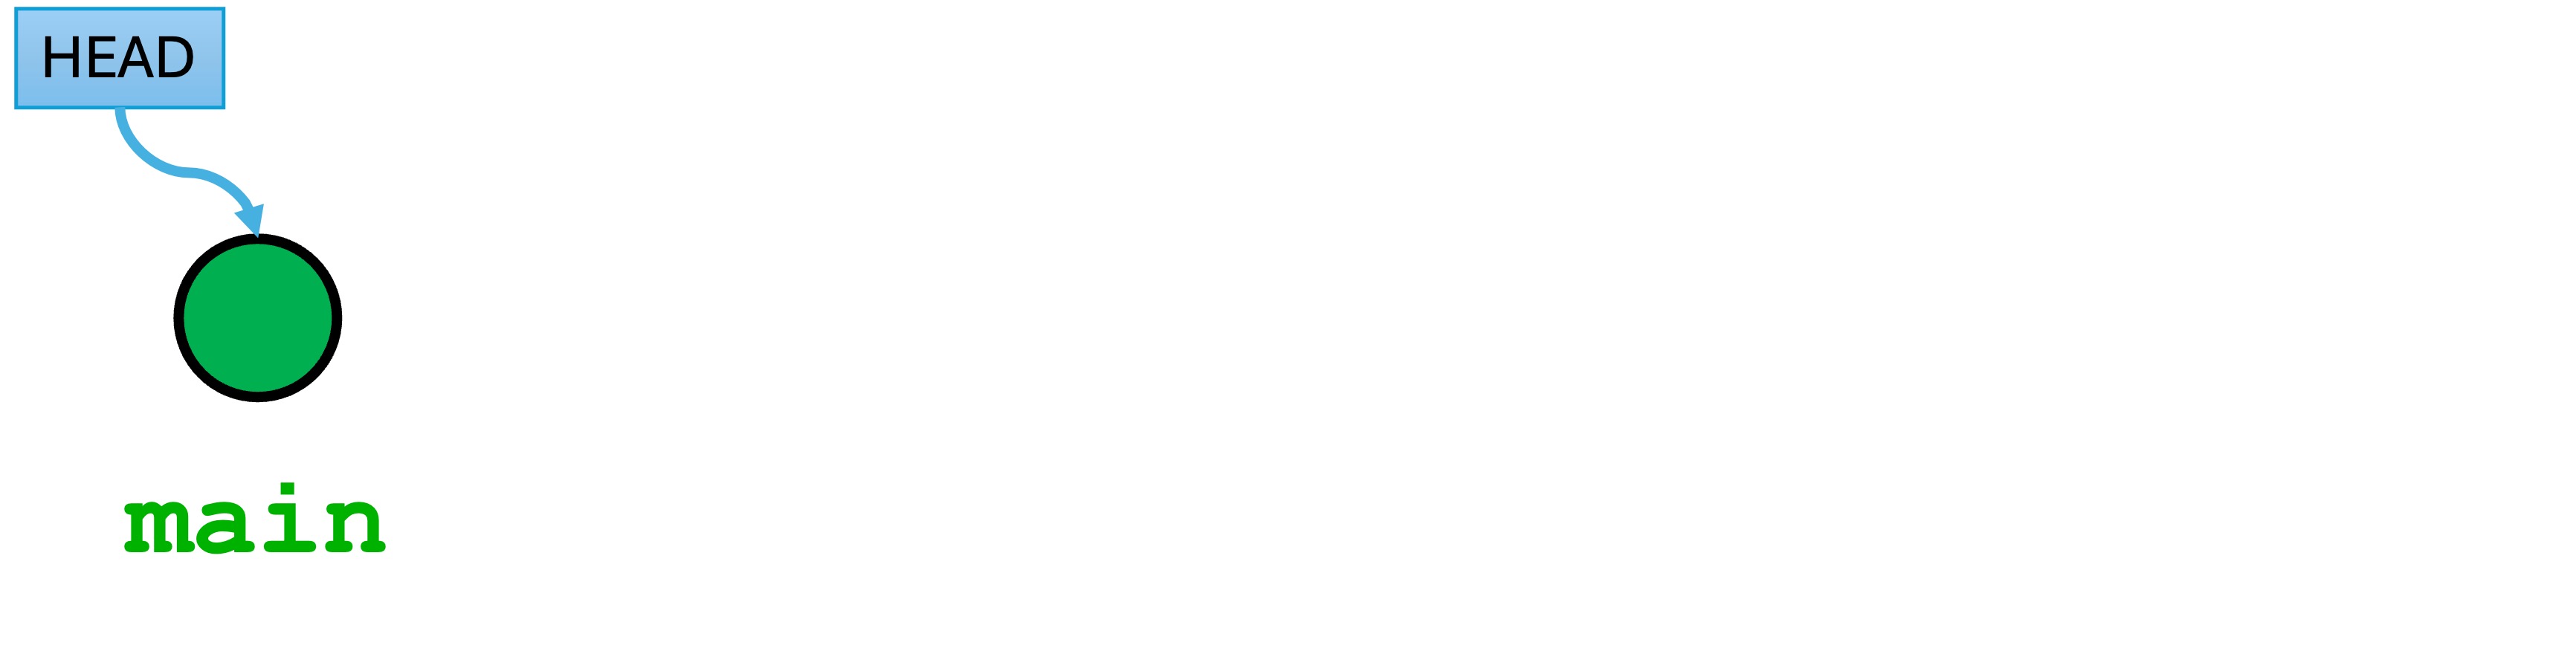

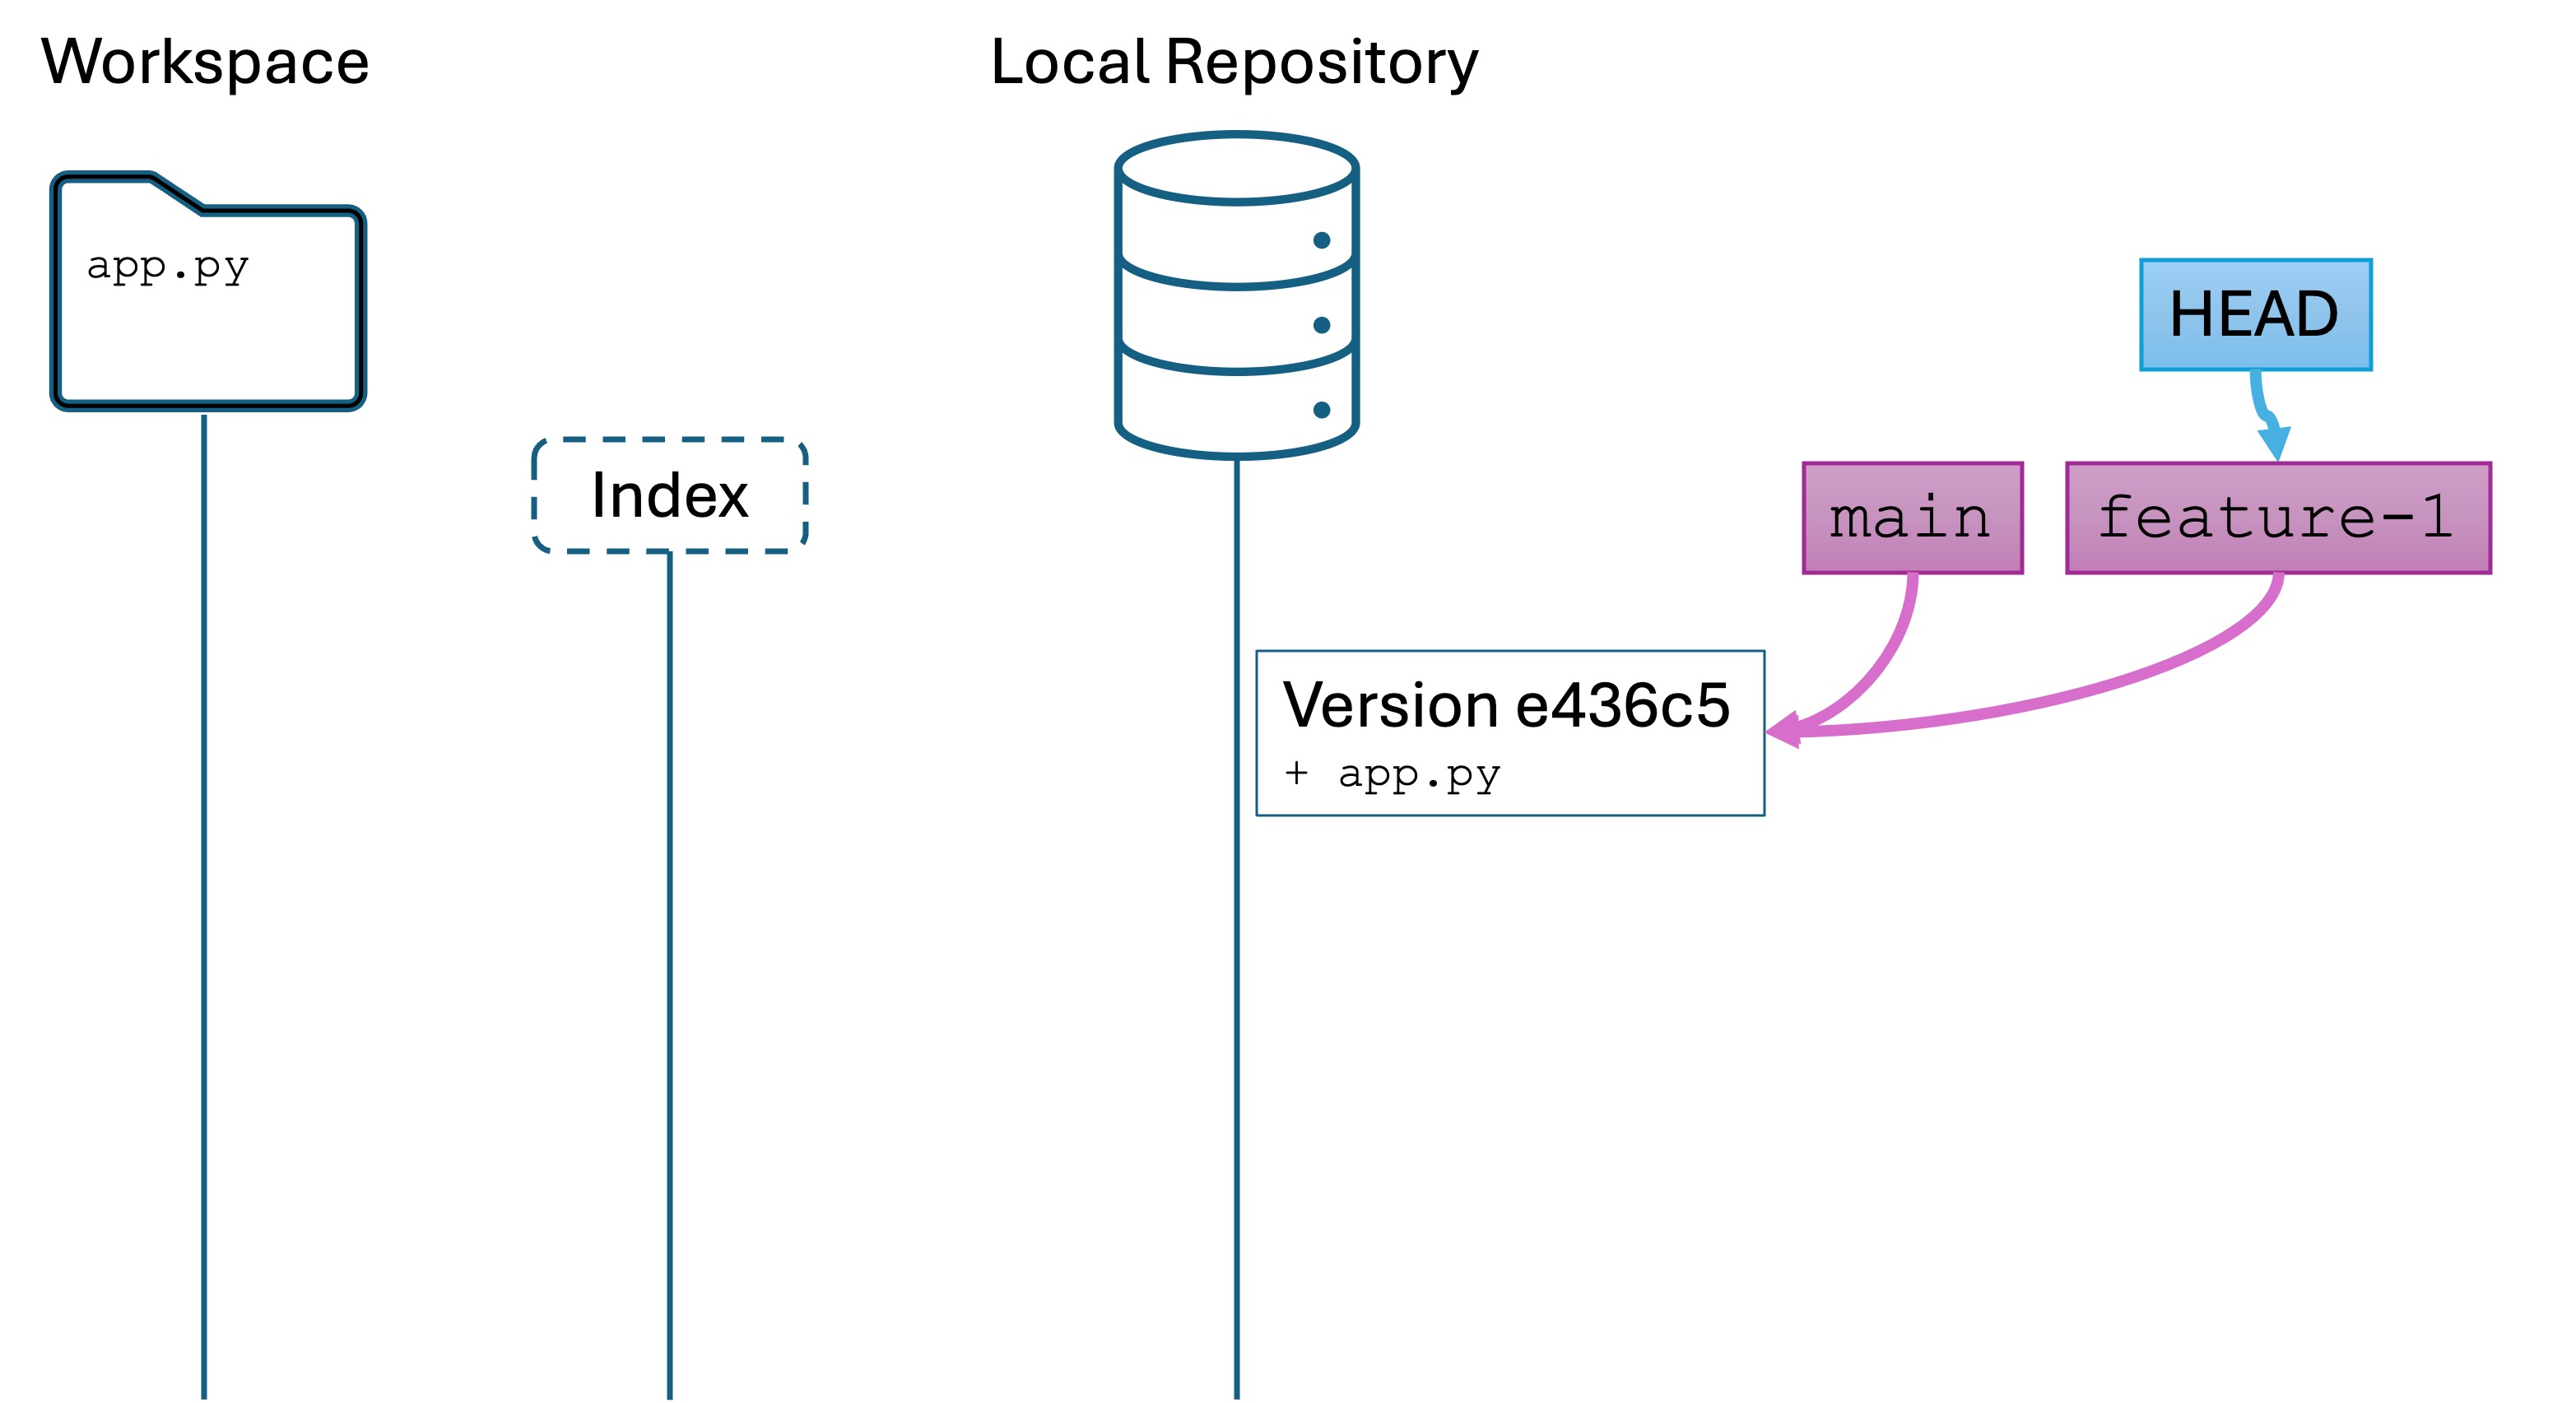
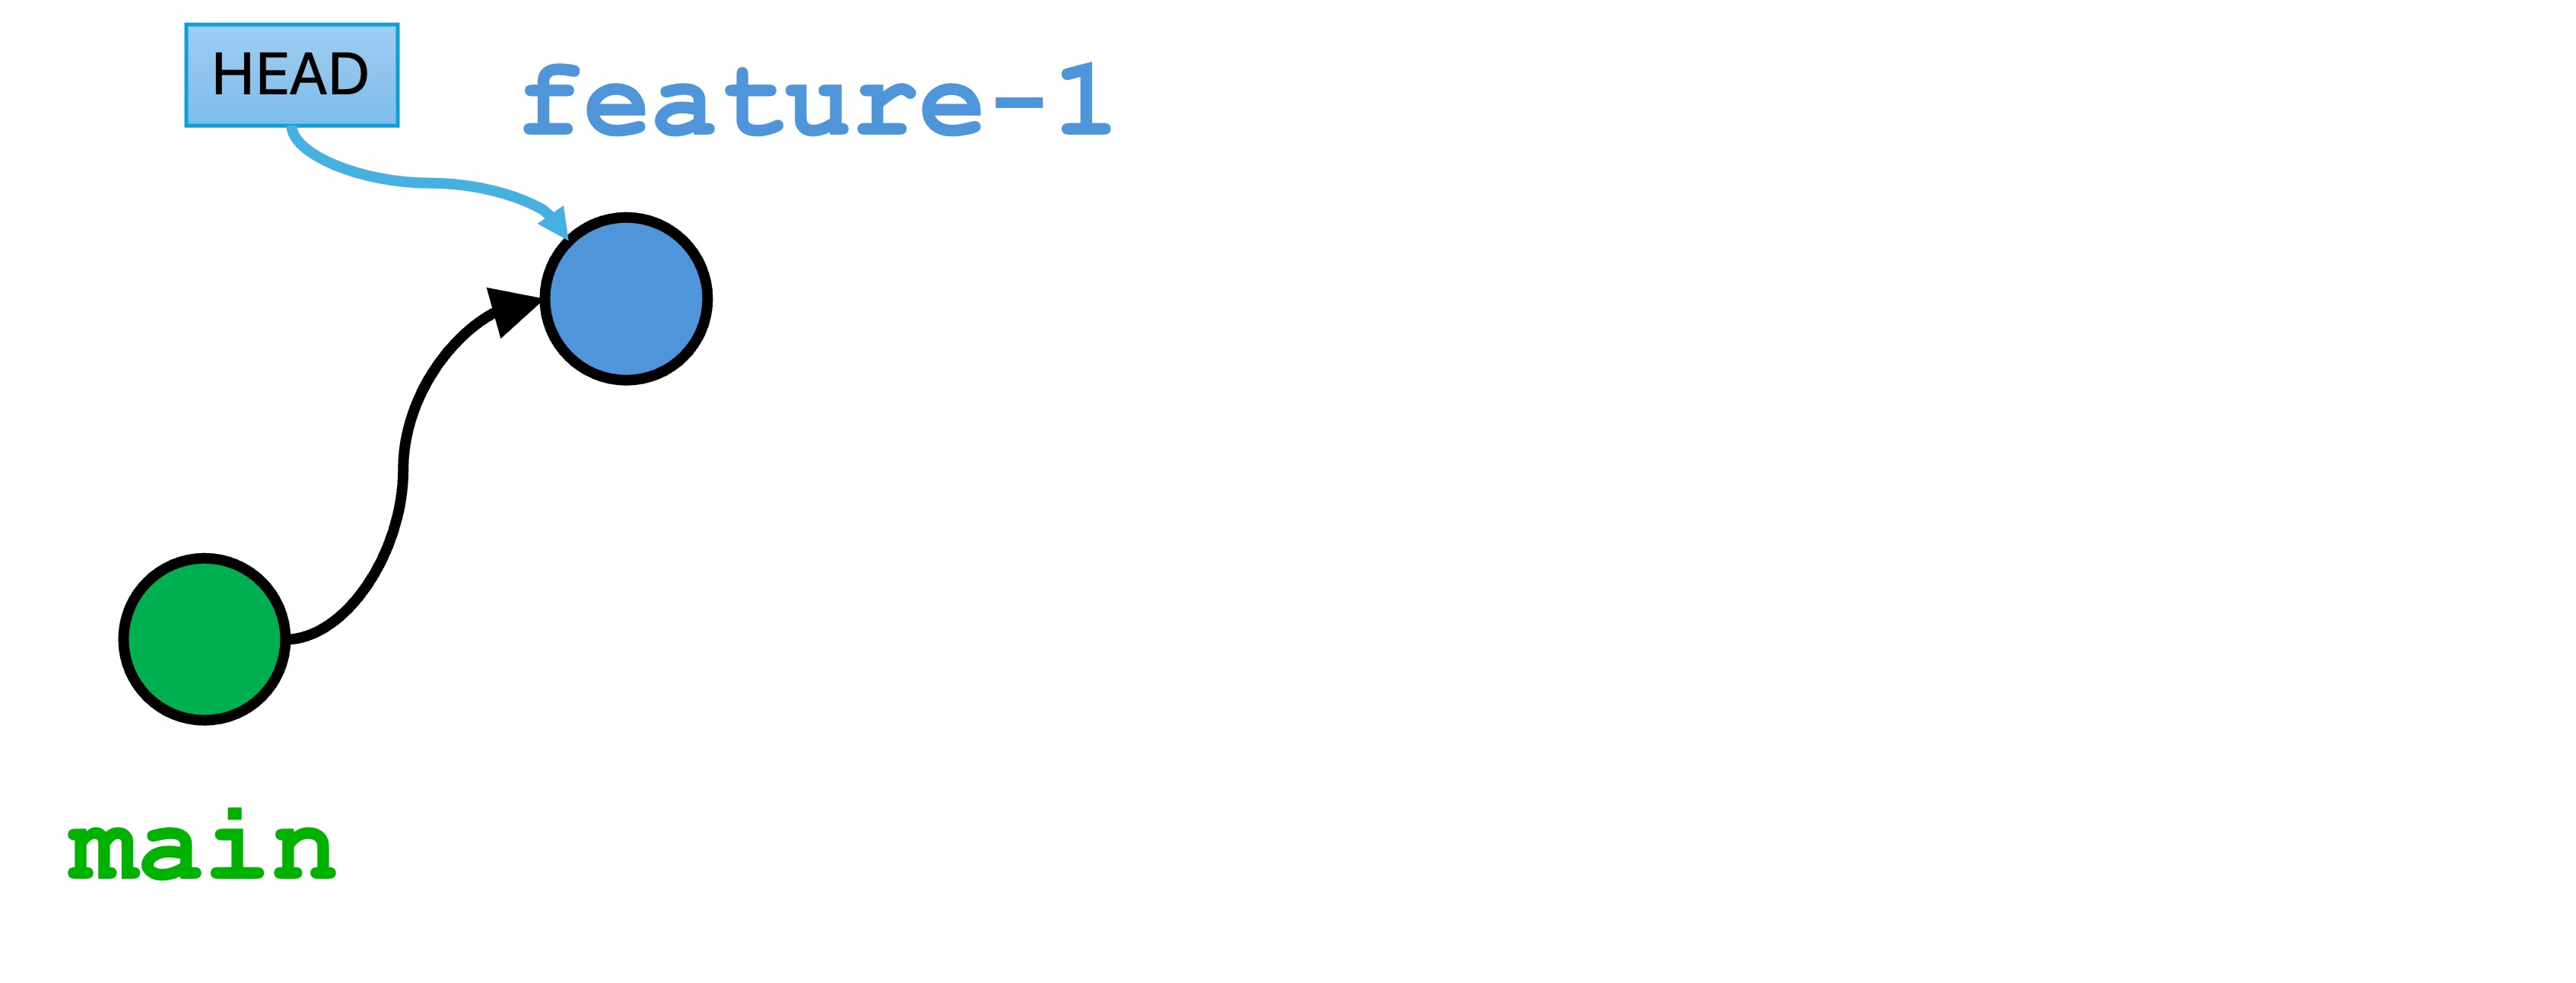
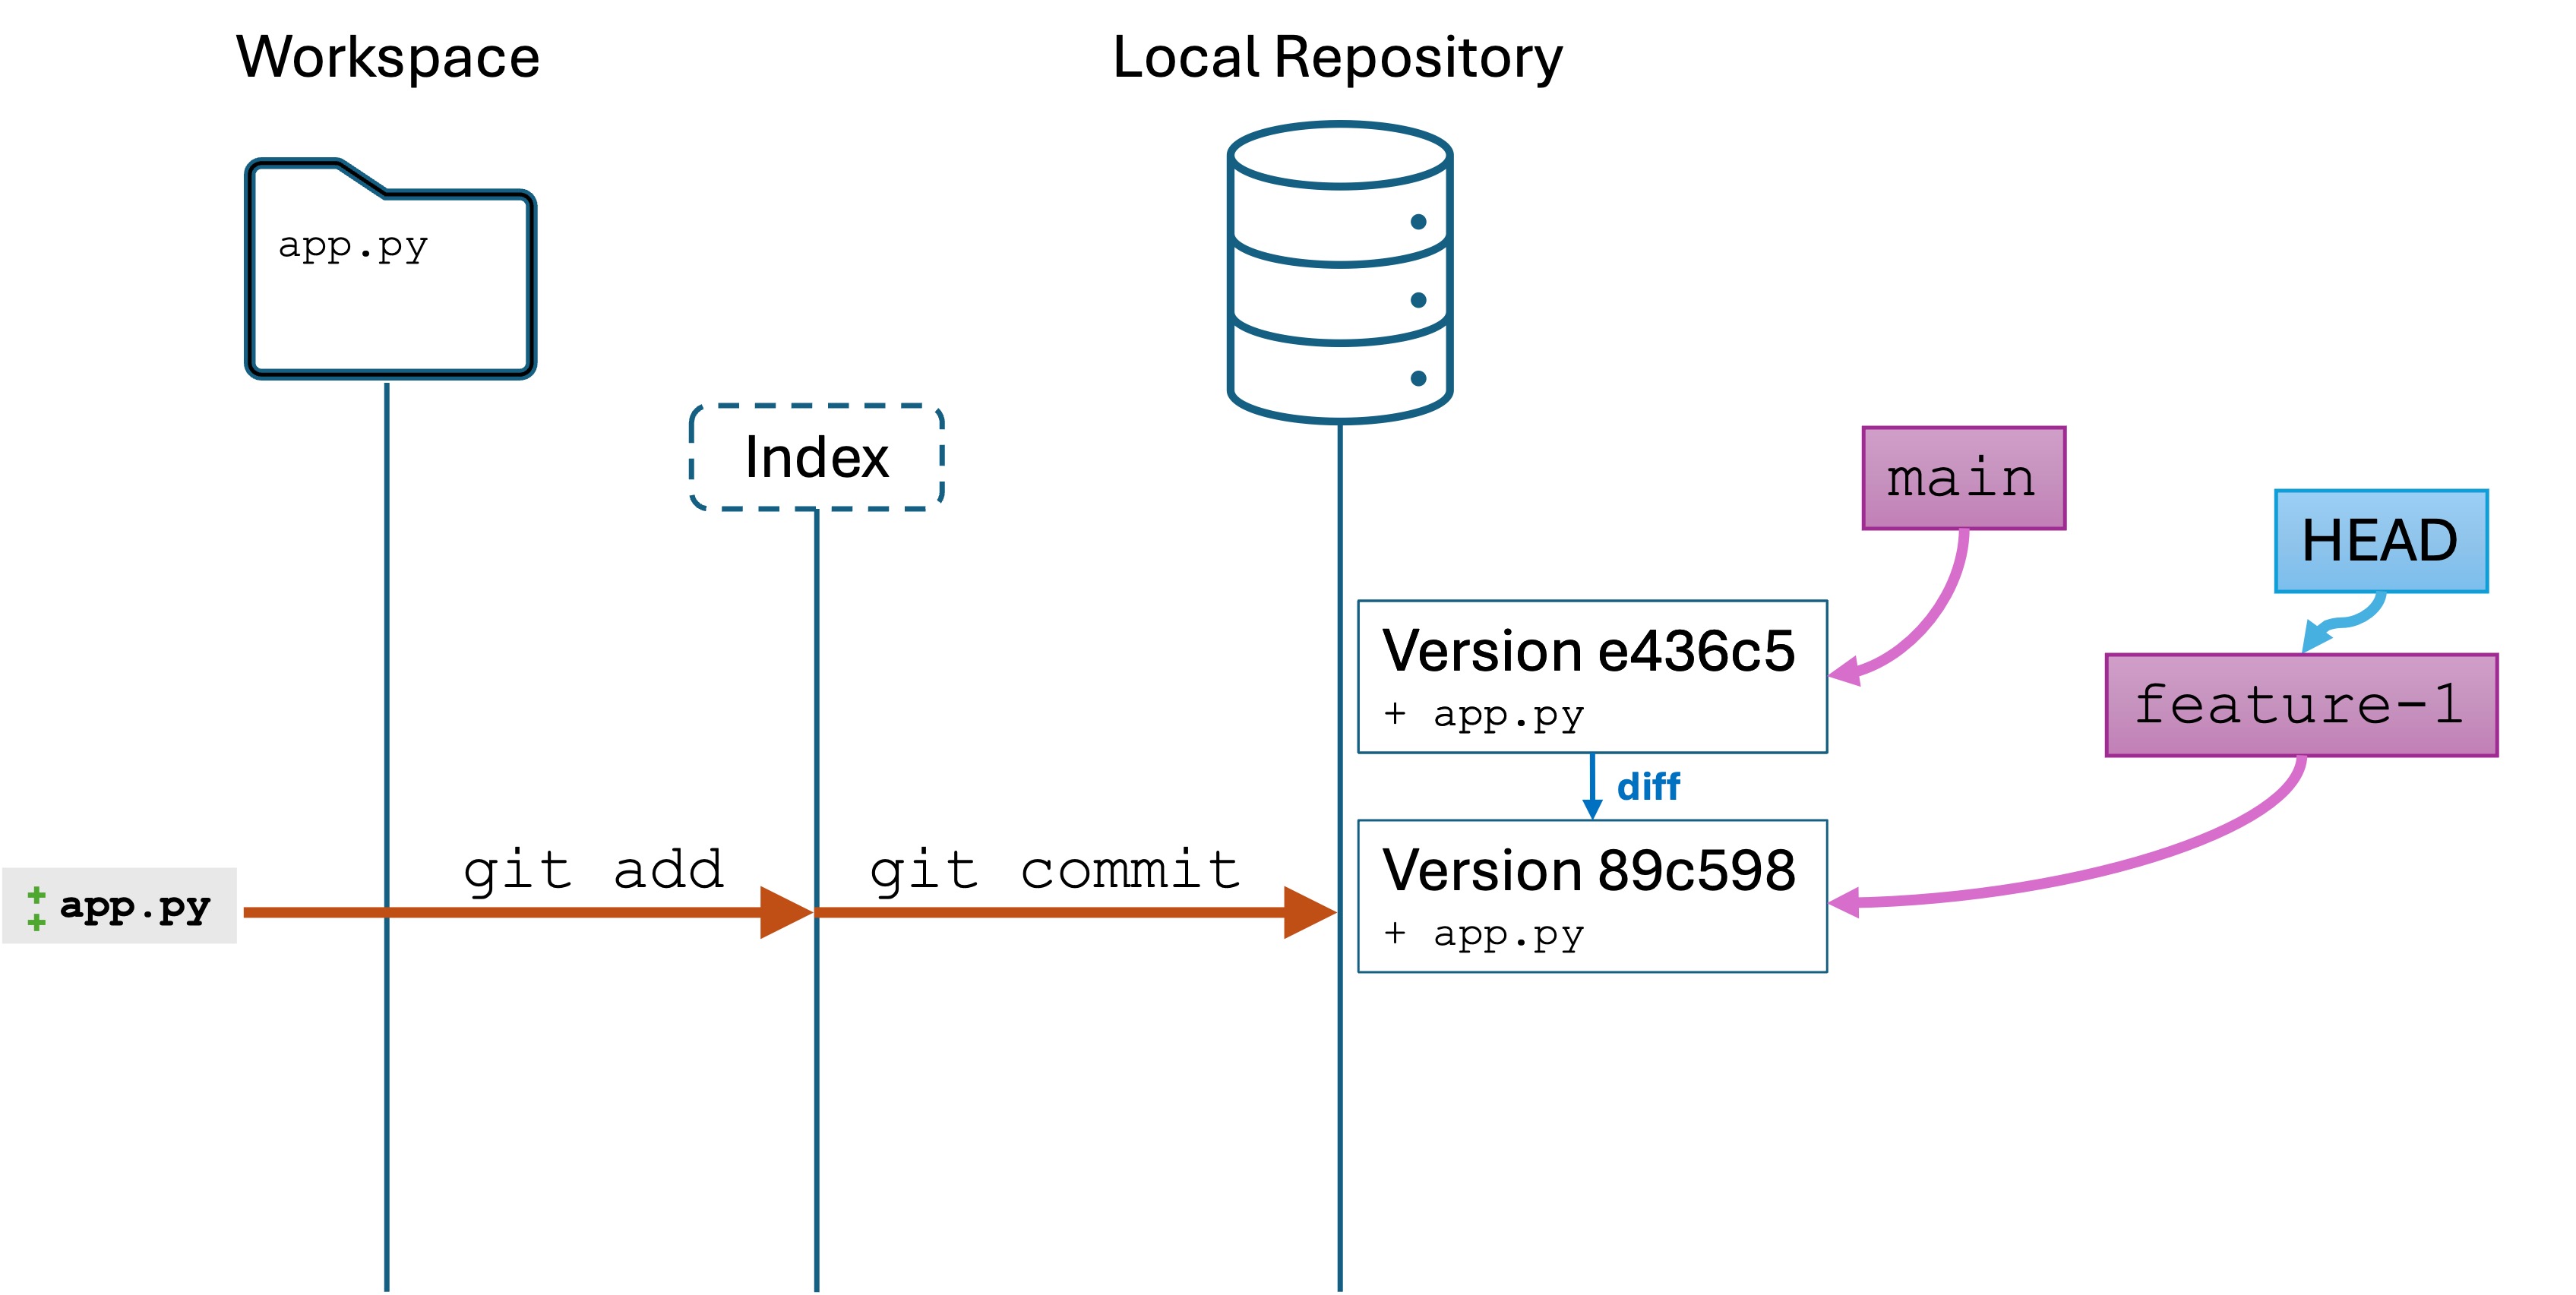
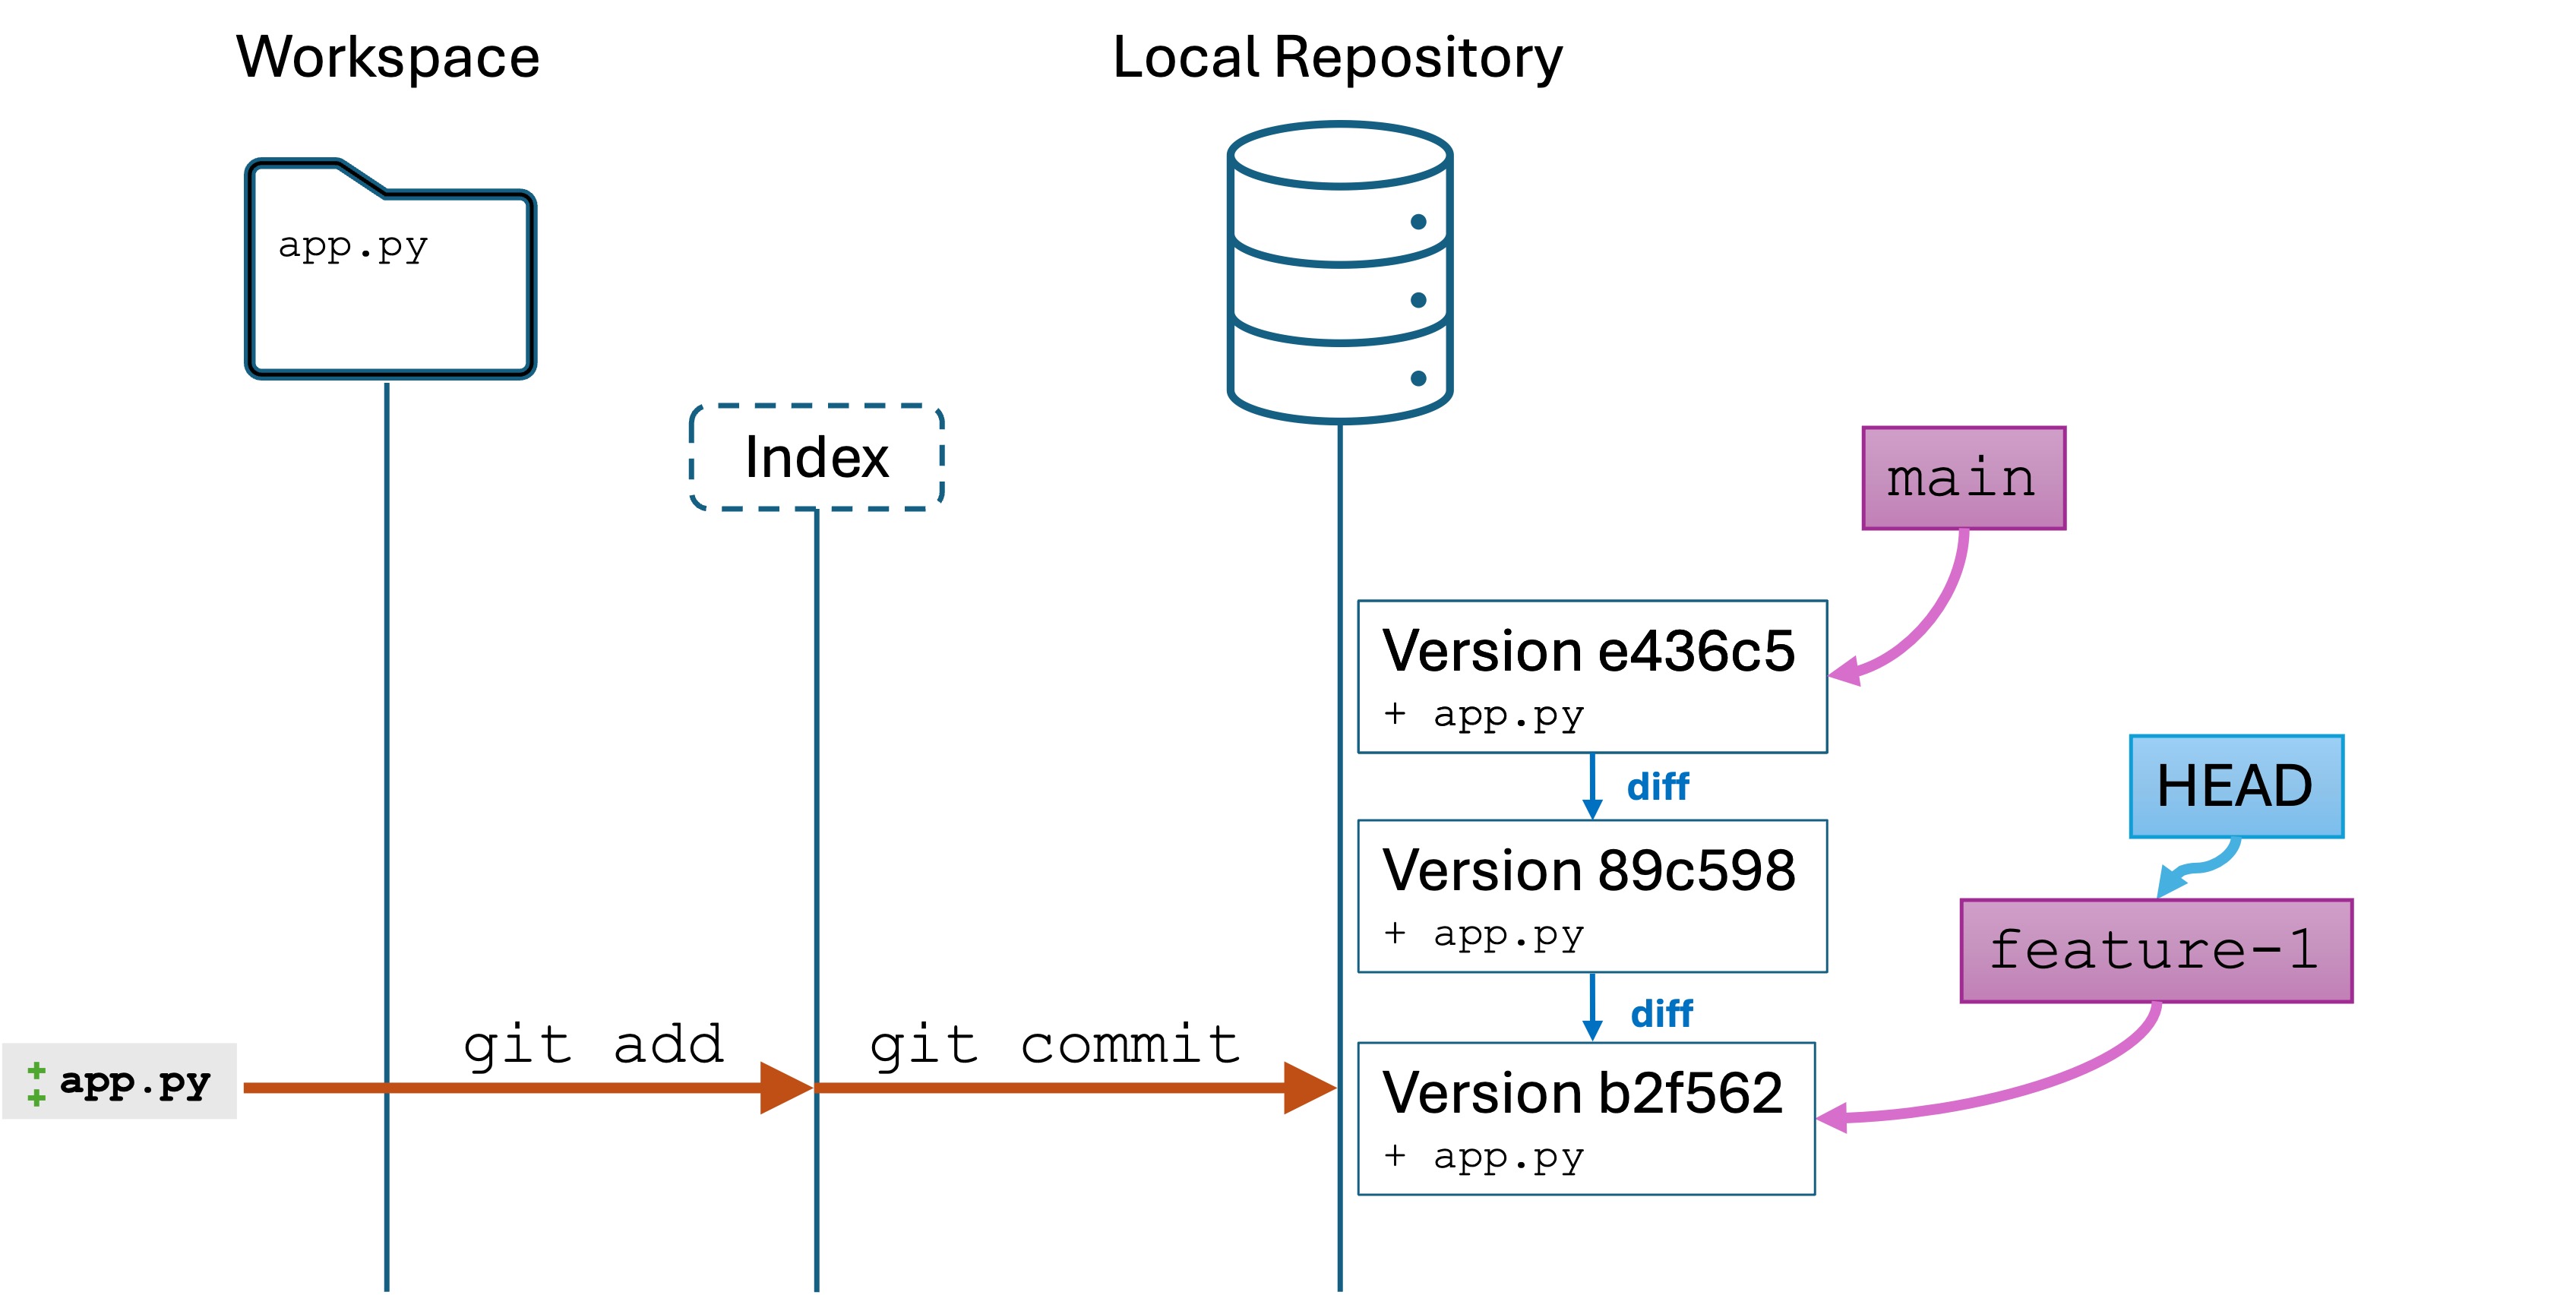
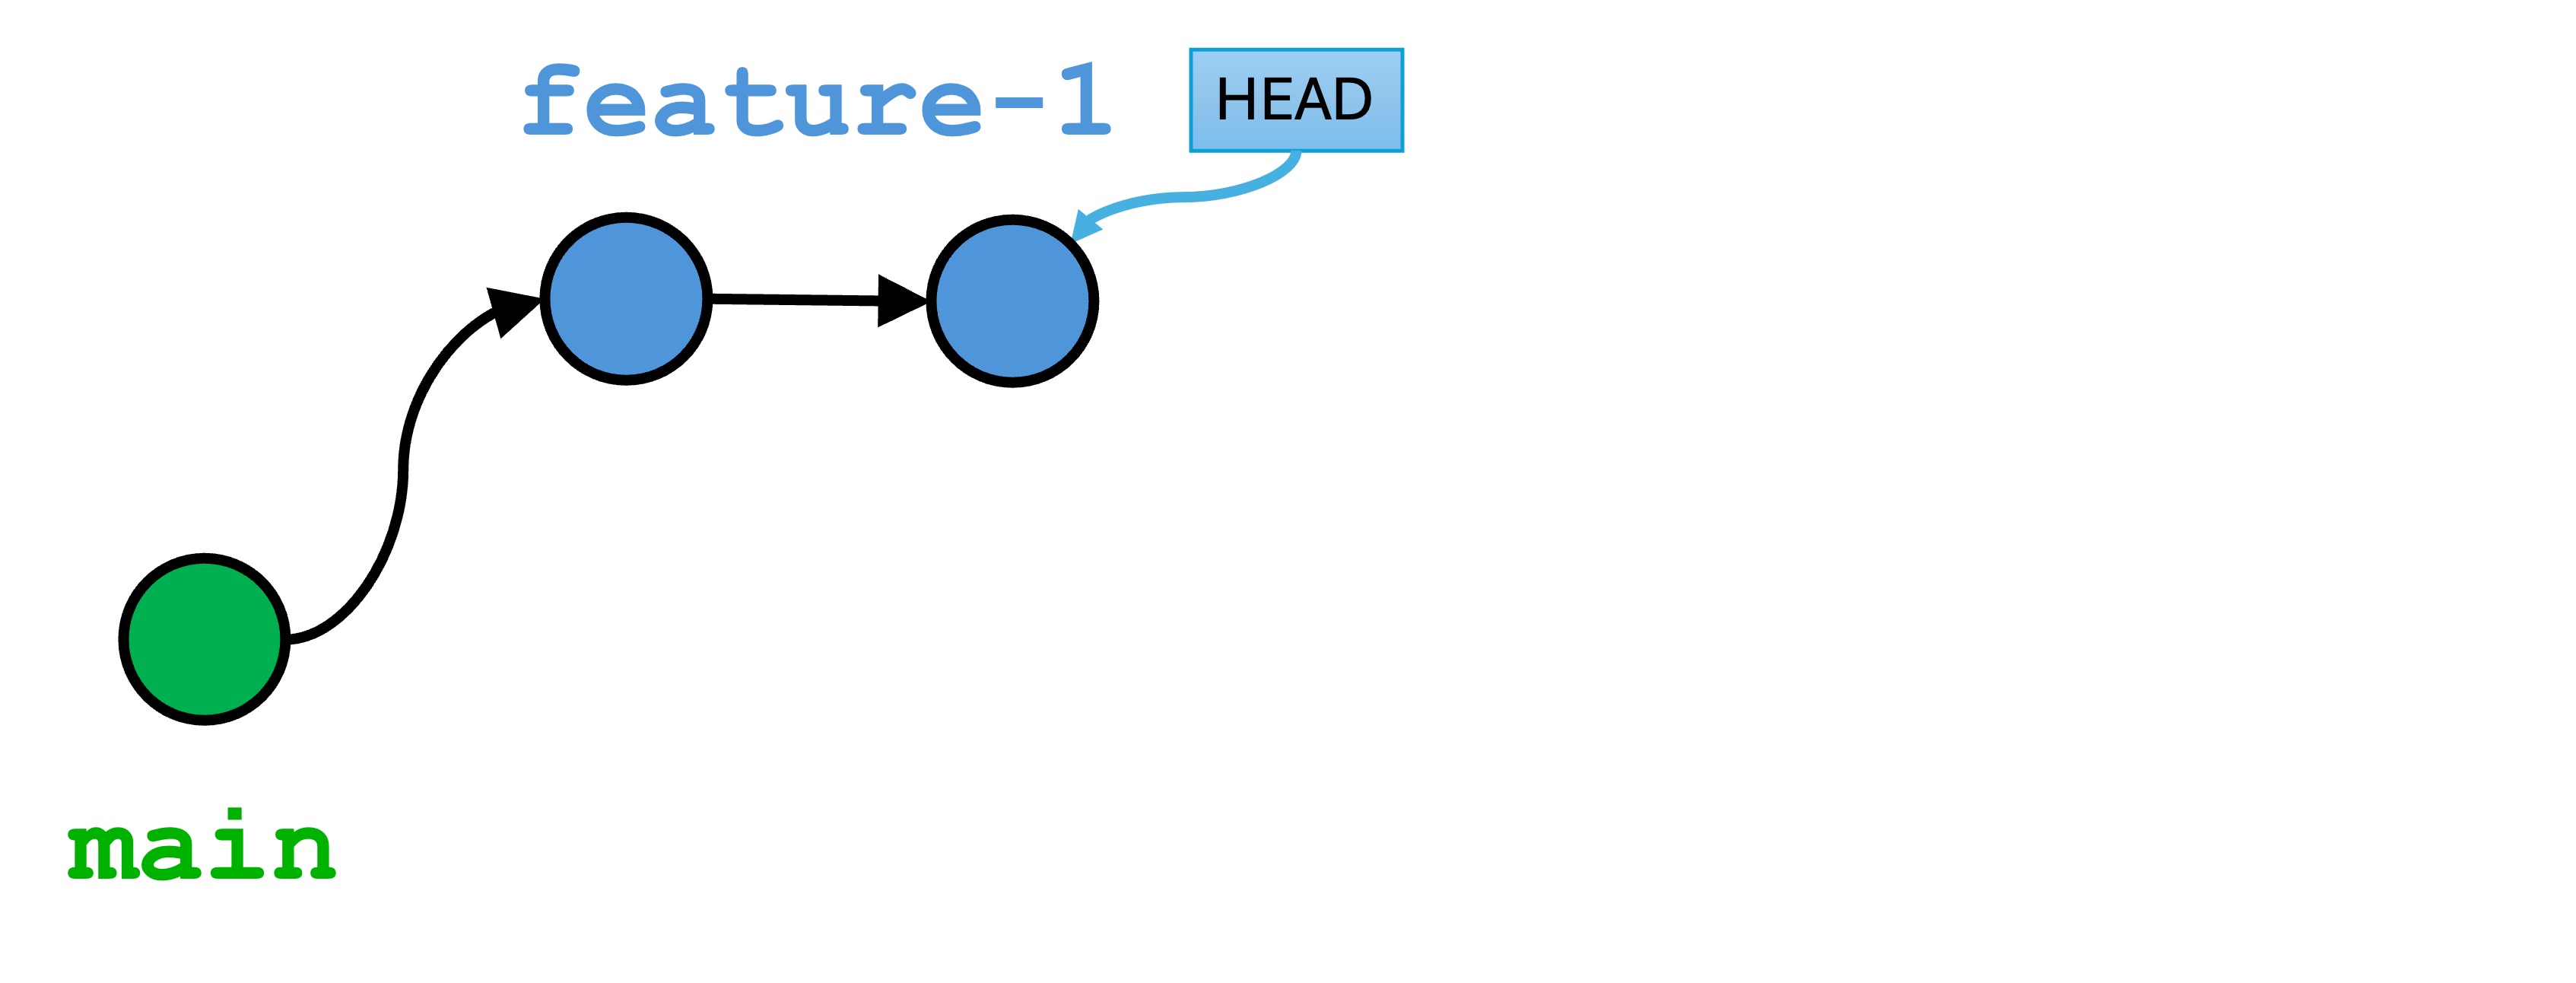
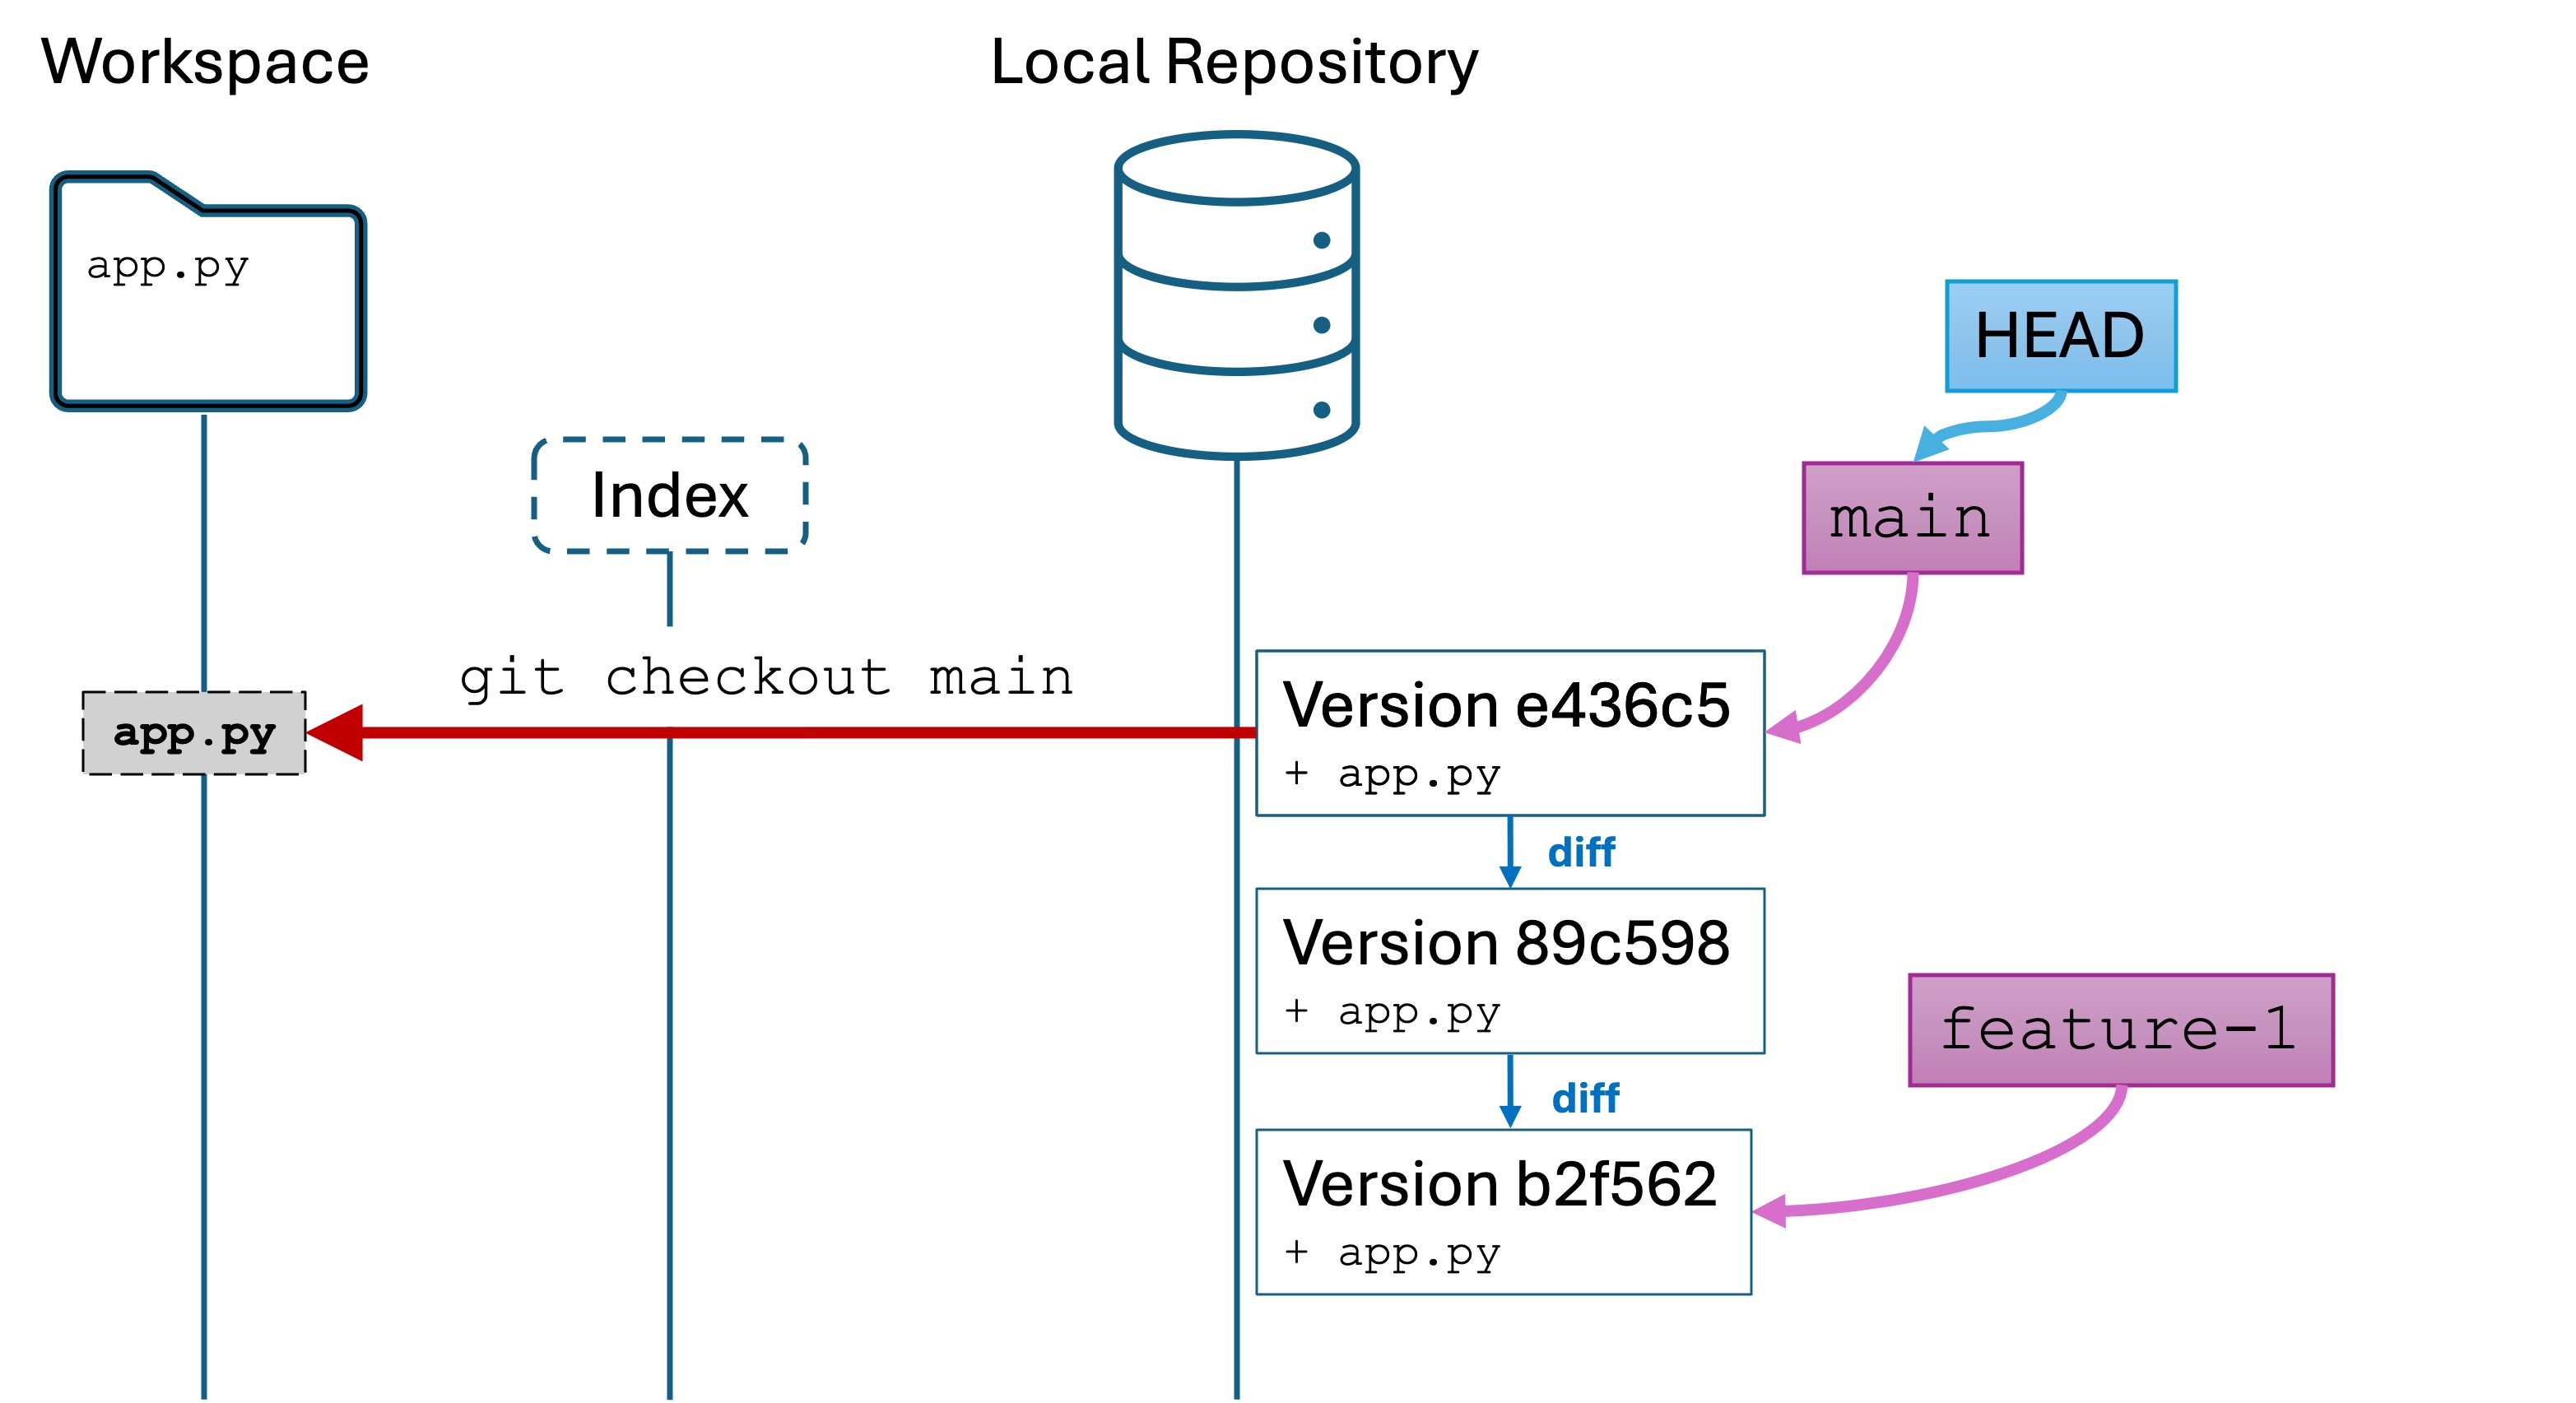
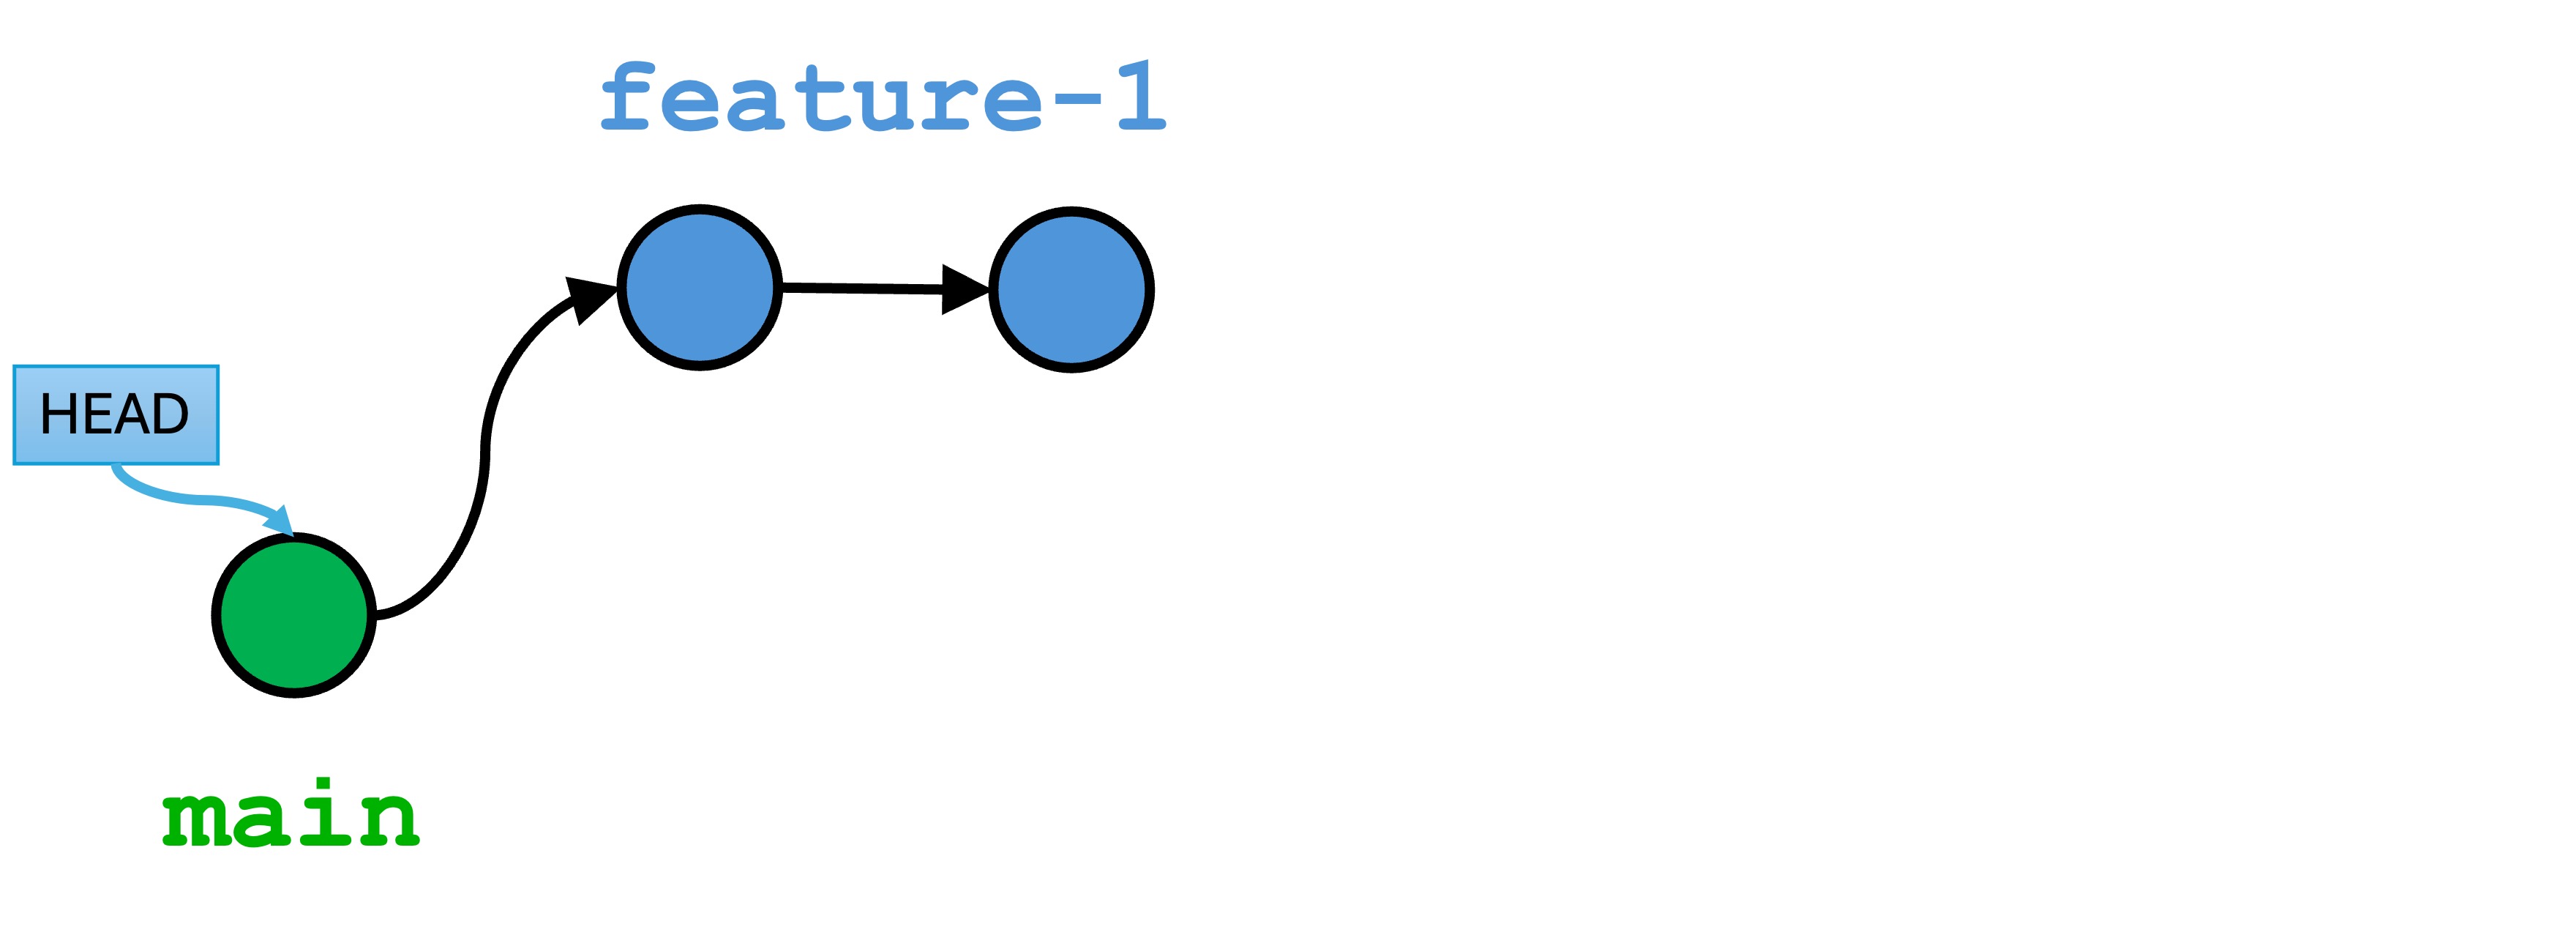
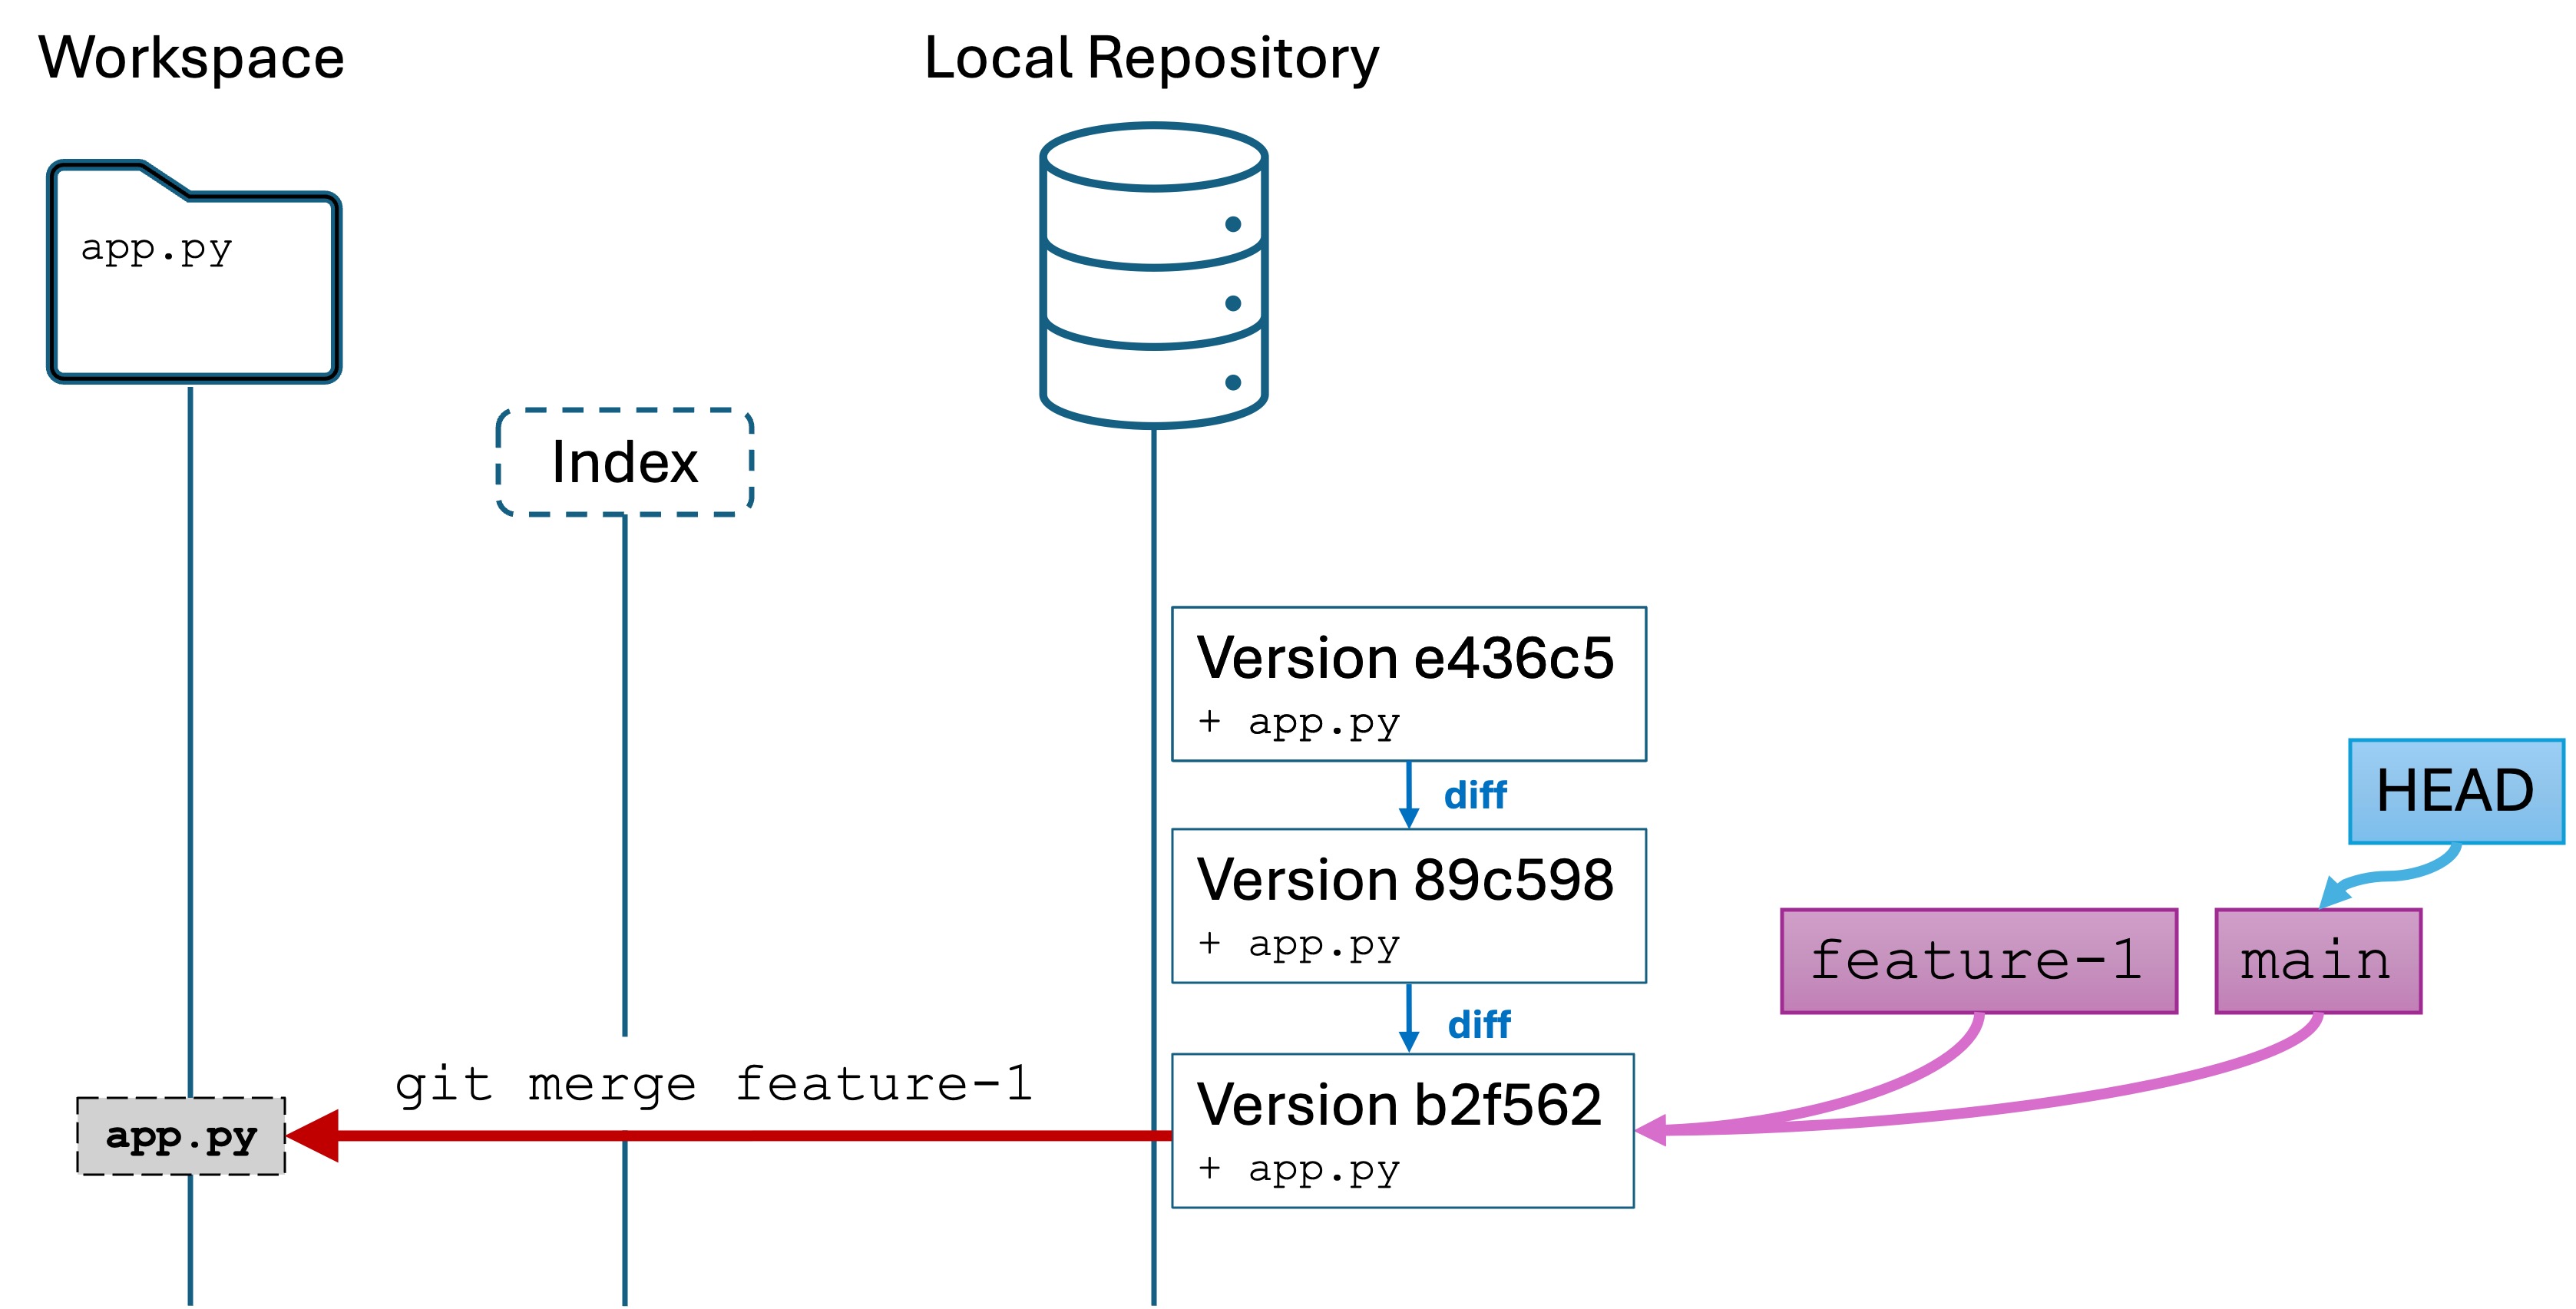
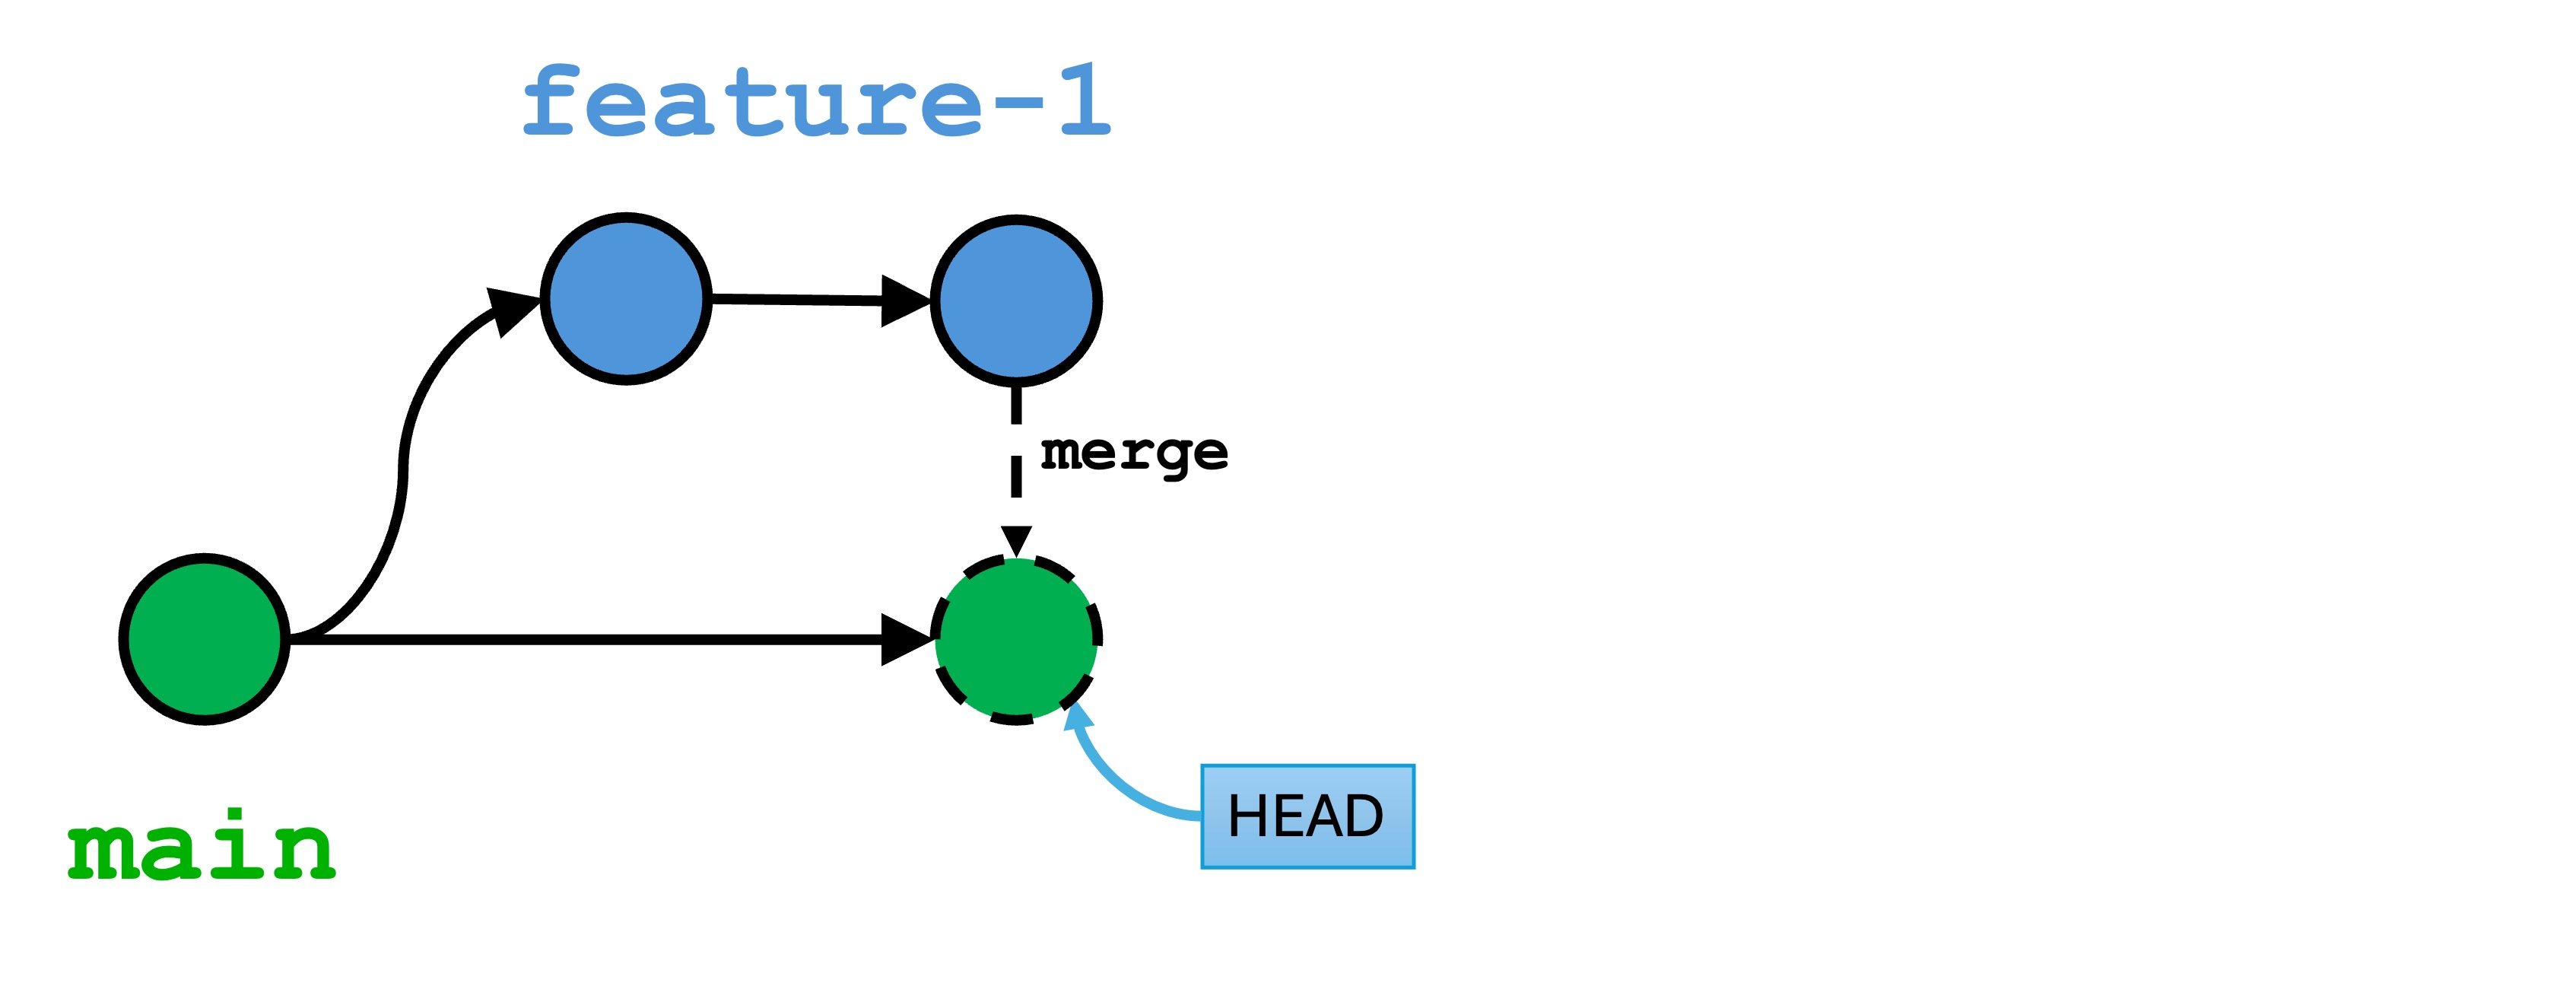
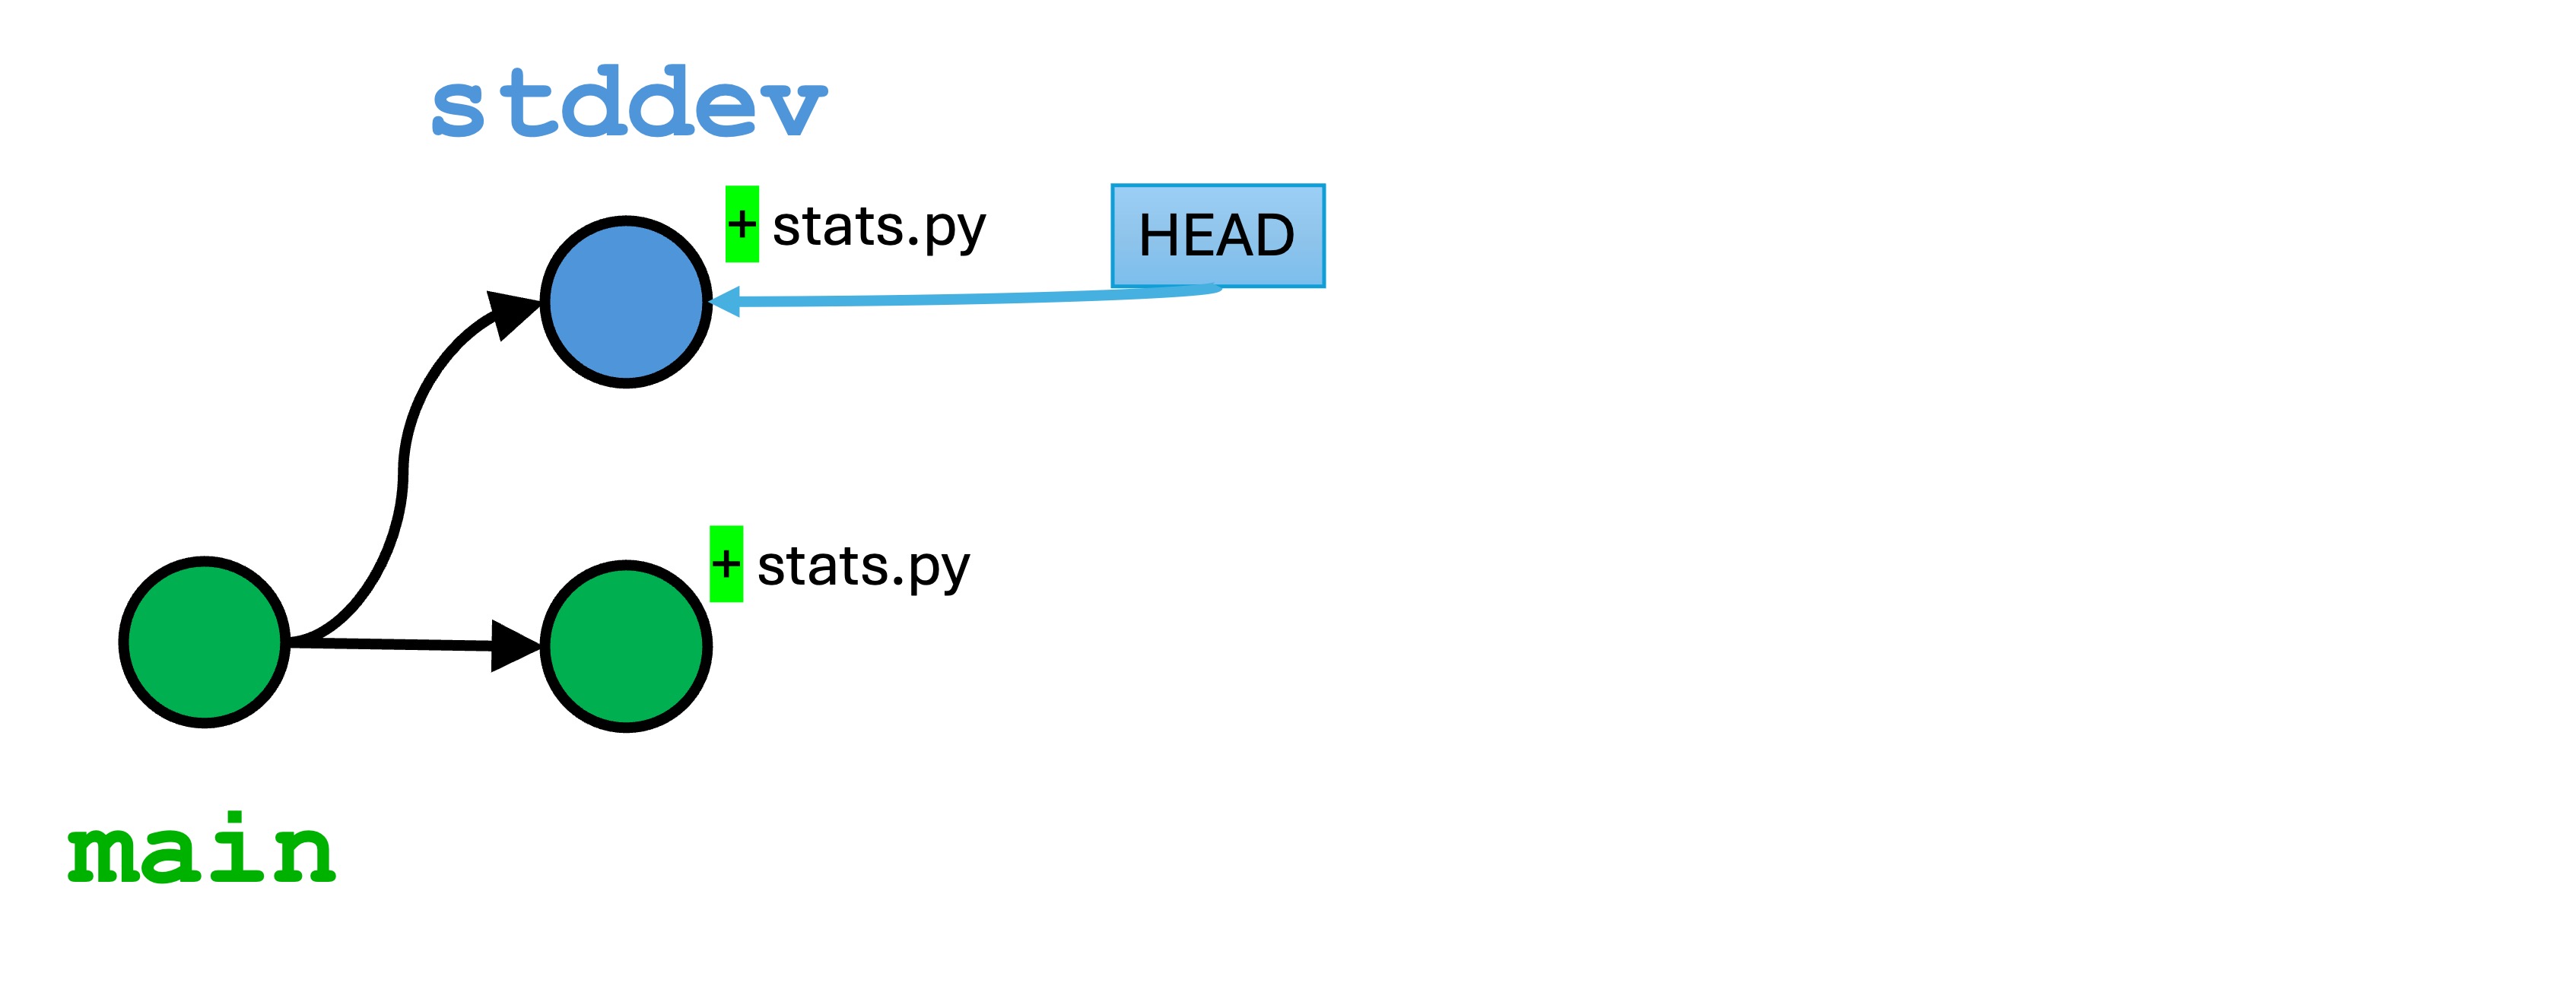

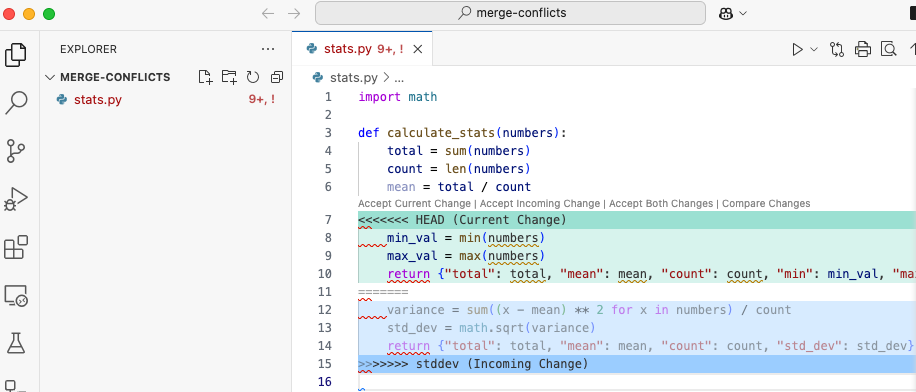
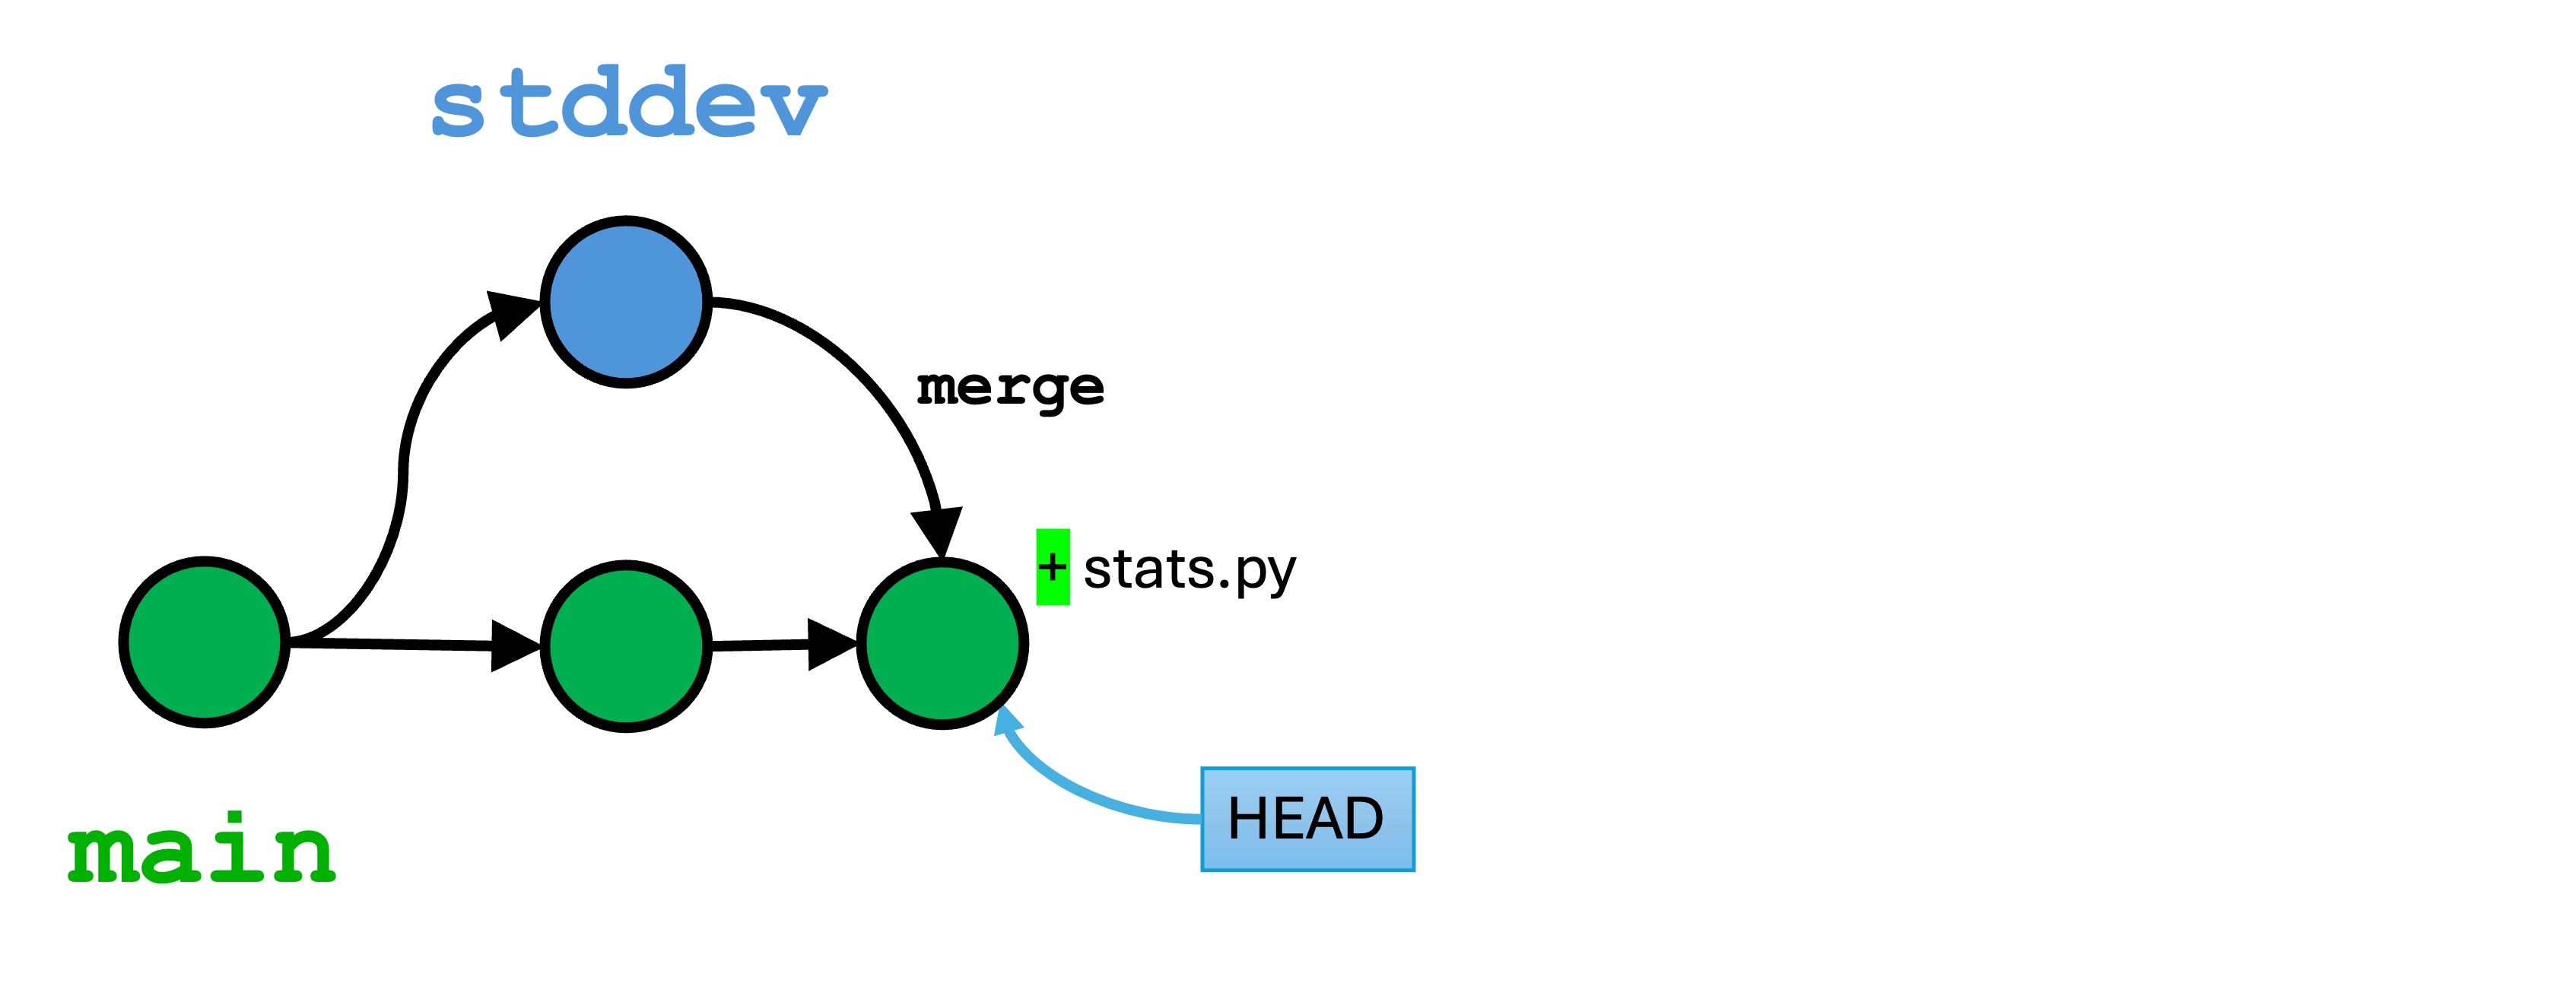
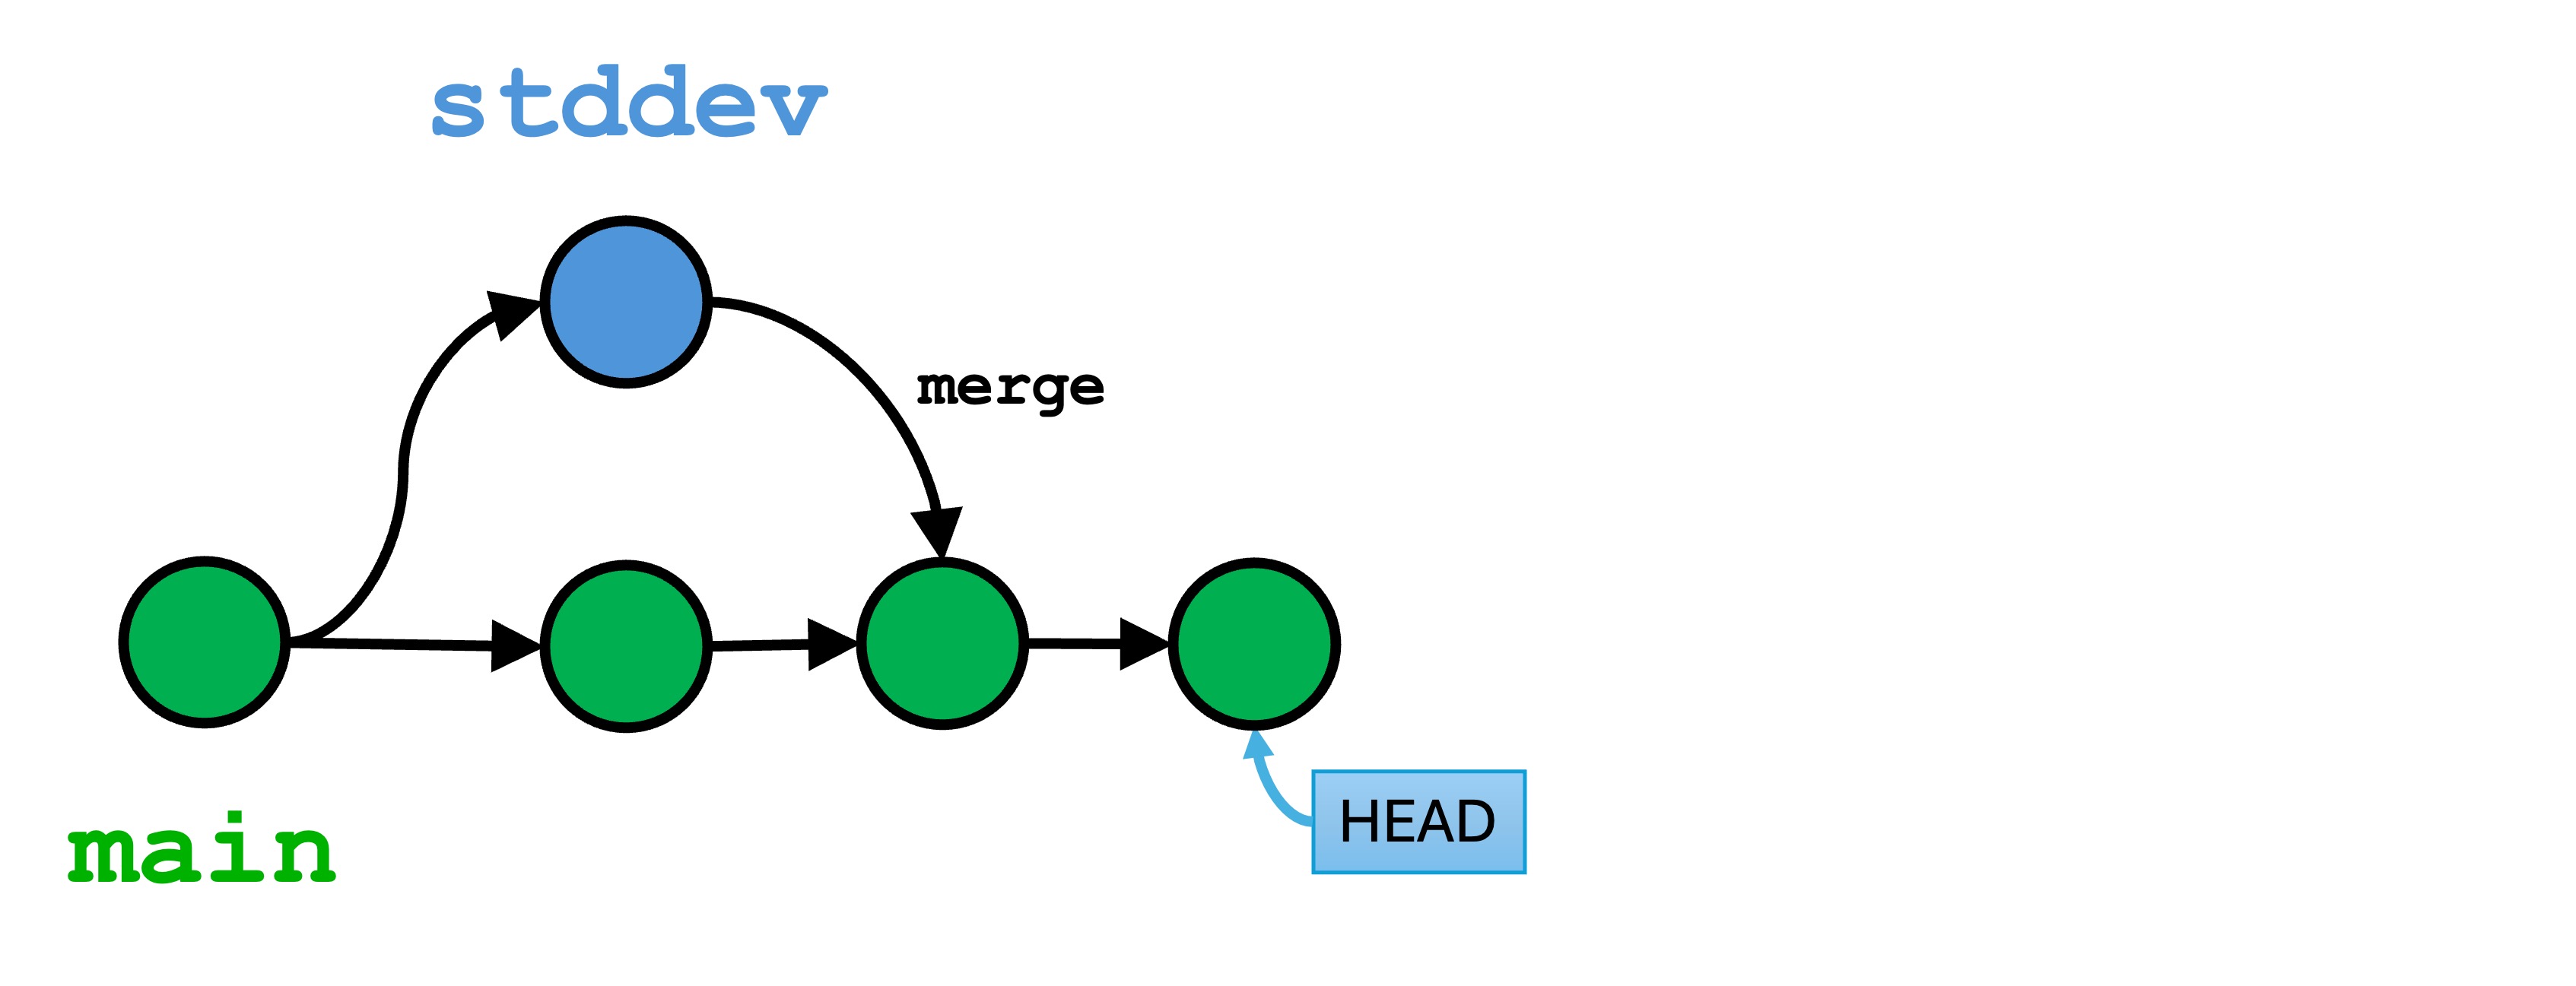
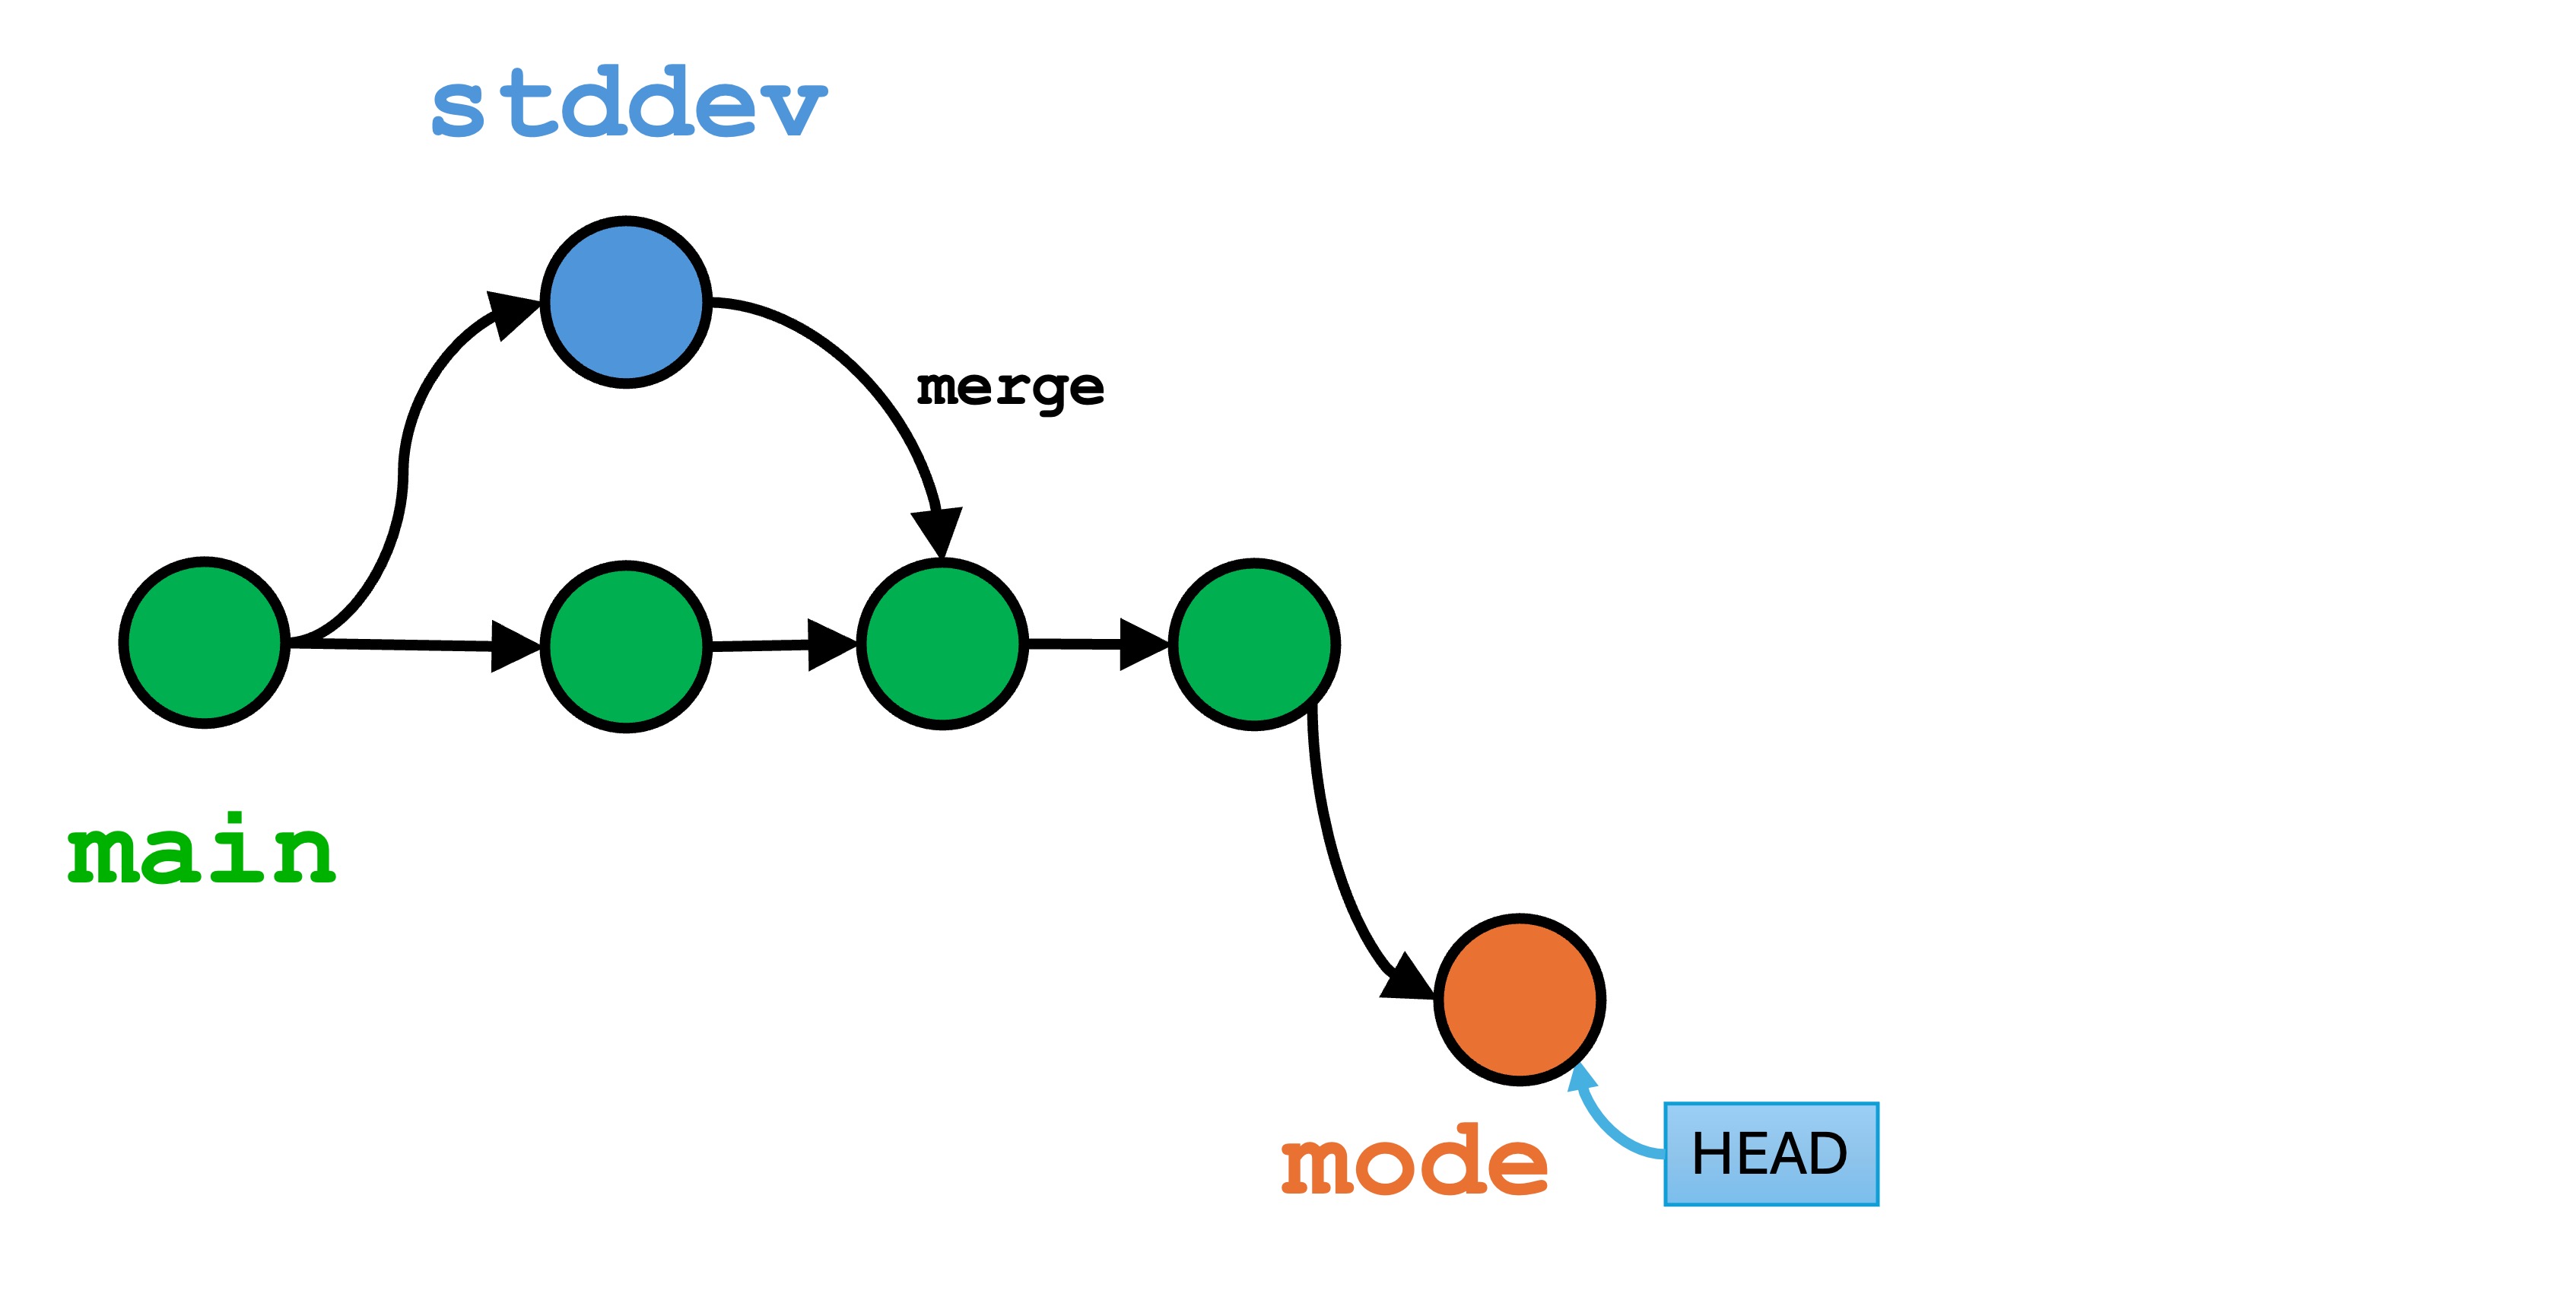
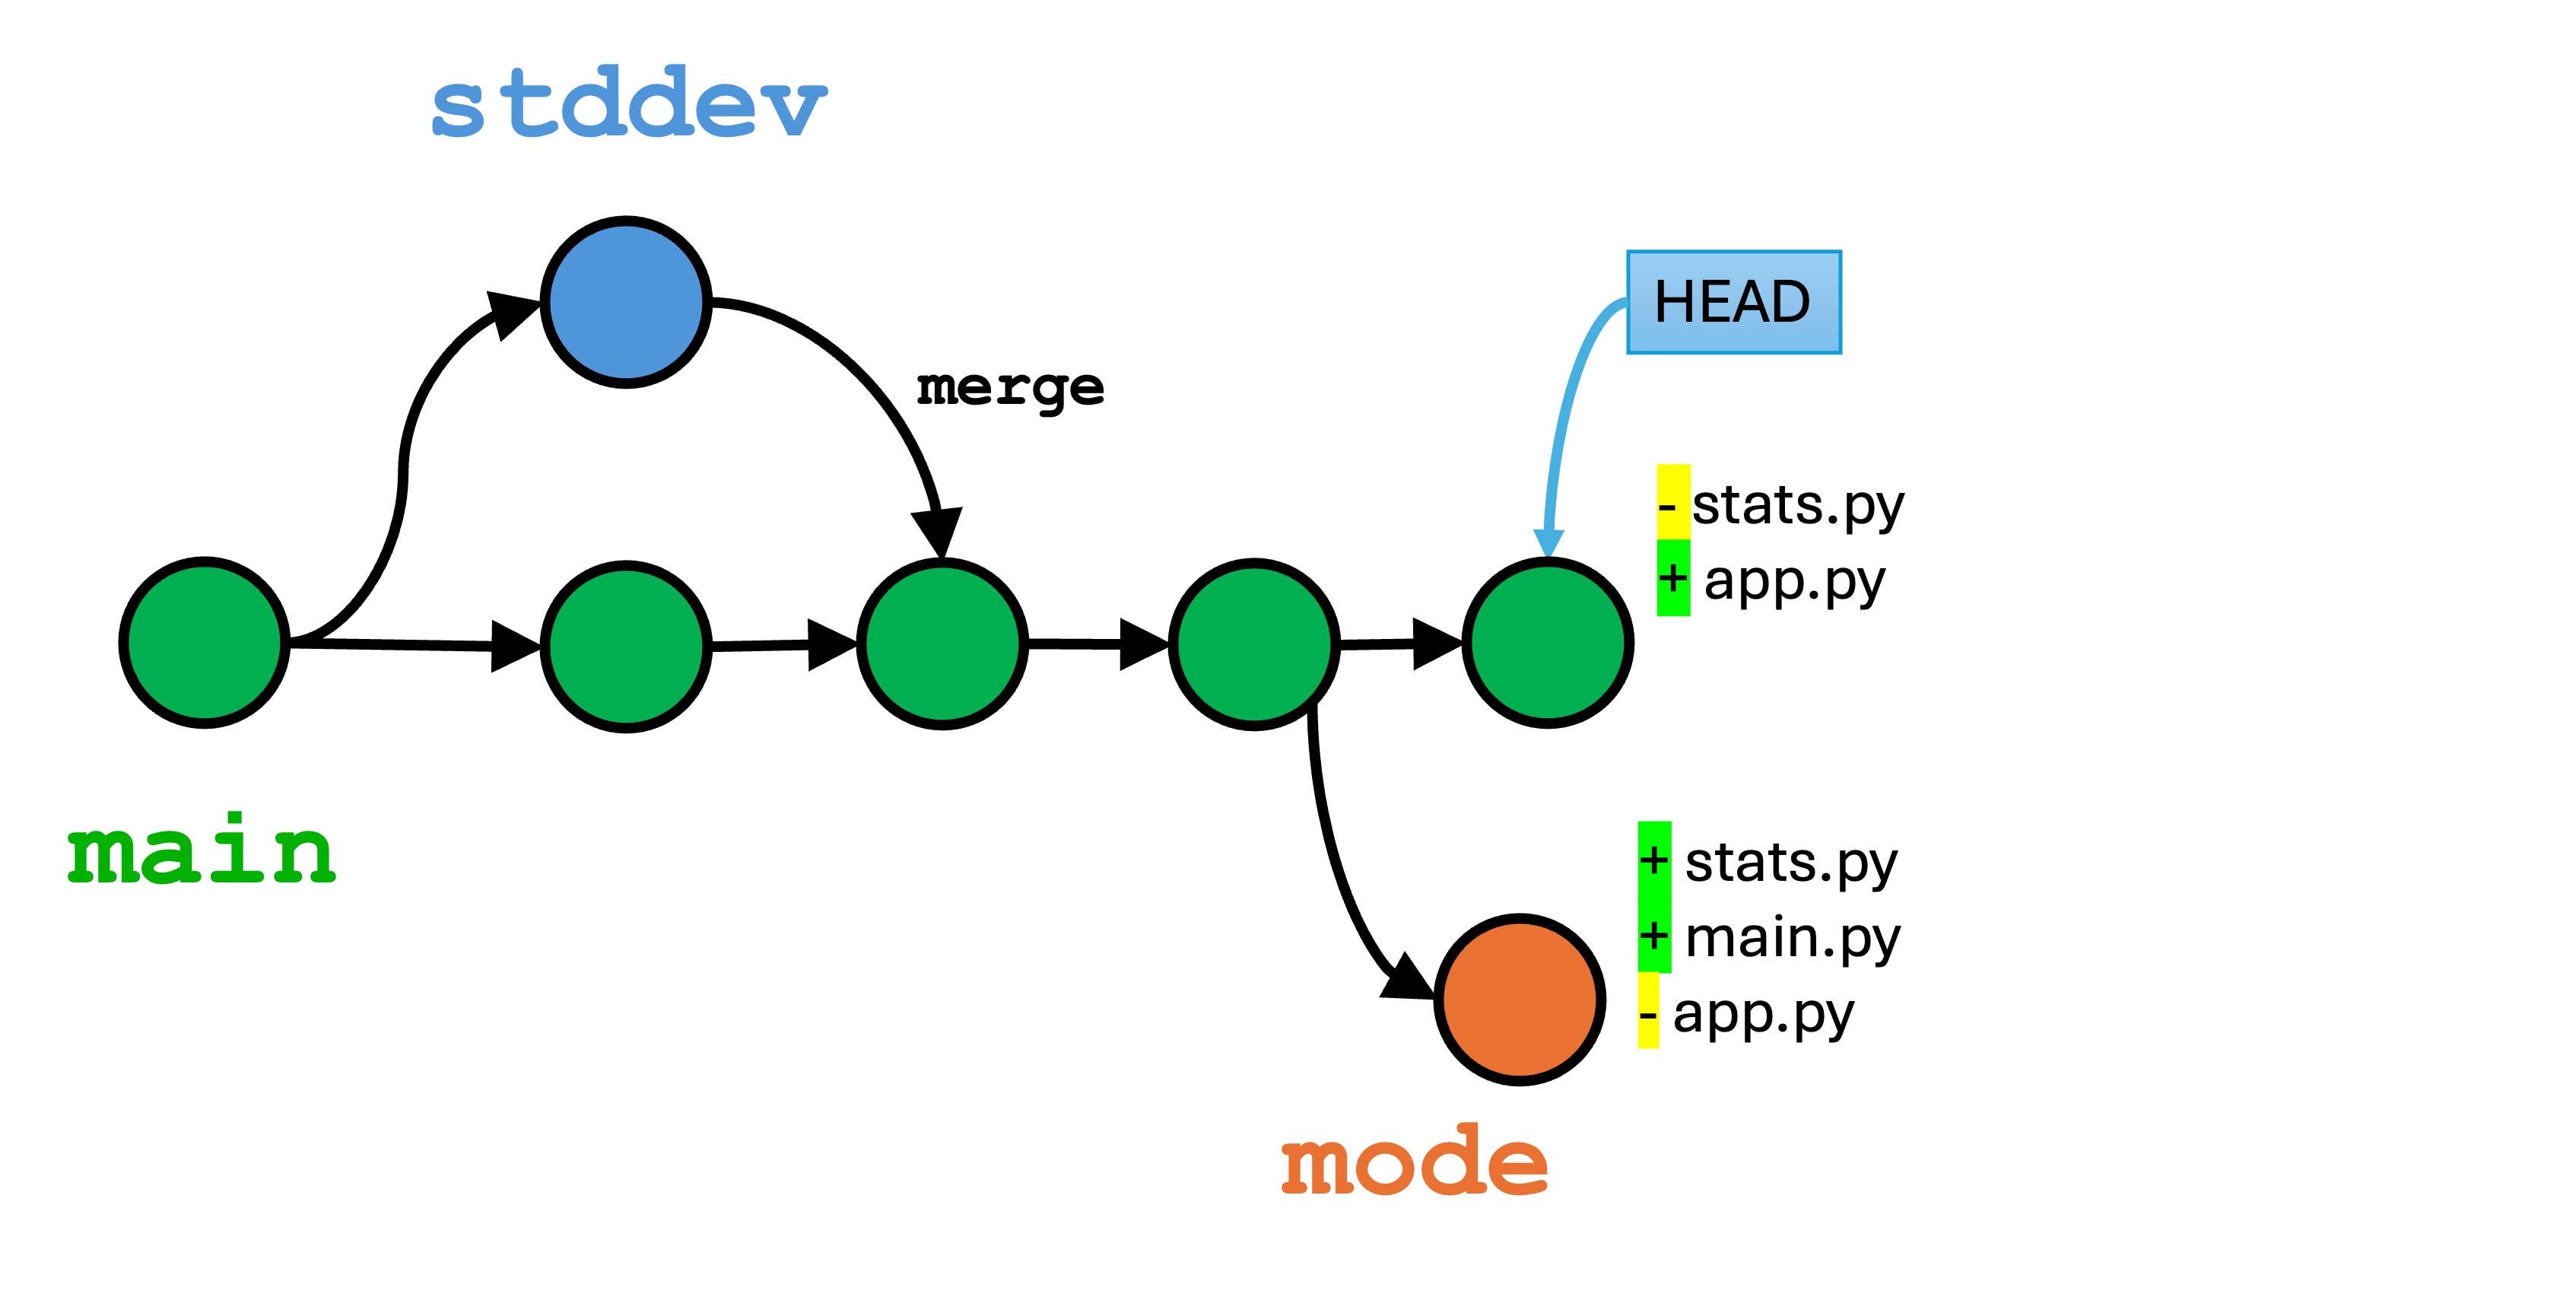
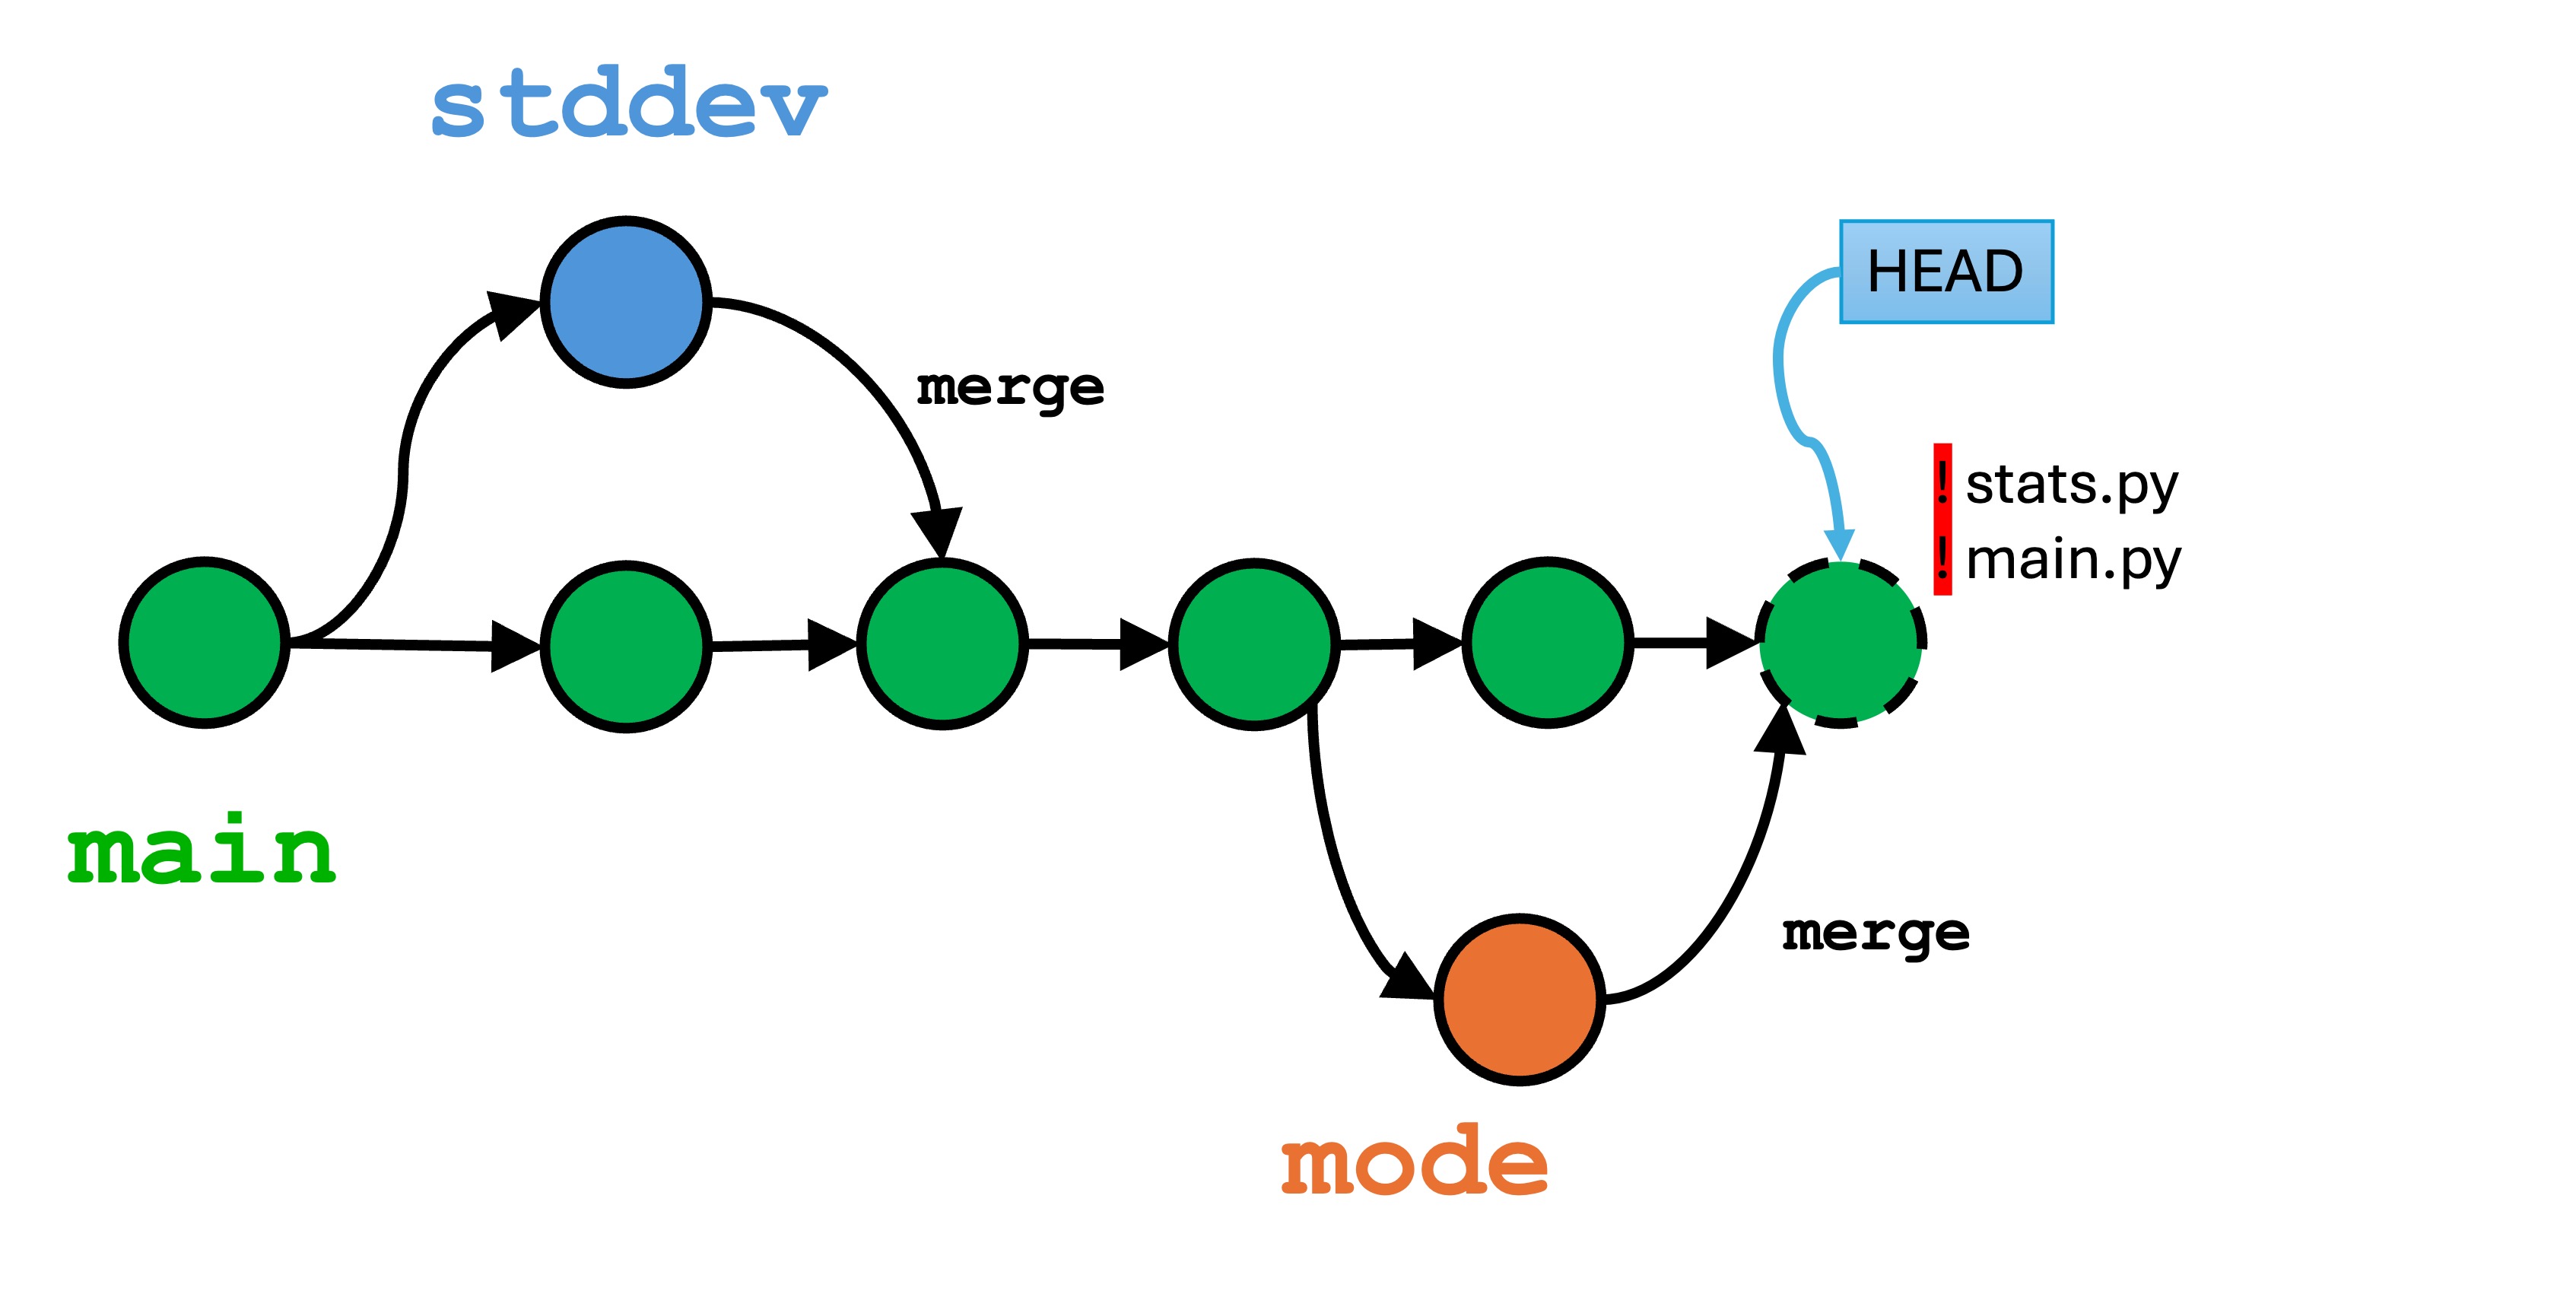
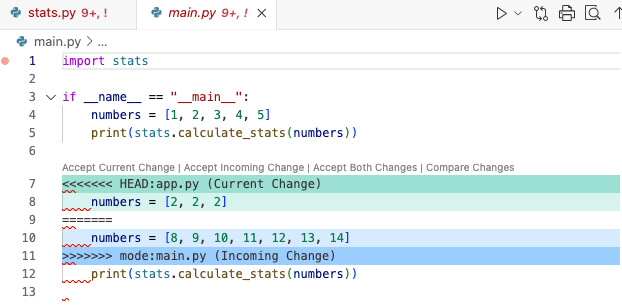
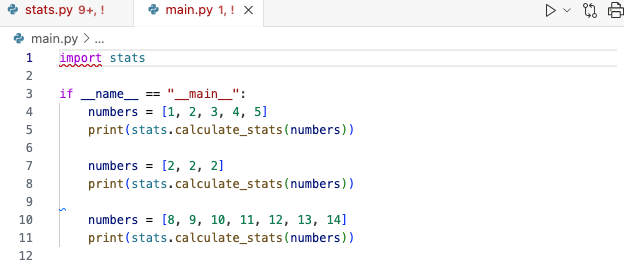
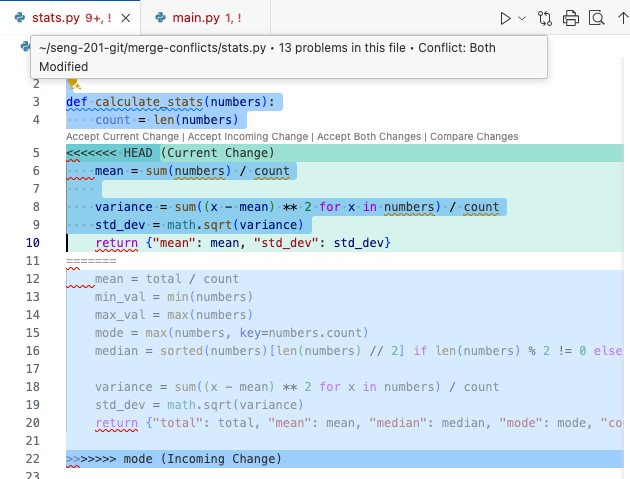
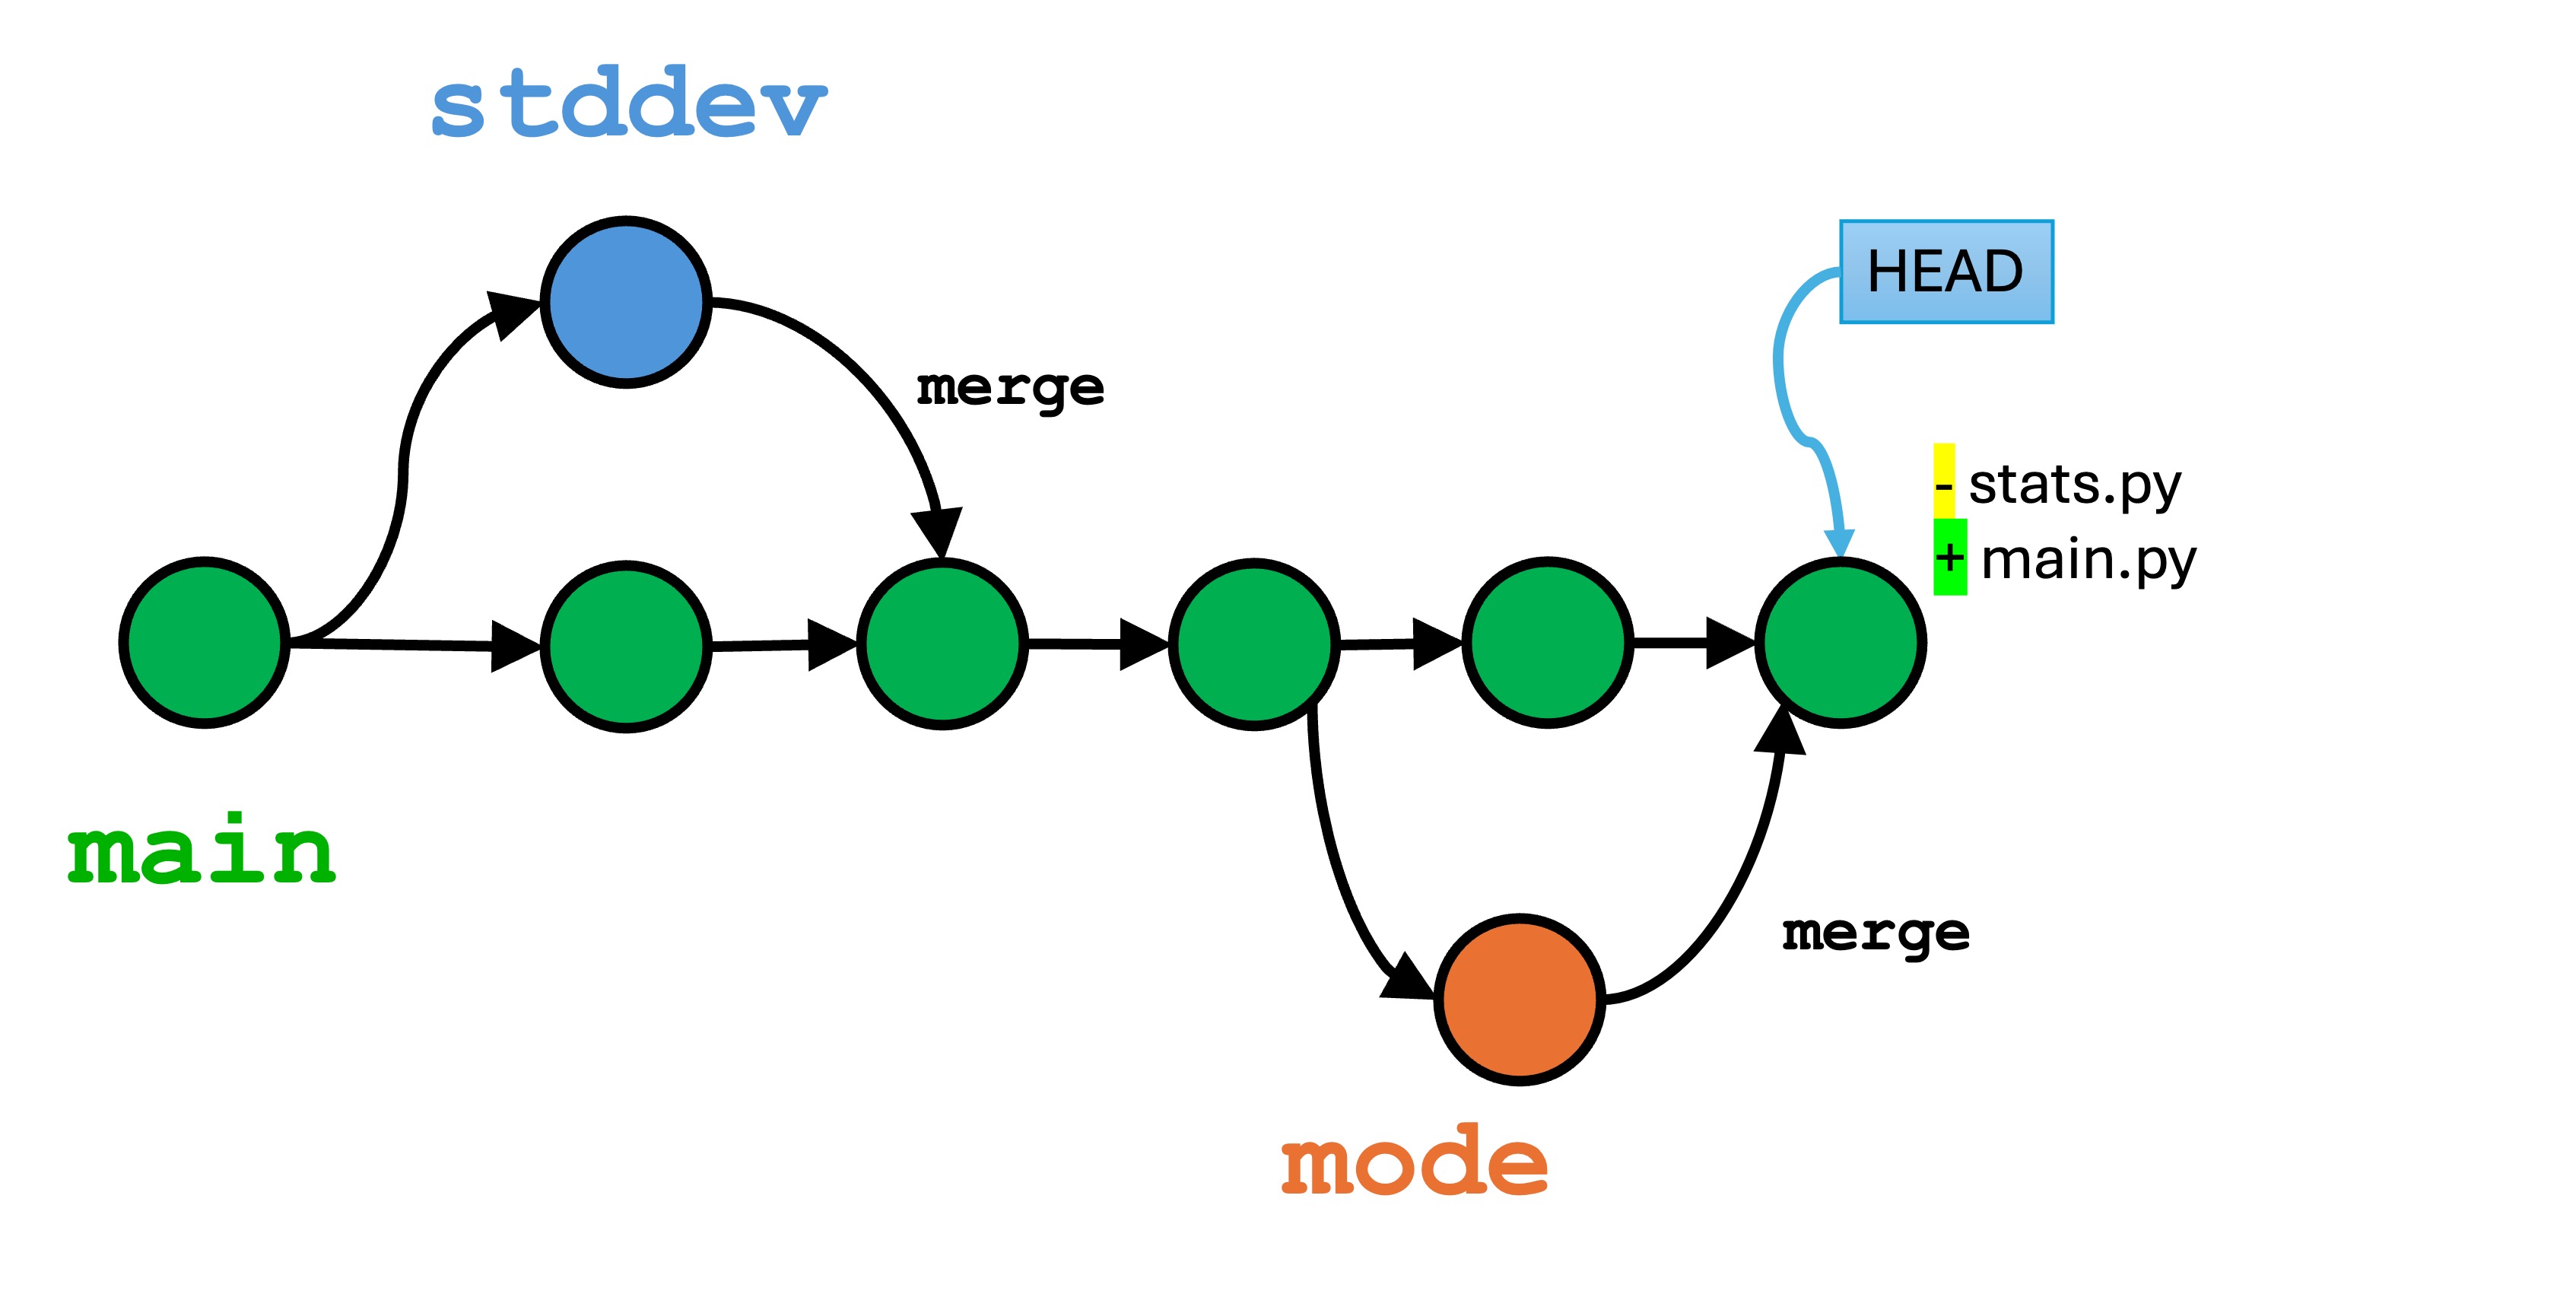
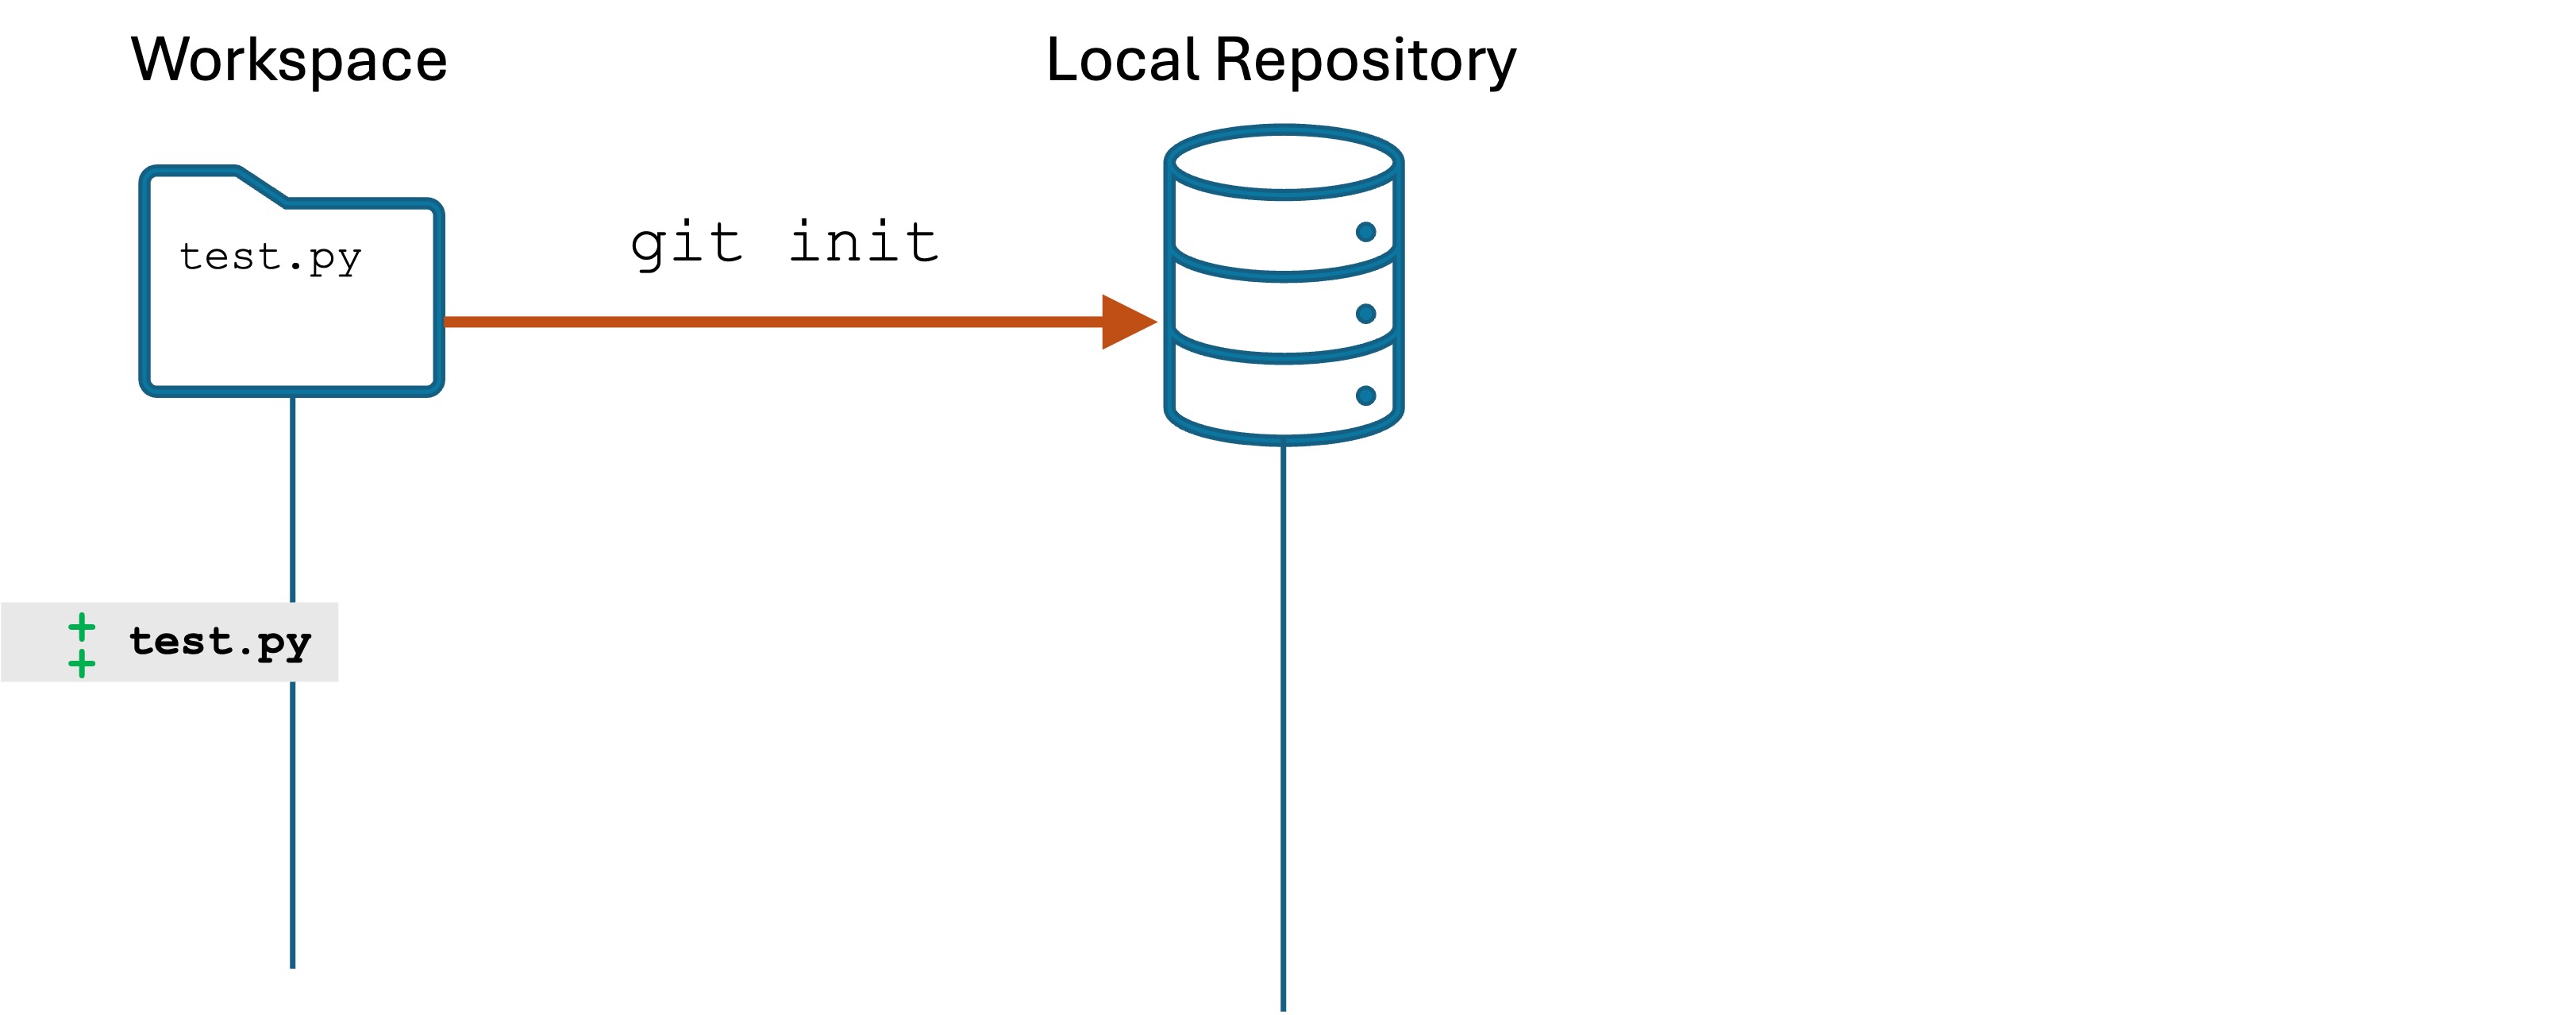


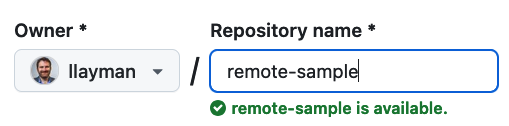
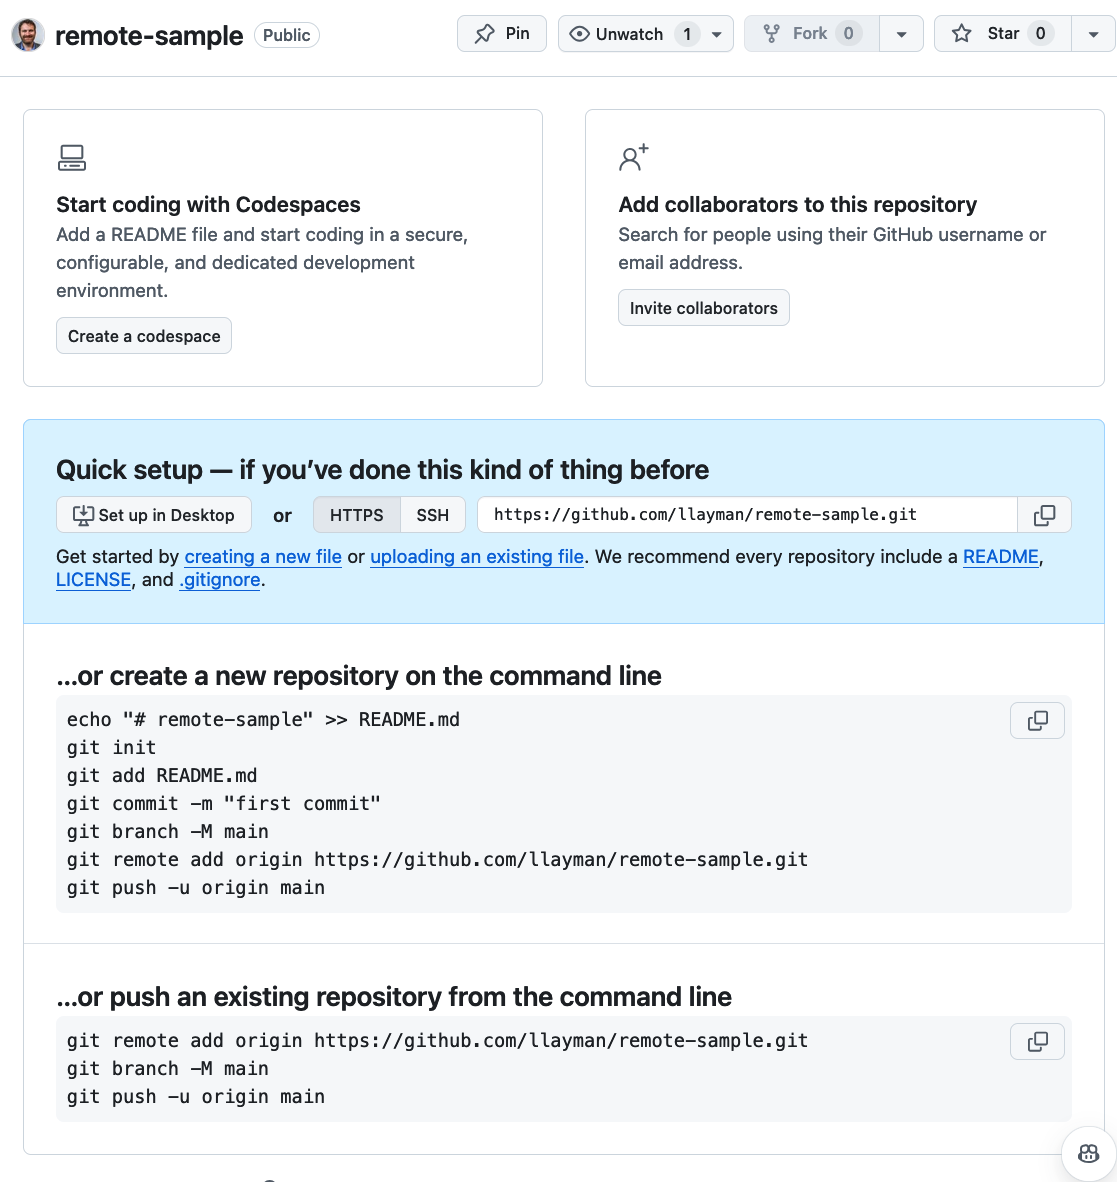
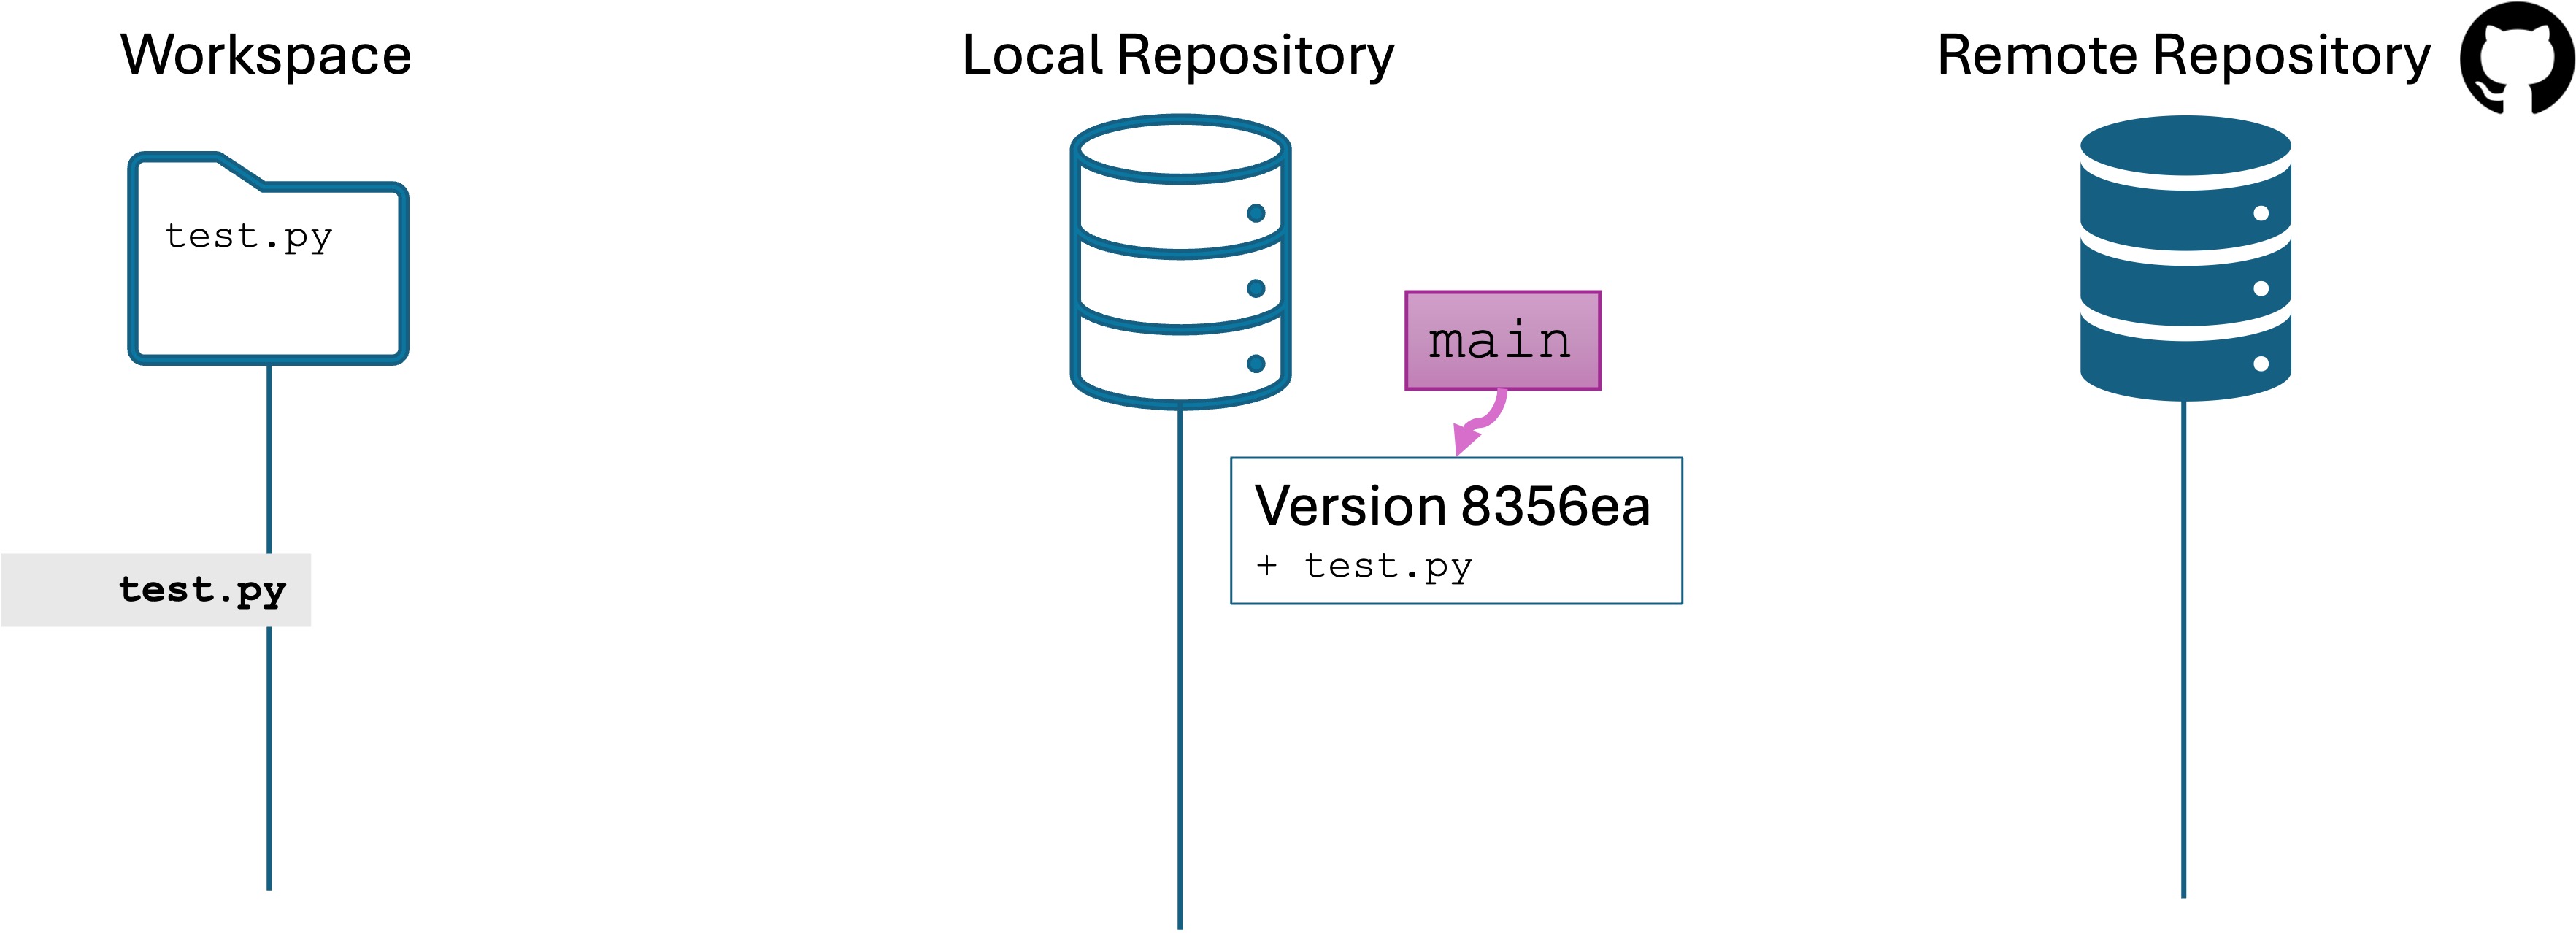

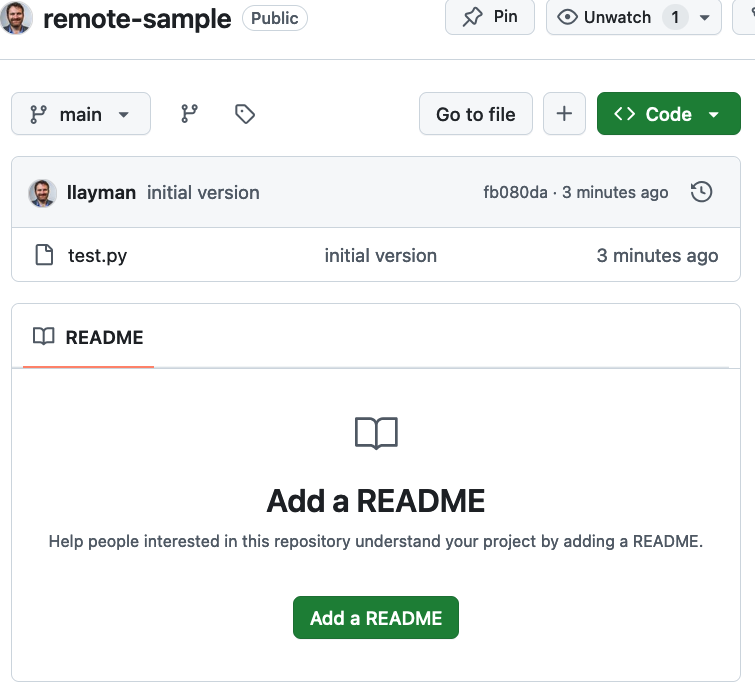
 next to the version name to see the