This is the multi-page printable view of this section. Click here to print.

Return to the regular view of this page.

03. Installing the PyCharm IDE

You will install a popular code editor, PyCharm, in your Linux-ish environment.

The most useful tool for a software developer, other than the brain, is an integrated development environment (IDE). You may have used IDEs in your classes, such as IDLE (which is bundled with Python), PyCharm, IntelliJ, Visual Studio, or XCode. IDEs usually have the following capabilities at a minimum:

  • Text editing for writing source code
  • Running the code
  • Debugging (more on this in the future)
  • Browsing files
  • Searching through files
  • Navigating through code structures easily

Most IDEs have many more capabilities. Software developers develop a preference for an IDE based on its capabilities, its ease-of-use, and the programming languages it supports.

In this class, we will use PyCharm, an IDE published by JetBrains. It has many handy features to support Python programming.

PyCharm works on Windows, Mac, and graphical Linux-based operating systems. If you are using Windows, we want to run it from our Linux environment

Choose the section corresponding to your Linux environment for instructions on installing PyCharm.
1 - for Mac

Instructions for installing PyCharm on Mac

This lab is for those who are installing PyCharm on Mac machines.

Installation

  1. Download PyCharm.

  2. Locate the downloaded .dmg file and click to open. Drag PyCharm into the Applications folder.

  3. Open your Finder, select Applications, then PyCharm.

  4. You may wish to pin PyCharm to your dock after launching.

Enable launching PyCharm from the Terminal

  1. Open the Mac Terminal application as described in the Launching a Terminal lab.
  2. In the Terminal, type the command
    
    sudo nano /usr/local/bin/pycharm
    
  3. Enter your password when prompted.
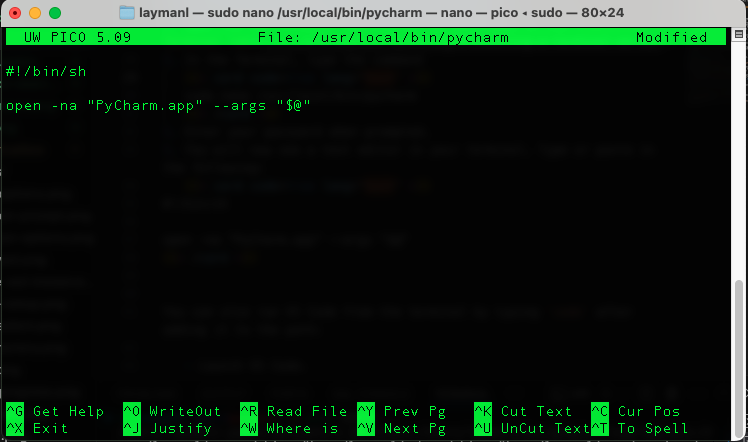
  4. You will now see the Nano text editor in your terminal. Type or paste in the following:
    
    #!/bin/sh
    
    open -na "PyCharm.app" --args "$@"
    
    Creating a pycharm launch script using nano
  5. Hit Control+O to save, then Enter to accept the filename.
  6. Hit Control+X to exit the text editor.
  7. Run the following command in the Terminal:
    
    sudo chmod +x /usr/local/bin/pycharm
    

You will now be able to type pycharm . in the Terminal to open PyCharm to edit the current directory’s contents.

Test drive

We are going to create a sample project directory using the Terminal, then open PyCharm and edit files in that directory. A video follows the steps.

  1. Open the Terminal application.
  2. Run the following in the Terminal:
    
    cd ~                # make sure in your home directory
    mkdir seng-201      # This directory will hold all our code for the course
    cd seng-201         # change to the new directory
    mkdir pycharm-test  # Make a new subdirectory for a test project.
    cd pycharm-test     # change into the subdirectory
    pycharm .           # launch PyCharm in the current directory
    
    The pycharm command launches the PyCharm program. The command pycharm . says launch Pycharm and have it open the current working directory. The symbol . always means the working directory. Sometimes it will be necessary to explicitly tell the CLI we are referring to the working directory; more on those situations as they arise.
  3. A PyCharm window will open after a moment.
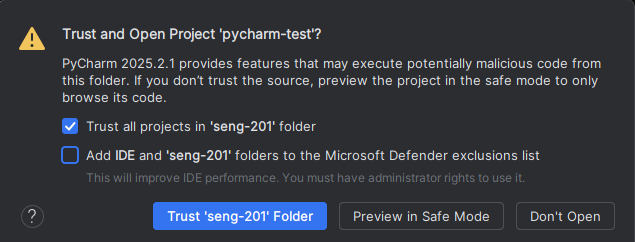
  4. You may be asked if you “trust the authors of the files in this folder”. Click the checkbox and then pick “Yes, I trust the authors.”

Here is the process in a video:

Creating a new file

Let’s create a file in the Terminal in our project directory. We should see it immediately in PyCharm.

  1. Go back to your Terminal and make sure you are in the pycharm-test directory.
  2. Type the command touch hello.py to create an empty Python file.
  3. Go back to PyCharm. You should see the file hello.py in the directory here. Click on it and it will open an empty editor pane.
  4. In the code editor, type print("Hello World").
  5. Go back to the Ubuntu Terminal and type cat hello.py. You should see the code.

Next

So you now have PyCharm successfully editing files and interacting with directories on Mac.

You are now ready to code! Move on to PyCharm Basics lab.

2 - for Windows

Instructions for installing PyCharm on Windows

This lab is for those who are installing PyCharm on Mac machines.

Installation

  1. If you are on a lab computer, skip to the next section.
  2. Download PyCharm.
  3. Locate the downloaded .exe file and double-click to run.
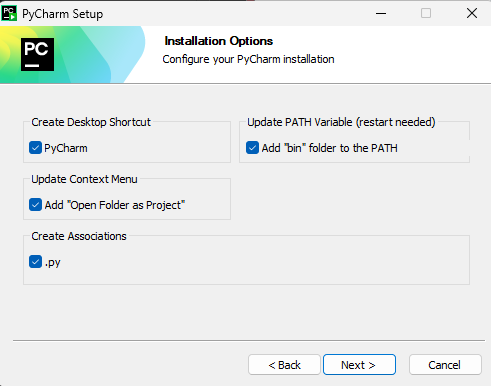
  4. Choose the following options:
    Windows PyCharm installation options
  5. Finish the installation and run Pycharm.
  6. Close any PowerShell or other terminal windows you have open.

Test drive

We are going to create a sample project directory using PowerShell, then open PyCharm and edit files in that directory. A video follows the steps.

  1. Open the Terminal (PowerShell) application.
  2. Run the following in PowerShell:
    
    cd ~                # make sure in your home directory
    mkdir seng-201      # This directory will hold all our code for the course
    cd seng-201         # change to the new directory
    mkdir pycharm-test  # Make a new subdirectory for a test project.
    cd pycharm-test     # change into the subdirectory
    pycharm64 .           # launch PyCharm in the current directory
    
    The pycharm64 command launches the PyCharm program. The command pycharm64 . says launch Pycharm and have it open the current working directory. The symbol . always means the working directory. Sometimes it will be necessary to explicitly tell the CLI we are referring to the working directory; more on those situations as they arise.
  3. A PyCharm window will open after a moment, and you will be asked if you want to “trust” the directory. Select the top option and, if using your own computer, the bottom option:
    Pop-up from PyCharm asking if you trust the contents of the directory. Pick yes.
  4. PyCharm will finish opening, and you will see a code editor with a boilerplate main.py file.

Creating a new file

Let’s create a file in the PowerShell in our project directory. We should see it immediately in PyCharm.

  1. Go back to PowerShell and make sure you are in the pycharm-test directory.
  2. Type the command echo "print('Hello World')" > hello.py to create a Python file.
  3. Go back to PyCharm. You should see the file hello.py in the directory here. Click on it and it will open an empty editor pane.
  4. In the code editor, add the line print("How are you?").
  5. Go back to the Powershell and type cat hello.py. You should see the code.

Next

So you now have PyCharm successfully editing files and interacting with directories on Mac.

You are now ready to code! Move on to PyCharm Basics lab.