Most software that you use is a combination of a client software system and a server software system. “The cloud” is a generic term for a group of servers that do the same thing.
For example:
You use the TikTok app on your phone, which performs searches and recommends videos in the cloud.
You play a multiplayer game on your XBox, but a server controls people entering and leaving, tracking scores, and managing lag.
You have used pip to install Python libraries, but pip talks to a remote server to find the package and retrieve the bytes.
In the final weeks of SENG 201, we will connect to a remote server to host a network application. You will edit and deploy the application.
1 - Connecting to ada
Instructions for connecting to ada and installing a VPN for offsite work
We will use an on-premises (on-prem) server called Ada, named after Ada Lovelace, who wrote the first algorithm for the precursor to modern computers, Babbage’s Analytical Engine.
WHEN OFFSITE - use the VPN client
The ada server is accessible only from the UNCW network.
You will need to use UNCW’s Virtual Private Network (VPN) client software to reach the server while offsite.
Install the VPN client software. You can only install the VPN client while offsite.
Native Linux: Point your web browser at https://vpn.uncw.edu and follow the prompts.
Open the Cisco AnyConnect VPN program and connect to the pre-configured UNCW VPN.
I recommend that you disconnect from the VPN when you don’t need it because it can slow your connection.
Connecting to ada via SSH
We will use the Secure Shell (SSH) program to connect to ada. SSH is a program for creating client-server connections. SSH will connect you to ada’s Linux CLI, which will function like a WSL or MacOS Terminal.
SSH is pre-installed on Windows, MacOS, Ubuntu, and WSL. Open a Terminal and enter the following:
ssh <your-uncw-id>@ada.cis.uncw.edu
# for example, ssh laymanl@ada.cis.uncw.edu
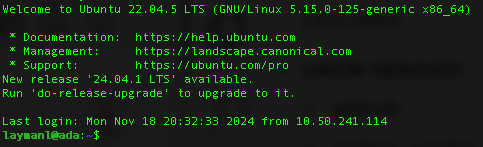
Enter your UNCW login password when prompted. Choose “yes” when prompted to trust the connected machine. The initial login may take several seconds as your account is loaded from UNCW systems.
You should see something like the following after successfully signing in:
You are now logged into the ada server. ada is running Ubuntu Linux, and understands all the standard Linux CLI commands.
There are many commands at your disposal, including python and git.
Type pwd to see your home directory location.
Rules for using ada
ada is a shared server. As such:
Do not read, write, or edit files outside your home directory.
Do not change the permissions on your home directory using chmod or any other command.
Do not intentionally do anything to harm the server, such as fill up the hard disk or overload the CPU.
Activity on the server is logged. Any intentional or negligent violation of these rules will result in a grade of 0 for the course and a violation of the Student Code of Conduct reported to the Dean of Students.
When in doubt if you are allowed to do something, ask the instructor first.
Understanding the basics of files, disks, processes, and programs on Linux
Class recording
Starting out
ada is running Ubuntu Linux, and understands all the standard Linux CLI commands. There are additional commands at your disposal, including python and git.
Open a Windows PowerShell, WSL Terminal, or MacOs Terminal and type the following to connect to ada:
ssh <your-uncw-id>@ada.cis.uncw.edu
# for example, ssh laymanl@ada.cis.uncw.edu
Navigating the file system
Make sure you are connected to ada using SSH. Type the following commands:
pwd# where am I?ls # list filesls -l # list with permissions and sizesls -lah # human-readable sizes, show hiddencd / # root of filesystemls
cd ~ # back to their home
The commands above provide the basics of navigating through the file system.
Linux commands accept OPTIONS, which are the parts beginning with a hyphen, e.g., -lah
Most Linux commands also accept ARGUMENTS that specify the target of the command. For example:
cd ~: the ~ is the argument.
cd /: the / is the argument.
You can also give ls an argument, e.g., ls /usr/bin to list the contents of the usr/bin
Question: What is a hidden file? Why do they exist, do you think?
Question: Which option to ls gives you the sizes, owner, and permission?
What’s happening on the system?
Just like working on your computer, you may run out of disk space or a process may be using all your memory or CPU power. How do check these?
Run the following one at a time:
df -h # disk free — storage usage across mounted filesystemscd ~
du -h # list the size of the current directory and all subdirectoriescd /
du -sh # summarize size of current directory and all subdirectoriesdu -sh ~ # summarize size of your home directory directory and all subdirectories, but using an argument
The df (disk free) and du (disk used) commands are complimentary, show information about files on disk. You use ls -l to see the size of individual files.
What about processes using CPU or memory? You have a few options for that.
Run the following one at a time:
free -h # memory: total, used, availabletop # live process viewer (press q to exit)ps aux # snapshot of ALL processesps u # more compact, shows %CPU, %MEM of YOUR processes
Curious to know who else is on the server? Run the who command.
Exercise: Use top or ps to find the PID (process id) of the most CPU or memory intensive process. Write the PID down. Then run kill <PID>. What happens?
Downloading files and piping
Linux offers a convenient command-line tool for downloading files. All you need is the URL. Run the following command to download our meteoric dataset from the class website.
Run the following one at a time:
wget https://llayman.github.io/seng-201/labs/remote-server/exploring/meteors.zip
ls -l # Note that meteors.zip is downloadedunzip meteors.zip # decompress the filels -l # You should see both meteors.zip and meteorite_landings.csv
Now suppose you want to view the contents of that file. You can use commands we learned from CLI Lab: Text files:
cat meteorite_landings.csv # Print an entire file at oncemore meteorite_landings.csv # Paginate. Use SPACE to advance, and `q` to quit
Writing code remotely
When connected to a server like ada, you typically only interface through the CLI. In ada’s case, there is no window-like GUI.
Before creating files, let’s make a directory to work in inside our home directory. Run the following commands:
cd ~ # Go to your home directorypwdmkdir dev # Make a subdirectory named dev/cd dev # change into the dev directory within your homepwd
Linux uses the ~ character as shorthand for your home folder, i.e., /home/<your_id>. So ~/dev is shorthand for /home/<your_id>/dev.
Make sure you are in your ~/dev folder. Do the following:
nano hello.py
a text editor called Nano will open in the Terminal looking like this:
type in print("Hello World!")
Hit CTRL+X to exit, then Y to save the changes.
You have now created the file. Primitive, huh? Run the following:
ls -al # You should see your hello.py file.python3 hello.py # Python will run an execute the file
Note we use python3 on the server. You may also want to refresh yourself on how to copy, move, and delete files and directory in Lab: File and directory management.
Exercise: Use nano to create another Python file that prints out the numbers from 0 to 9. Run it from the CLI.
Code locally, then upload
The Nano editor is quite handy for editing files on the server quickly. But, we are spoiled by the power of IDEs like Visual Studio Code and PyCharm.
Most of the time, software engineers develop on their own machines and deploy their software programs to servers. One way to accomplish this is to directly transfer files from your computer to a server. To do this requires a program often bundled with ssh called scp – secure copy.
On your local computer: open one of your seng-201/ projects and create a file named process_info.py. Paste in the following:
On your local machine, open a new PowerShell or Terminal window. Use the cd command to navigate to the directory you created process_info.py. Once in that directory, enter the following:
This will copy the file securely to your ~/dev/ directory. Now, switch back to the Terminal where you are connected via SSH. Use python3 to run the file you just uploaded, which should be in your dev/ directory.
You will see output like the following:
laymanl@ada:~/dev$ python3 process_info.py
Python executable: /usr/bin/python3
Current working directory: /home/laymanl/dev
My PID: 348335My parent PID: 347328USER env var: laymanl
SHELL env var: /bin/bash
PATH env var (first 60 chars): /home/laymanl/.local/bin:/usr/local/sbin:/usr/local/bin:/usr...
The scp command is the key here. You can upload multiple files or entire directories at once with it as well. It is great for infrequent use.
As developer, or a team of developers, a much more convenient way to get your source code on a server for testing or production is to use git. We will do this in the next lab.
Key Takeaways
You’ll connect to the remote server ada via SSH (e.g., ssh <your‑uncw‑id>@ada.cis.uncw.edu).
Basic file‑system navigation on Linux includes commands such as pwd, ls, ls -l, ls -lah, cd /, cd ~.
Understanding disk usage and processes:
Use df -h to check mounted filesystem usage.
Use du -h or du -sh to check directory sizes.
Use free -h, top, ps aux (or ps u) to inspect memory/CPU and running processes.
Use wget to download files by URL, unzip to extract archives, and cat / more to view text files on the server.
When writing code on a server with no GUI:
Use a simple editor like nano (e.g., nano hello.py → write code → python3 hello.py).
Or develop locally with an IDE and upload via scp (or use version control like git) for more advanced workflows.
The tilde ~ represents your home directory (/home/<your_id>), so ~/dev is shorthand for /home/<your_id>/dev.
Knowledge Check
What command would you use to show hidden files and human‑readable sizes in your home directory?
Suppose your home directory is filling up. Which command(s) would you use to identify large subdirectories?
How can you see a live view of processes using the most CPU on the system? What key do you press to exit that view?
You have a Python file on your local machine named process_info.py. How would you securely upload it to the server into your ~/dev directory?
In the context of a remote server, why might you prefer editing code locally in an IDE and uploading it rather than using a terminal editor like nano? (Provide two reasons.)
3 - Deploying a networked application
Writing a simple server application that listens for network connections and deploying it to ada
Networked applications are any program that listen for data to arrive over a network socket. Several networked applications are running on your computer right now that are part of your operating system. Web browsers, games, video chat apps are all examples of network applications.
What is the data that arrives over the network? Initially it is treated as raw bytes, but those bytes could represent text that you process as strings, numbers, file data, or other things. The software engineer writes code that processes the bytes into whatever type they represent, and then writes normal program logic to operate on that data. The basics of working with data from a network is quite simple, actually, but what programs can do with that data can be enormously complex.
Some important terms:
Server: The computer or program that is waiting for connections.
Client: The computer or program that is initiates connections. Once connected to a server, they can exchange data.
Socket: the combination of network address and logical port that a program uses to send and receive data, e.g., 152.20.12.250:25555.
127.0.0.1: this IP address is “home” and is shorthand for your local computer
Creating a local server application
We will write in class a simple server application in Python that:
listens for network data on a specified socket.
sends a random question to a client that connects to the socket.
Deploying software to ada
Deployment is the act of making your software available for use. You could deploy your software to your own computer (you do this while testing). For other people to use your software, you need to make your computer accessible via a network and make sure the program is running all the time and ensure that your computer has enough resources to handle thousands of people using it all at once.
Hence, servers. Servers are network accessible and all they do (usually) is serve software programs that users can connect to.
So, how can you get a program to ada? You can use file transfer tools like scp, but we will use git.
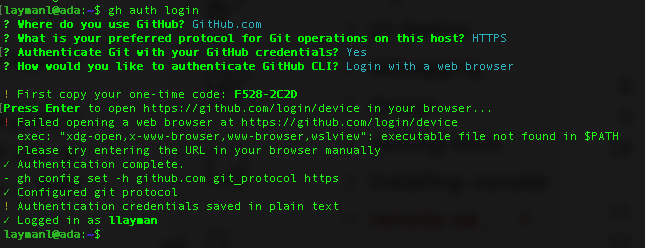
Create a new GitHub repository
We will place your quote-server project on GitHub.
You should see in the ada Terminal a “Logged in as ” message. You are done.
Cloning and running the app on the server
Now you can use git on ada to clone the project and pull any changes.
On ada, run git clone <YOUR_REPO URL> to clone your repo.
cd into the cloned directory
run python3 quote_server.py
If successful, you should see a startup message saying the server is running. You are good to proceed to the next section.
If you see an error message, it may mean that someone else has chosen the same PORT number as you. No problem.
If so, run nano quote_server.py and change the port number to something unique between 10,000-60,000 that is unique.
Hit CTRL+X then Y to save and exit.
Run python3 quote_server.py again.
If you still get an error, go to Step 1 or ask the instructor.
Remember to git add, commit, and push any changes!
You can stop the server app by hitting CTRL+C or closing the connection to ada.
Testing the server
On your local computer:
Run git pull if you pushed changes to your server code!
Run the quotes_client.py script.
Hit c to connect.
Enter 152.20.12.250:PORT where PORT is what you set in the quote_server.py on ada
Hit r a few times. Your quotes are now streaming from your server application on ada to the client application on your computer!
Connecting to ada’s quote server registry
I created a web application that lists all the quote servers running on ada. You can see it here if on the UNCW network or VPN: http://152.20.12.250:22222/
You can add your application to the registry. To do so, you need code that talks to the registry when your server app starts.
Do the following with your quote_server.py in your computer.
Paste the following function into quote_server.py:
deftransmit_server_info():"""Connects to a predefined IP and port and transmits the server's ipaddress, port, and server_name."""try:# Connect to predefined targetclient_socket=socket.socket(socket.AF_INET,socket.SOCK_STREAM)client_socket.connect((TARGET_IP,TARGET_PORT))# Prepare data to transmitdata=f"{PORT},{SERVER_NAME}"# Transmit the informationclient_socket.send(data.encode())print(f"Transmitted server info to {TARGET_IP}:{TARGET_PORT} - {data}")client_socket.close()exceptExceptionase:print(f"Error transmitting server info: {e}")
Invoke transmit_server_info() before your while loop.
Git add, commit, and push.
Connect to ada, pull your changes.
Run your server again with python3 quote_server.py. Your quote server should appear in the registry within a few seconds.
You can use quote_client.py to connect to answer server in the registry (use their IP+PORT address) so long as you are on the campus network or VPN. Nifty!
Note that your server will shutdown when you logout. You may cancel it manually with CTRL+C.