Coding is an incremental activity. You write code, it’s a little broken, you fix it. You work on the next thing, it’s a little broken, you fix it. And so forth until you’re “done”.
During the coding process, you have probably done the following:
Saved a copy of the file at a point when you know it just works. Then you keep coding.
Wanted to go back in time to a point when everything did work so you can start over.
Had to email or otherwise share your code files between computers.
Version Control Systems (VCSes) are systems that manage changes to source code, documents, and other files over time. VCSes are also how all teams store and share their code on a shared project. VCSes are essential to software engineering.
A VCS is a computer application, the most prolific of which is called Git and was created by Linus Torvalds, the creator of Linux. All VCSes, including Git, have the following features:
The ability to make a version: a snapshot of the project files at the current time.
The ability to revert to an earlier version.
The ability to compare versions of the project files to see their differences.
The ability to share versions with a central repository that multiple people can access.
Importantly, it is up to the programmer to decide when to create a version, when to revert, and when to share. This is in contrast to your OS or an app like OneDrive or Google Drive, which do some of these things automatically.
We will use Git and GitHub in this class as our VCS. We will start by setting up these tools on your computer.
1 - Git and GitHub setup
Setting up Git and GitHub utilities
Git is the world’s most popular version control system. GitHub is a cloud service that hosts shared code repositories.
We will setup these and then delve further.
Git installation
Git is available for all operating systems.
On Mac: Open a Terminal and run git --version. If git is already installed, you will see something like git version 2.39.5 (Apple Git-154).You will be prompted to install git if you do not have it.
Lab computers: Should already have git installed. Run git --version from a Terminal and you should see a verison number like git version 2.49.0.windows.1. If not, let the instructor know.
Close any open Terminals. Run the following in a new Terminal.
git config --global user.name "John Doe"# Put your real namegit config --global user.email johndoe@example.com # Put a permanent email here
You only run these once when you install Git.
GitHub set up
We will use GitHub in this class to remotely store versions of our code. Many organizations use GitHub to store their code, including many popular open source projects.
Use a permanent, personal email account to register for a free GitHub account at https://github.com. You will eventually lose access to your UNCW email, but you will want to access your GitHub account long after you graduate.
That’s all you need to do for now. We will use GitHub soon.
1.1 - Git setup for Windows
These instructions are to set up Git on a personal Windows computer.
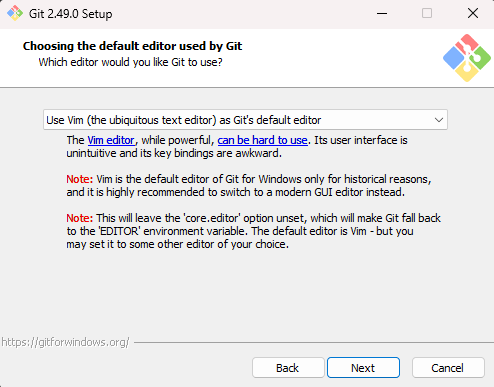
Run the installer. You will keep the default options, except for the following:
On the Choosing the default editor for Git screen, I recommend that you pick an editor that you are somewhat familiar with, like Notepad.
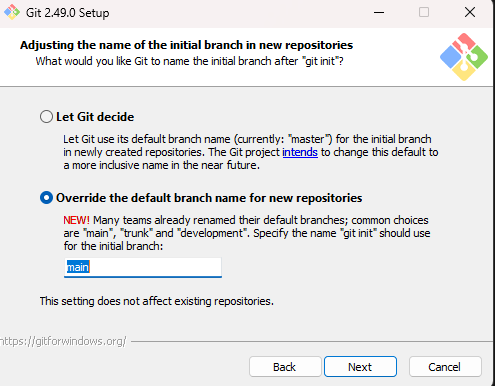
On the Adjusting the name of the initial branch in new repositories screen, select the bottom option:
Leave the remaining options set to their defaults. When done, return to the Git Configuration section in the Git install lab.
2 - Git basics
Basic Git concepts and commands
The Git Verson Control System (VCS) stores versions in repositories. You will typically have one repository for each project. For example, you would have a repository for Assignment 2, a separate repository for Assignment 3, etc.
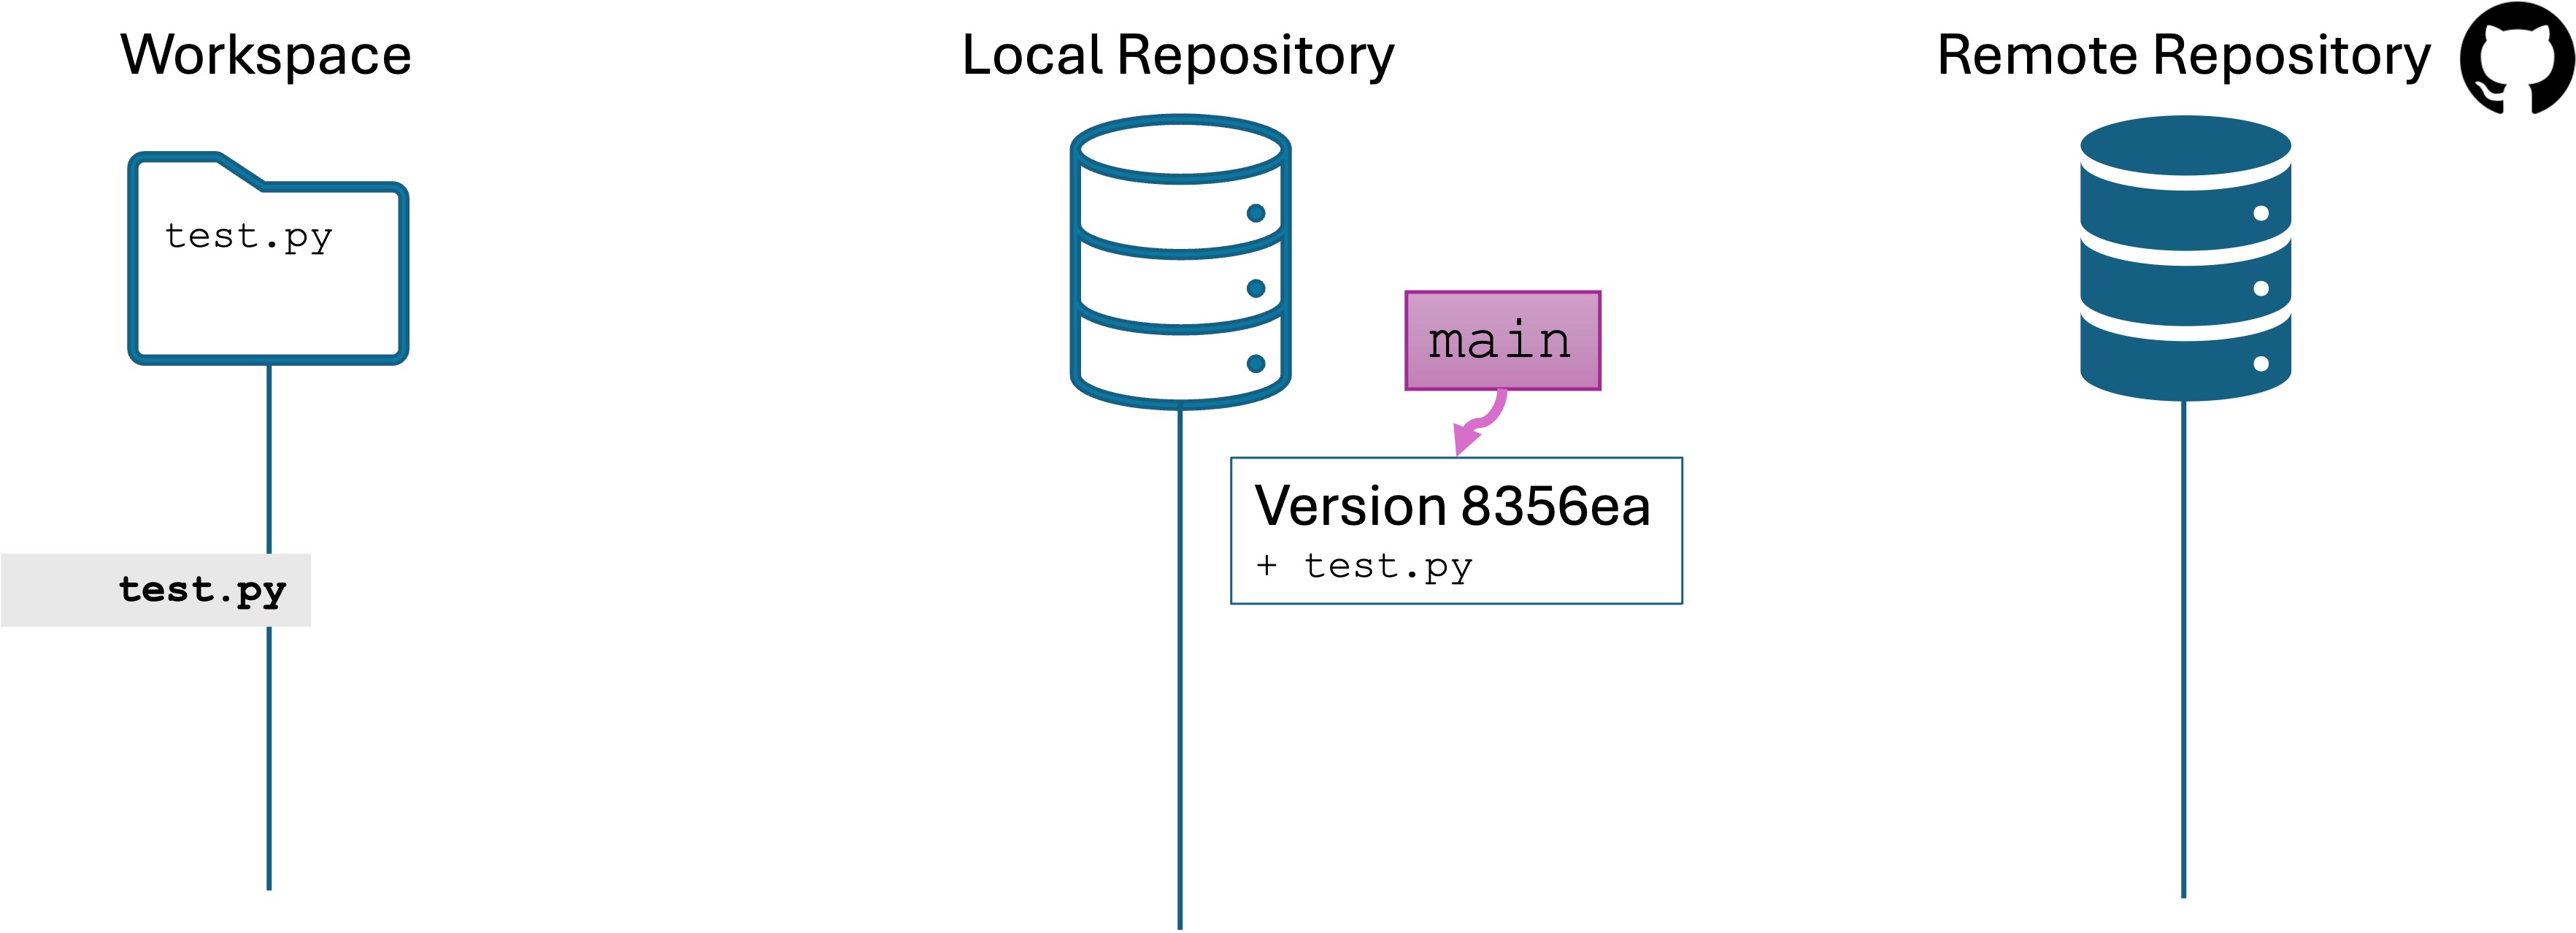
Git divides the world into three parts to facilitate tracking and sharing versions.
The workspace or working directory is the directory on your computer where the project resides, e.g., seng-201/assignment3/. You work on your files in this directory as usual.
A local repository is a hidden directory within the workspace where Git stores the version history and other information. The local repository is created by the Git program. You interact with the local repository using git commands to create new versions, compare files, and revert back to earlier versions.
A remote repository is a copy of the local repository on a computer somewhere else. In this class, the copy will be kept on GitHub, but software companies may have their own servers. The remote repository enables teams to share project changes and to restore the project if something terrible happens to someone’s computer.
You must learn and understand the relationship between these entities to master Git. Tools like OneDrive and Google Drive have similar concepts, but what distinguishes Git from those tools is that you decide when to save and share changes to your project between these entities.
Keeping a version history
We will start with the most simple use case for a VCS: we want to kept a historic timeline of versions. A version is a snapshot of files in the workspace at a point in time.
Step 1. Start with a directory
Create a subdirectory called speakeasy in your seng-201/ directory. Change into the speakeasy directory
Open the directory in your code editor. Create a file named main.py with the following:
main.py
print("Welcome to the Speakeasy!")print("Did you know? The term 'speakeasy' was coined during Prohibition in the United States.")mocktails=["Virgin Mojito","Cucumber Lemonade","Pineapple Ginger Beer","Berry Spritzer"]print("\nToday's Mocktail Menu:")fordrinkinmocktails:print(f"- {drink}")print("\nThank you for visiting! Come again soon.")
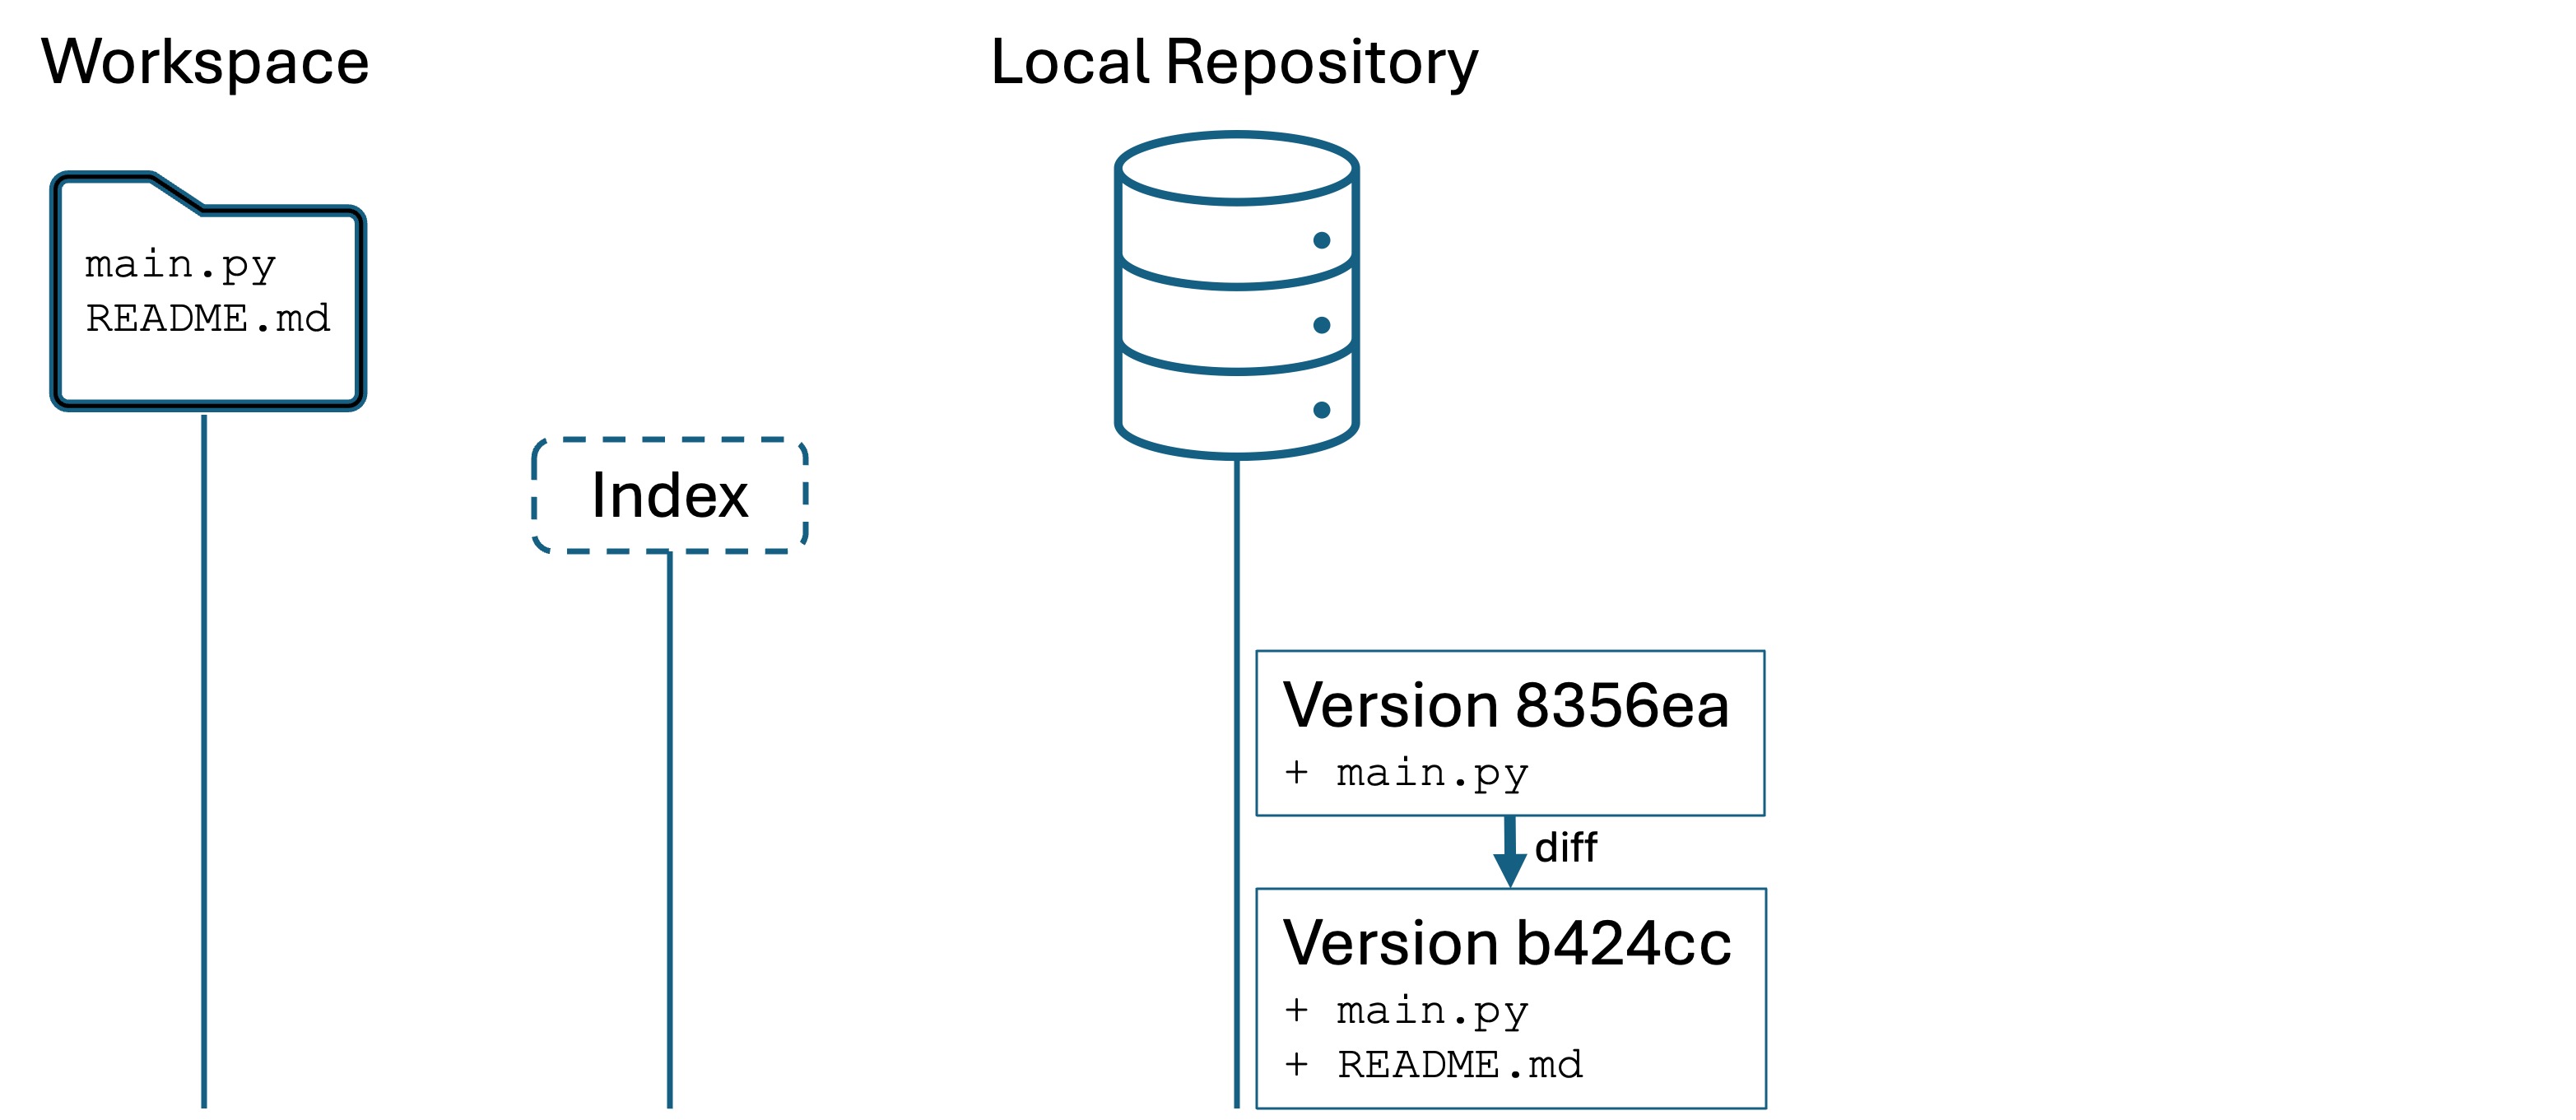
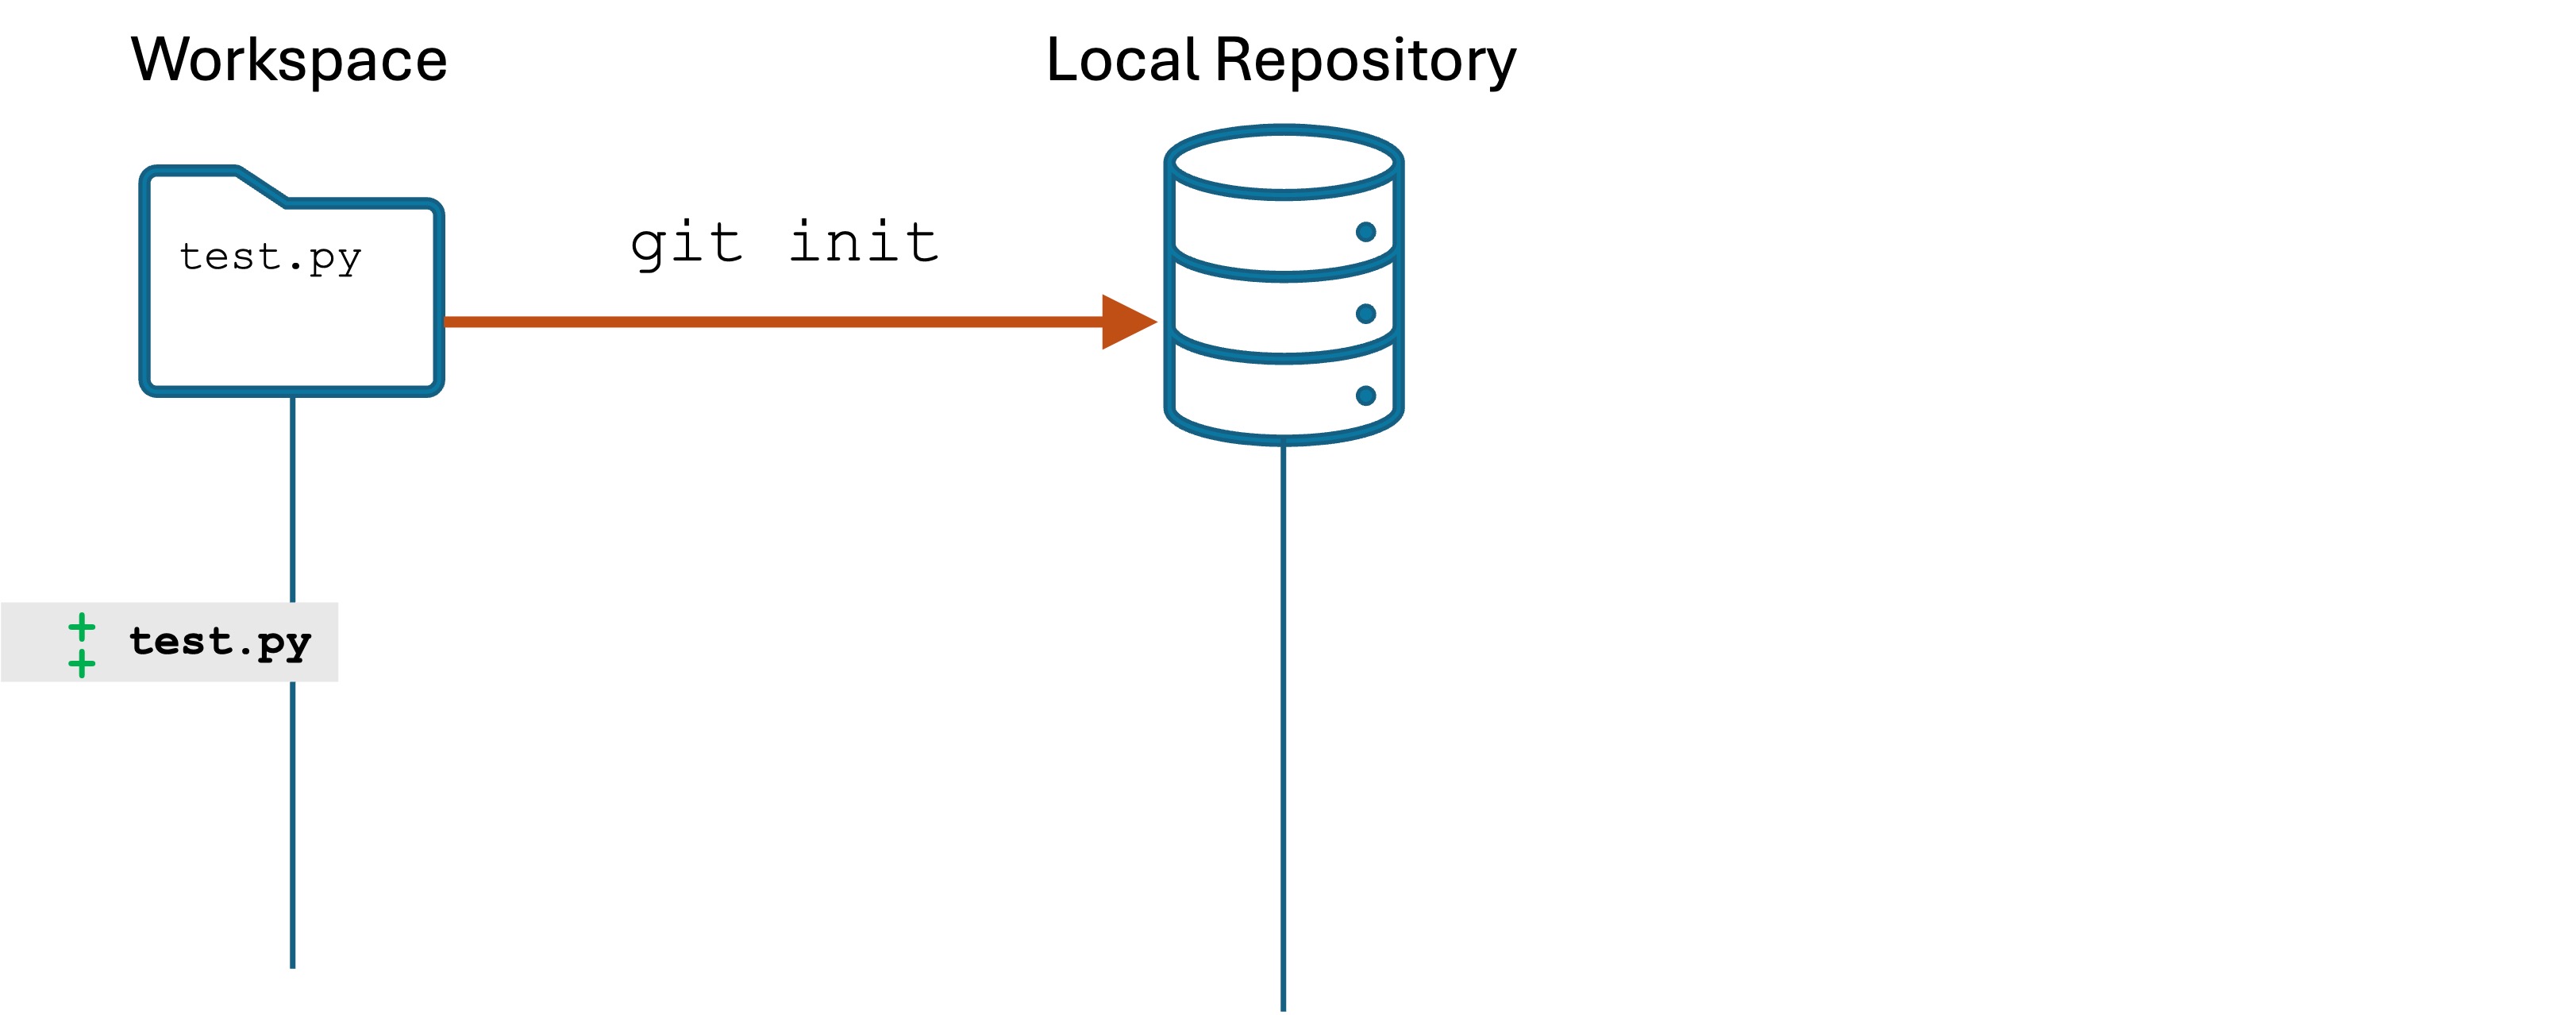
We have created only the workspace – no Git yet:
Conceptual model
Step 2. git init
We need to initialize each project to use Git. In the Terminal:
Make sure you are in the speakeasy/ directory.
Run the command git init
You will see output like Initialized empty Git repository in /Users/laymanl/seng-201/speakeasy/.git/
This command initializes the local repository within the working directory. The local repository is created within a hidden .git/ subdirectory. Run the command:
(Mac/Linux) ls -al
(Windows) dir /a
to see the .git/ subdirectory. You will not see it in the file browser of your IDE by default.
You may see the .git/ subdirectory in your Mac Finder or Windows Explorer depending on your settings.
Conceptual model
Git is now monitoring the workspace for changes to files and subdirectories. You only need to run git init once to track a new project and any subdirectories under that project.
A word about git directories
First, you should not keep Git repositories in directories that are in OneDrive, Google Drive, or the like. You can run into weird authentication errors.
Second, do not nest Git local repositories, i.e., do not run git init on a directory, then run git init later on a subdirectory of the original.
If you ran git init in the wrong place, find that hidden .git/ directory and delete it. This will remove the Git repository (and all of its history), but will not change the workspace files.
Checking where you are: git status
Run the command git status. You should see something like:
On branch main

No commits yet

Untracked files:
  (use "git add <file>..." to include in what will be committed)
	main.py

nothing added to commit but untracked files present (use "git add" to track)
git status is useful for understanding the state of your workspace and local repository. Breaking down the contents:
On branch main: we will discuss branches in a future lab. Ignore for now.
No commits yet: Git is telling us we have not created a version yet. We have to do this manually.
Untracked files...: Git says there are files that have been added, changed, or removed that we have not versioned yet.
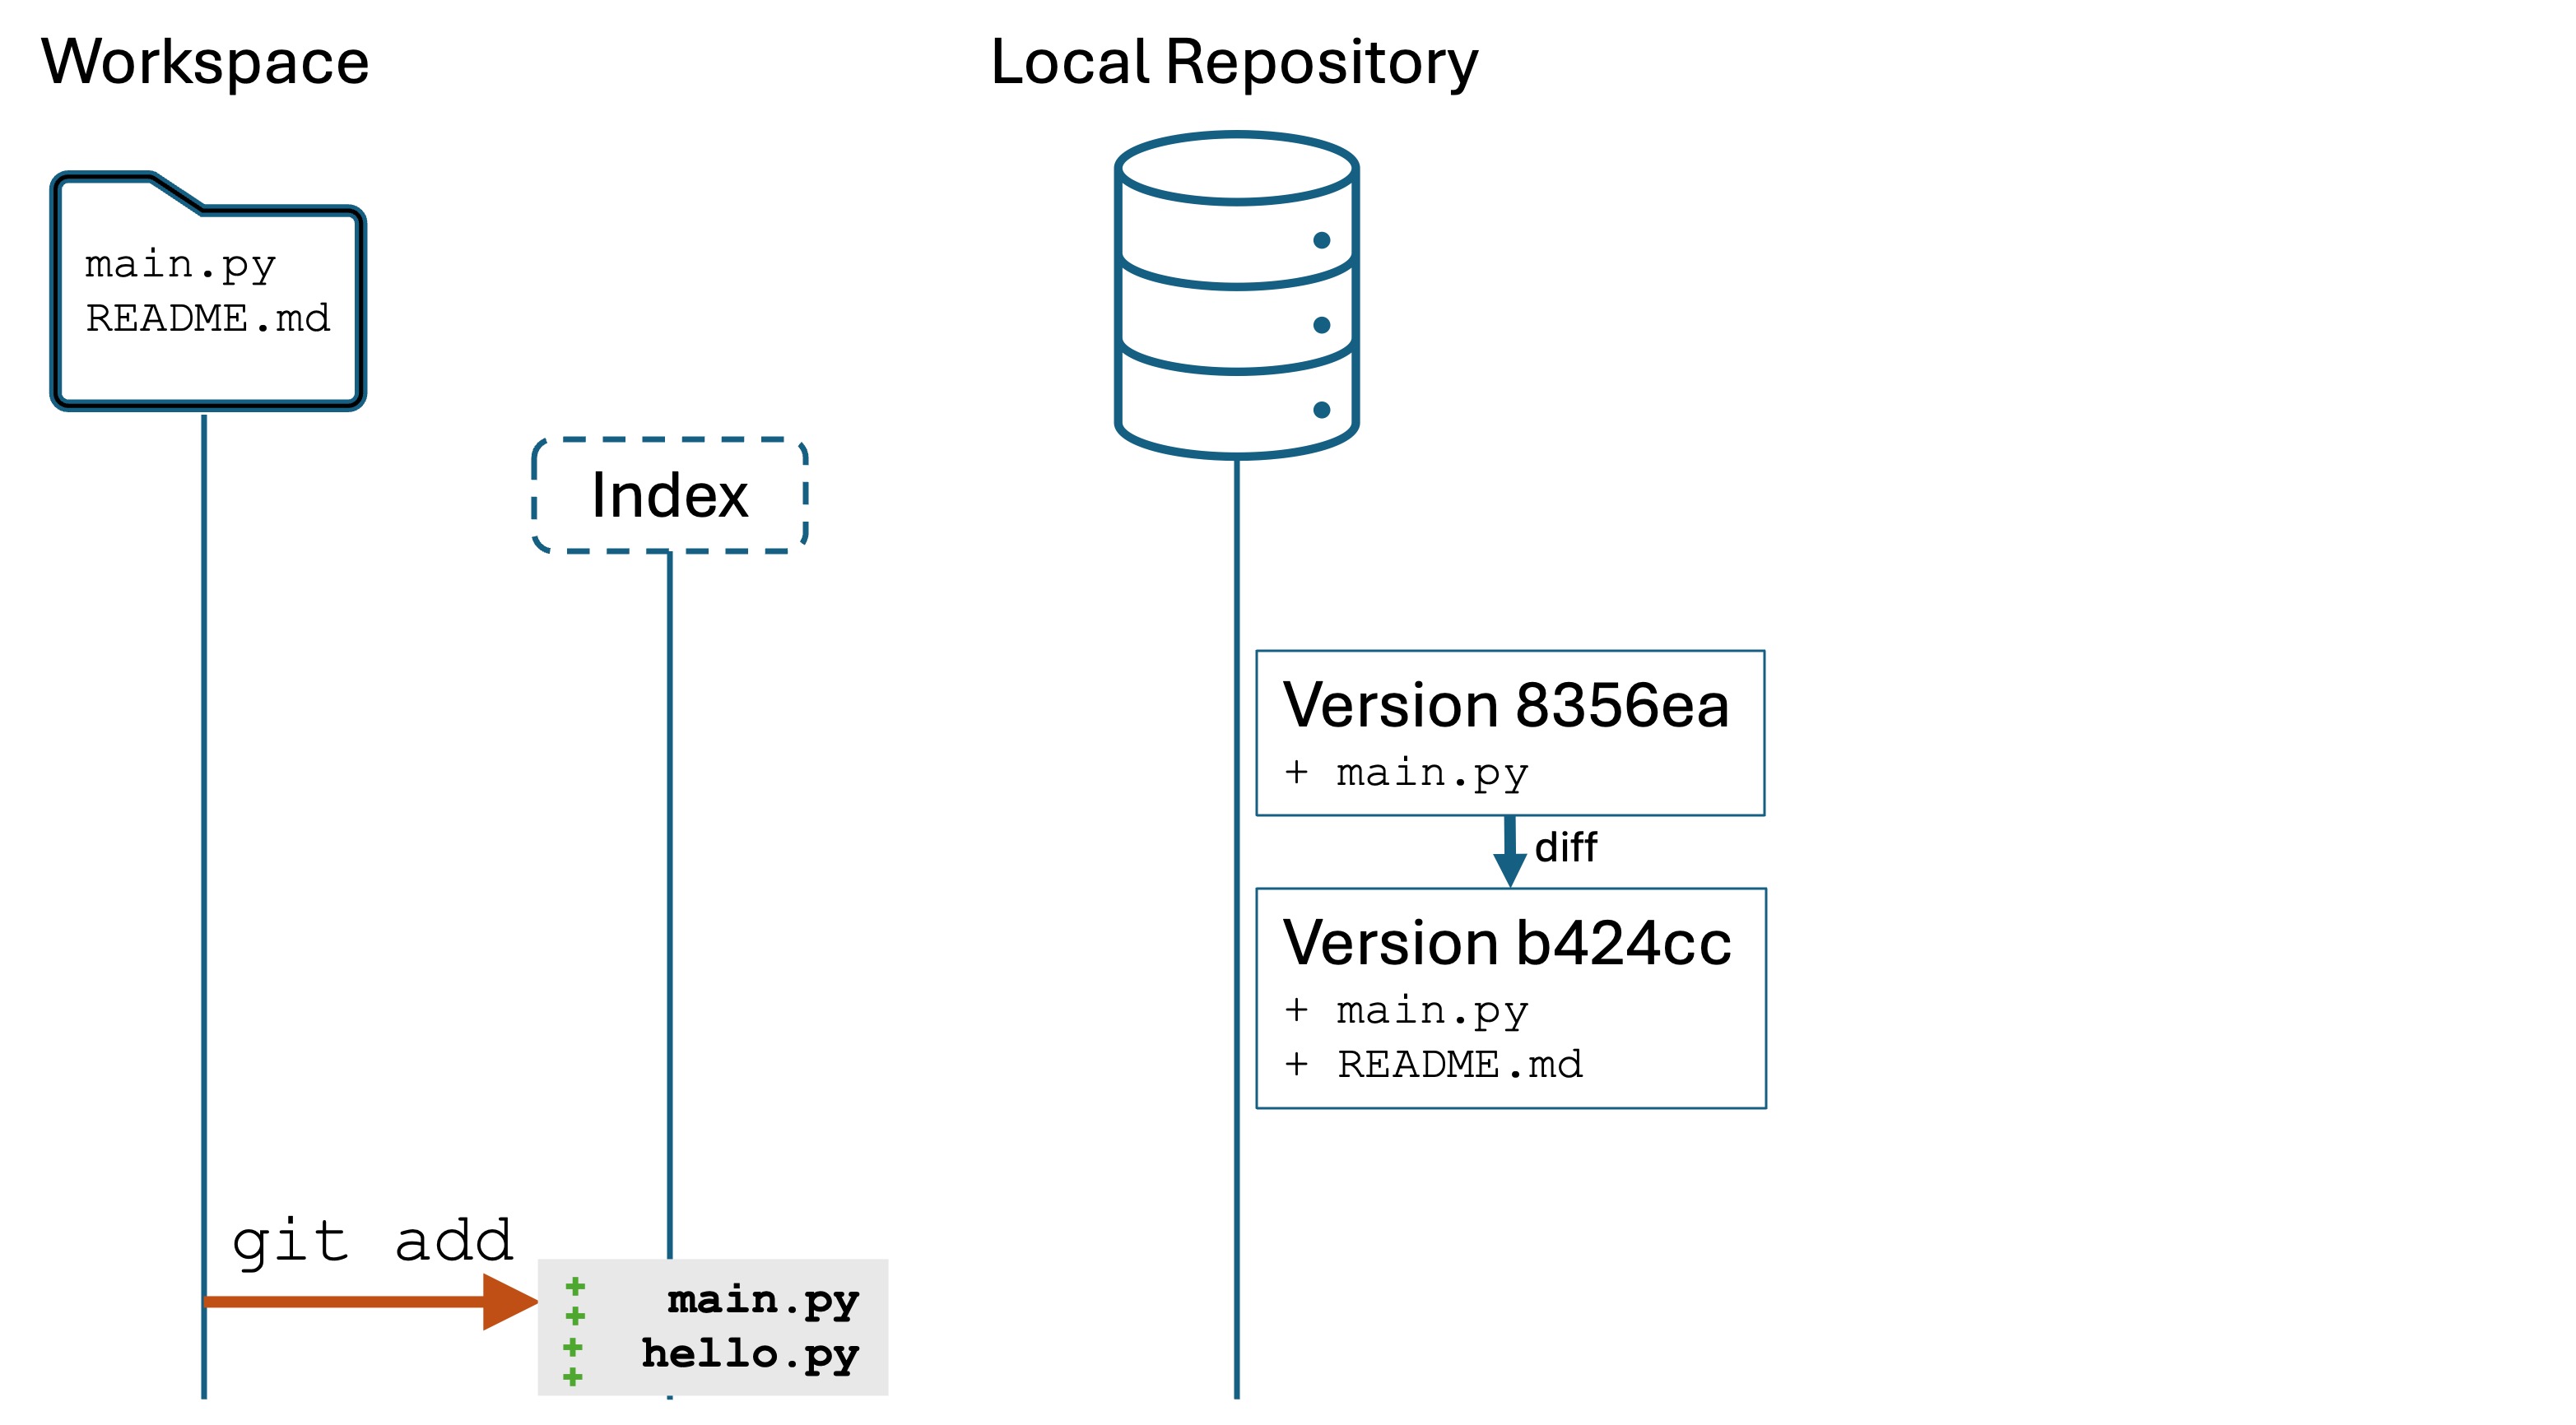
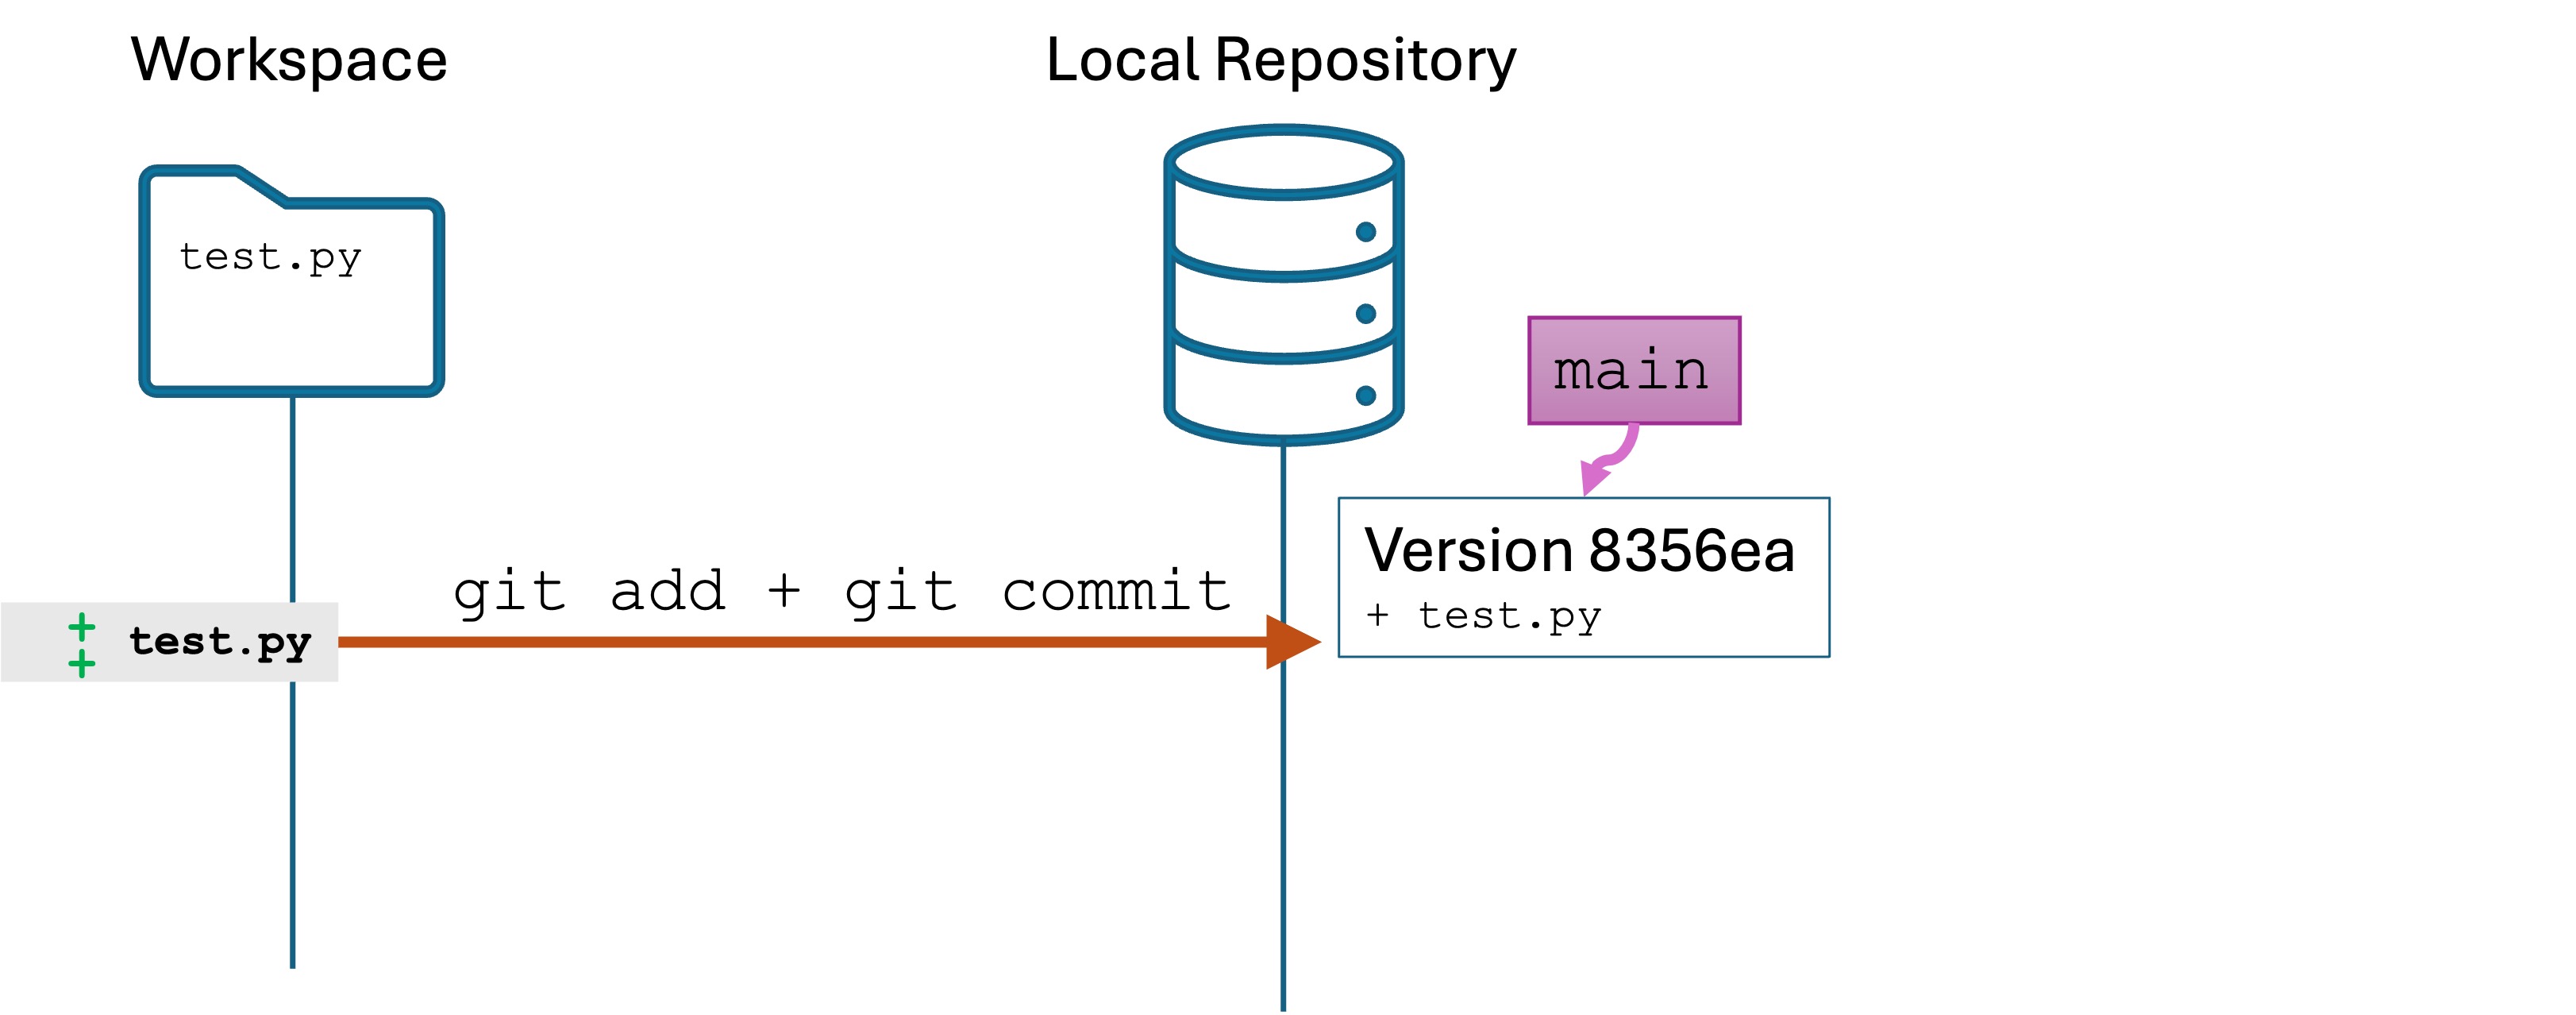
Step 3. Creating the first version
Creating a version entails two steps. Run the following in the Terminal:
git add main.py
git commit -m "First commit of main.py"
git add [file]: Adds a changed file to the index.
The index is the list of files that will be saved to the version.
It is possible to edit, say, 10 files, but only save 5 of them to the version. The index lets you be selective if you need to.
git commit -m "<message>": Commit your changes to a new version.
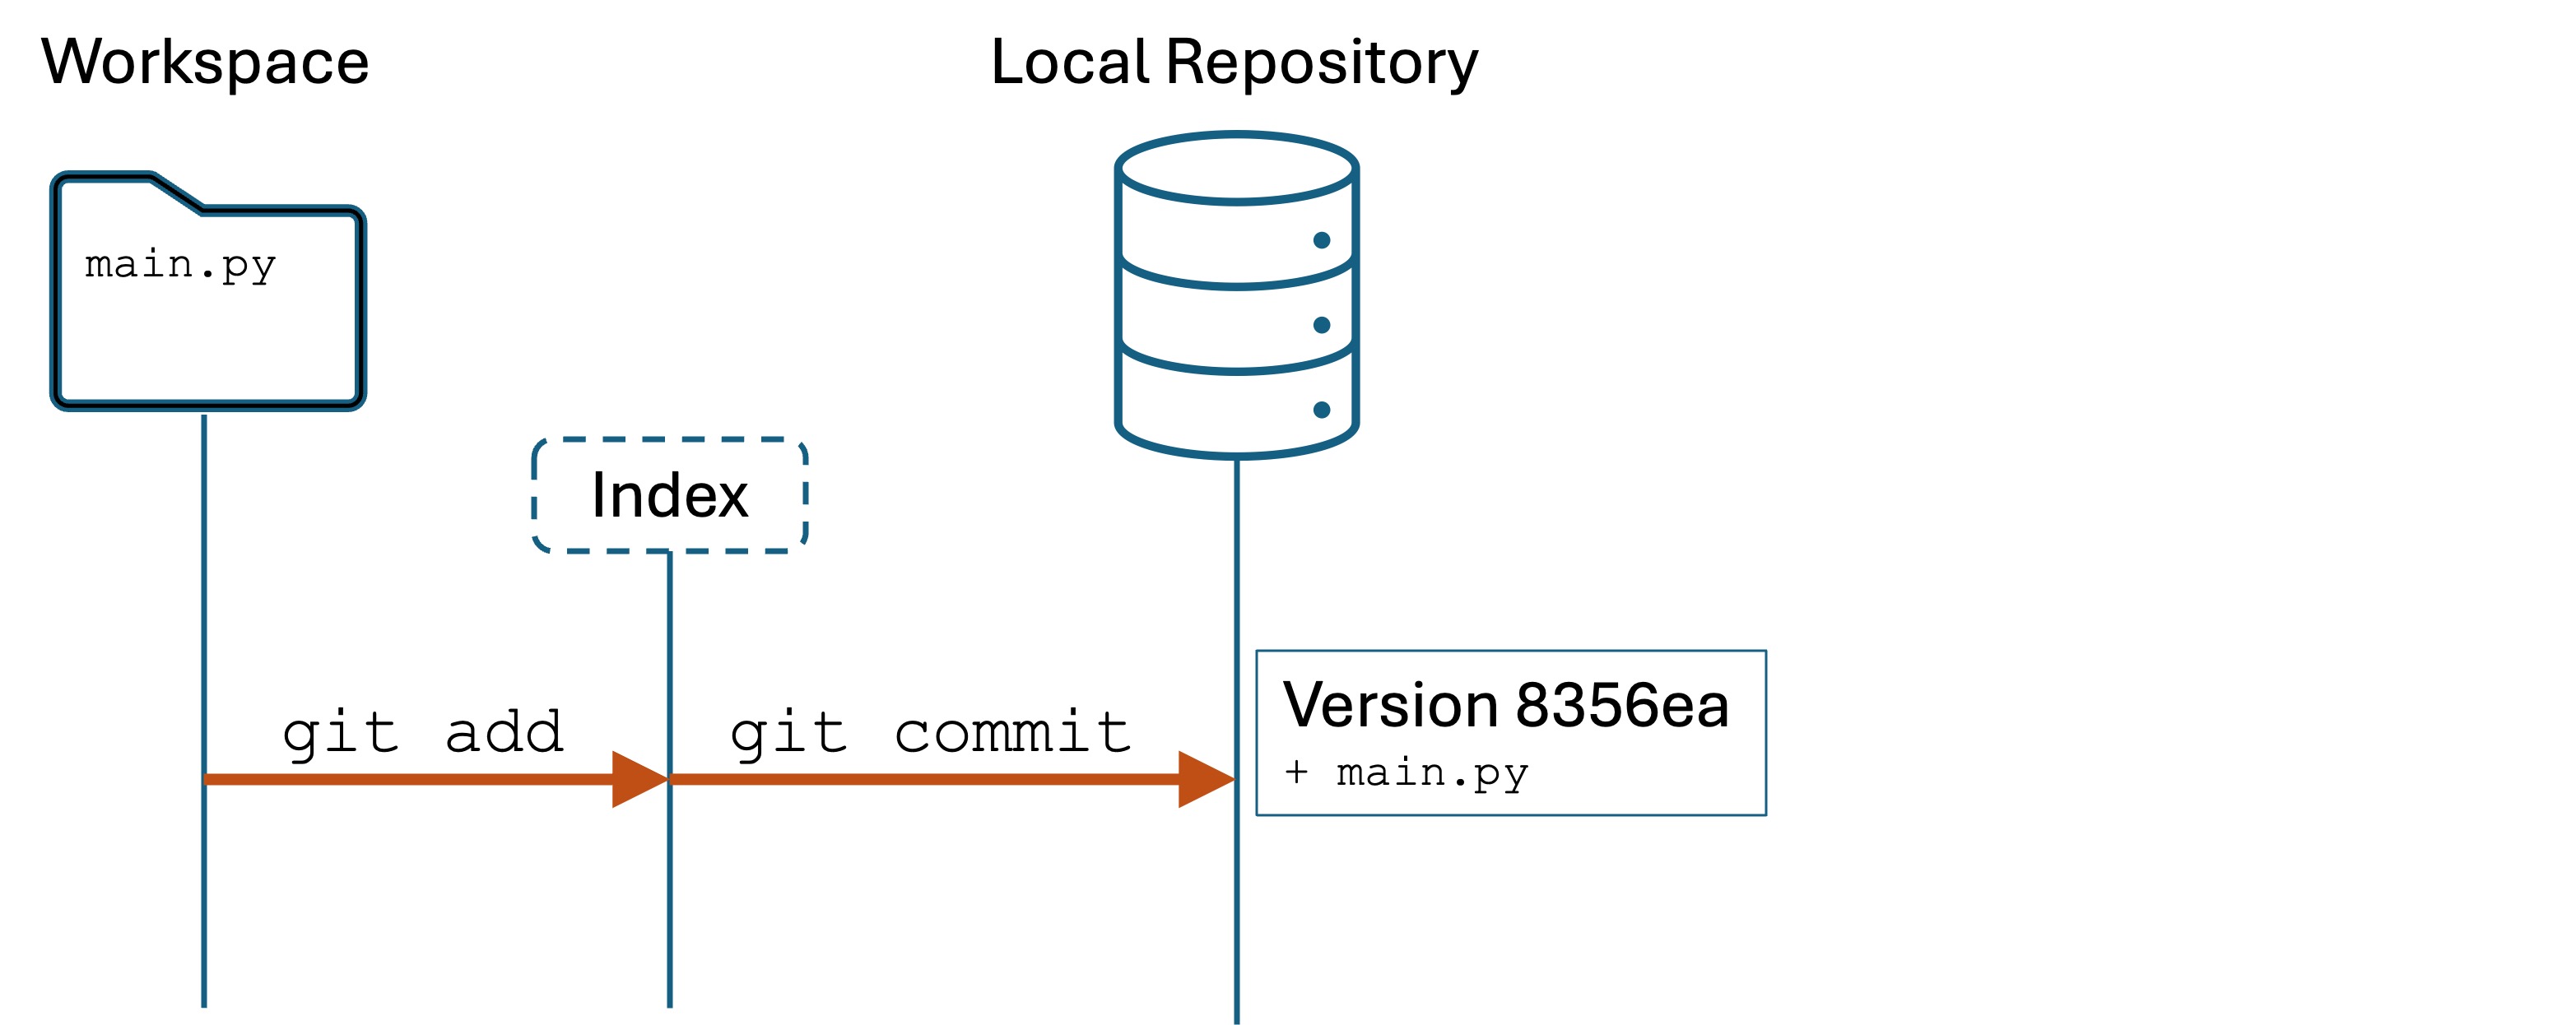
Conceptual model
We have just created a new version: a snapshot of project files at a point in time. We have added and committed main.py to a new version in Git local repository. We can now, if we want, restoremain.py to this version in the future.
Step 4. Creating another version
Let’s make some edits to our project. First, the following line to main.py:
print("Don't forget to tip your server!")
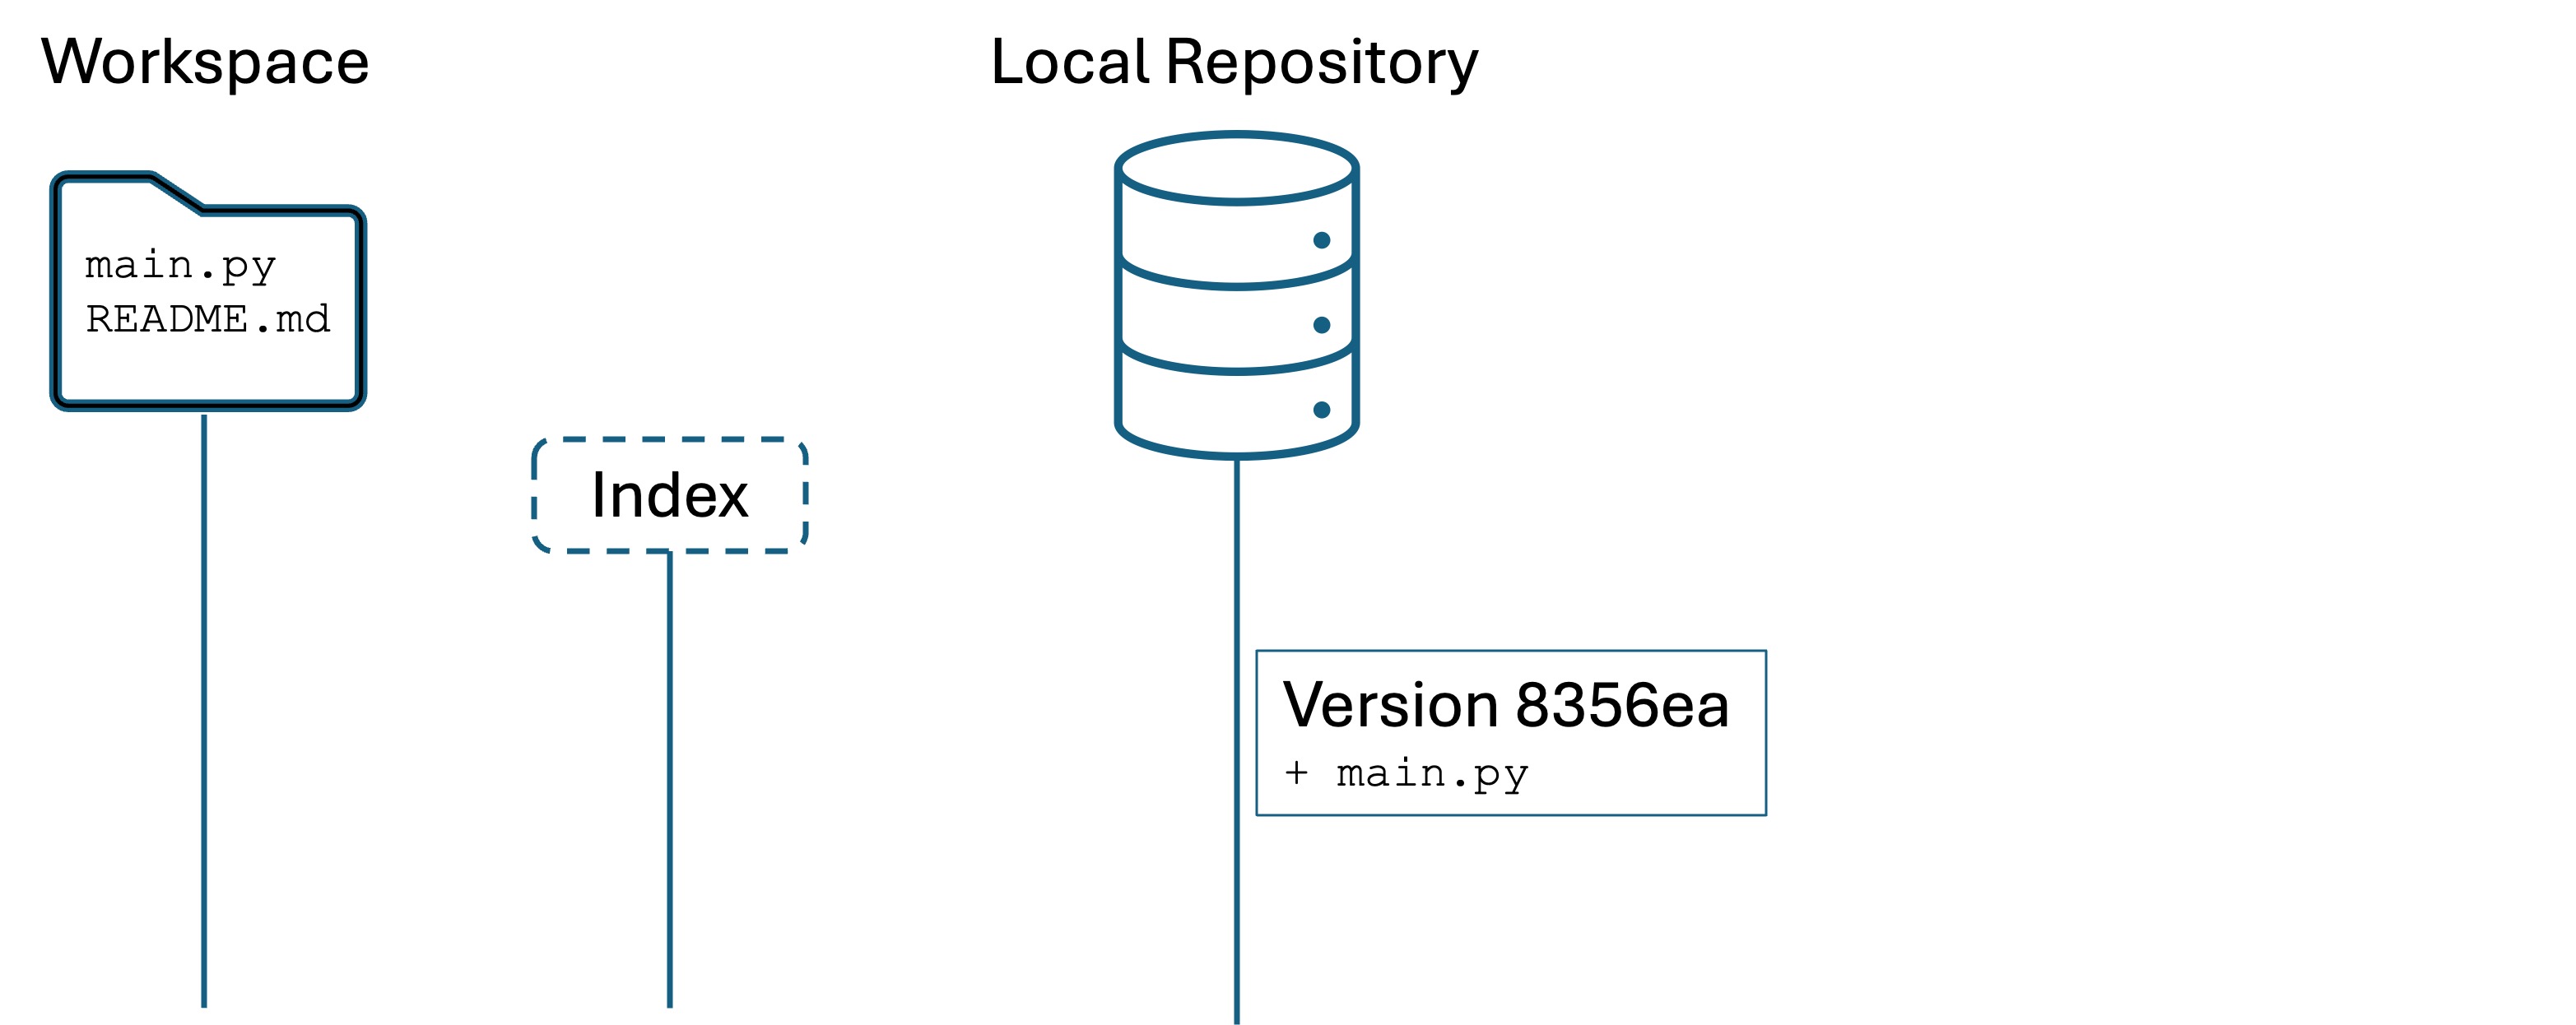
Second, create a new file named README.md in your IDE:
This is my first project!
Go to the Terminal and run git status. You will see something like:
On branch main
Changes not staged for commit:
(use "git add <file>..." to update what will be committed)(use "git restore <file>..." to discard changes in working directory) modified: main.py
Untracked files:
(use "git add <file>..." to include in what will be committed) README.md
no changes added to commit (use "git add" and/or "git commit -a")
This is the current status. We have added a file, but we have not added it to the index nor committed it yet. We also haven’t added or committed our changes to main.py yet. Remember, everything in Git is manual and this is by design.
The Changes not staged for commit: section tells us which files have changed in the workspace, but we haven’t added to the index. We also see the Untracked files: section, which is telling us that README.md is a new file with no version history.
Let’s commit them both at once. Run the following:
The command git add . tells Git to add ALL changes, additions, and deletions in the current directory. This is how you should get a snapshot of all changes to your project.
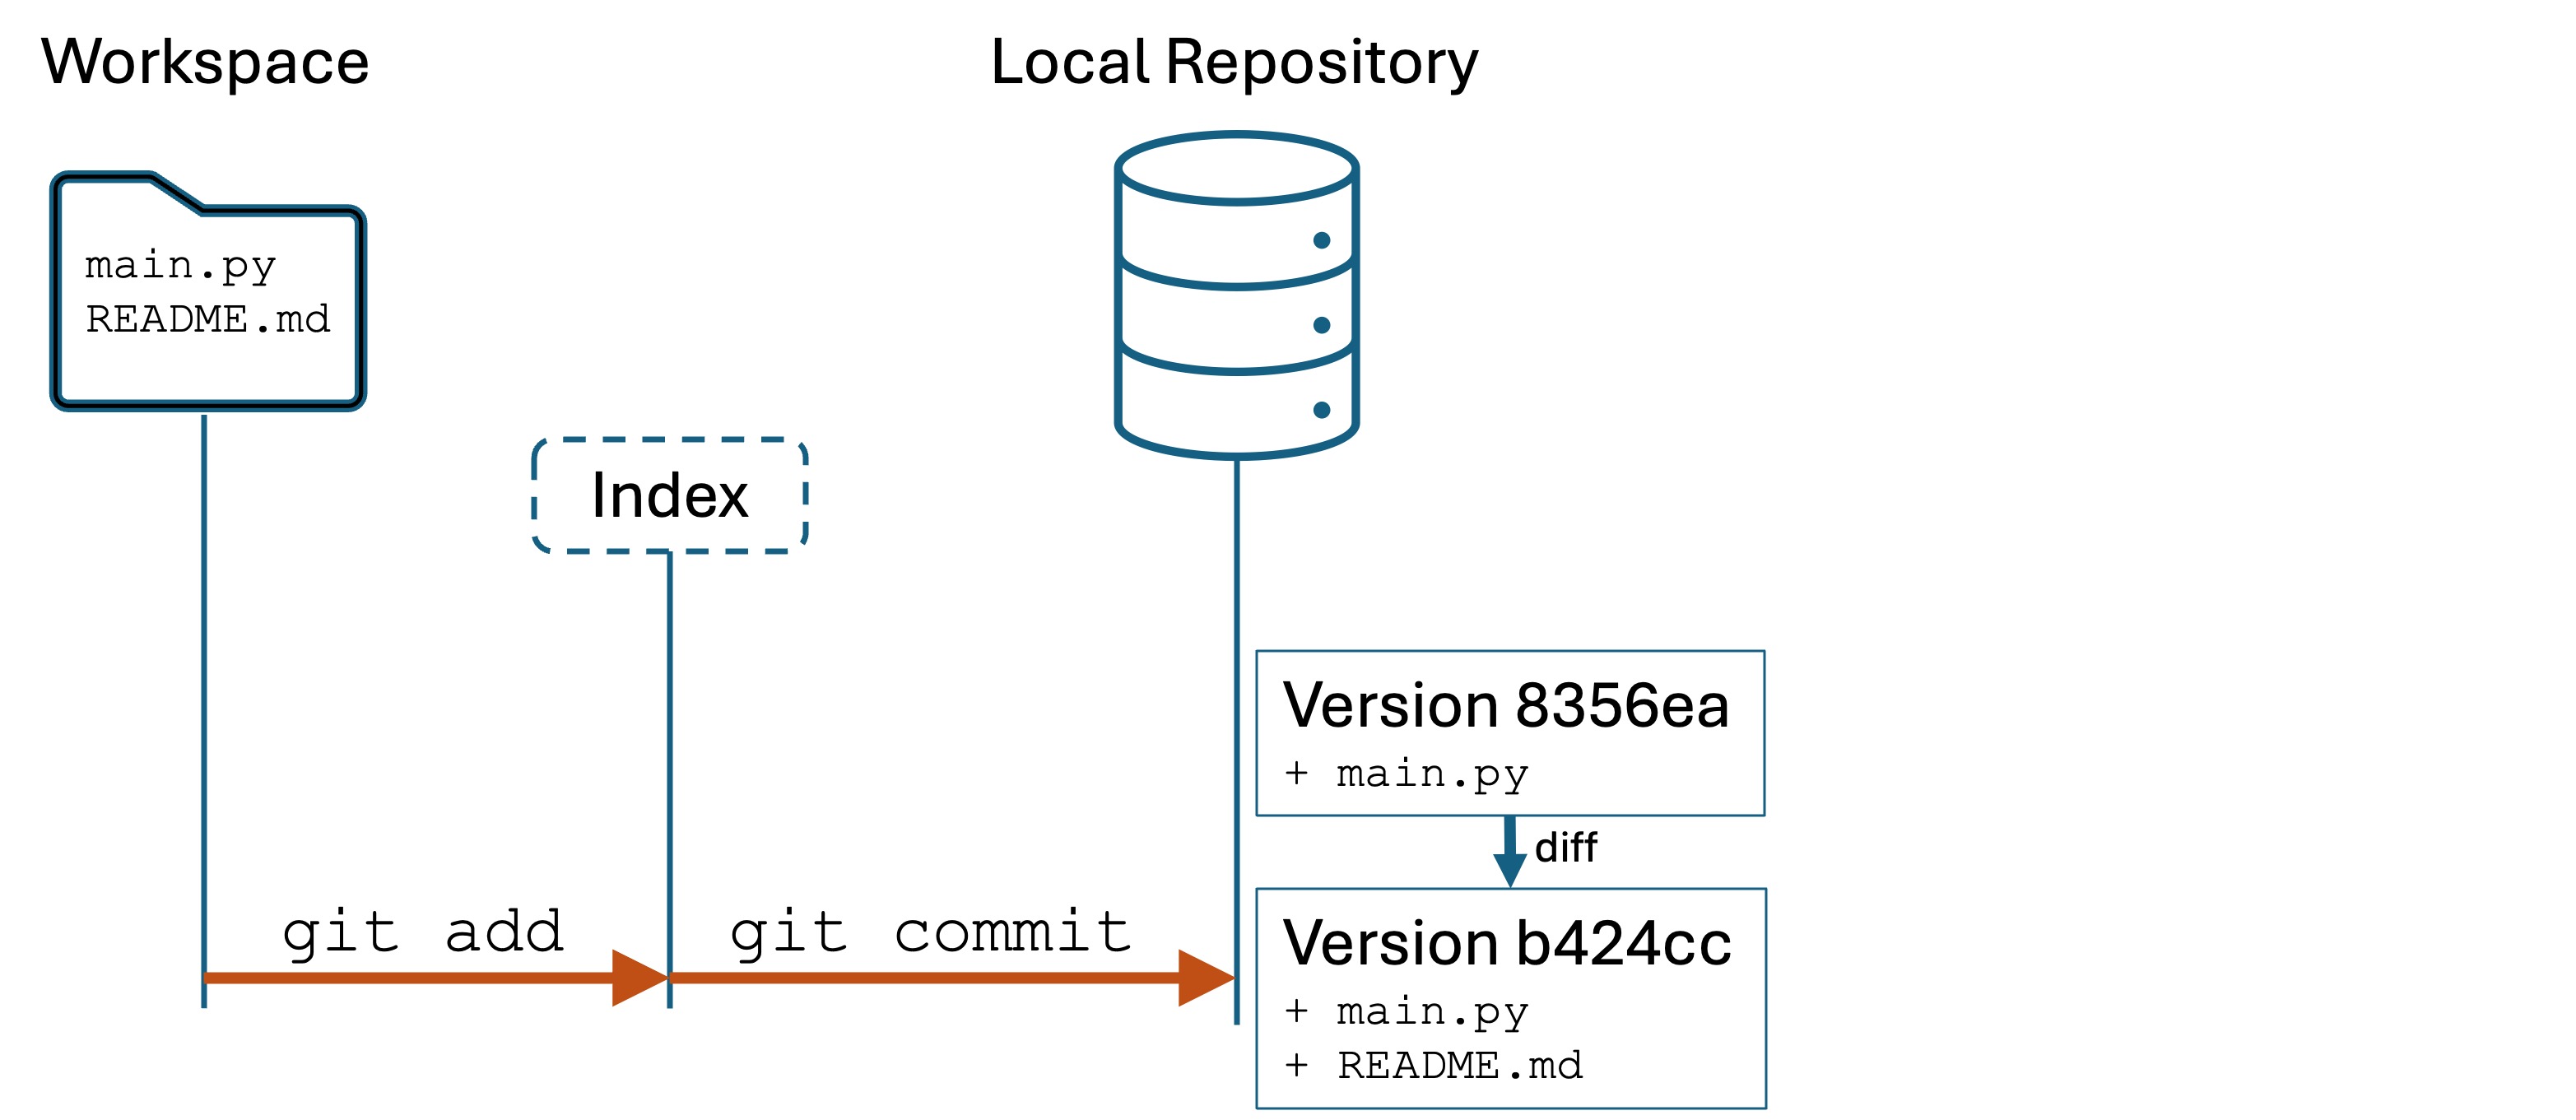
We have now created a new version. Our Git looks like this:
Differences
It is important to understand that Git does not store entire copies of files. You cannot go into the hidden .git/ directory and simply copy “version 1” of your files.
Git stores file differences. It compares Version 2 of your files to Version 1 to see what has changed, and stores the set of changes. This set of changes is called a difference, or a diff for short. Storing only the differences makes Git more space efficient, and also enables some useful comparison functionality that we will use in a future lab.
Step 5: Viewing history with git log
Type git log in your Terminal. You will see something like this:
commit b424cc472f7276dc35493abbd186563a191ca25b (HEAD -> main)
Author: Lucas Layman <laymanl@uncw.edu>
Date:   Mon Oct 21 15:21:44 2024 -0400

    Added message and README file

commit 8356ea035b8d6538f9ea4eabe2393d6cd6016553
Author: Lucas Layman <laymanl@uncw.edu>
Date:   Mon Oct 21 15:13:00 2024 -0400

    First commit of main.py
(END)
Press q to exit the log viewer.
Each block is a version. The versions are not numbered 1, 2, 3, etc. but are identified by a unique hash like b424cc472f7276dc35493abbd186563a191ca25b. They are shown in reverse chronological order.
git log shows you the version history of the local repository. git log useful to see what work has been done recently. The log output also highlights the importance of a meaningful, succinct commit messages.
Important concept review
The workspace is the directory on your filesystem that your project lives in. You code here. When you make changes to files, they are immediately saved in the workspace because the workspace is synonymous with your filesystem.
The local repository is Git’s history of versions. Versions are snapshots of the workspace files at a point in time. The developer must manually add and commit changes to create a version.
Git does not store entire copies of files, but rather the differences from one version to the next.
Summary of the process
To create a version history for a project (a directory), do the following:
Run git init to create the local repository.
Make changes to files: adding new files, editing existing files, deleting files.
git add . to stage all changes in the index.
git commit -m "<message>" to save the version to the local repository.
Repeat steps 2–5.
Knowledge Check
(Question) Explain the purpose of the local repository and how it differs from the workspace.
(Question) What is the function of a remote repository in Git?
(Question) Describe the significance of the .git/ directory.
(Question) What happens when you run git init in a directory?
(Question) What does the git status command show you?
(Question) What is the purpose of the Git index (staging area)?
(Question) What command do you run to add something to the staging area?
(Question) What command do you run to save a new version in the local repository?
(Question) What happens if you try to save a new version without staging first?
(Question) True or False: A version is a copy of the entire file that was changed?
(Question) Versions in Git are not stored sequentially as in Version1, Version2. How are versions uniquely identified in Git?
(Challenge) Create a new directory, initialize it with Git, and create a new file. Commit changes to track the file.
(Challenge) Add modifications to an multiple files and use git status to see the changes. Commit only a subset of the changes.
(Challenge) Describe how you would undo an incorrect git init operation.
3 - GitHub CLI setup
Prepare to work with remote repositories on GitHub
Signup to GitHub
Sign up for a free GitHub account if you haven’t already. I recommend that you use a permanent, personal email.
Install the GitHub CLI
Let’s install the GitHub CLI, which will make working with remote GitHub repositories easier.
On MacOS
Install Homebrew if you do not have it already. Run the following in the Terminal and follow the on-screen instructions:
Open the new directory. Click until you find the bin directory inside. Drag that bin directory to the C:\Users\YOUR_ID\gh\ directory you created.
Hit the Windows key and search for user environment variables. Select the program Edit the user environment variables for this account
Click the New button, then Browse
A File Explorer will appear. Navigate inside the C:\Users\YOUR_ID\gh\bin directory. Click “Okay”.
Now open a new Terminal window. Run the command gh and you should see a list of available commands.
Login with the GitHub CLI
Run gh auth login and follow the onscreen instructions to register your computer with GitHub.
Leave the default options selected in the CLI. You will hit Enter to open a web browser. Sign into GitHub with your GitHub credentials.
If the browser does not open: manually open a browser to https://github.com/login/device. Sign into GitHub with your GitHub credentials if needed.
Enter the code shown in the Terminal window.
Complete the authorization and leave the default options as-is.
Once you have finished, your Terminal and Browser should look like this:
That’s it. We are now ready to work with Git and GitHub.
4 - Undoing mistakes with Git
Resetting your work to a safe state
One of Git’s powers is being able to “go back in time” to a previous version to undo a terrible mistake or simply to start fresh.
How to identify the scenario that applies to you
We will walk through some common scenarios where you might want to undo your work and reset to a known safe state.
“Going back in time” depends on what you want to change and the current state of your repository in terms of (a) what’s changed in the workspace, (b) what is staged in the index, and (c) what has been committed to the local repository.
Use the git status command to identify staged and unstaged changes, and git log to check the local repo version history.
Starting state
In Lab: Git Basics, we created a Git repository for a simple speakeasy/ project. We added two files, main.py and README.md, and committed two versions:
We will pick up our example from this point.
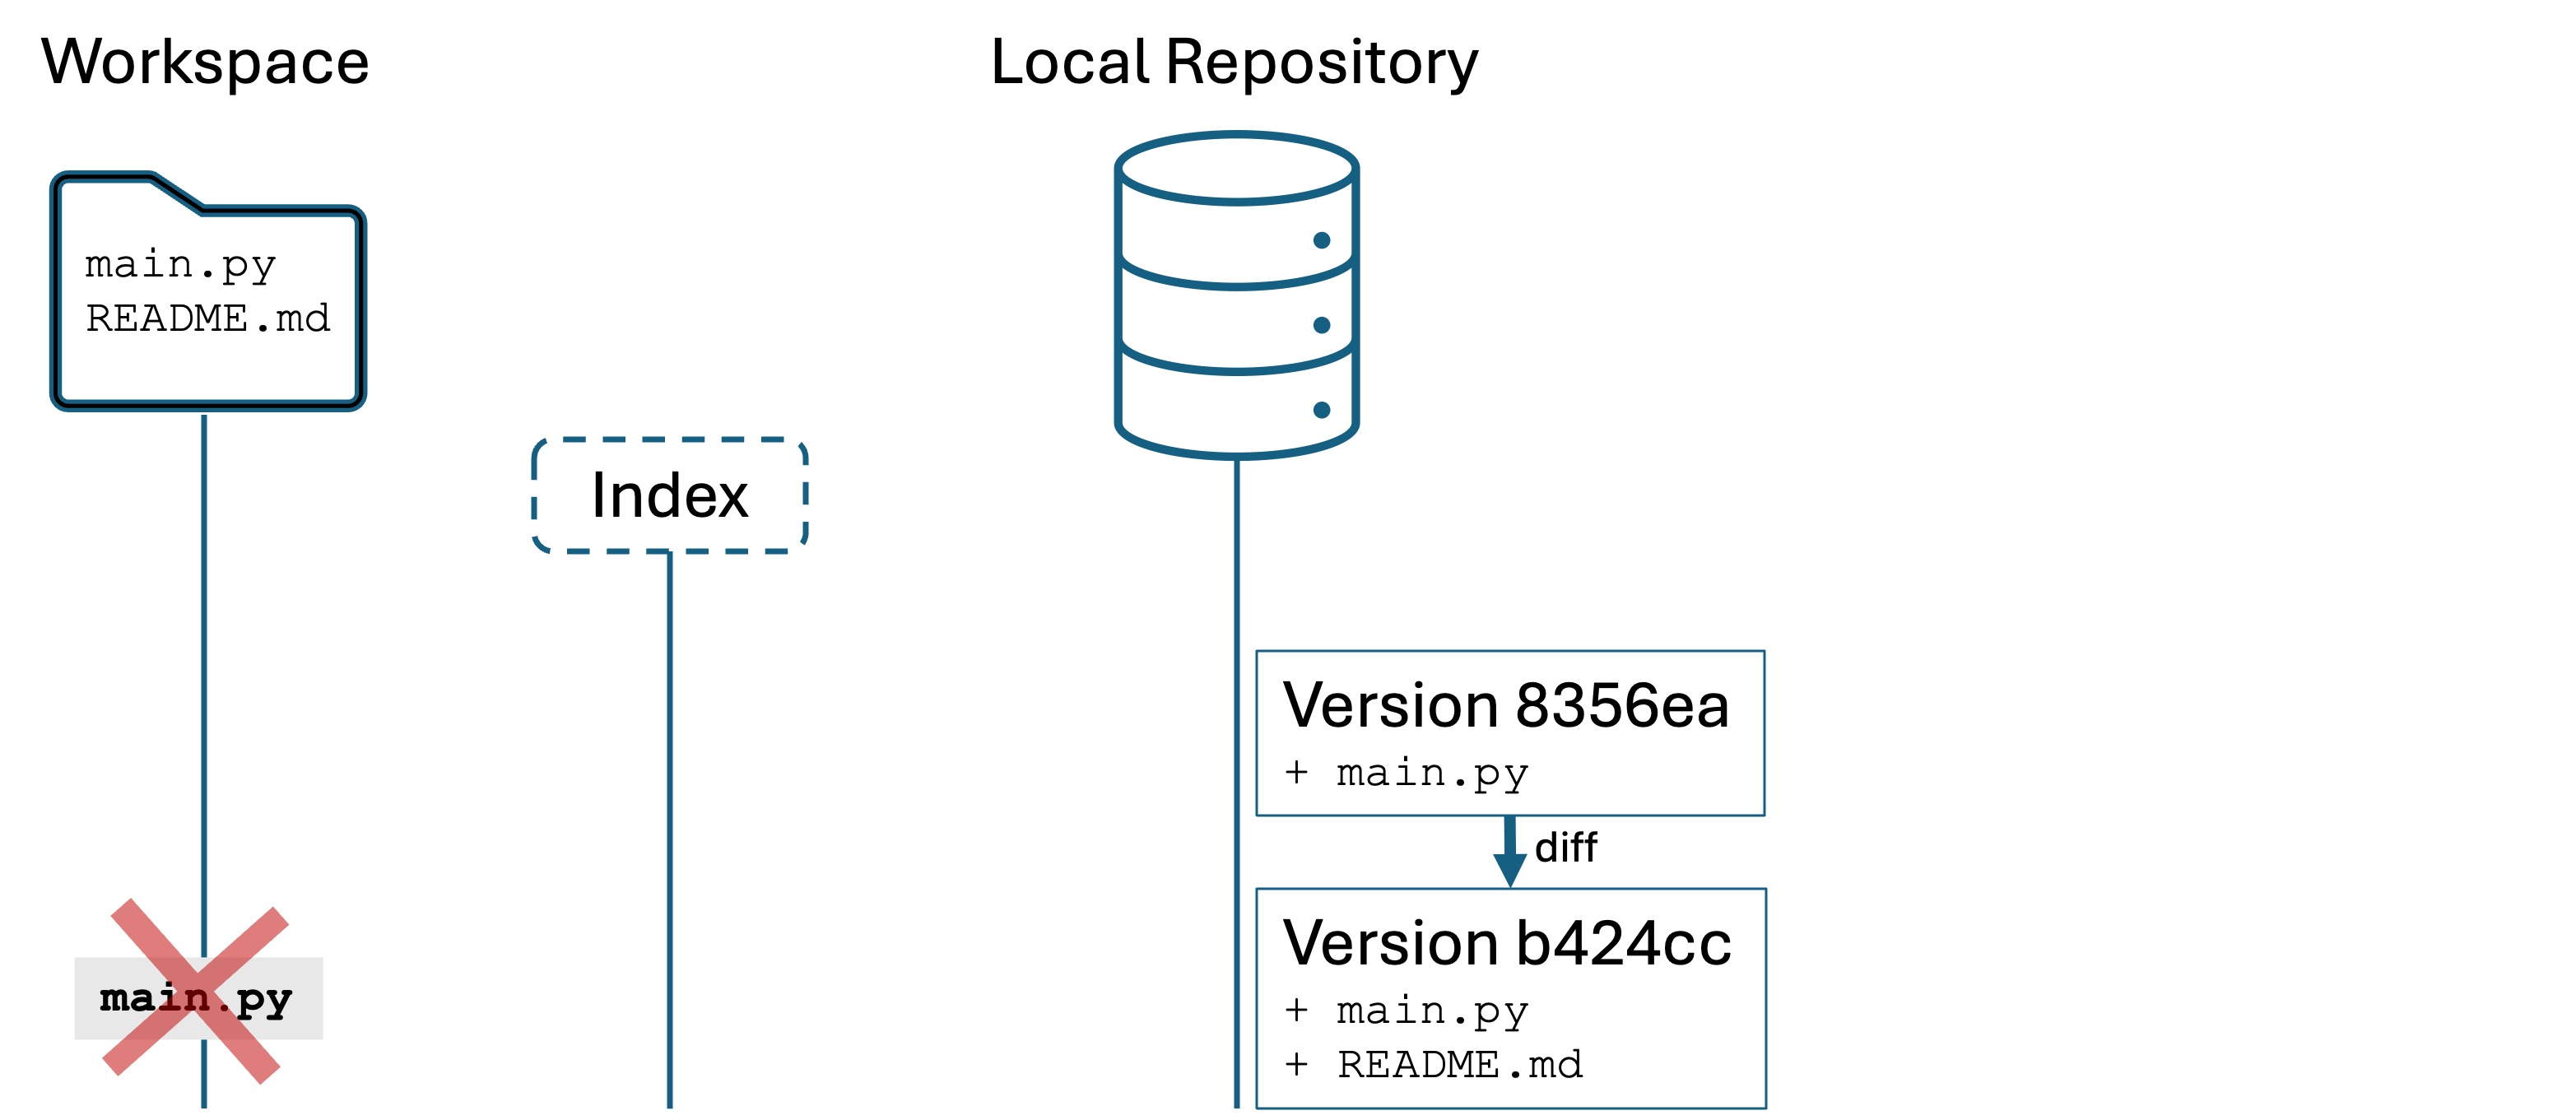
Oops #1: Deleted something from the workspace
Open Visual Studio Code for the speakeasy/ folder.
Now delete main.py
Let’s say you want to recover what you just deleted. This scenario may involve one file, many files, directories, or anything in the project folder. So when I use the word “file” below, I mean any of those things.
Your options depend on whether the file has been staged with git add or committed at some point in the past.
If the file has been staged before
First try using your IDE’s undo feature: CTRL+Z or CMD+Z. If you see the file reappear, you are good to go.
If undo doesn’t work, use git restore [name]. Git will place a copy in the workspace.
If the file has not been staged
Try using your IDE’s undo feature.
If that doesn’t work, check your operating system’s “trash can”.
Sorry. It’s gone.
Oops #2: Undoing unstaged changes
Suppose you’re editing a file tracked by Git. You don’t like what you’ve done, and want to start over from most recent version.
Make sure main.py is back in your workspace.
Add the following code to main.py:
importrandomdefsilly_compliment():compliments=["You're as useful as a screen door on a submarine, but twice as fun!","Your brain is like a sponge... except it soaks up memes more than facts!","You're as rare as a unicorn at a hotdog stand."]returnrandom.choice(compliments)
Save the file.
Add the line I like working on it! to README.md and save the file.
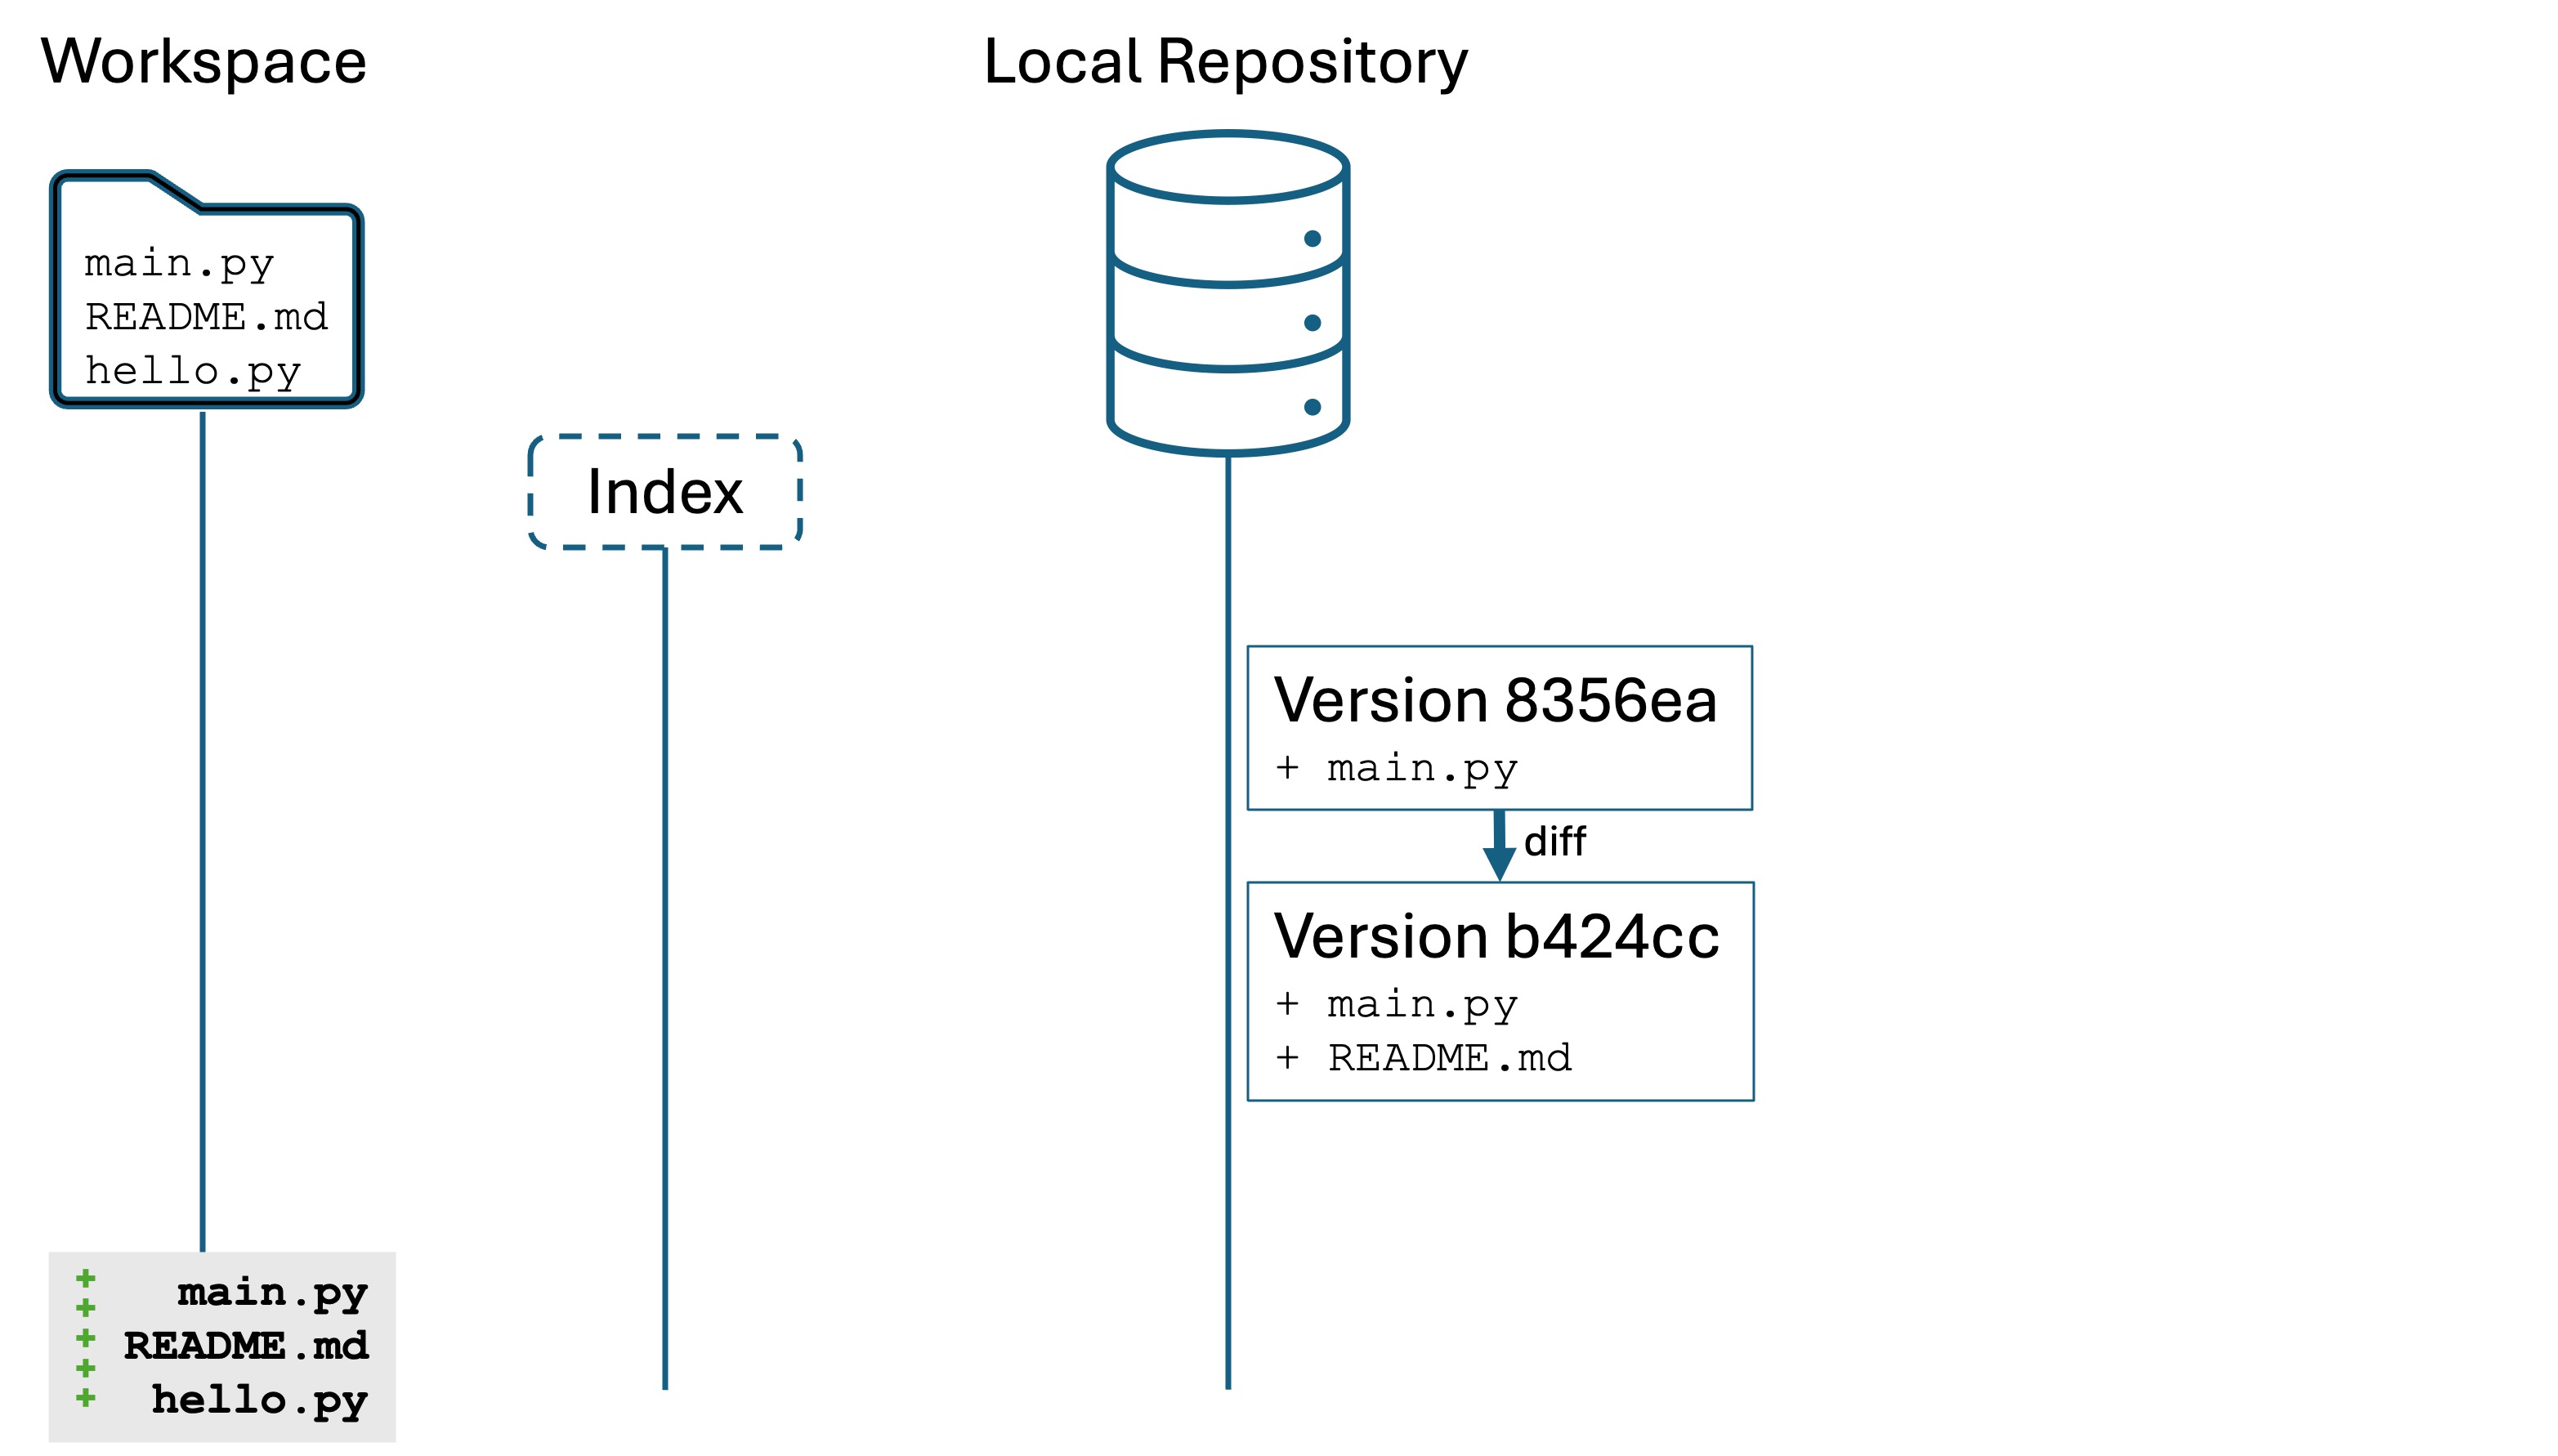
Make a new file hello.py and add print("Hello world!") to it.
Run git status
git status tells you that main.py and README.md have been modified but are not staged, and it tells you that blah.py is new and untracked:
Our changes are only in the workspace, they are not staged in the index yet.
Now, let’s undo some changes:
Run the command git restore main.py to reset to the file to the most recent version, in this case, the version b424cc.
The contents of main.py will change in the editor.
Notice that hello.py and README.md are unchanged. This is because we specified main.py as the target of git restore
Restore the changes to main.py by undoing with CTRL+Z or CMD+Z.
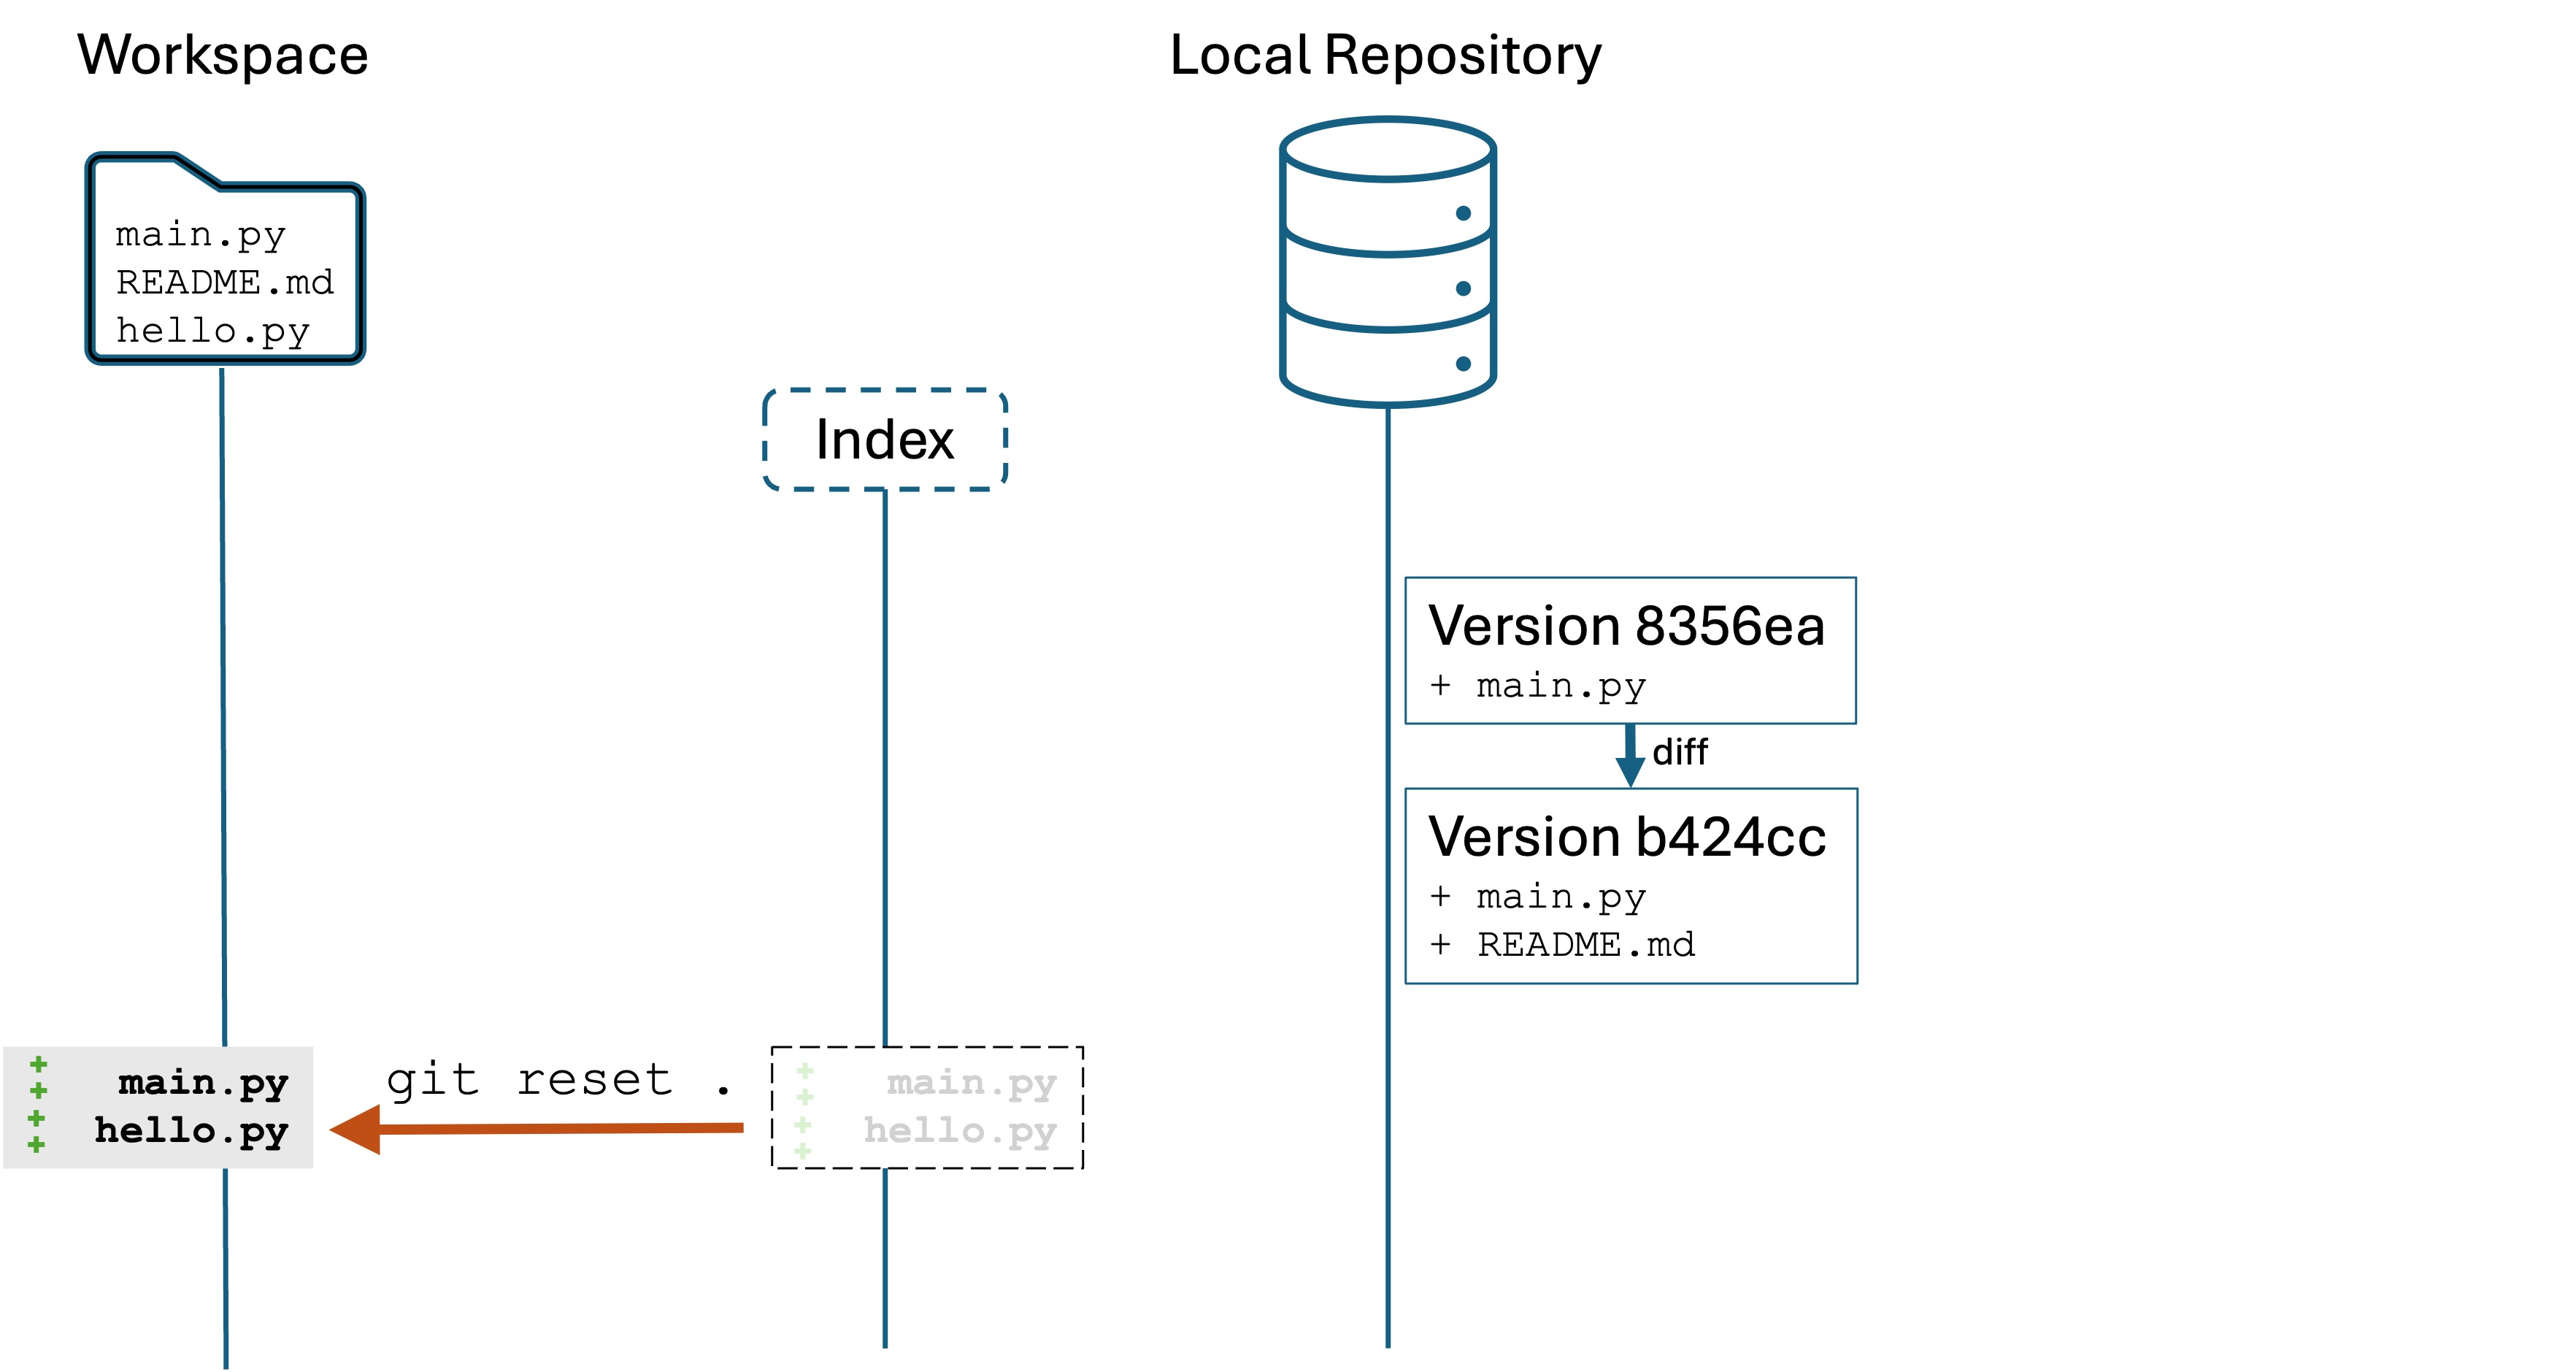
Now run the command git restore .
Notice that both main.py and README.md reset to their previous version. This is because we specified the target ., which is shortcut for “the current working directory”. Both main.py and README.md are tracked by Git, so they both reset.
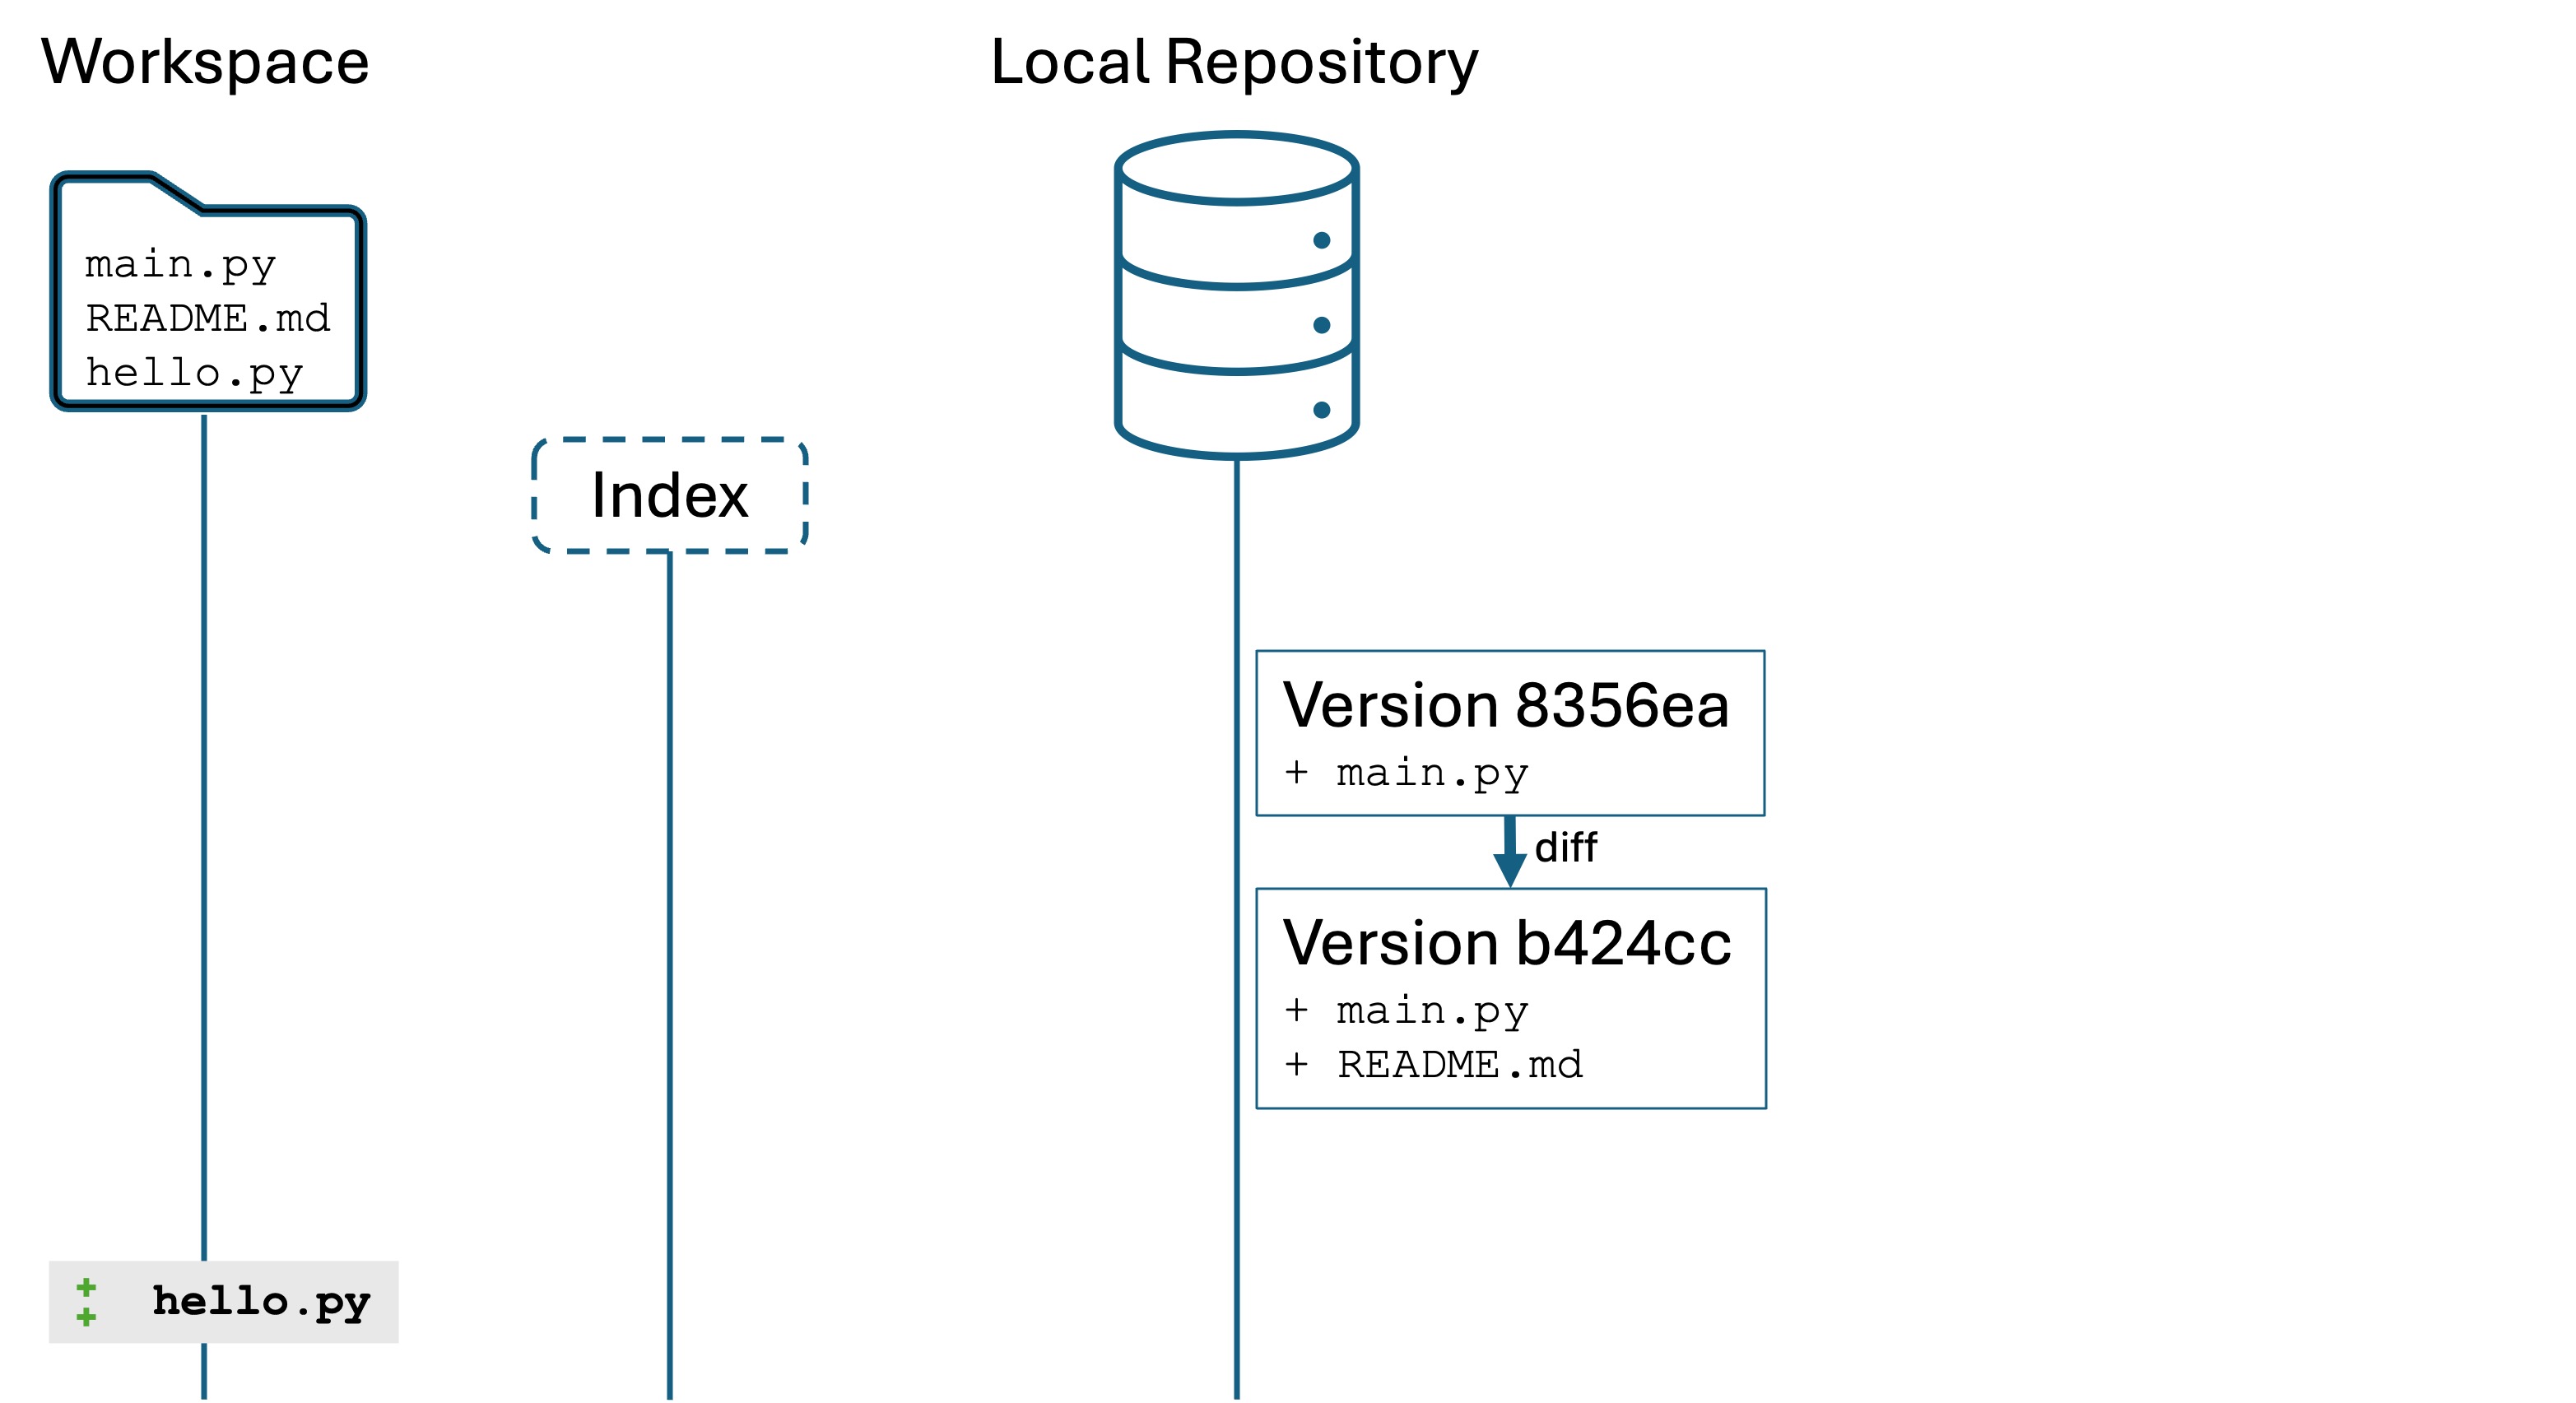
However, hello.py is untracked by Git so it is unaffected.
After running these commands, we are in the state below where hello.py is a new file but not being tracked by Git. Both README.md and main.py are as they were in the most recent committed version.
Now what if you want to get rid of an untracked, unstaged file like hello.py? Just delete the file!
The restore command replaces the workspace files with the most-recently-committed versions of those files in the local repository, i.e., the files as they were in b424cc.
Oops #3: Undoing staged changes
Suppose you are adding, editing, or deleting files and you have run the git add . command to stage the changes in the index. You realize that you made a mistake, and you do not want to save those changes. You either want to work on them some more, or you simply want to start over.
We will start at the end of the previous scenario: main.py and README.md are unchanged and look like they do in the most recent version b424cc, while we added added a new file hello.py that is not staged yet.
Run the following:
Re-add the following code to main.py:
importrandomdefsilly_compliment():compliments=["You're as useful as a screen door on a submarine, but twice as fun!","Your brain is like a sponge... except it soaks up memes more than facts!","You're as rare as a unicorn at a hotdog stand."]returnrandom.choice(compliments)
Run git add . to stage the changes to both main.py and the new hello.py file.
Run git status
main.py and hello.py are now in the index of changes we want to save to a new version, but we haven’t committed that new version to the local repository yet.
Suppose at this point that we need to do more work in hello.py and main.py. Maybe we’ve made a mistake, and we’re not ready record these changes.
Run the command git reset hello.py. This will unstage the file, meaning it will not be included in the commit until you run git add again.
You can also run git reset . to unstage any staged changes. The files will be unchanged in your working directory.
The files still have all their changes in the workspace. You are ready to edit and fix up whatever you need.
Oops #4: Completely restart from the last version
This is a common scenario. You work for a bit and then decide that all the changes you have made are bad, and the easiest thing is just to start over.
You want to wipe out all the changes in both your workspace and the index. Be careful: once you do this, you can’t undo it.
Let’s start where we ended in the previous figure: we’ve changed main.py and added the new file hello.py. These changes are not staged in the index yet.
Do the following:
Run git status to see that we have unstaged and uncommitted changes.
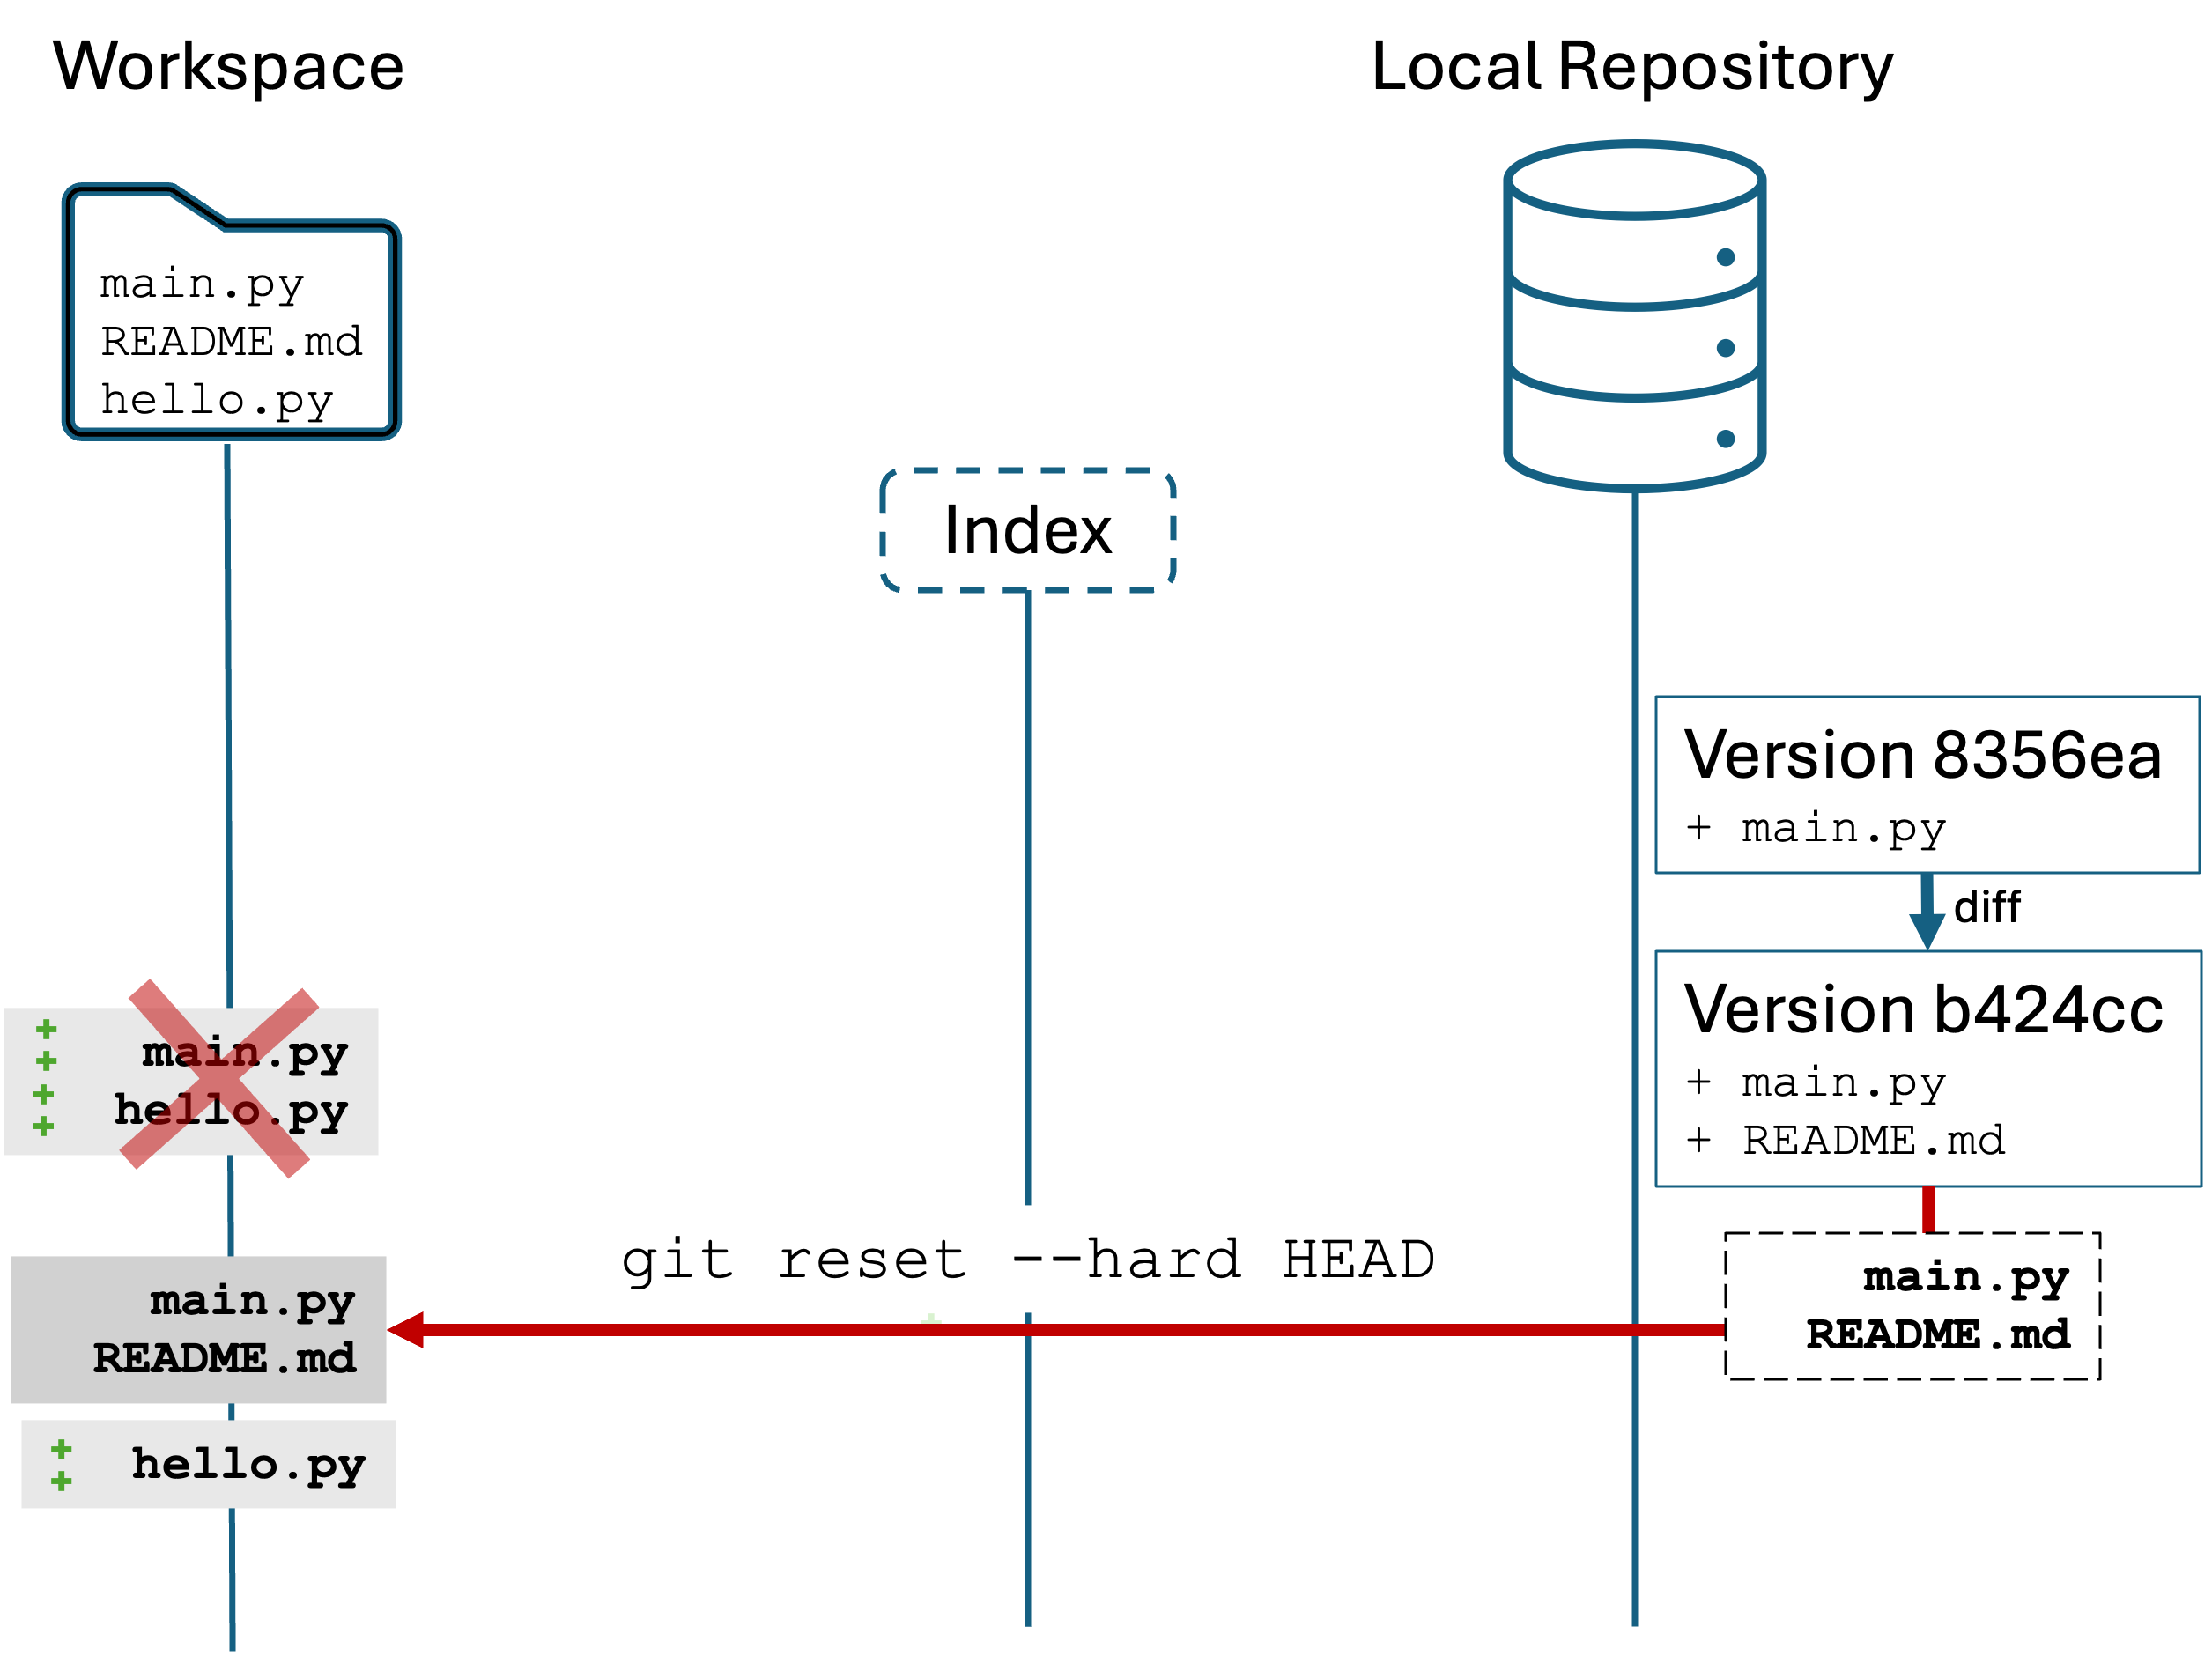
The git reset --hard HEAD
HEAD is a special reference that means “the most recent committed version”.
--hard argument tells Git “destroy changes to tracked files in the workspace and the index”
You should see output like
HEAD is now at b424cc4 Added message and README file
b424cc4 is the most recent committed version in the local repository, and “Added message and README file” was the message for that version.
Run git status:
Notice that untracked files are unaffected. We have not added or committed hello.py, so it remains untouched. But main.py has been reset to its most recent version.
All together, git reset --hard HEAD says “reset the tracked files in the workspace by replacing (--hard) the workspace contents with the most recent version (HEAD)”
Again, this is a destructive action. You cannot undo it once done. But, it is very useful for starting fresh. Your local repository is unaffected by the command.
Oops #5: Undoing the most recent commit
You have run git add . and then a git commit -m "<message>". Committing saves a new version to the local repository.
Maybe you are unhappy with the version and you want to edit your work. Maybe you forgot to add a file that needed to be there. In these cases, the simplest thing is often to make the changes and just make another commit.
You committed version should be “good code”. Bug free, compiles, works. However, sometimes you commit a mistake. You find a terrible bug in your code. Or you committed a syntax error and didn’t notice. These scenarios call for you to undo the commit.
Starting from the previous scenario, we have hello.py in the workspace but untracked. Let’s introduce a bug to main.py:
Open main.py and add the line tip = float(input("Enter a tip amount: "))
Make sure to save main.py
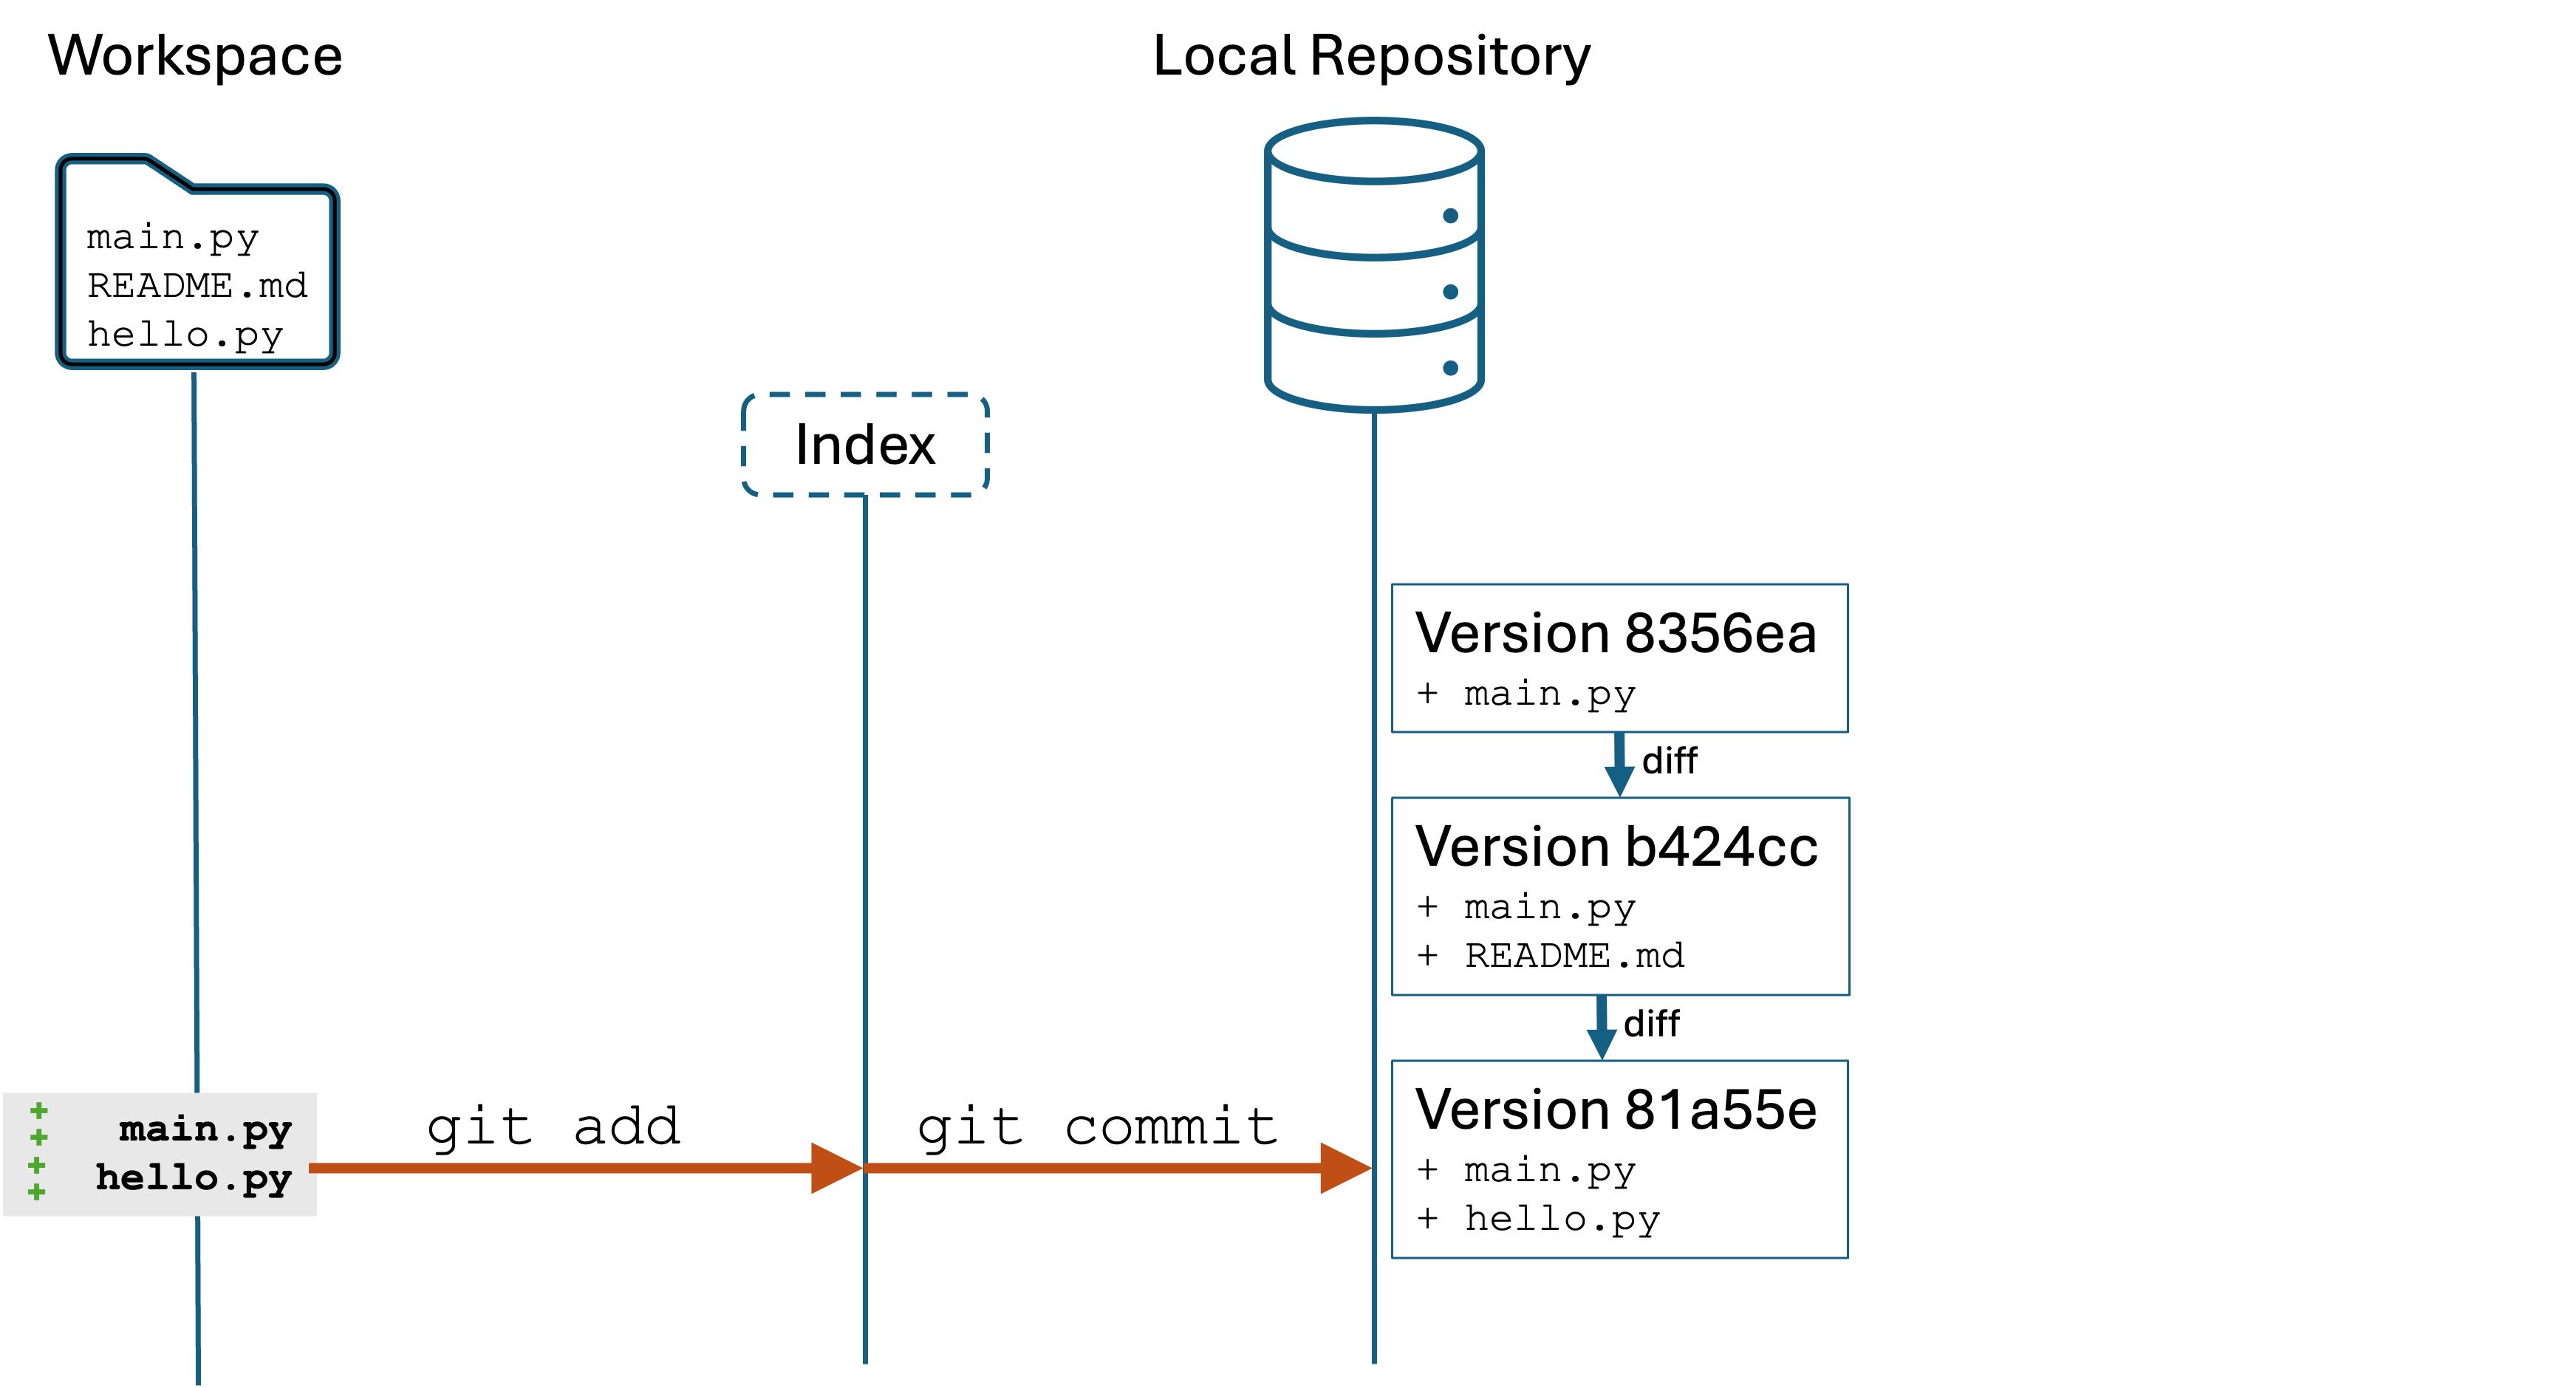
Run git add .
Run git commit -m "Enable user to type a tip amount"
You will see output like:
[main 81a55e5] Enable user to type a tip amount
 2 files changed, 3 insertions(+)
 create mode 100644 hello.py
We should now have three versions in our local repository. Run git log to see them:
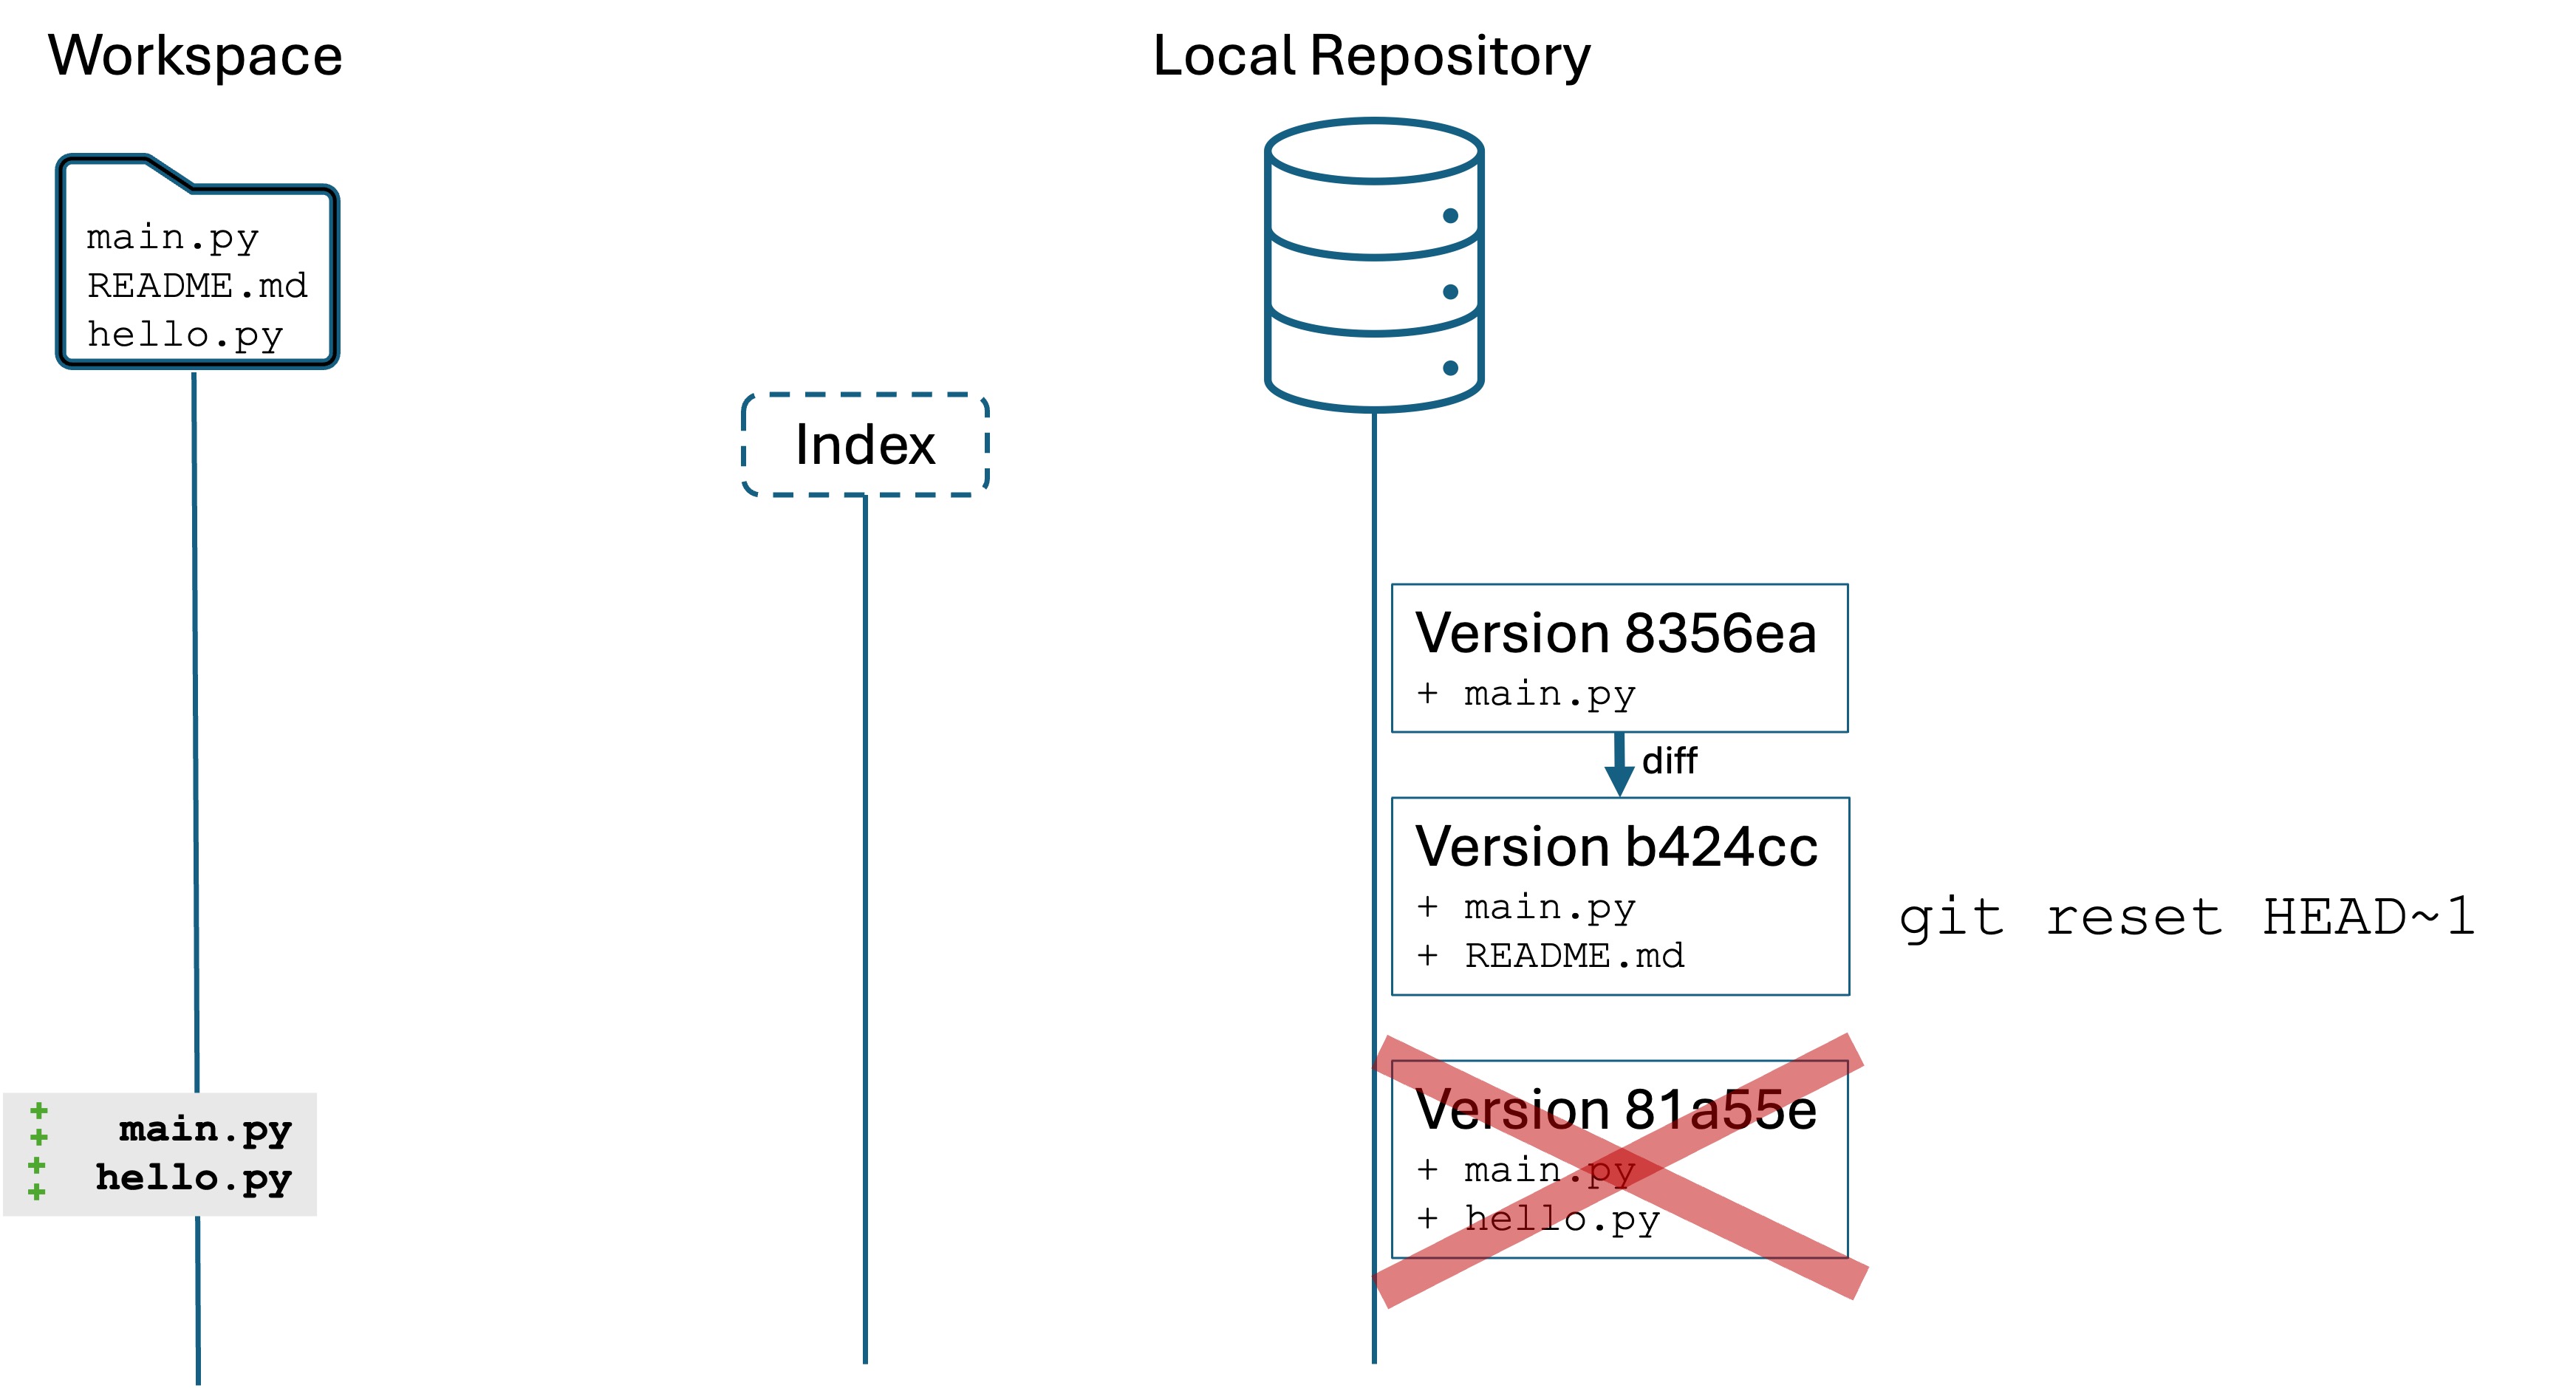
We realize that we have committed a bug. tip = float(input("Enter a tip amount: ")) will crash the program if the user types in a non-numeric number for the tip, like "one dollar". We want to undo the commit so we can fix the bug and to keep our version history containing only “good code”.
You have two options here:
You may have some changes to your workspace that you want to keep. Like you want to keep hello.py. Or maybe your code in main.py is pretty good, and you just want to fix it up a little bit.
Your last commit was a total disaster. You don’t want to keep any changes you made to main.py or hello.py. You want to completely throw away the most recent version and go back to the one before it.
Option 1: Preserve your work, fix it, then make a new commit.
Run the command git reset HEAD~1. You will see output like:
Unstaged changes after reset:
M       main.py
Now run git log. You will see something like:
commit b424cc472f7276dc35493abbd186563a191ca25b (HEAD -> main)Author: Lucas Layman <laymanl@uncw.edu>
Date: Mon Oct 21 15:21:44 2024 -0400
Added message and README file
commit 8356ea035b8d6538f9ea4eabe2393d6cd6016553
Author: Lucas Layman <laymanl@uncw.edu>
Date: Mon Oct 21 15:13:00 2024 -0400
First commit of main.py
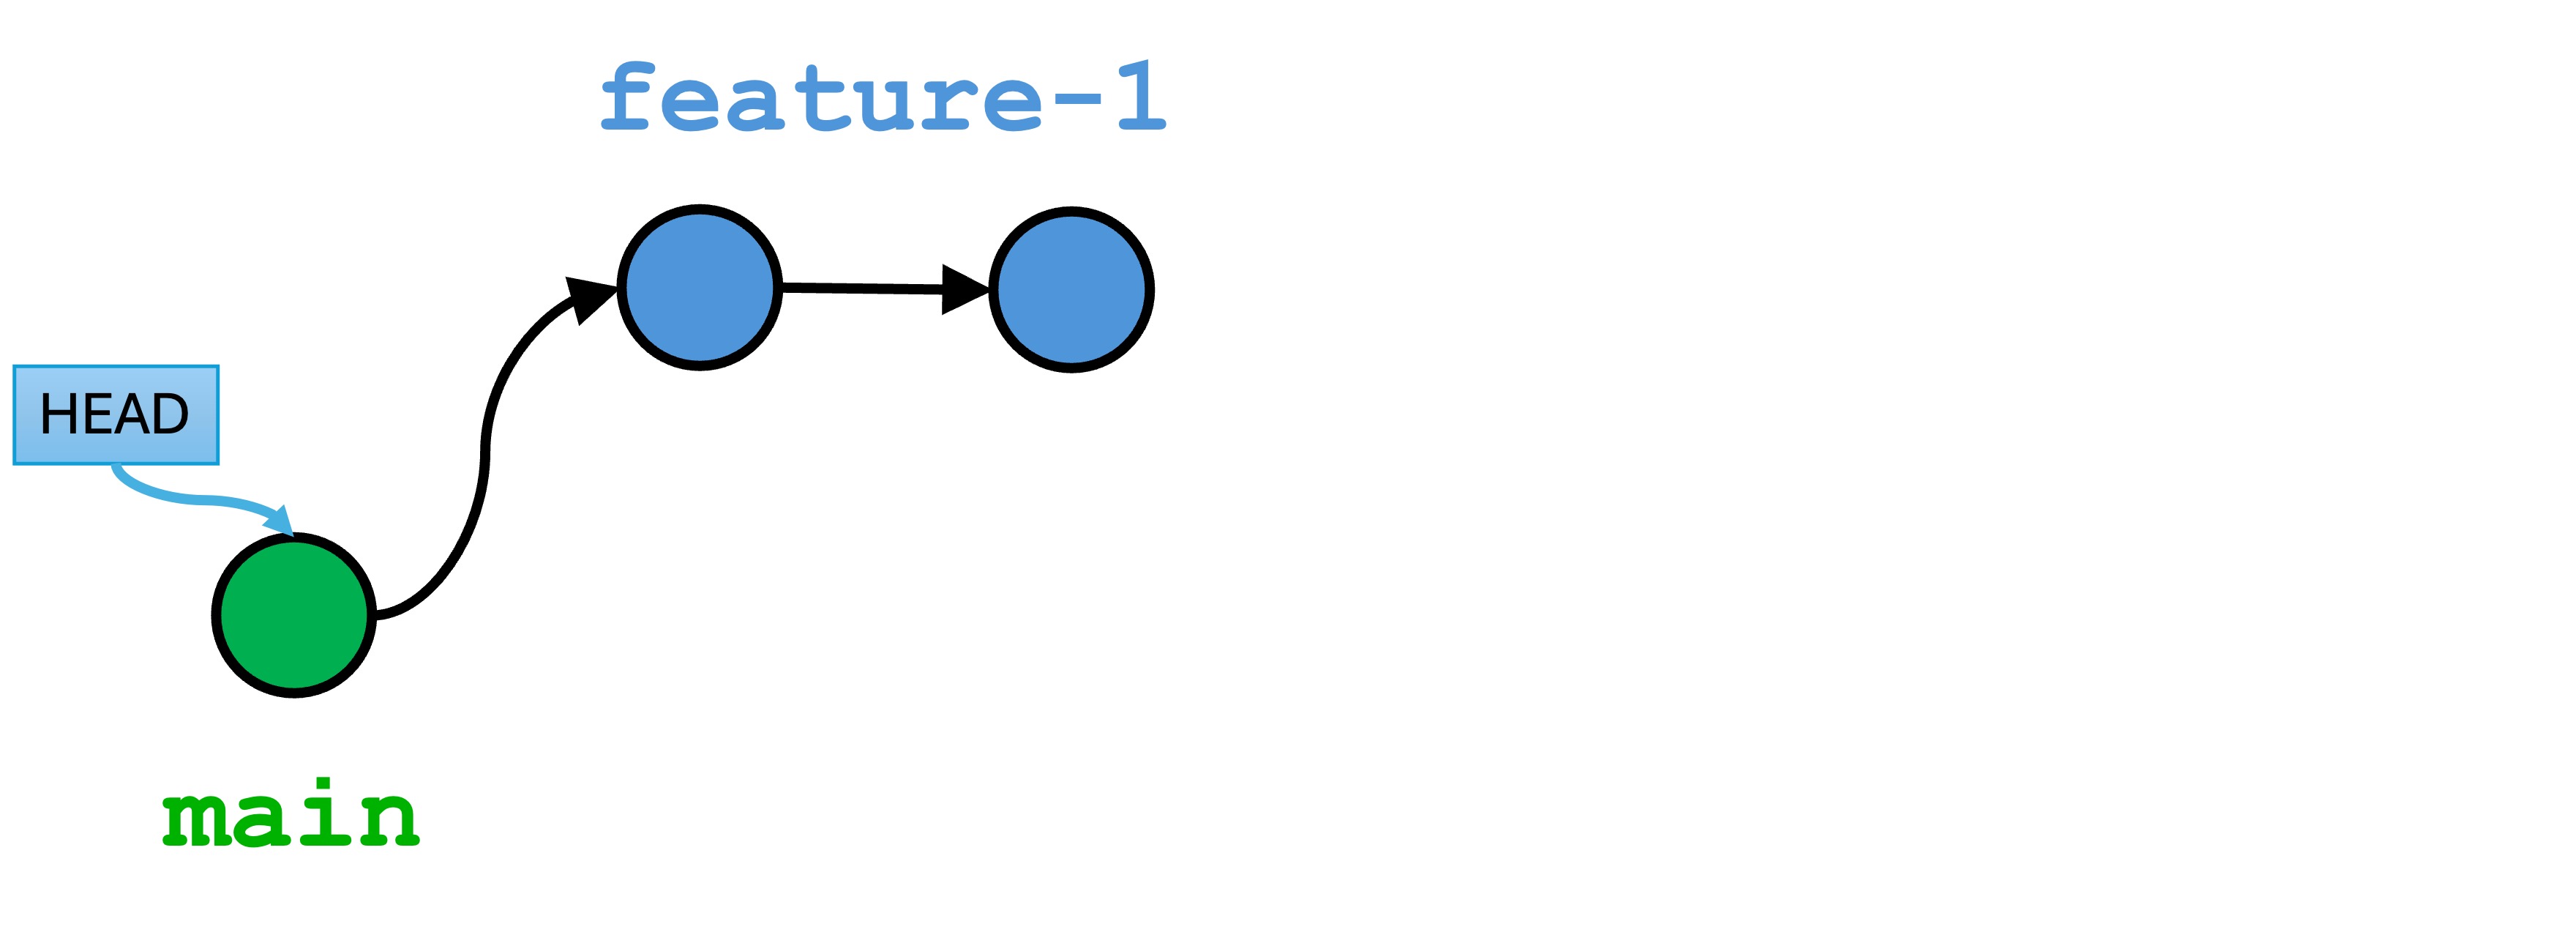
Notice that git log only shows two versions! What have we done? Your current Git state is like this:
The command git reset HEAD~1 tells the local repository to “forget” the most recent version. It’s like it never happened.
However, the files in your workspace and index are unchanged! All the edits and additions are still there for you to work with, they are just not committed.
Now you have the opportunity to fix up those files, add them, and commit them.
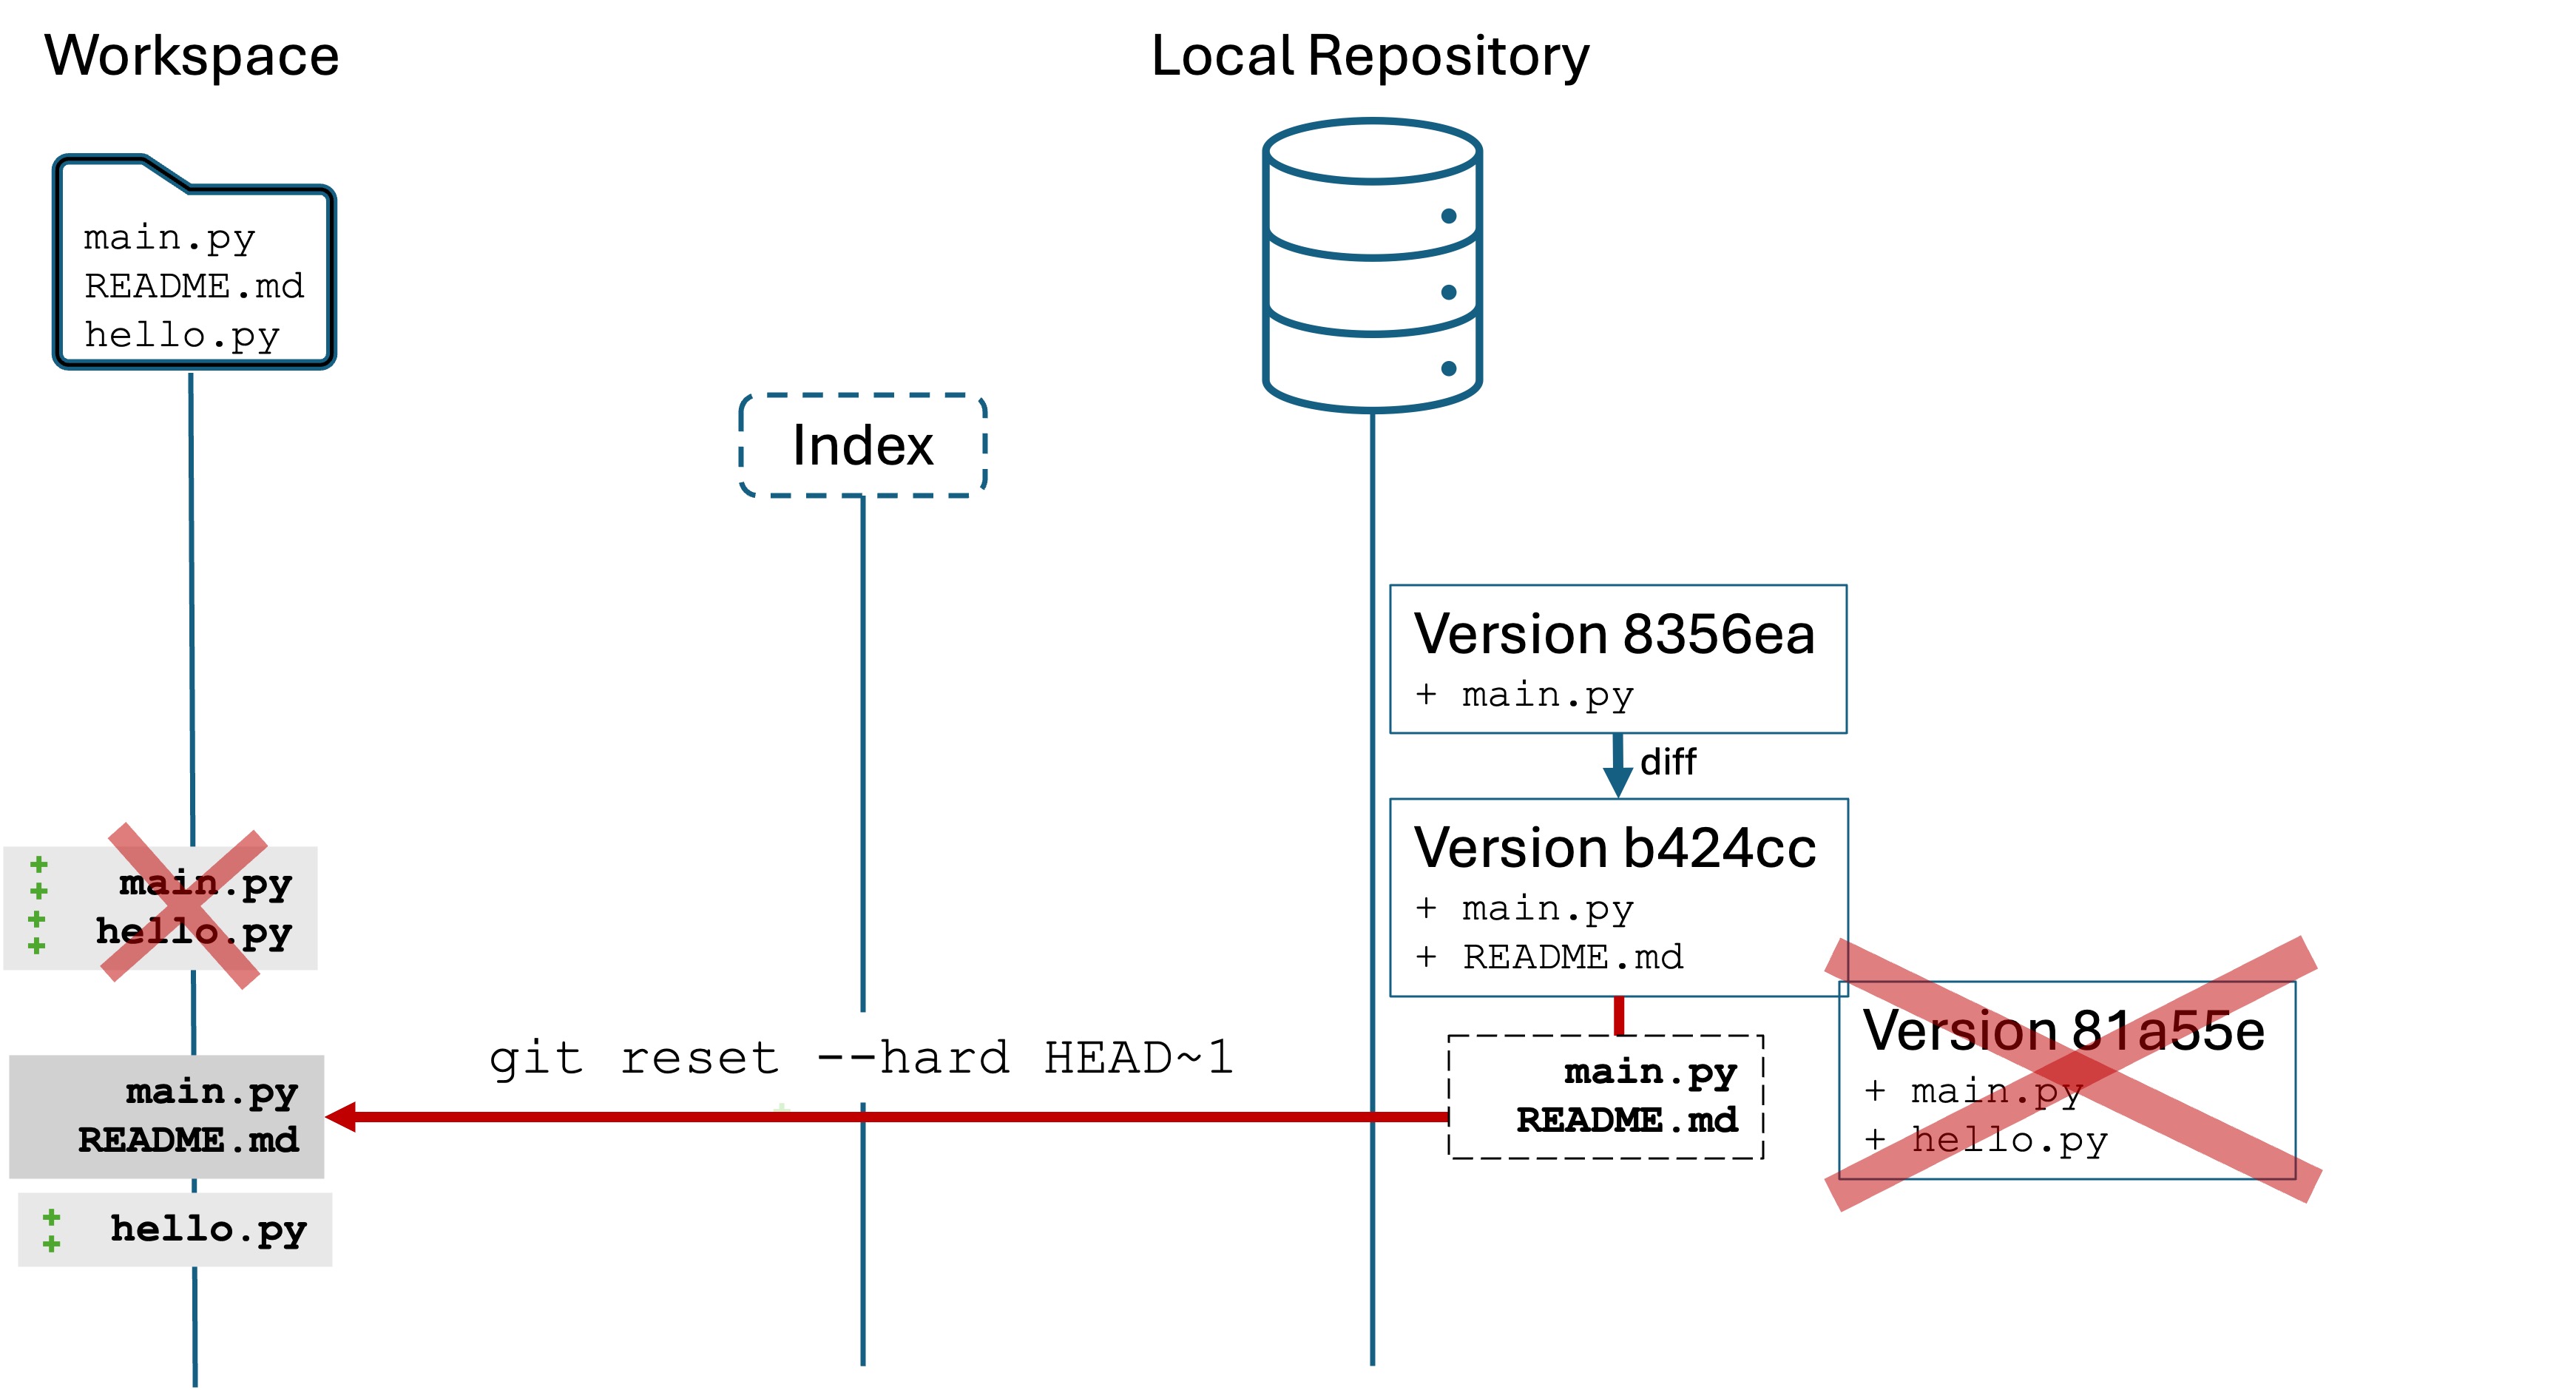
Option 2: Disaster! Delete the last version and reset all the files
This is just like Oops #4 where you reset the tracked files, but you also want to destroy the most recent commit.
The command to do this is git reset --hard HEAD~1. This command is destructive and you cannot undo the consequences.
Assuming you have changes to main.py and hello.py from the previous scenario:
Do git add . and git commit -m "Enabling the user to enter a tip" to stage and commit a new version
Run git reset --hard HEAD~1
Run git log to see the version history
hello.py is unaffected because it is untracked, however, main.py and README.md are reset to their version 2 status. We’ve also deleted the bad version.
Recap
Git has even more functionality for “going back in time”, such as going back two, three, or more versions in the past. Or undoing multiple commits at once. Those use cases can be tricky to do correctly without unintended consequences.
For now, the “Oops” scenarios above will be sufficient 95% of the time as you develop your Git skills:
Deleted a file from the workspace: Undo (CTRL+Z/CMD+Z) or git restore <filename>
Undoing unstaged changes: git restore <filename>
Undoing staged changes: git reset <filename>
Completely restart from the last version: git reset --hard HEAD. This is destructive!
Undoing the most recent commit:
and keep your work: git reset HEAD~1
and throw away work: git reset --hard HEAD~1. This is destructive!
Knowledge check
(Question) Describe how git status and git log help identify a repository’s state.
(Question) What command would you use to recover a deleted file that was previously staged or committed?
(Question) Explain how to undo changes that are staged but not committed.
(Question) What happens to untracked files when you run git restore .?
(Question) Which command do you run to completely reset your working directory to the most recent version?
(Question) Which command do you run to destroy/remove the last version in the local repository?
(Challenge) Simulate deleting a file and use Git commands to recover it.
(Challenge) Experiment with staging changes, then undo them.
5 - Branching and Merging, Part 1
Working concurrently
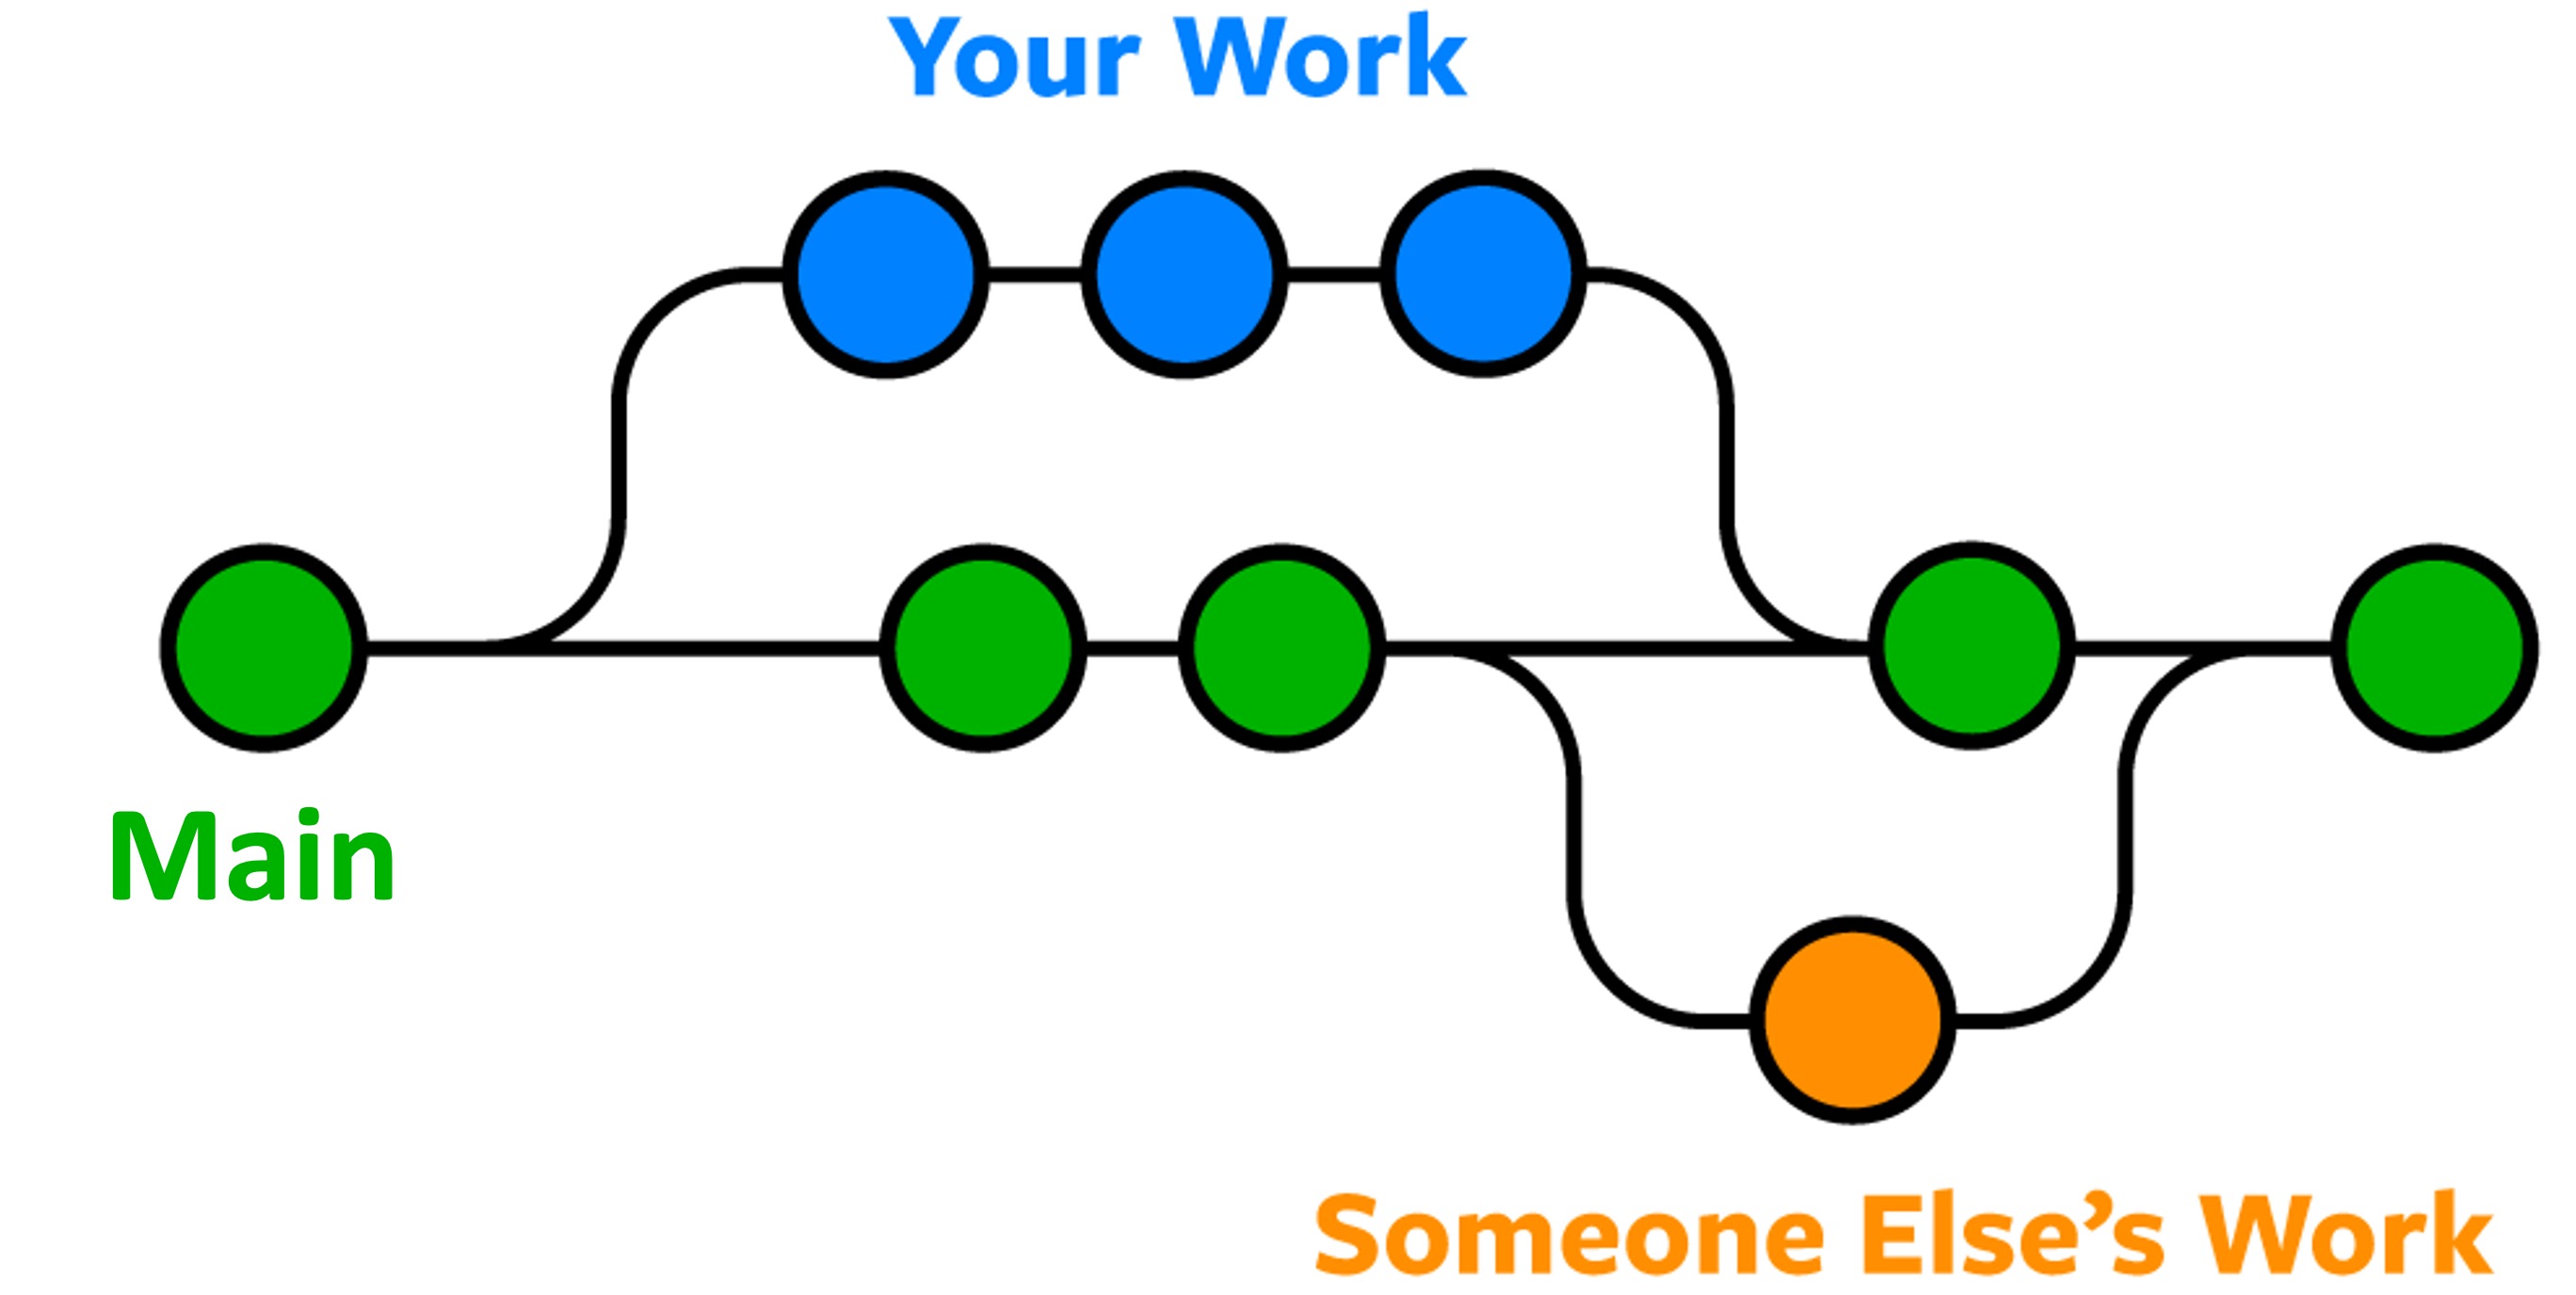
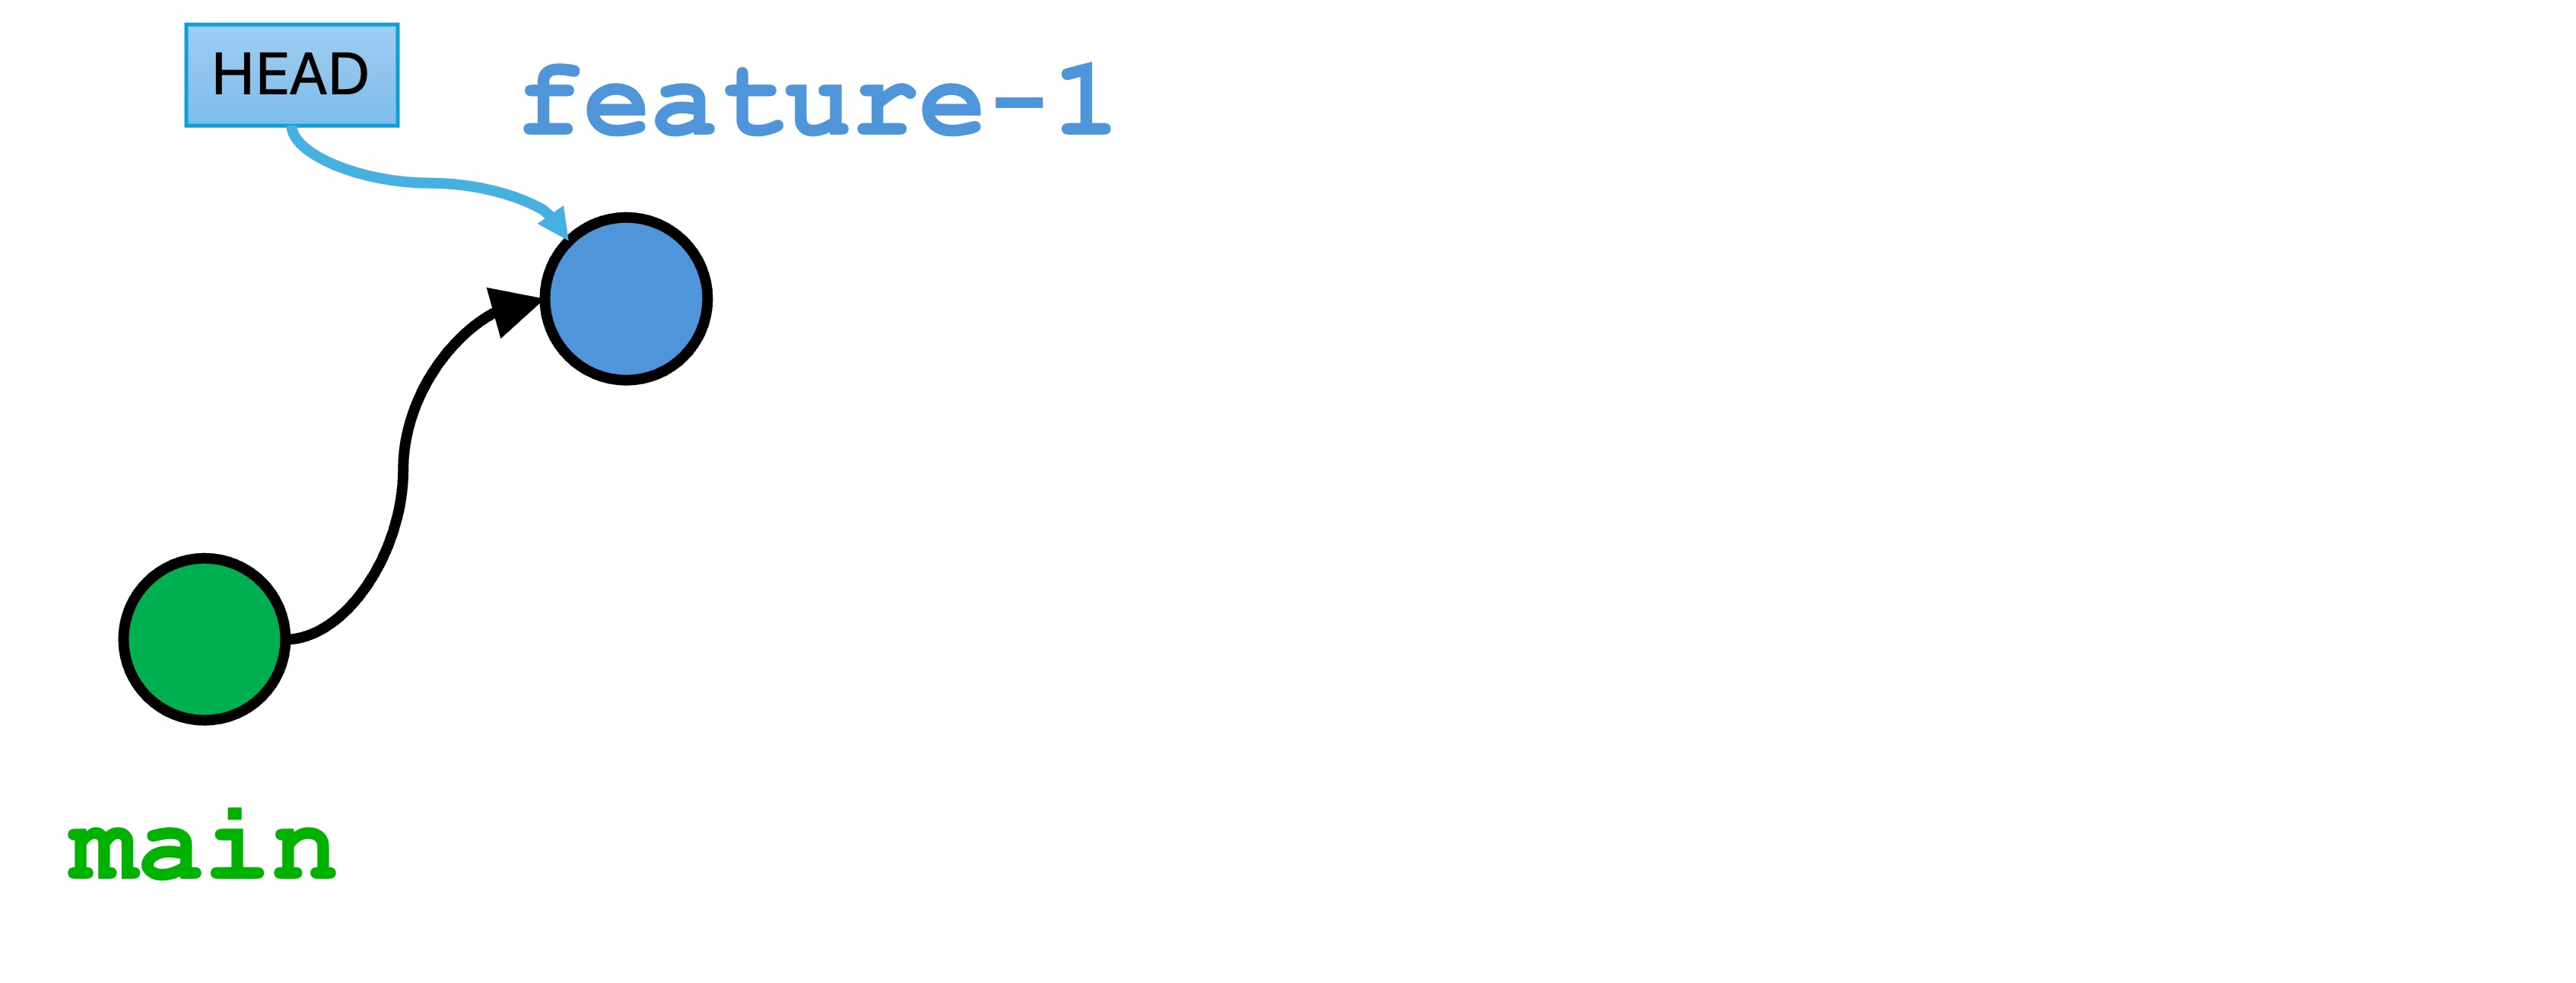
One of Git’s main features is branching: the ability to create parallel timelines in version history, and then merge them together later.
The circles in the illustration represent versions. The lines indicate different branches. We will build a similar diagram below while introducing branching concepts.
Why branching? It allows version histories to be a little dirty, or only incrementally complete. Then we share when we’re happy and done.
This feature is essential for working on a team, and also by yourself to preserve a “clean” main branch while updating functionality in parallel.
The active branch
Git has a notion of the active branch, which is the branch you are currently committing to. So far, you have only been committing to the main branch in our examples.
The main branch
Let’s create a new project:
Create a directory git-branching in your seng-201/ directory.
Change into the git-branching directory and run git init to initialize a new Git repo.
Create the file app.py with the following content:
defmain():print("Welcome to the main branch!")if__name__=="__main__":main()
Run git add .
Run git commit -m "first version"
Every Git repository has a default branch called main (or master prior to July 2020). This branch is created for you when you run git init.
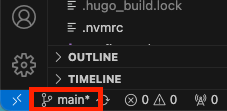
In the Terminal window, you may see the text (main) in the command prompt indicating that main is the active branch:
Your IDE also displays the active branch in the bottom left:
Most software groups treat the main branch as the place where only robust, finished, shippable code lives. You are not allowed to commit directly to main in many organizations. Instead, the expectation is that you work in a different branch and integrate with main when finished and approved.
Committing directly to main is fine for small personal projects that you don’t expect anyone else to use or that won’t live long. Most short class assignments fall into this category.
But, you should use branches for any other scenario, even if working by yourself!
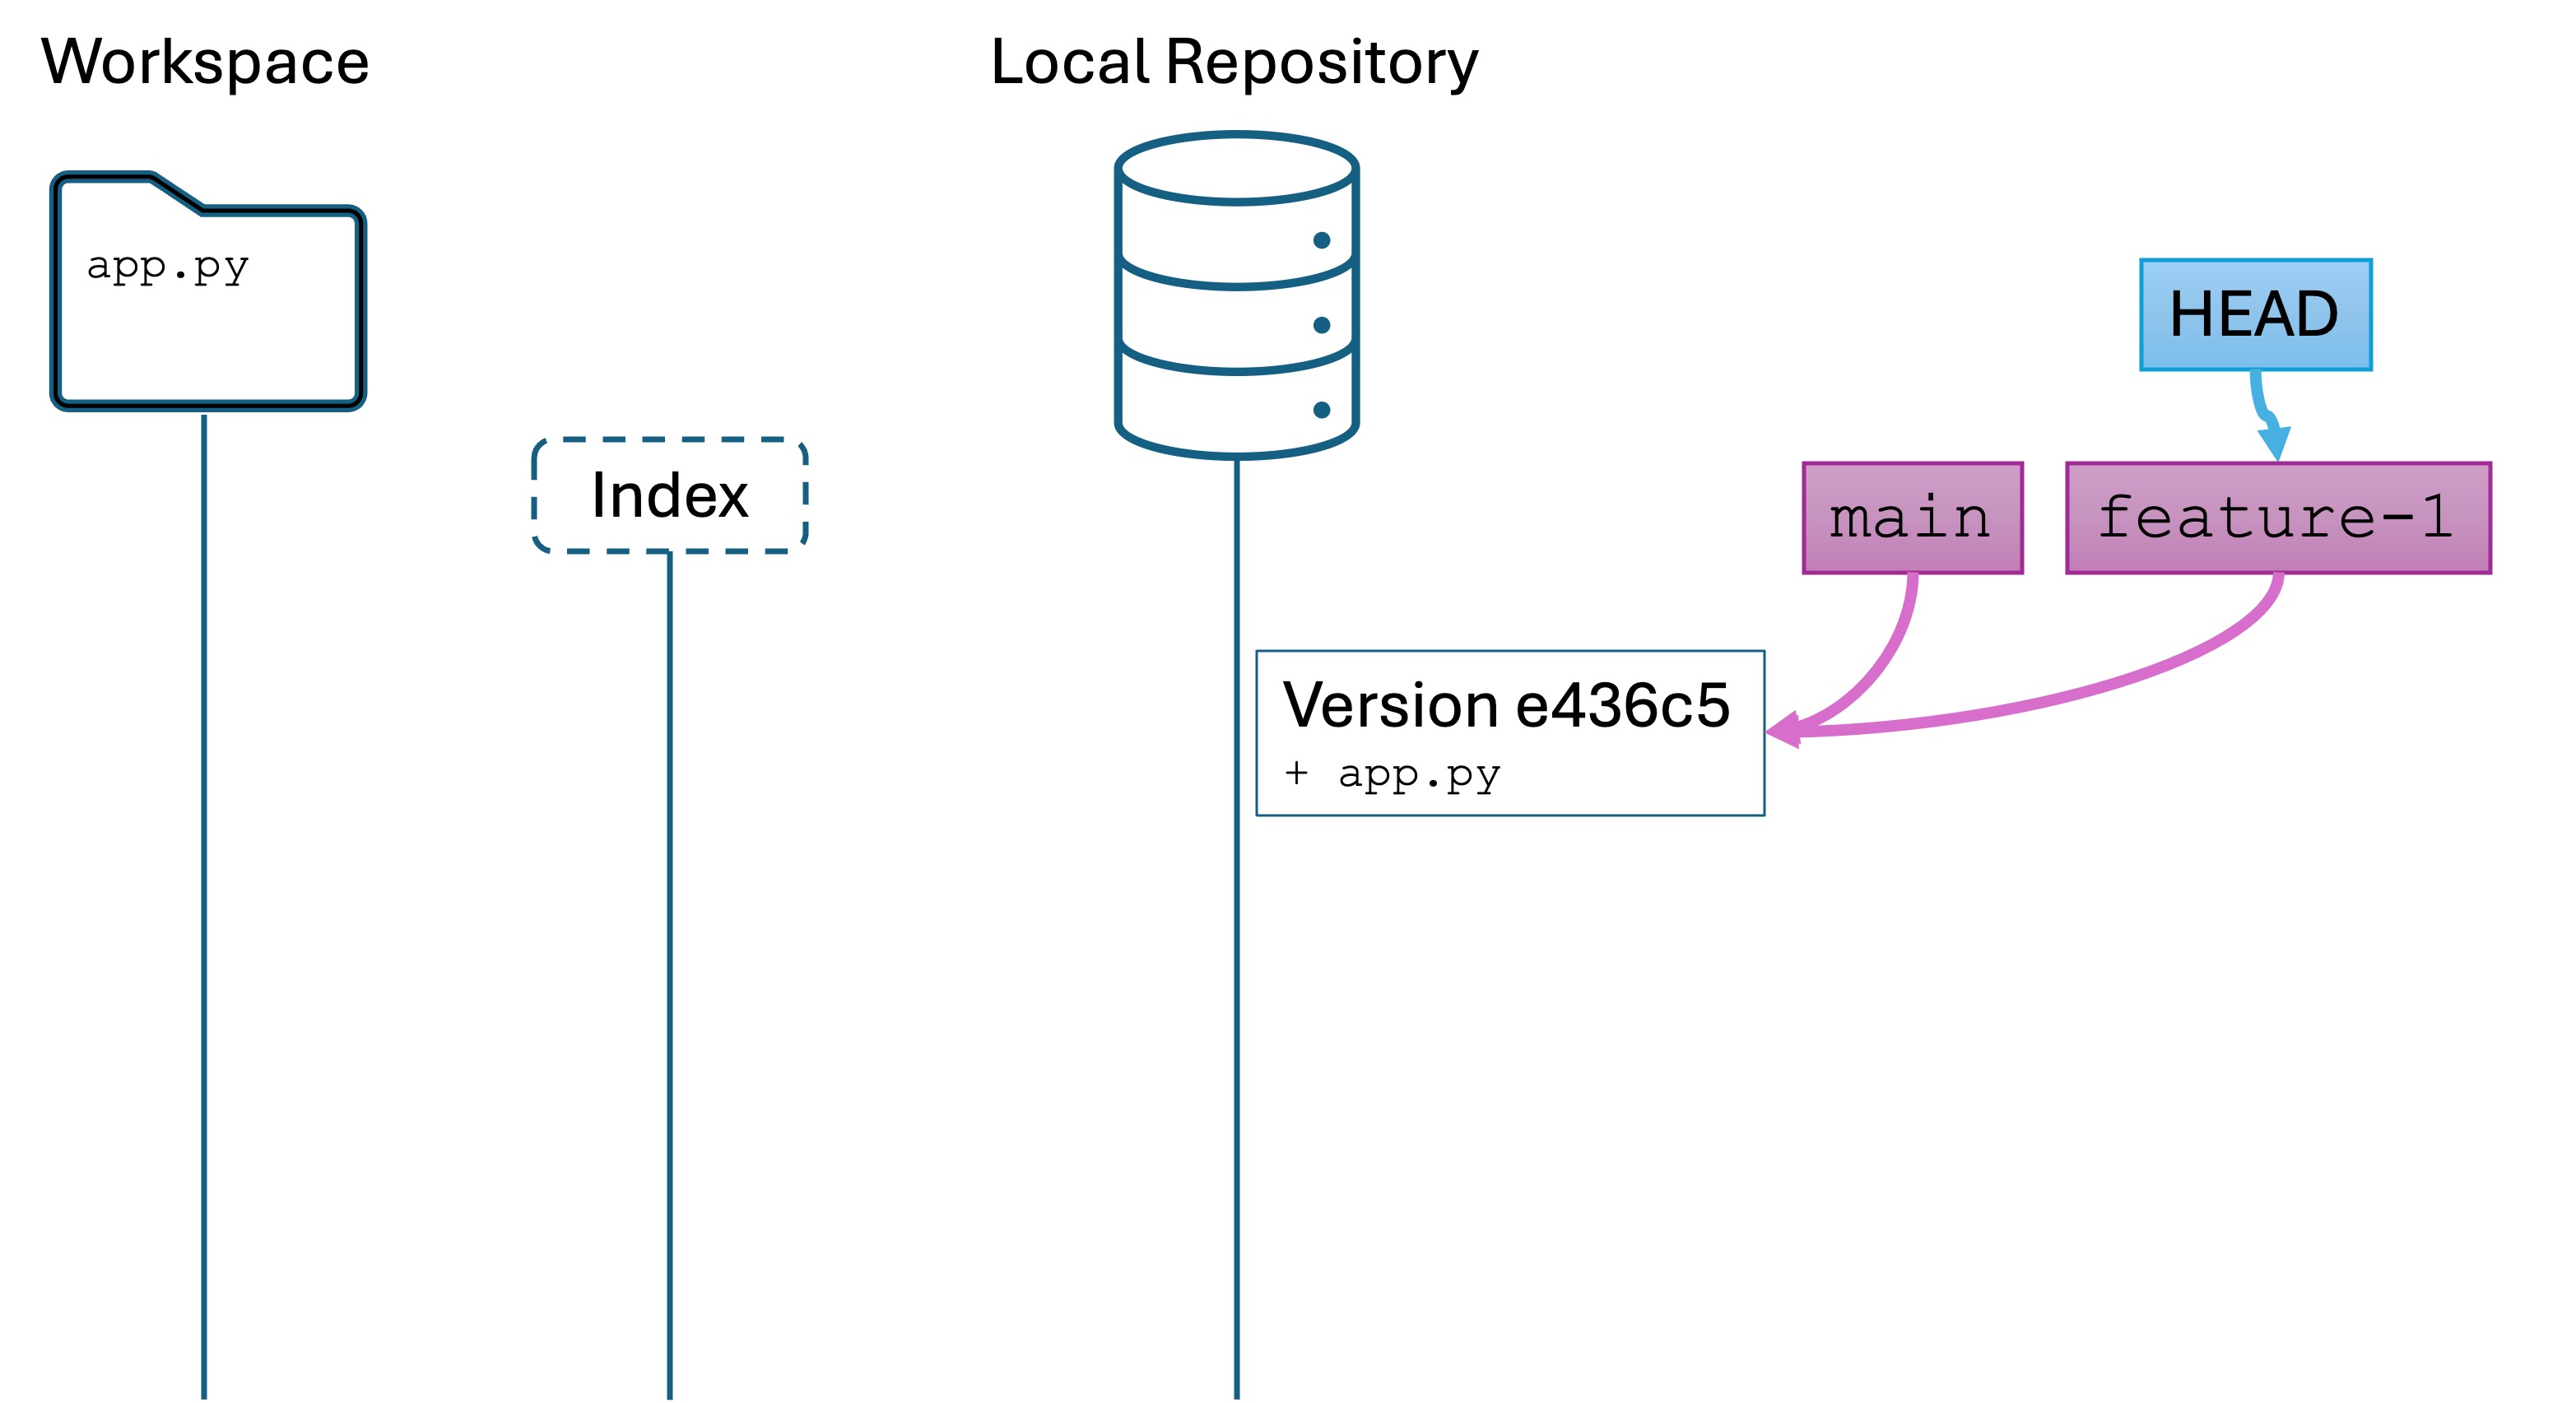
What is a branch?
Remember how we said that the special variable HEAD in Git is a pointer or reference to a specific version in the commit history? Usually, the HEAD is pointing to the most recent version of the active branch.
Branches, including the main branch, are additional named variables that point to a specific version. When you run git init, creates a named main variable that points to a specific version. When you make your first commit, main will point to the first version in your repository:
To branch or not to branch
Before you create a branch, you must decide what to do with any unstaged and staged changes.
When you create a new branch, un-committed changes (unstaged and staged) are brought into the new branch. This is often desirable.
Suppose you start working on code and you realize “this is more complicated than I thought and going to take a lot of effort.” You can move these changes to a new branch, and the version history of your current branch will be unchanged.
You may also want to save all your currently unstaged and staged changes to the active branch. You have three options:
If you have no changes in the working directory, then you’re good to create a new branch.
Stage and commit changes if you want to create a new version in the active branch.
Create a new branch if you want your staged and unchanged changes to appear in the branch, but you want the old branch, e.g., main, to be unchanged for now.
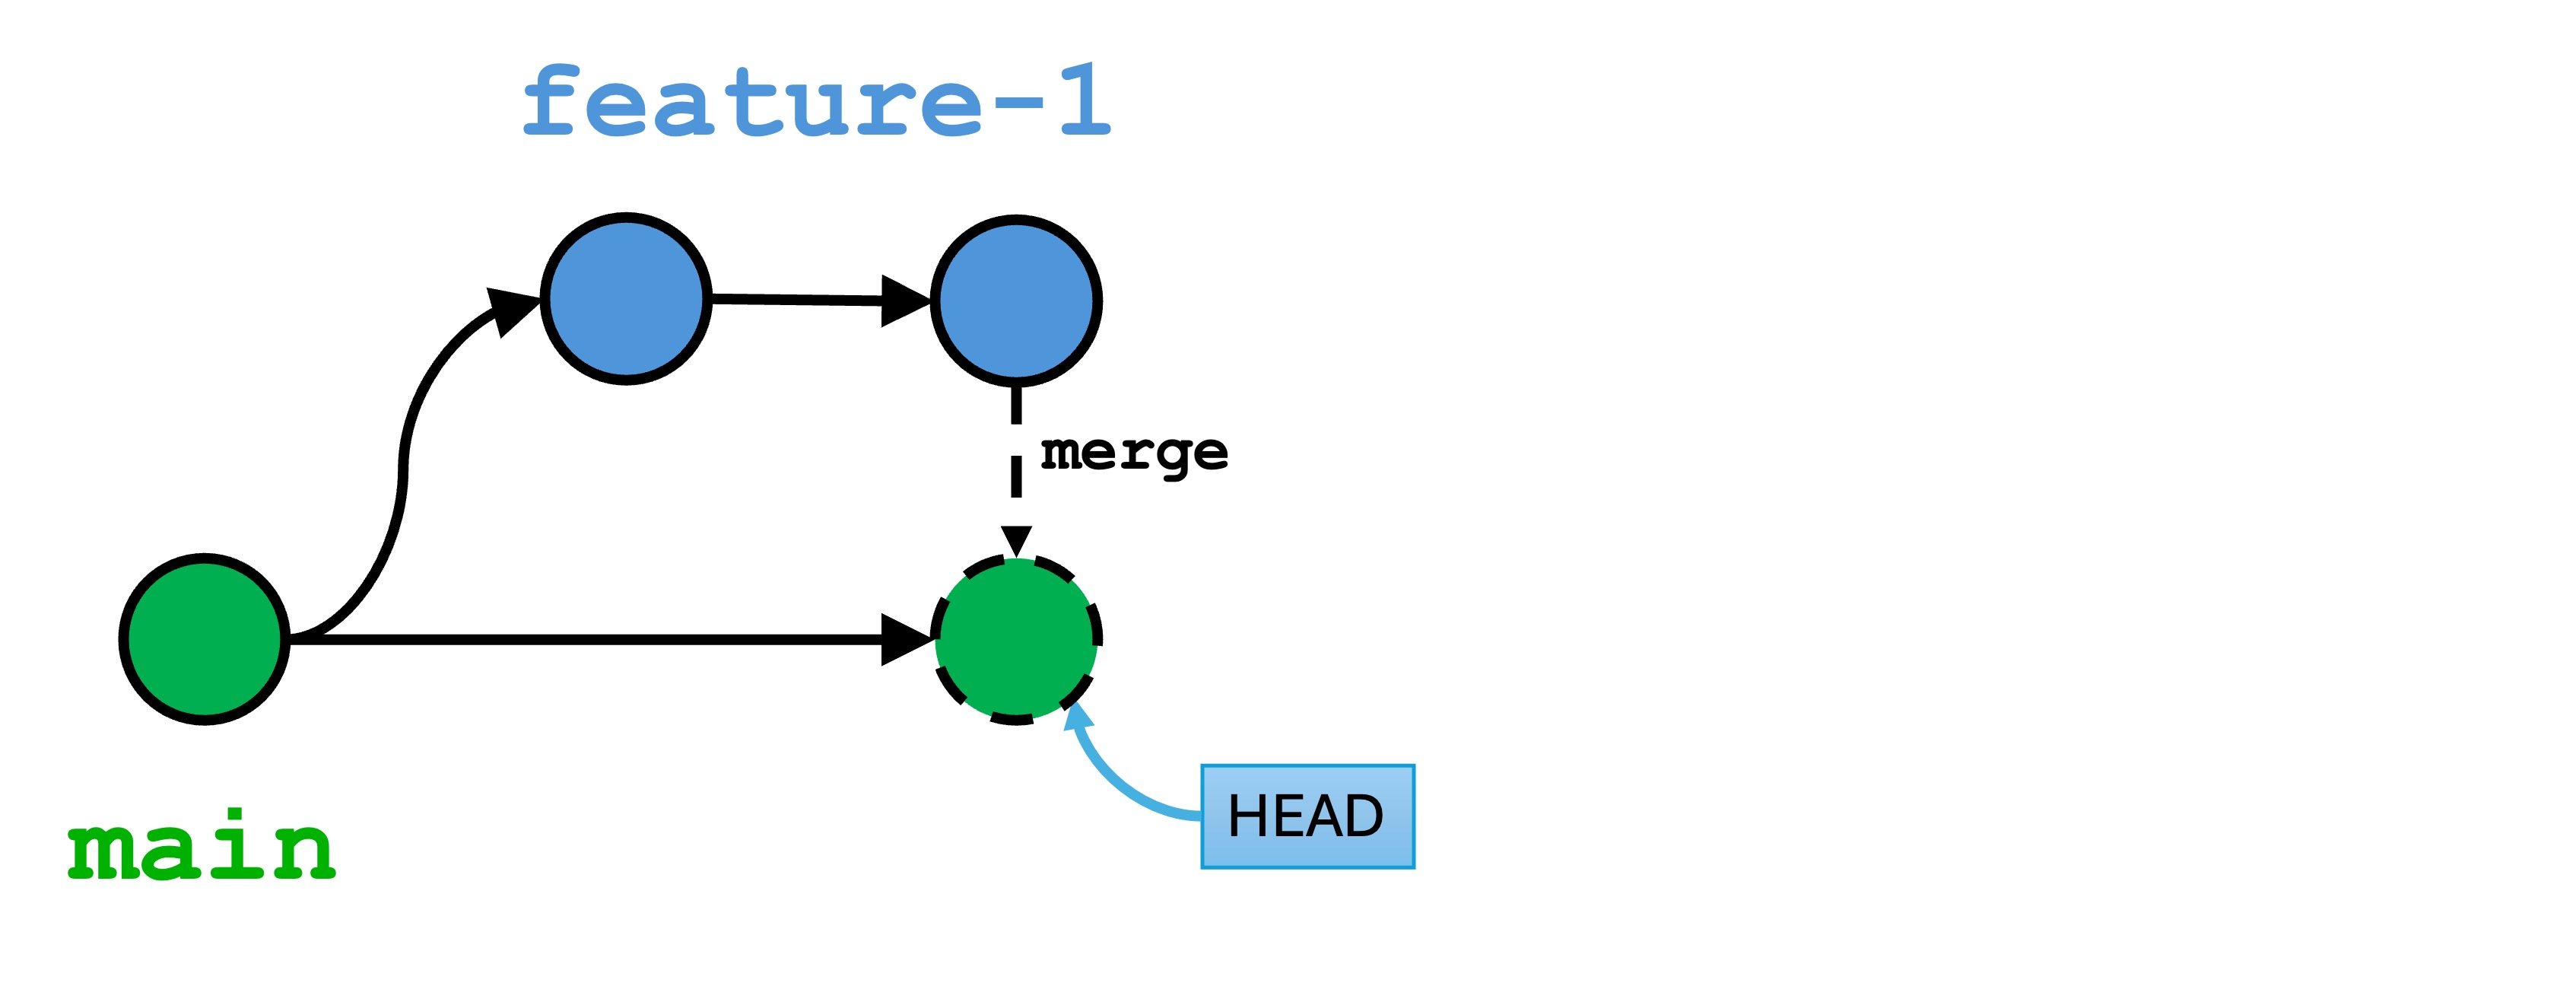
Run the command git switch -c feature-1. You will see something similar to:
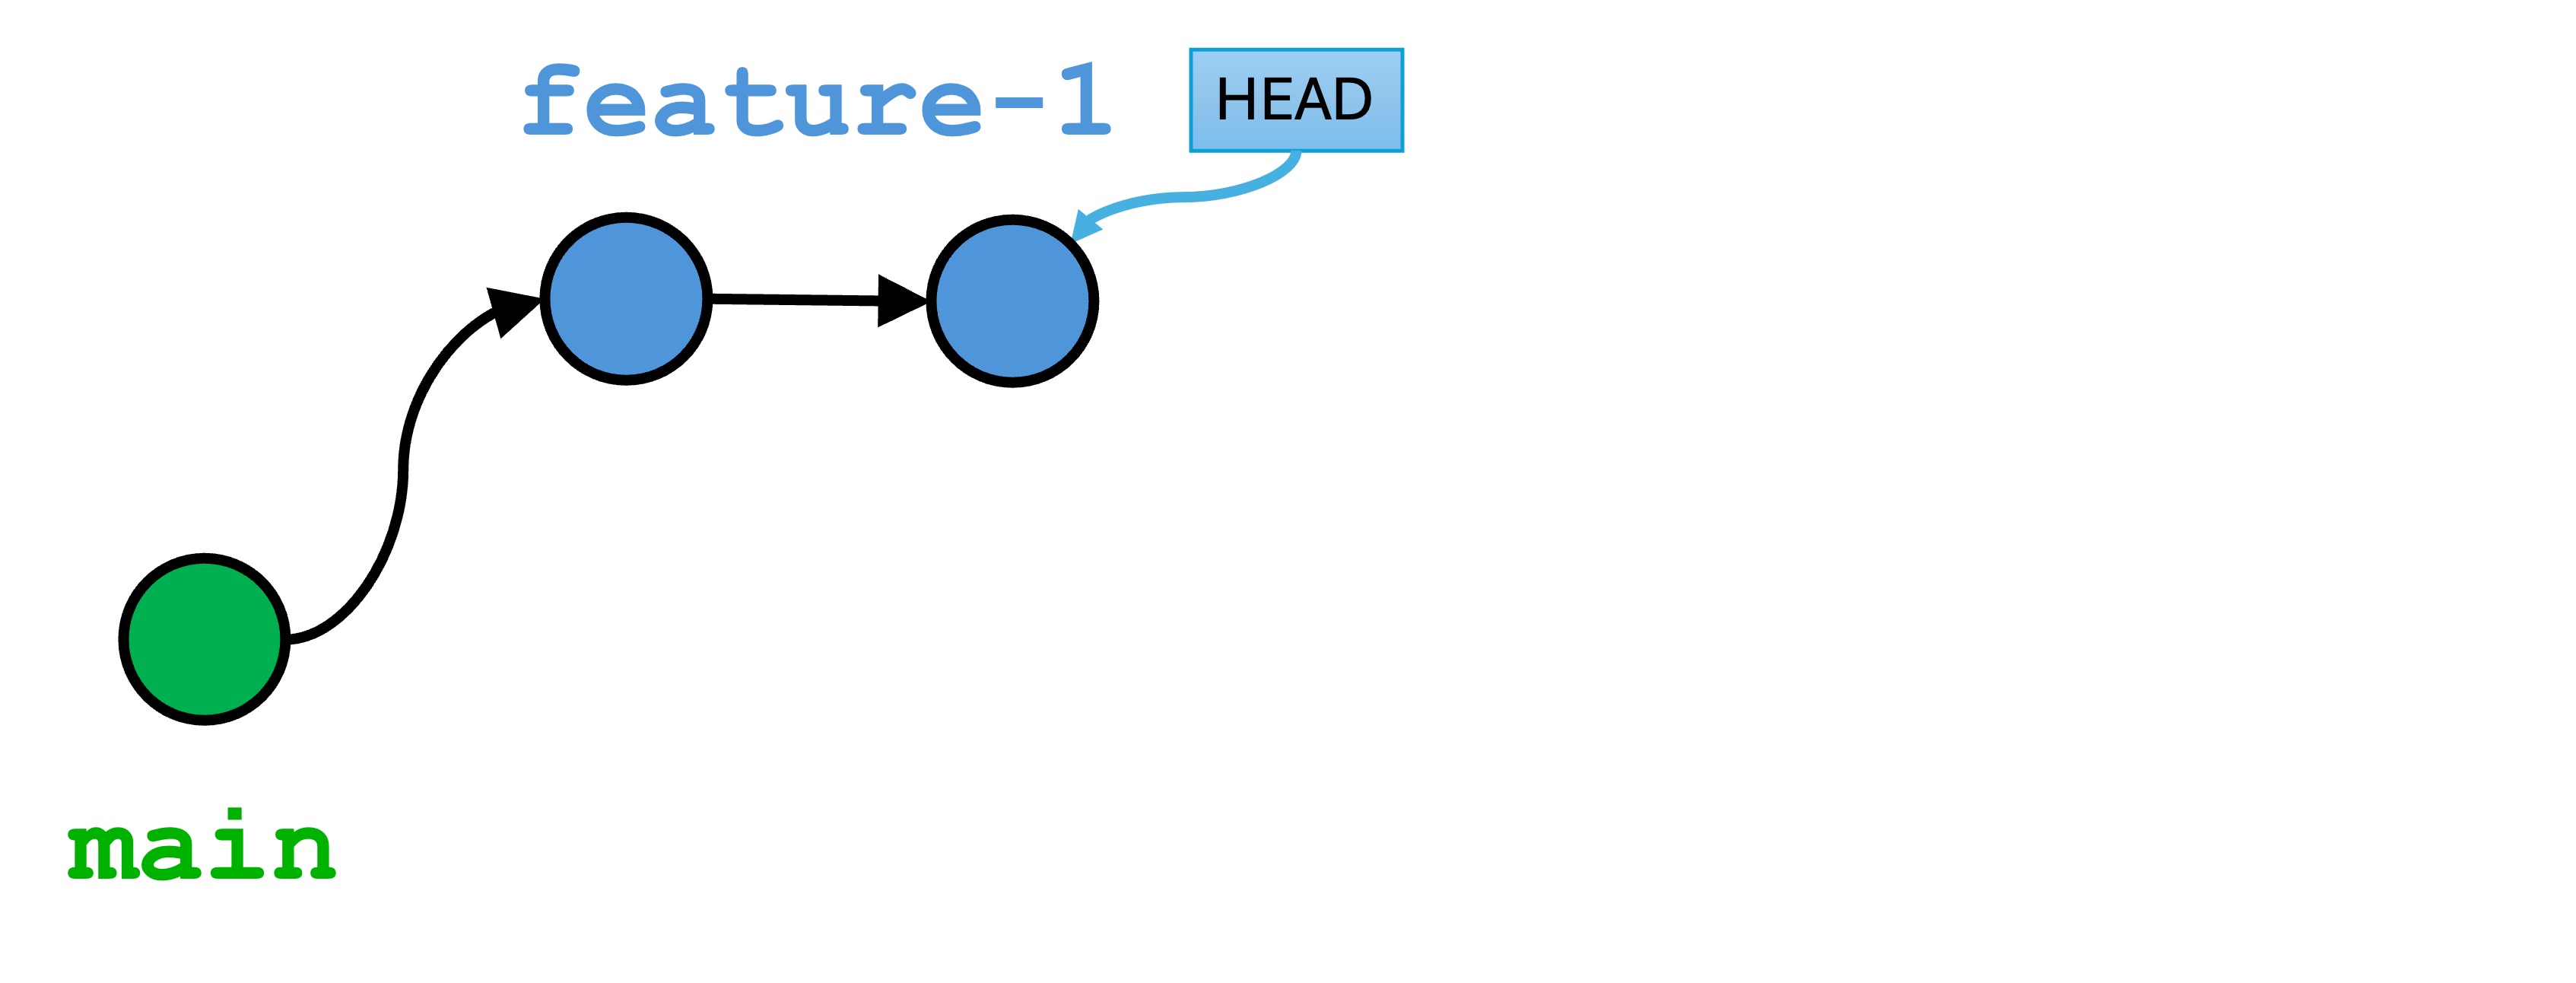
You have created a new branch named feature-1, and you have set the active branch to feature-1. The switch -c command tells the HEAD to point to feature-1, which makes feature-1 the active branch.
This means any committed changes will be saved to the version history of feature-1 but not to main. Your workspace state looks like the following:
We have not yet committed a new version, so all three variables are pointing the first version.
Remember: Why do we want to use branches? It allows version histories to be a little dirty, or only incrementally complete. Then we share when we’re happy and done. This feature is essential for working on a team, and also by yourself to preserve a “clean” main branch while updating functionality in parallel
Committing a new version to the branch
Change app.py to the following:
defmain():print("Welcome to the main branch!")feature_1()deffeature_1():print("Feature 1 activated!")if__name__=="__main__":main()
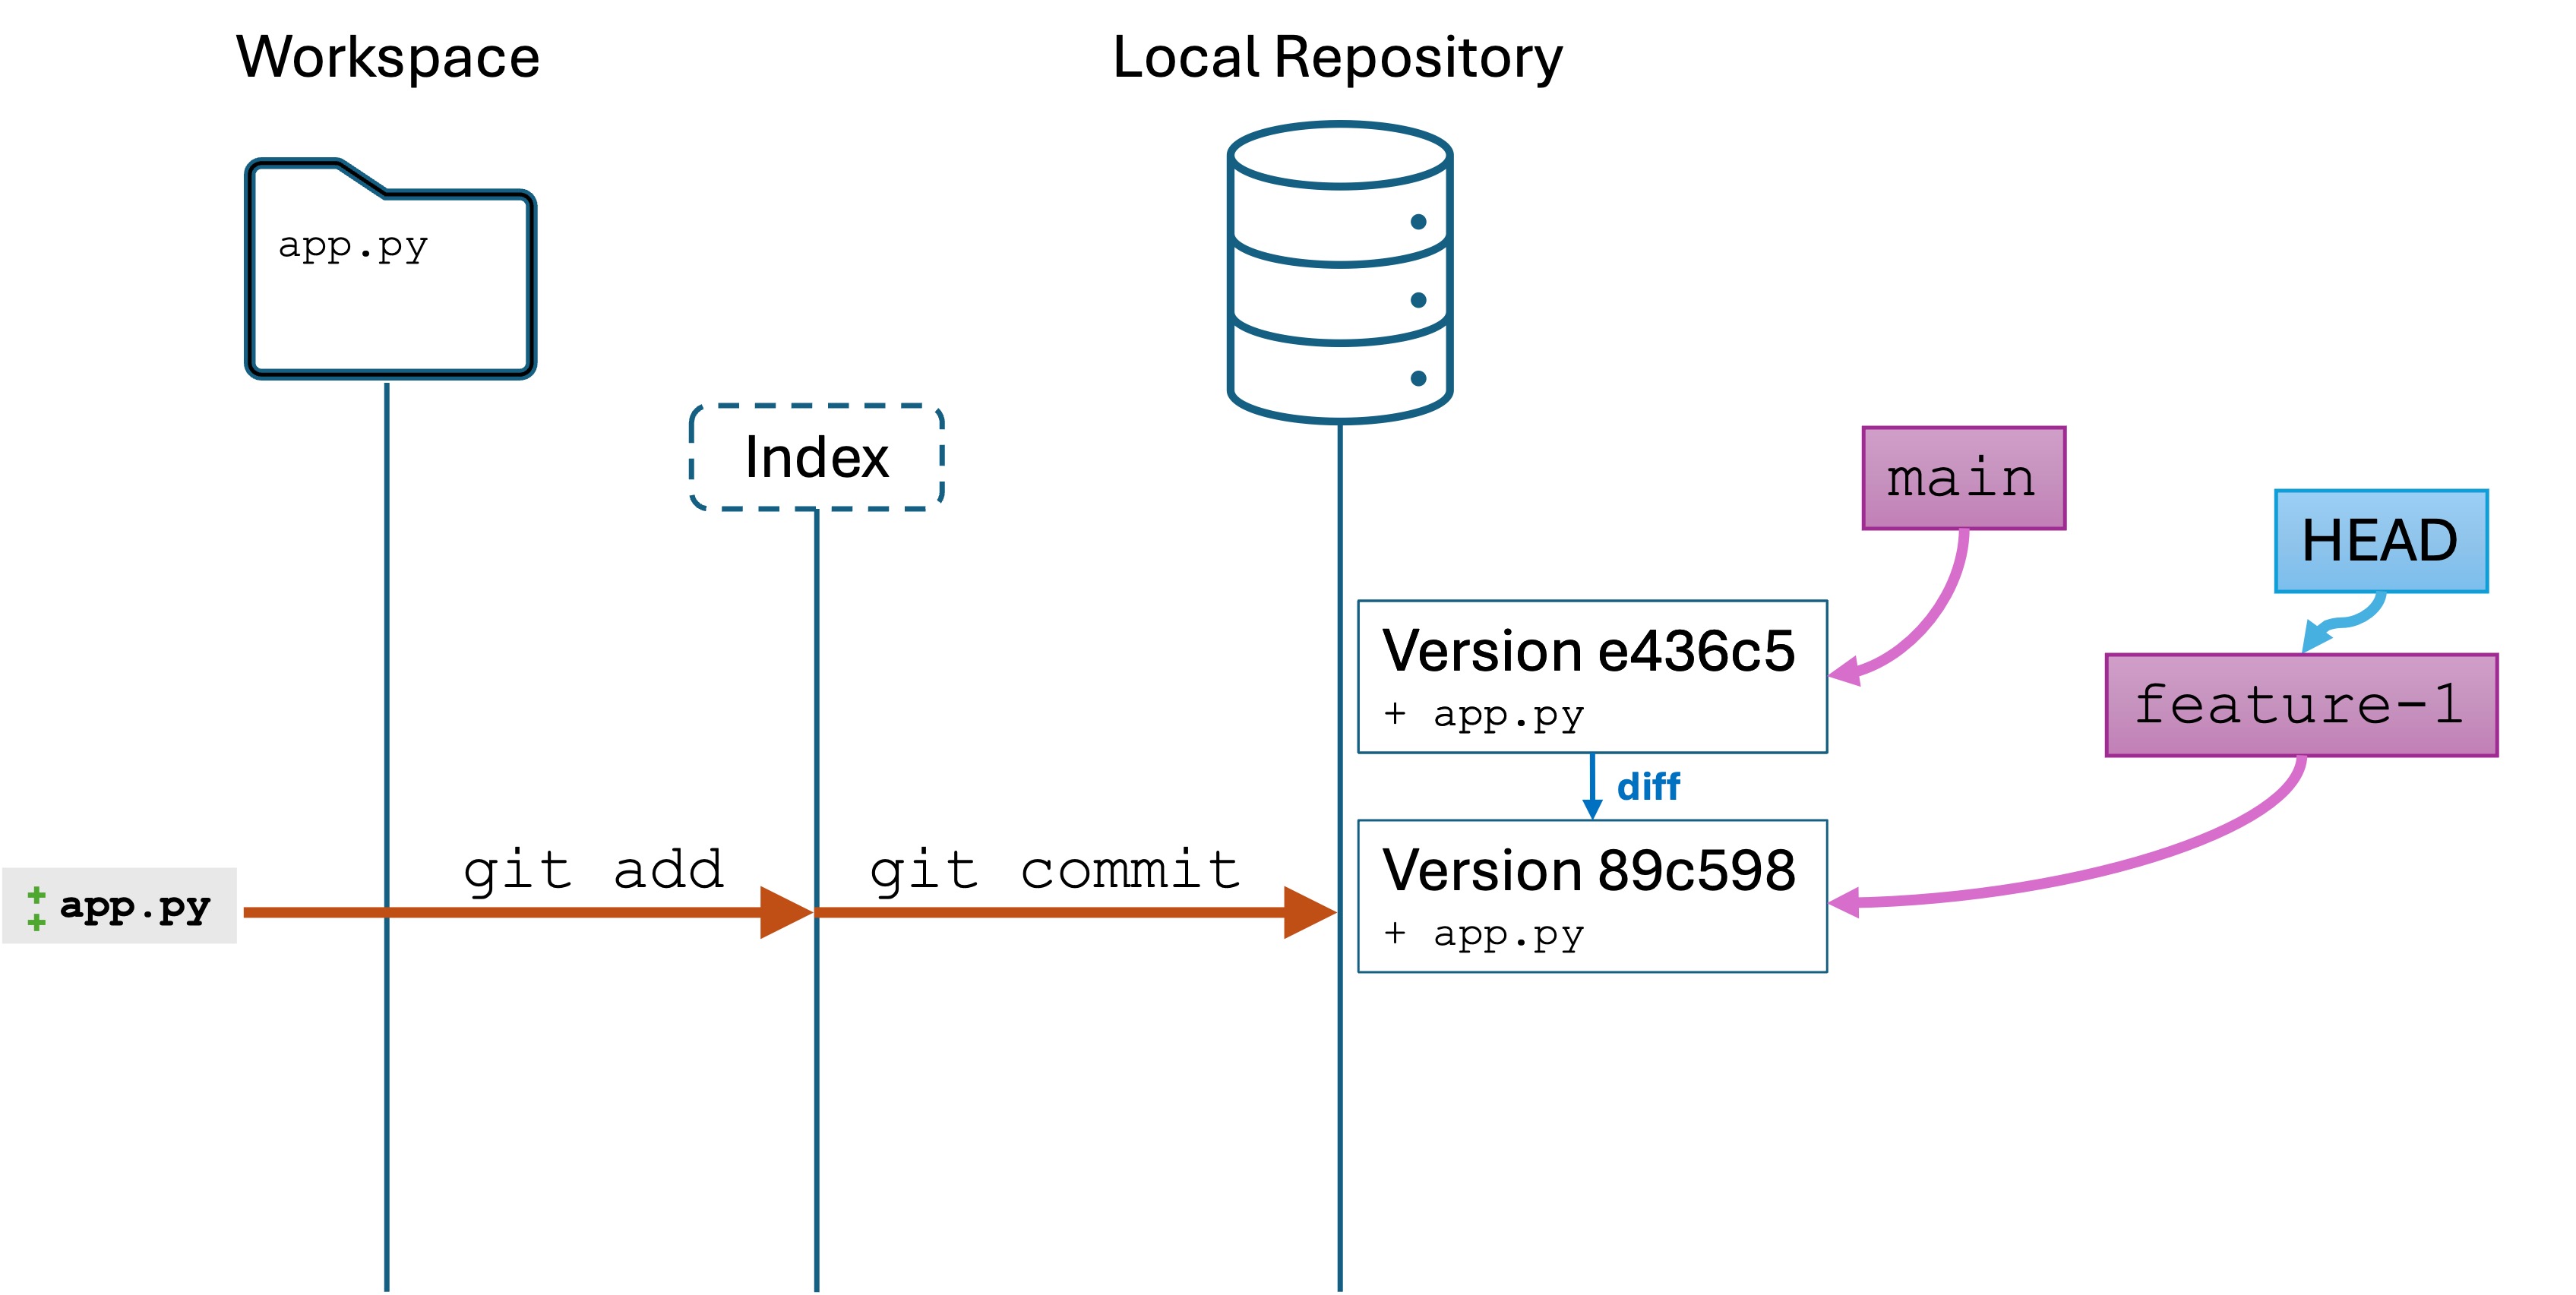
Run git log, and you will see something like this:
commit 89c5985701b1a6b188d1c23fef3b0196dd17b34e (HEAD -> feature-1)Author: Lucas Layman <laymanl@uncw.edu>
Date: Tue Oct 29 11:29:37 2024 -0400
Add feature 1functioncommit e436c51cd2760e9ef0d49a65472a404044c2d3c0 (main)Author: Lucas Layman <laymanl@uncw.edu>
Date: Tue Oct 29 11:19:05 2024 -0400
first version
You are looking at the version history of the feature-1 branch. Note that the history is based on the first version from main.
Conceptually, our branch history looks like this:
The local repository looks like this:
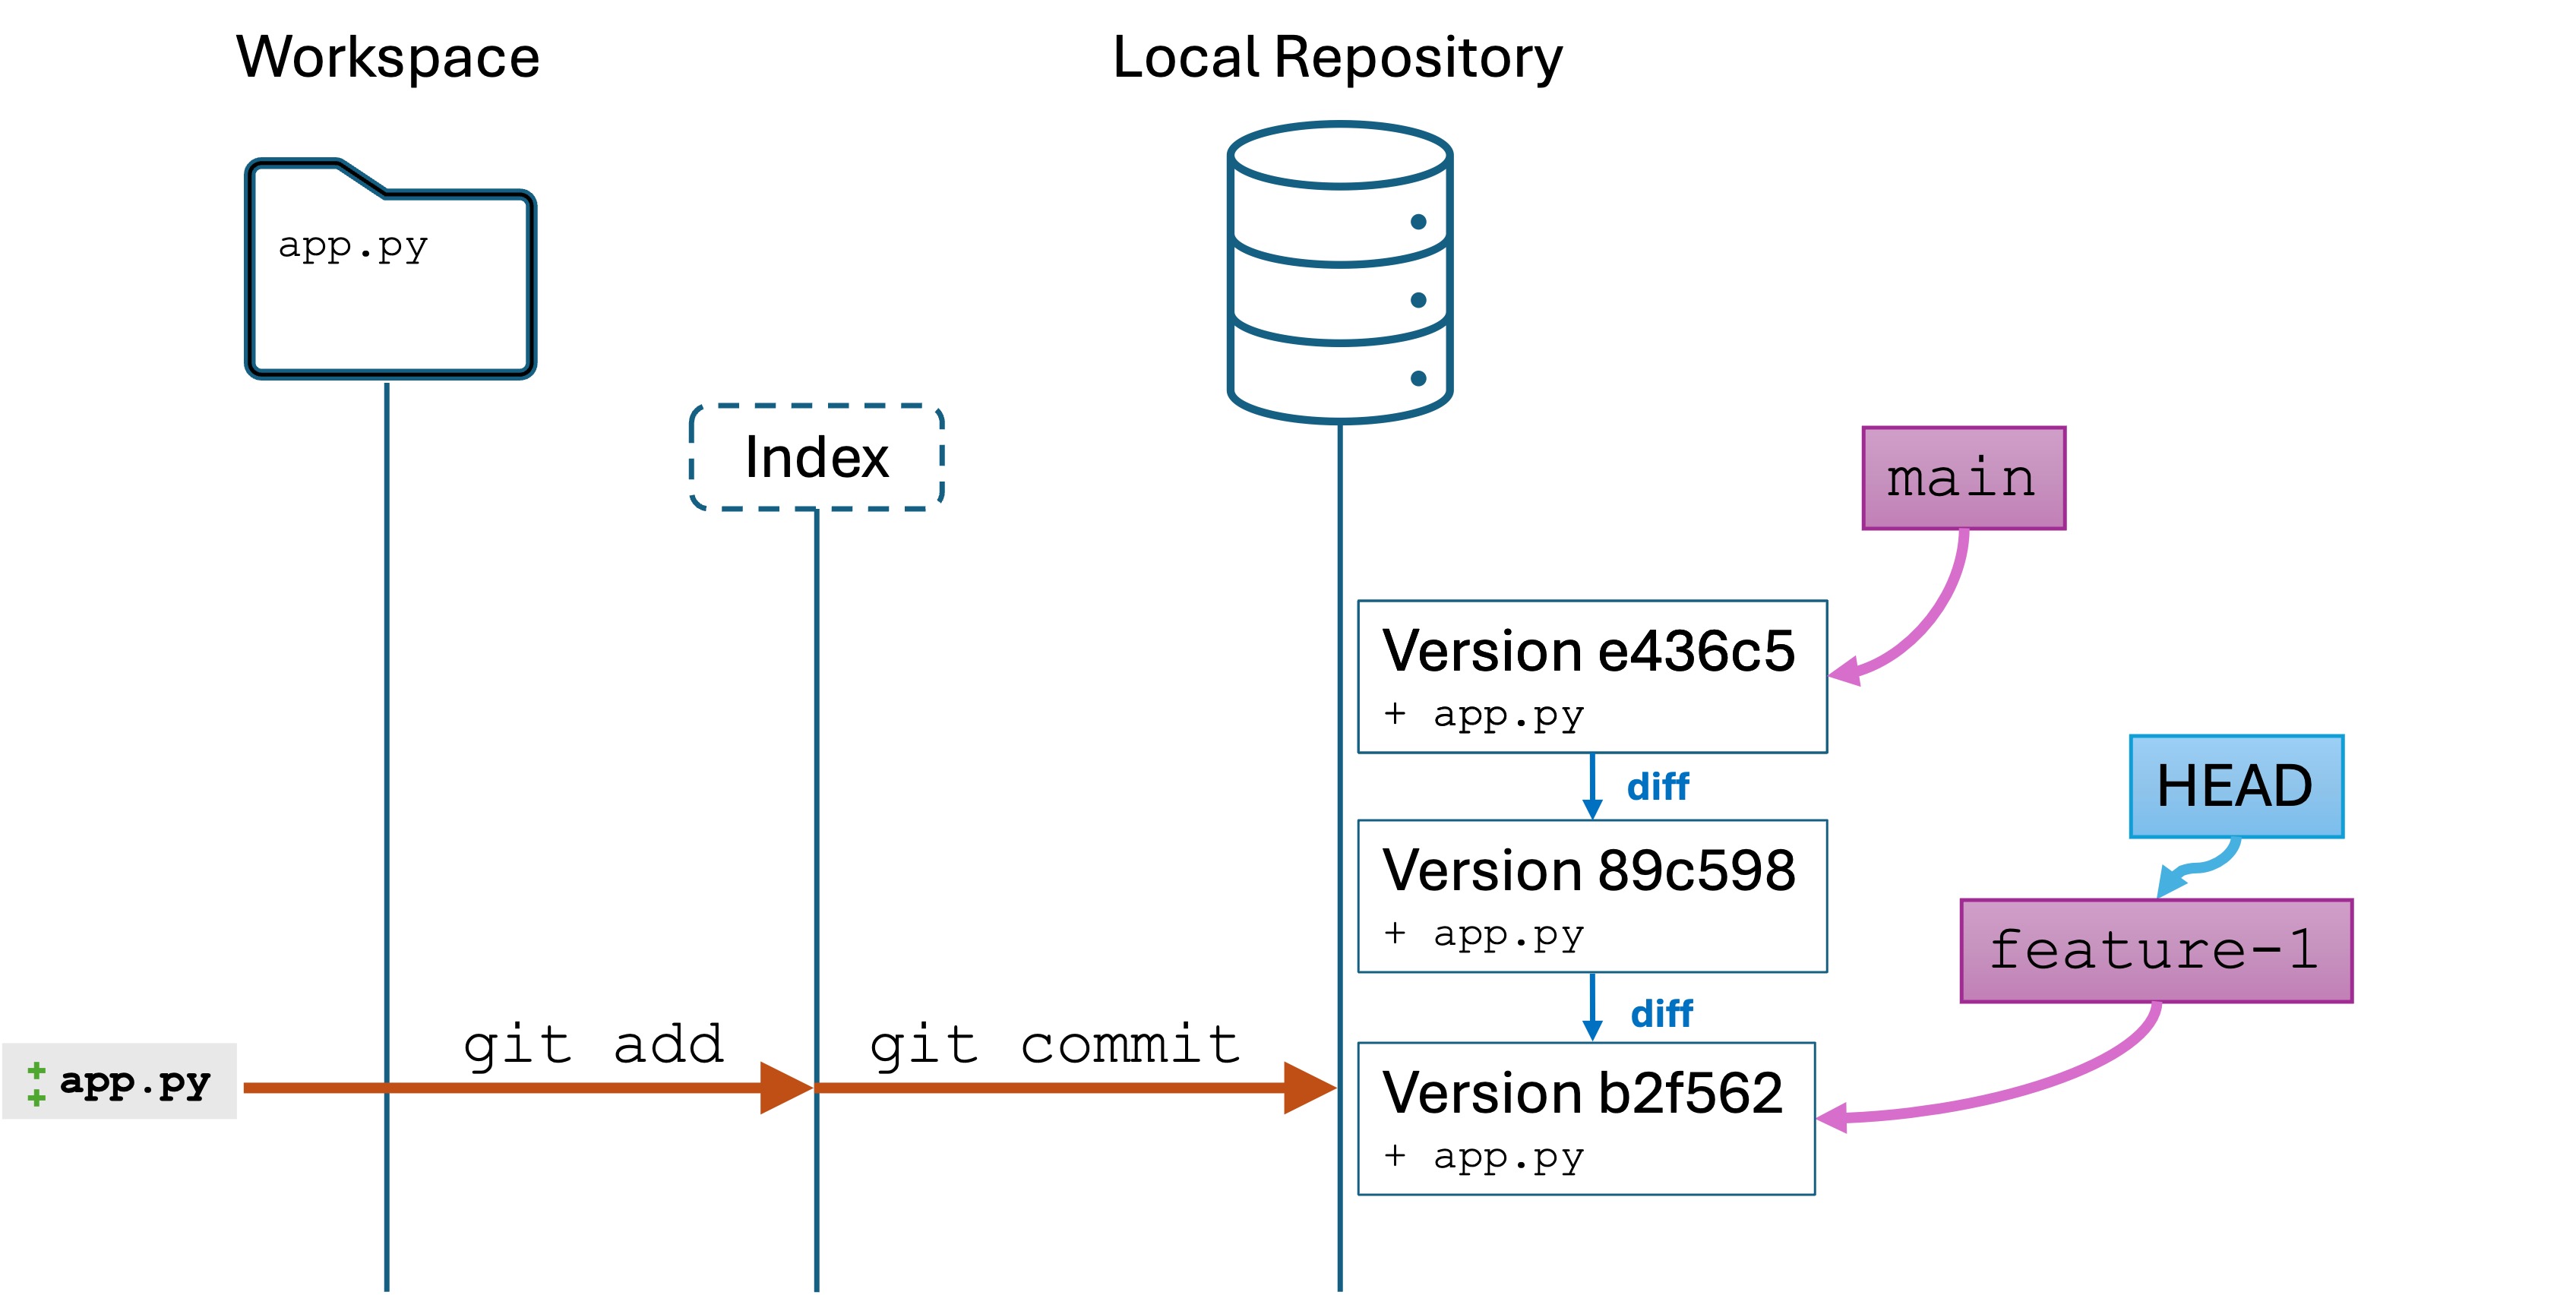
A second commit
Let’s make another change and commit it to the feature-1 branch. Do the following the following code:
Replace app.py with the following:
importrandomdefmain():print("Welcome to main!")feature_1()deffeature_1():print("Feature 1 activated!")print(f"Your random number is {random.randint(1,100)}.")if__name__=="__main__":main()
git add .
git commit -m "adding random number generation"
We now have two new versions in our feature-1 branch. Our repo and branch history look like this:
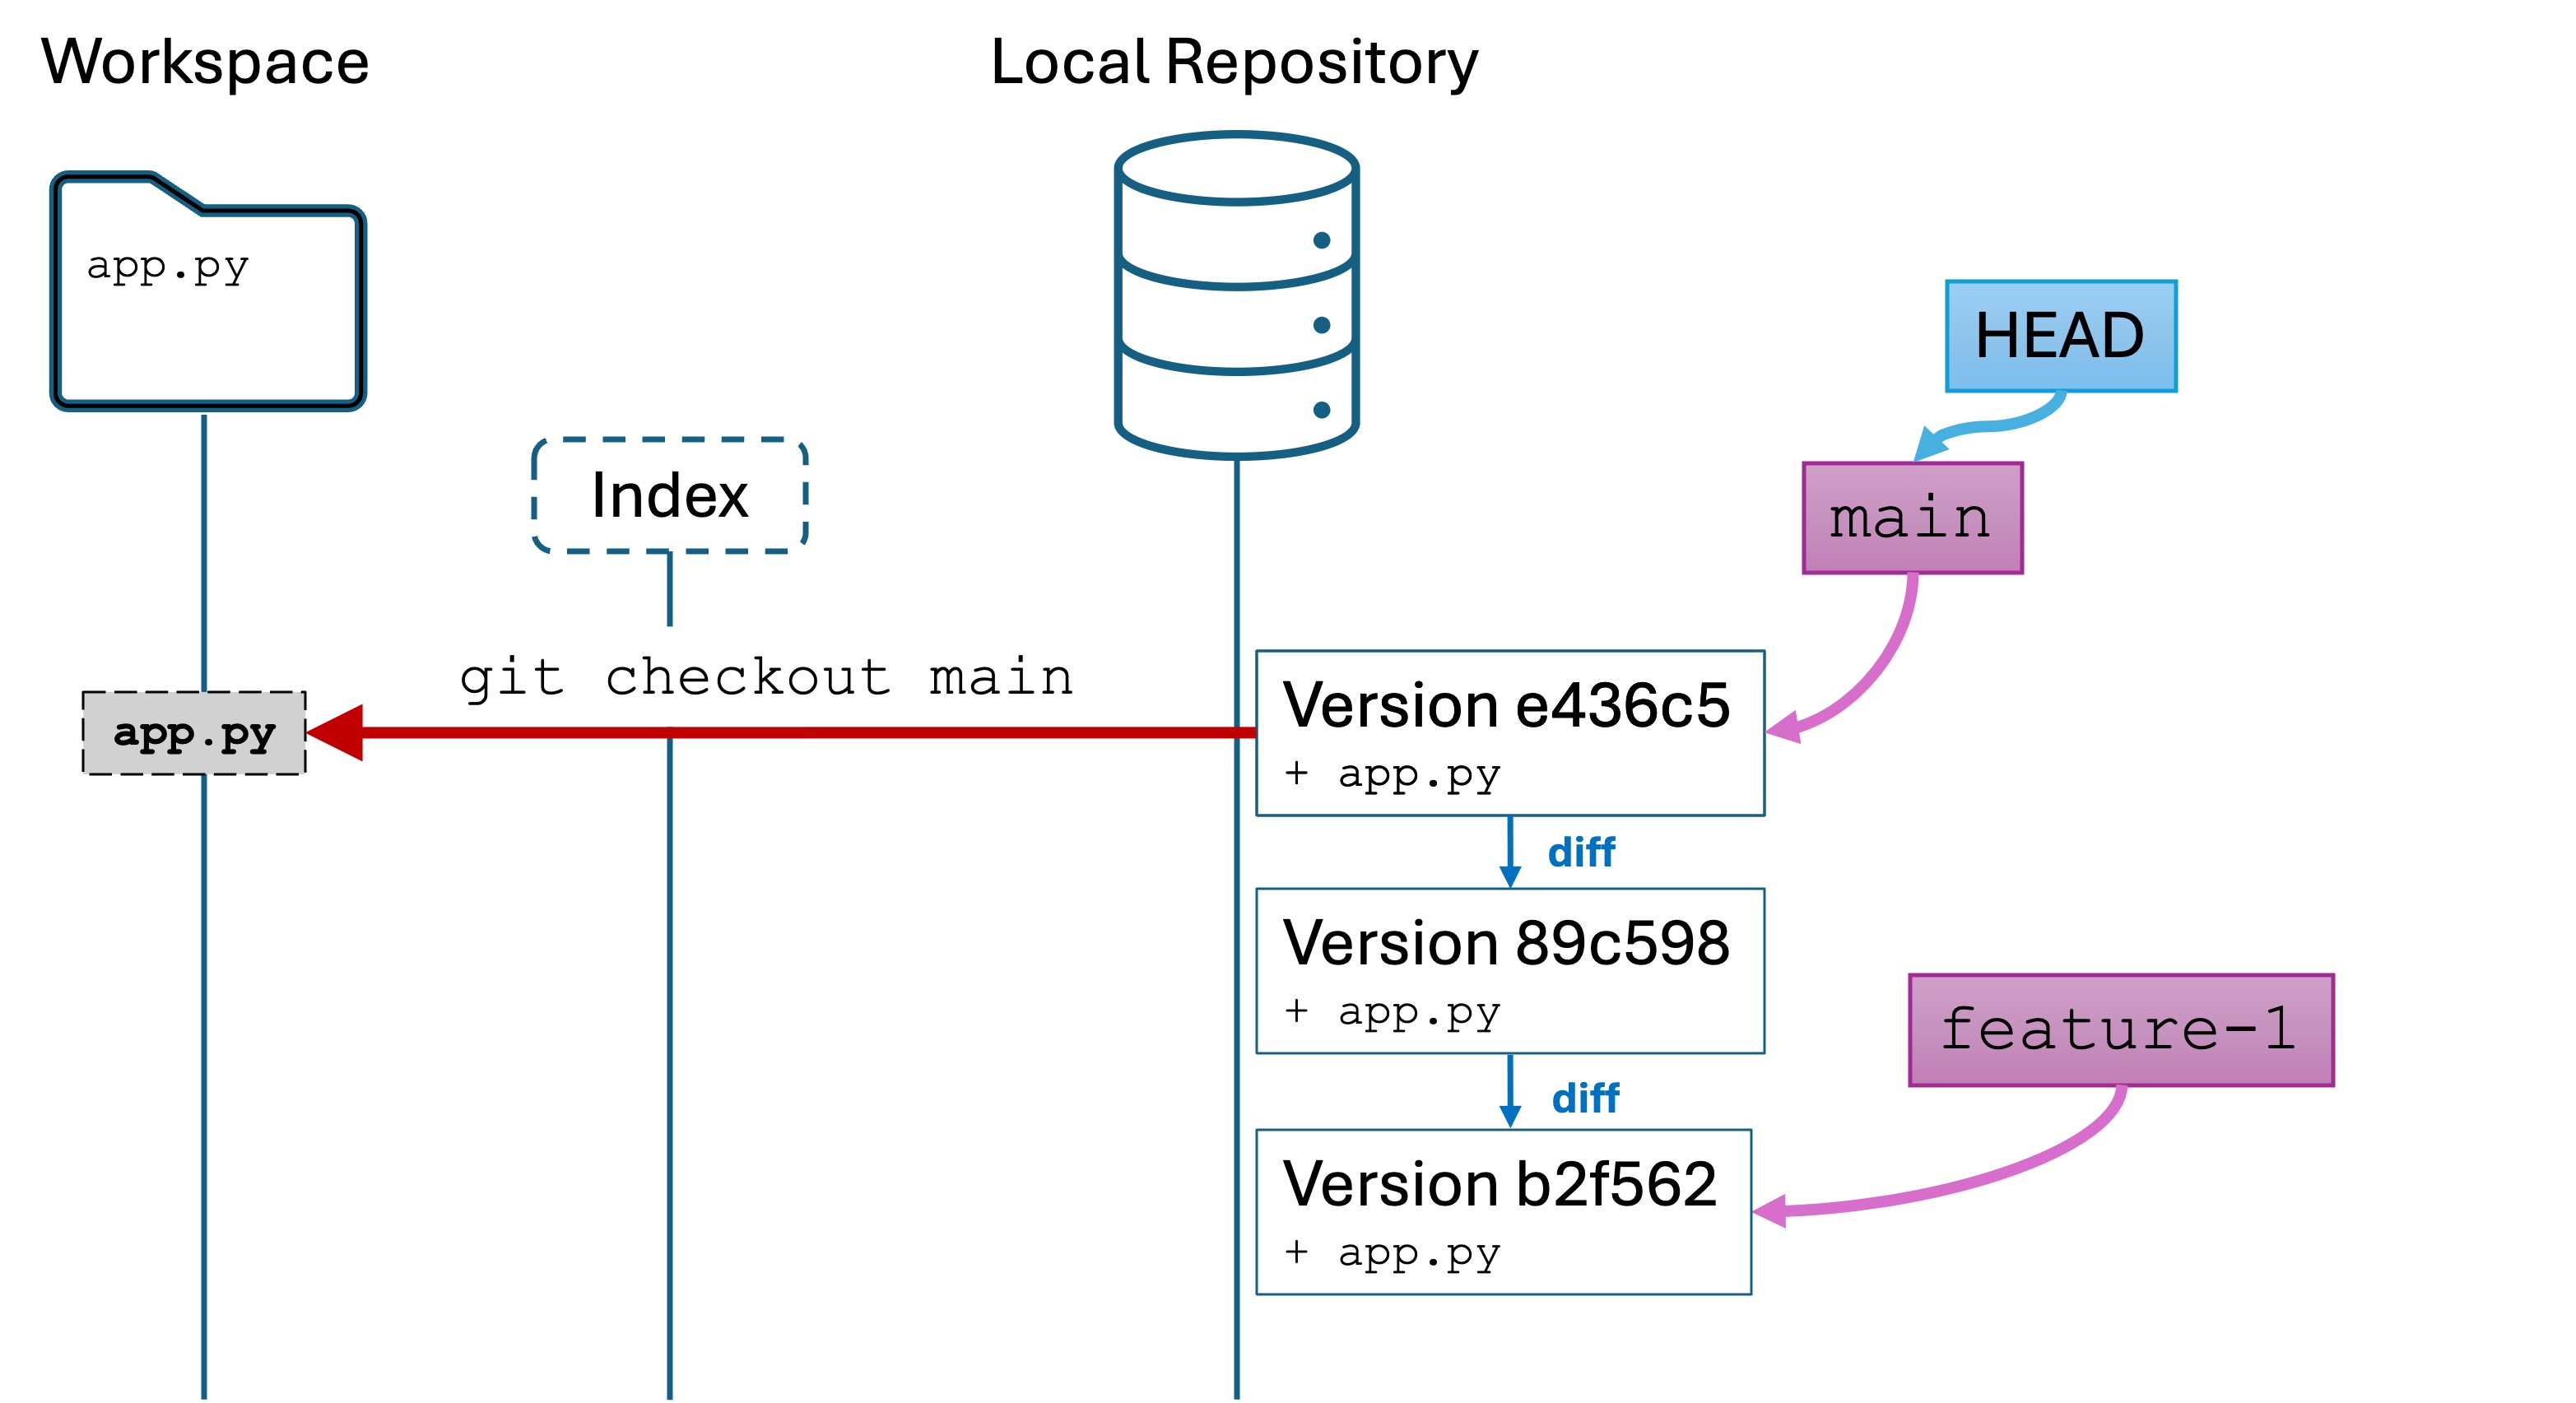
Switching between branches
Run the command
git switch main to switch back to the main branch. Notice there is no -b.
Question: What happens to the code in your IDE?
You should see that the contents of app.py are replaced with the contents as they were in the first version. Here is the current state of the repo:
Several things happened:
switch tells HEAD to point to the same version as the main variable. This makes the main branch the active branch again.
Git replaces the contents of the workspace with the files as they were at the main version.
feature-1 is unaffected. The version committed to feature-1 is still in the local repository, so we can go back to the files at that version by checking out the feature-1 branch.
Exercise: Switch to feature-1 to verify that all your changes have been saved in that branch. Switch back to main when you are done.
Merging
Our repo reflects the most common use case for branches: you work on something in a branch for a while, you make it perfect, and you are now ready to bring your work into main. Remember, main should only contain clean, complete, “good” code.
You want now to merge your feature-1 branch into the main branch. Merging is the process of combining the histories of two branches.
Run the following:
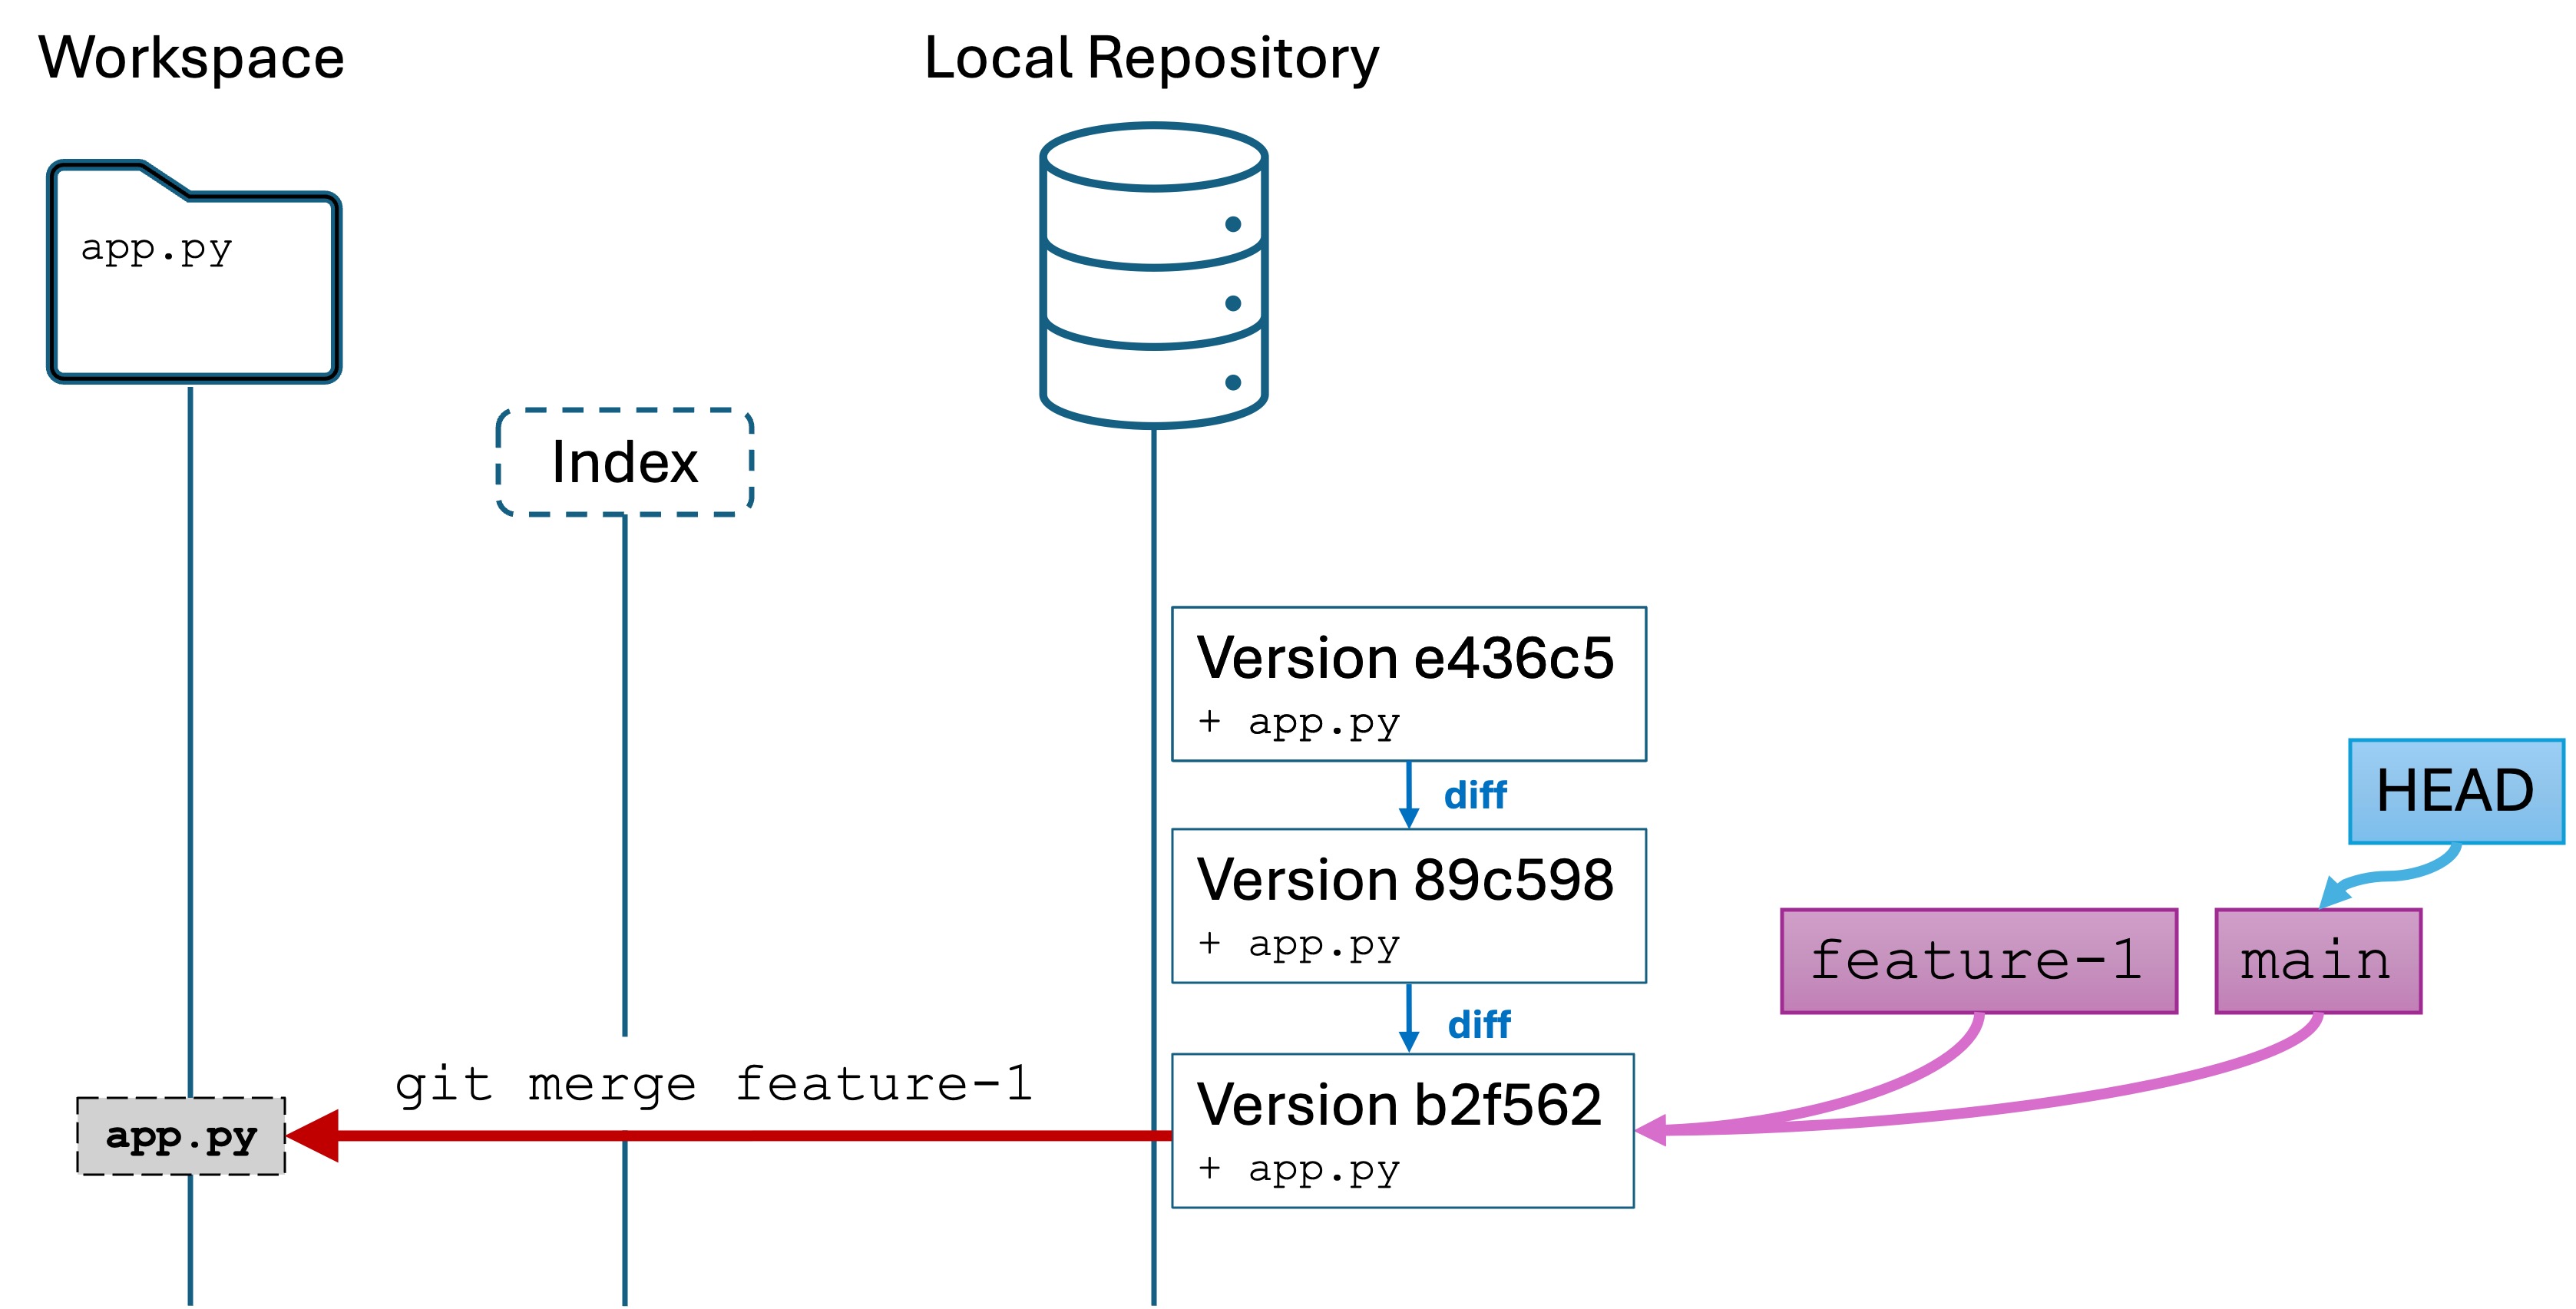
git switch main to ensure that main is the active branch.
git merge feature-1 to merge the feature-1 versions into main
You will also see that your IDE’s editor contents for app.py contain all the changes from the most recent version of feature-1. Run the git log command and you will see that HEAD, main, and feature-1 all point to the most recent version from feature-1.
Here is the state of our repo:
Conceptually, we have created a new version of main that includes all the changes from the feature-1 branch. I say conceptually because have not actually created a new version in the repo, but have updated the main variable to point to the same version as feature-1.
The feature-1 branch is still alive and well, and we can check it out and code against it. How does merging work?
Find most recent common ancestor: Git first identifies the most recent common ancestor (base commit) of the two branches. This is where both branches diverged from each other. In the illustration, this was the first commit e436c5.
Analyze changes: Git then looks at the changes that have been made in both branches since that common ancestor.
Apply Changes:
If the changes are non-conflicting (meaning they don’t overlap), Git automatically combines them. This is what happened here.
If there are conflicting changes (meaning the same parts of a file have been modified differently in each branch), Git pauses and marks the conflicts. You’ll need to resolve these conflicts manually before completing the merge.
(Sometimes) Create a Merge Commit: Once all changes are applied, Git creates a new commit (called a “merge commit”) on the active branch. This merge commit has two parents—one from each branch being merged—and represents the integration of both sets of changes.
I say “sometimes” because in cases where main has not changed, like in this lab example, a merge commit on main is not created. main is simply “fast-forwarded” (that is the actual Git term) to the latest version of feature-1 by moving the main pointer.
However, if changes were made to both main and feature-1, we would see a merge commit.
In our case, we had a non-conflicting merge. This is the best case scenario. In a real project involving multiple engineers editing the same parts of code, you will very likely have conflicting changes.
We will discuss handling merge conflicts in the next lab.
Exercise
Create a new practice branch.
Make at least three separate commits to the practice branch. Add code of your choosing. It can be trivial or non-trivial. You can modify existing lines or delete then. Follow the rules of good commit behavior:
Commit early and often, but only commit working code. Comment out code that has syntax or semantic errors.
Write a concise, descriptive commit message.
Merge the practice into the main branch.
Make a commit to the main branch.
Merge the main branch into the practice branch
Summary and Key Commands
Git enables you to create branches, and switch between them. When you switch branch, Git replaces the contents of your working directory with the most recent version in the branch. The version history of all branches are kept separately in the local repository. This allows you to work on different things in parallel.
Create a new branch: git switch -c [name]
Switch between branches: git switch [name]
Merge [branch-name] into the active branch: git merge [branch-name]
Knowledge Check
Question: What is the purpose of branching in Git, and why is it useful?
Question: What are two ways that you can identify the active branch you are currently working in?
Question: What is the name of the default branch created when you initialize a new Git repository?
Question: When you change the code in a branch, is main affected?
Question: Briefly describe what the special HEAD variable in Git refers to.
Question: Suppose you make have three branches: main, dev, and release. Fill in the blank: the branch names are __________________ inside Git that point to specific _____________________ in the repository.
Question: When you run git switch feature-1, you are making the _____________ variable point to the ________________ variable.
Challenge: Create a new Git project, create and switch to a new branch, and modify a file with a new feature. Commit the change to this branch.
6 - Branching and Merging, Part 2
Handling merge conflicts
The previous lab explained the concept of branching, which creates parallel version histories. Merging is the process of unifying parallel version histories back into a single history.
One example is you create a branch to implement a long and complicated feature. Once the feature is complete and tested, you merge it back into the main branch.
Merge conflicts occur when Git cannot automatically resolve differences between branches. This usually happens when:
Two branches modify the same line in a file.
One branch deletes a file while the other modifies it.
Merge conflicts occur frequently in real projects. Our goal is to learn how to recognize a conflict and resolve it.
Example 1: Simple Text Conflict
Do the following:
Make a new subdirectory called merge-conflicts in your seng-201/ directory.
Run git init to initialize a new Git repository.
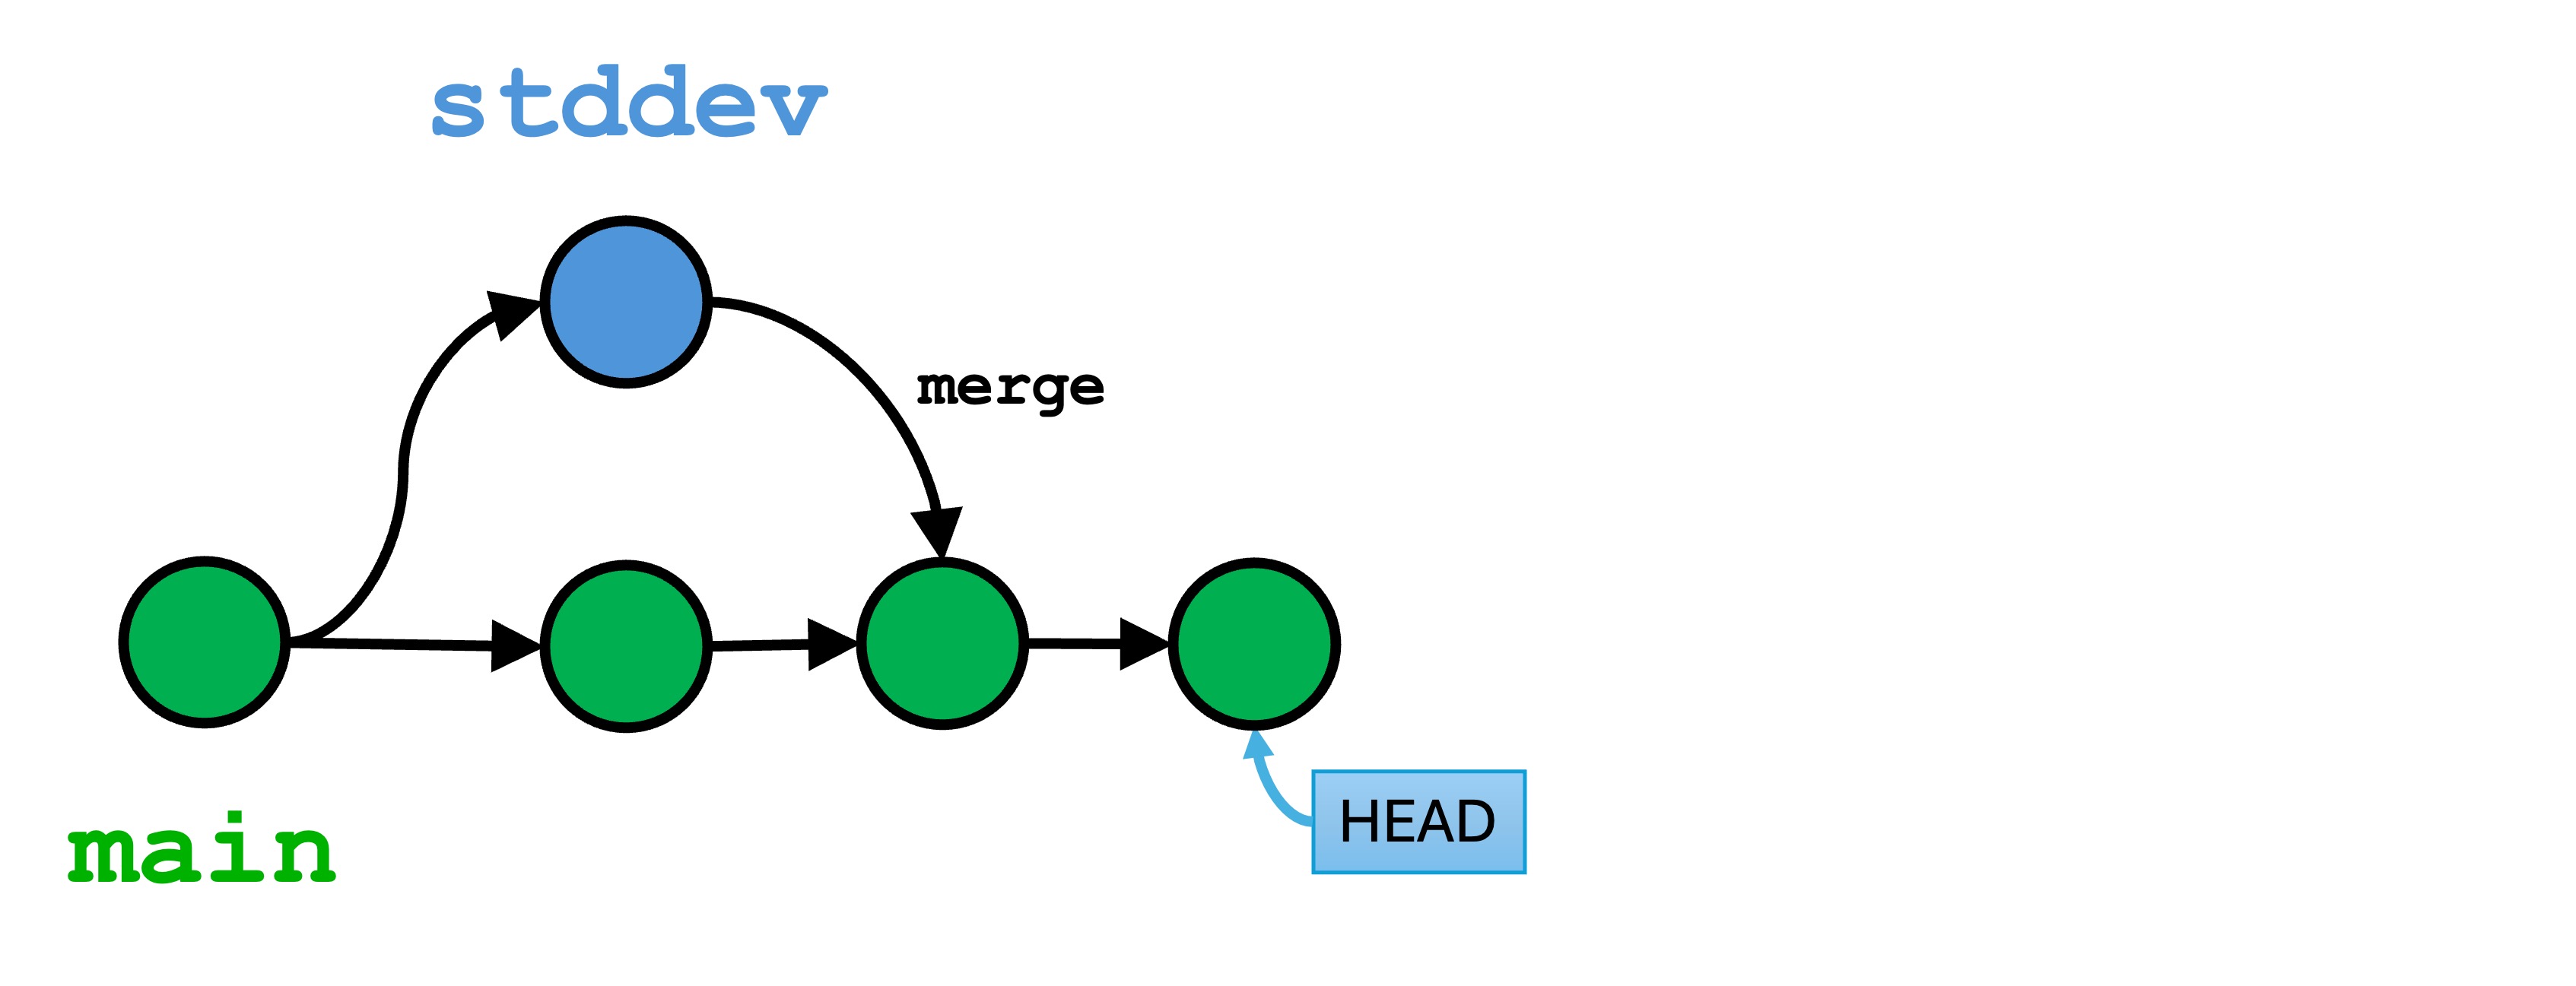
Create the file stats.py and paste in the following code:
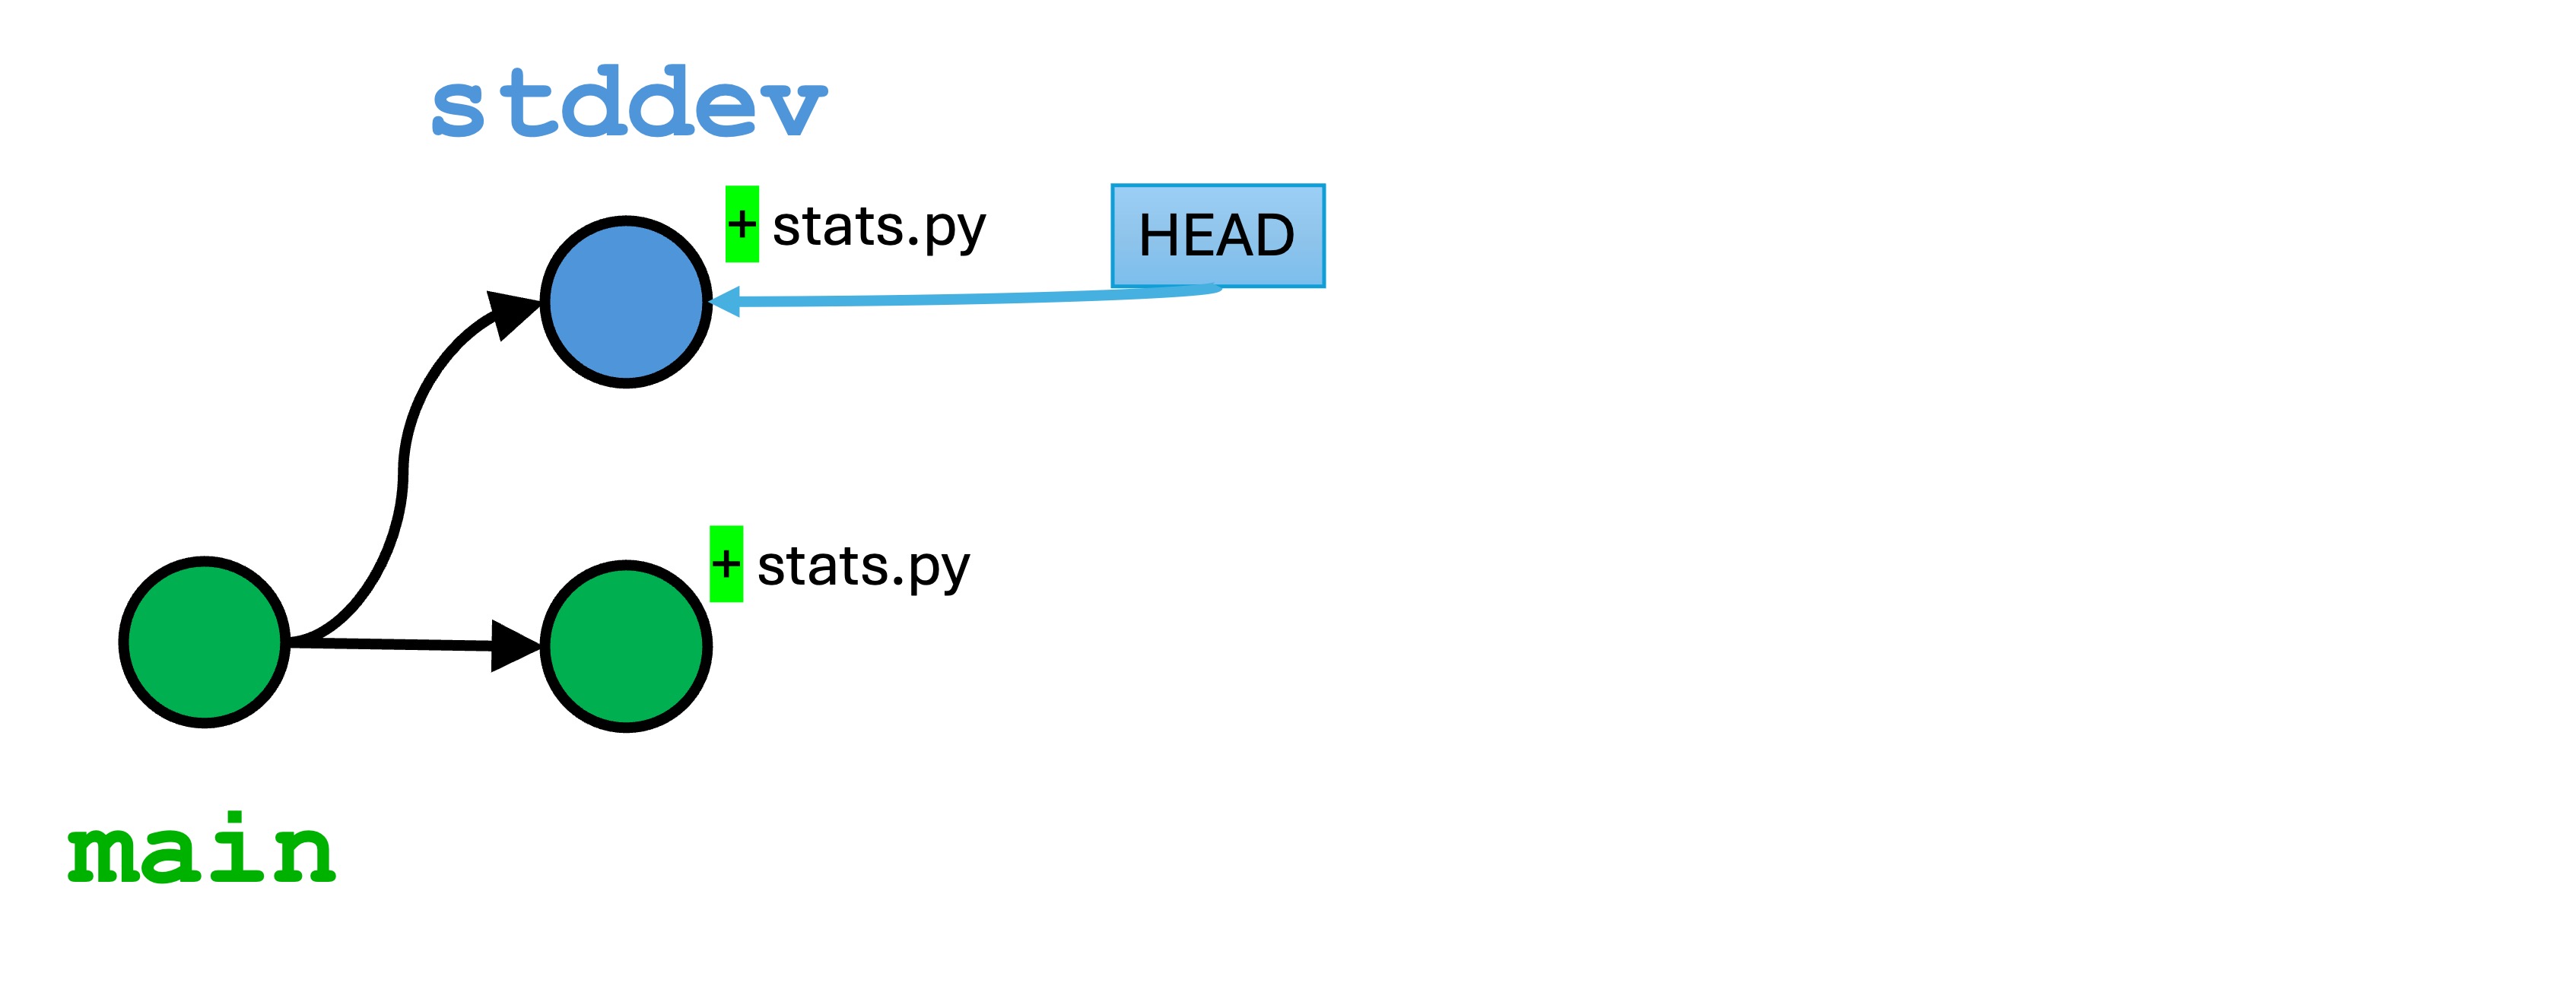
Now we have a conflicting change. We changed the last few lines of calculate_stats() differently in each branch.
stddev is the active branch, but we have changes to stats.py in both branches that edit the same lines.
Understanding a merge conflict
Now, let’s merge in an attempt to join our two branches. Make sure you are in the main branch, and run git merge stddev.
You will see output similar to the following in the Terminal:
Auto-merging stats.py
CONFLICT (content): Merge conflict in stats.py
Automatic merge failed; fix conflicts and then commit the result.
(3.12.2) ➜  merge-conflicts git:(main) ✗
Git has attempted to merge the two version histories, but this process failed because both branches edited the same lines of code. We are now in a conflicted state. You can think of the conflicted state as an unfinished commit. You can either discard the changes with git reset, or you can resolve the issues and finish the new commit.
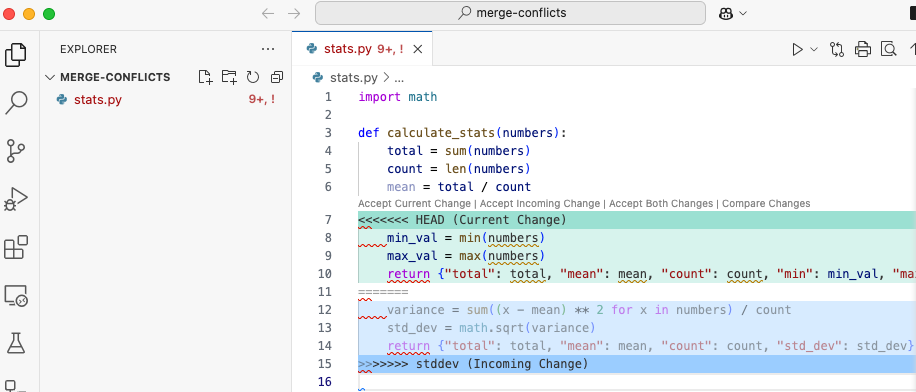
If Visual Studio Code is configured as your Git editor, you will see a screen similar to the following:
Notice that the content of stats.py has physically changed! Git has inserted special characters into the code. The code will no longer compile.
To resolve a merge conflict, you must decide what to keep. Our example has 3 conflicting lines. The lines in the main branch, pointed to be the HEAD, are marked with:
Remember, we ran the command git merge stddev, so HEAD is the main branch and the “incoming change” is from the stddev branch.
Resolving a merge conflict
To resolve a merge conflict entails three things:
Edit the code to keep what you want.
Remove any lingering Git lines beginning with <<<<<<<, =======, or >>>>>>>.
Add and commit the changes.
Visual Studio Code provides you with some shortcuts and a merge editor. I find these to be dangerous. You really want to think about the code and what you want to keep in most cases.
Let’s resolve the merge conflicts manually. Here stats.py currently the entire code:
As the developer, I actually want to keep both changes because I want the min, max, and standard deviation values.
I leave lines 8-9 (min and max) and lines 12-13 (standard deviation) as-is. I’ll delete lines 7, 11, and 15 containing the Git special characters.
Now the problem is with the return lines: I want a combination of them. There is no shortcut to do this. I will simply create my own return line that amalgamates the old ones.
My code looks like this after resolving the conflicts:
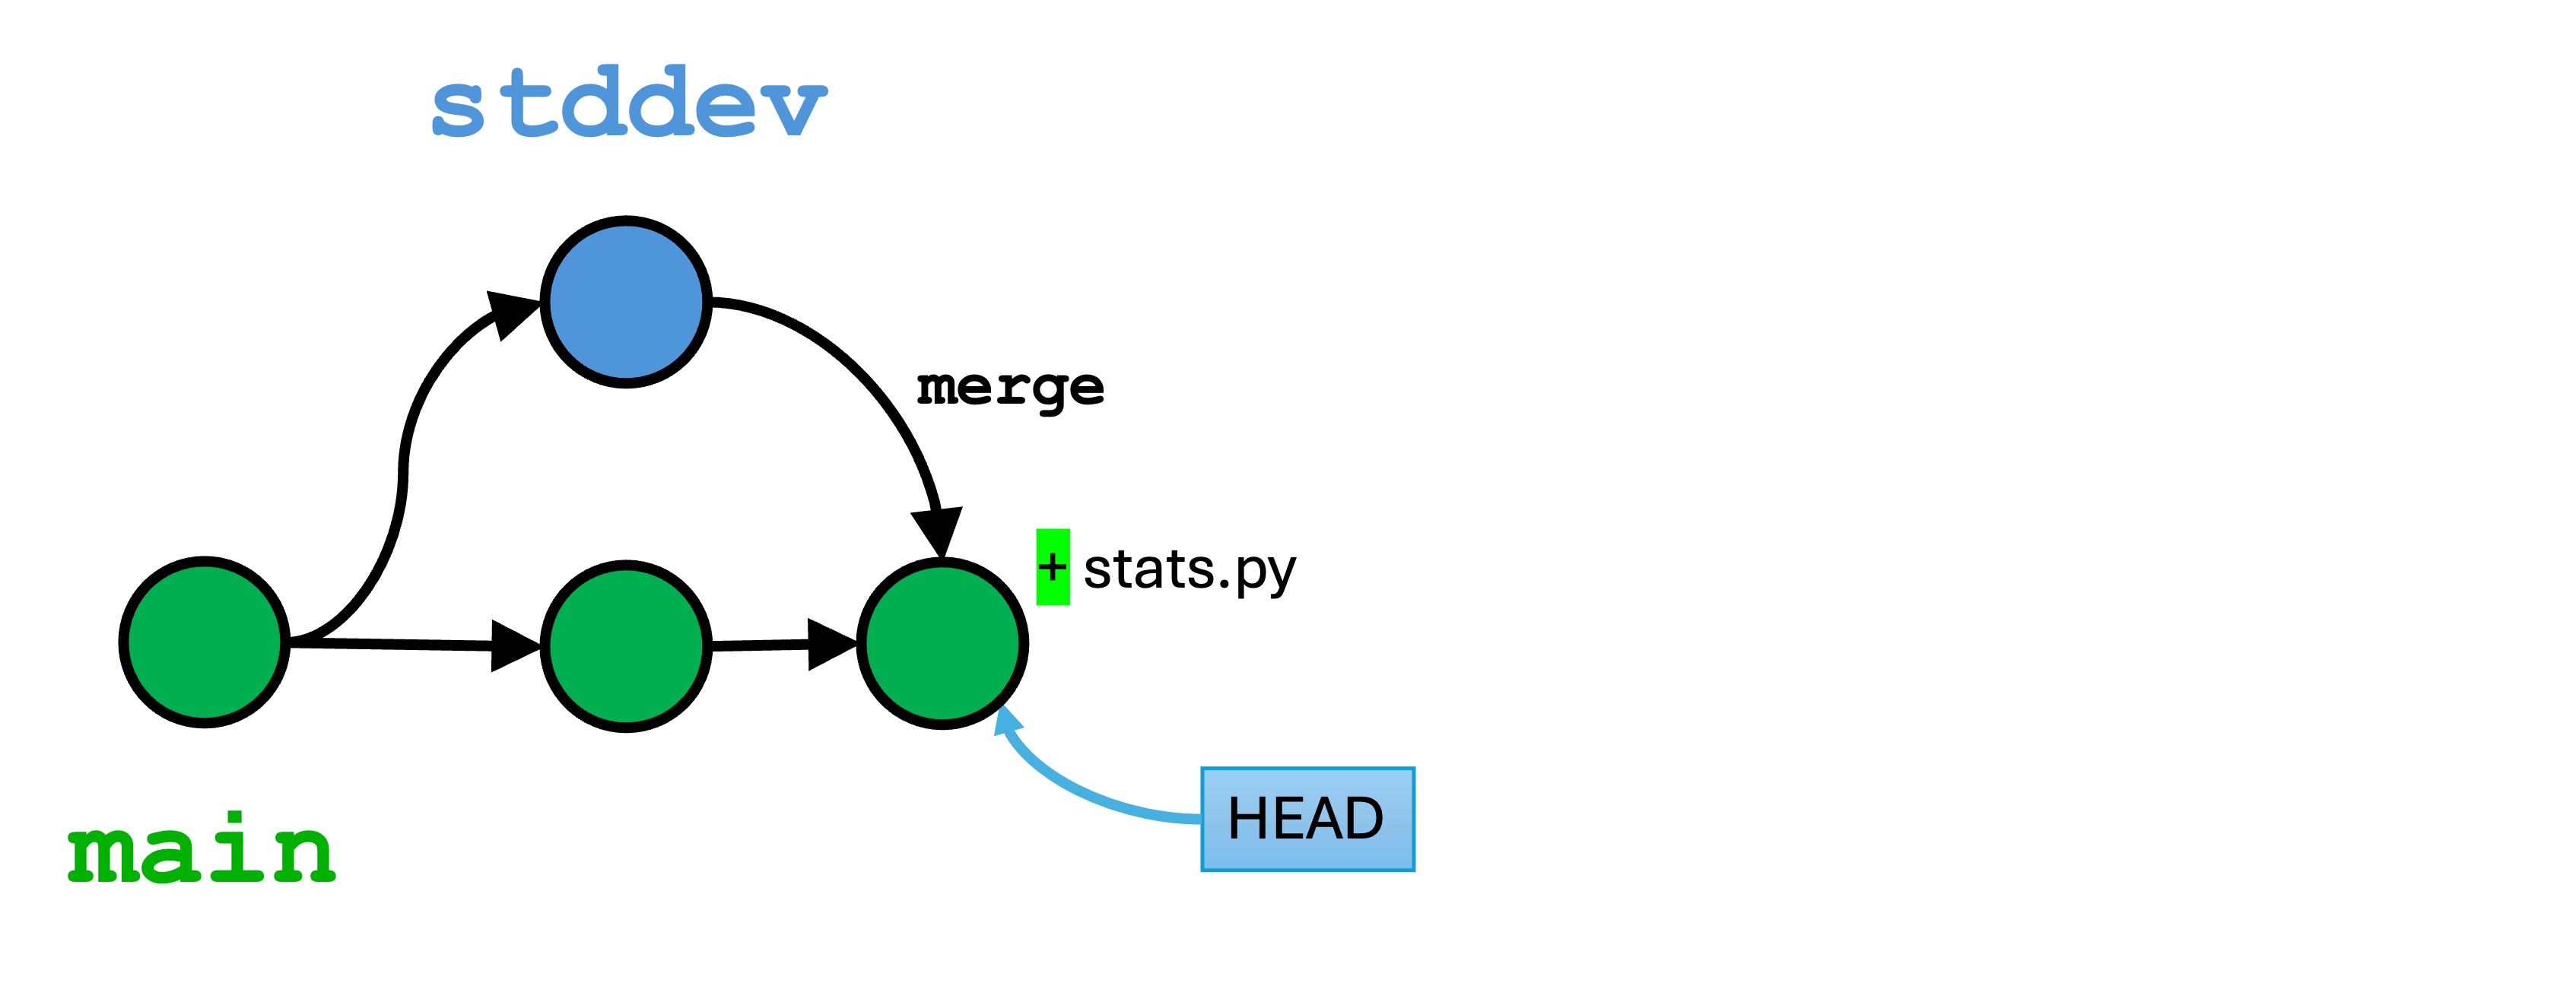
git commit -m "Resolving merge conflicts with min, max, and stddev"
I now have a new merge commit on the main branch that contains these changes. This version acts like any other version in your local repo, and the HEAD will be pointing toward it. You will notice that all the angry red and ! markers are gone from Visual Studio Code. I now have three versions in main’s history.
Example 2: Conflicts in multiple files
Let’s work through merge conflicts in multiple files.
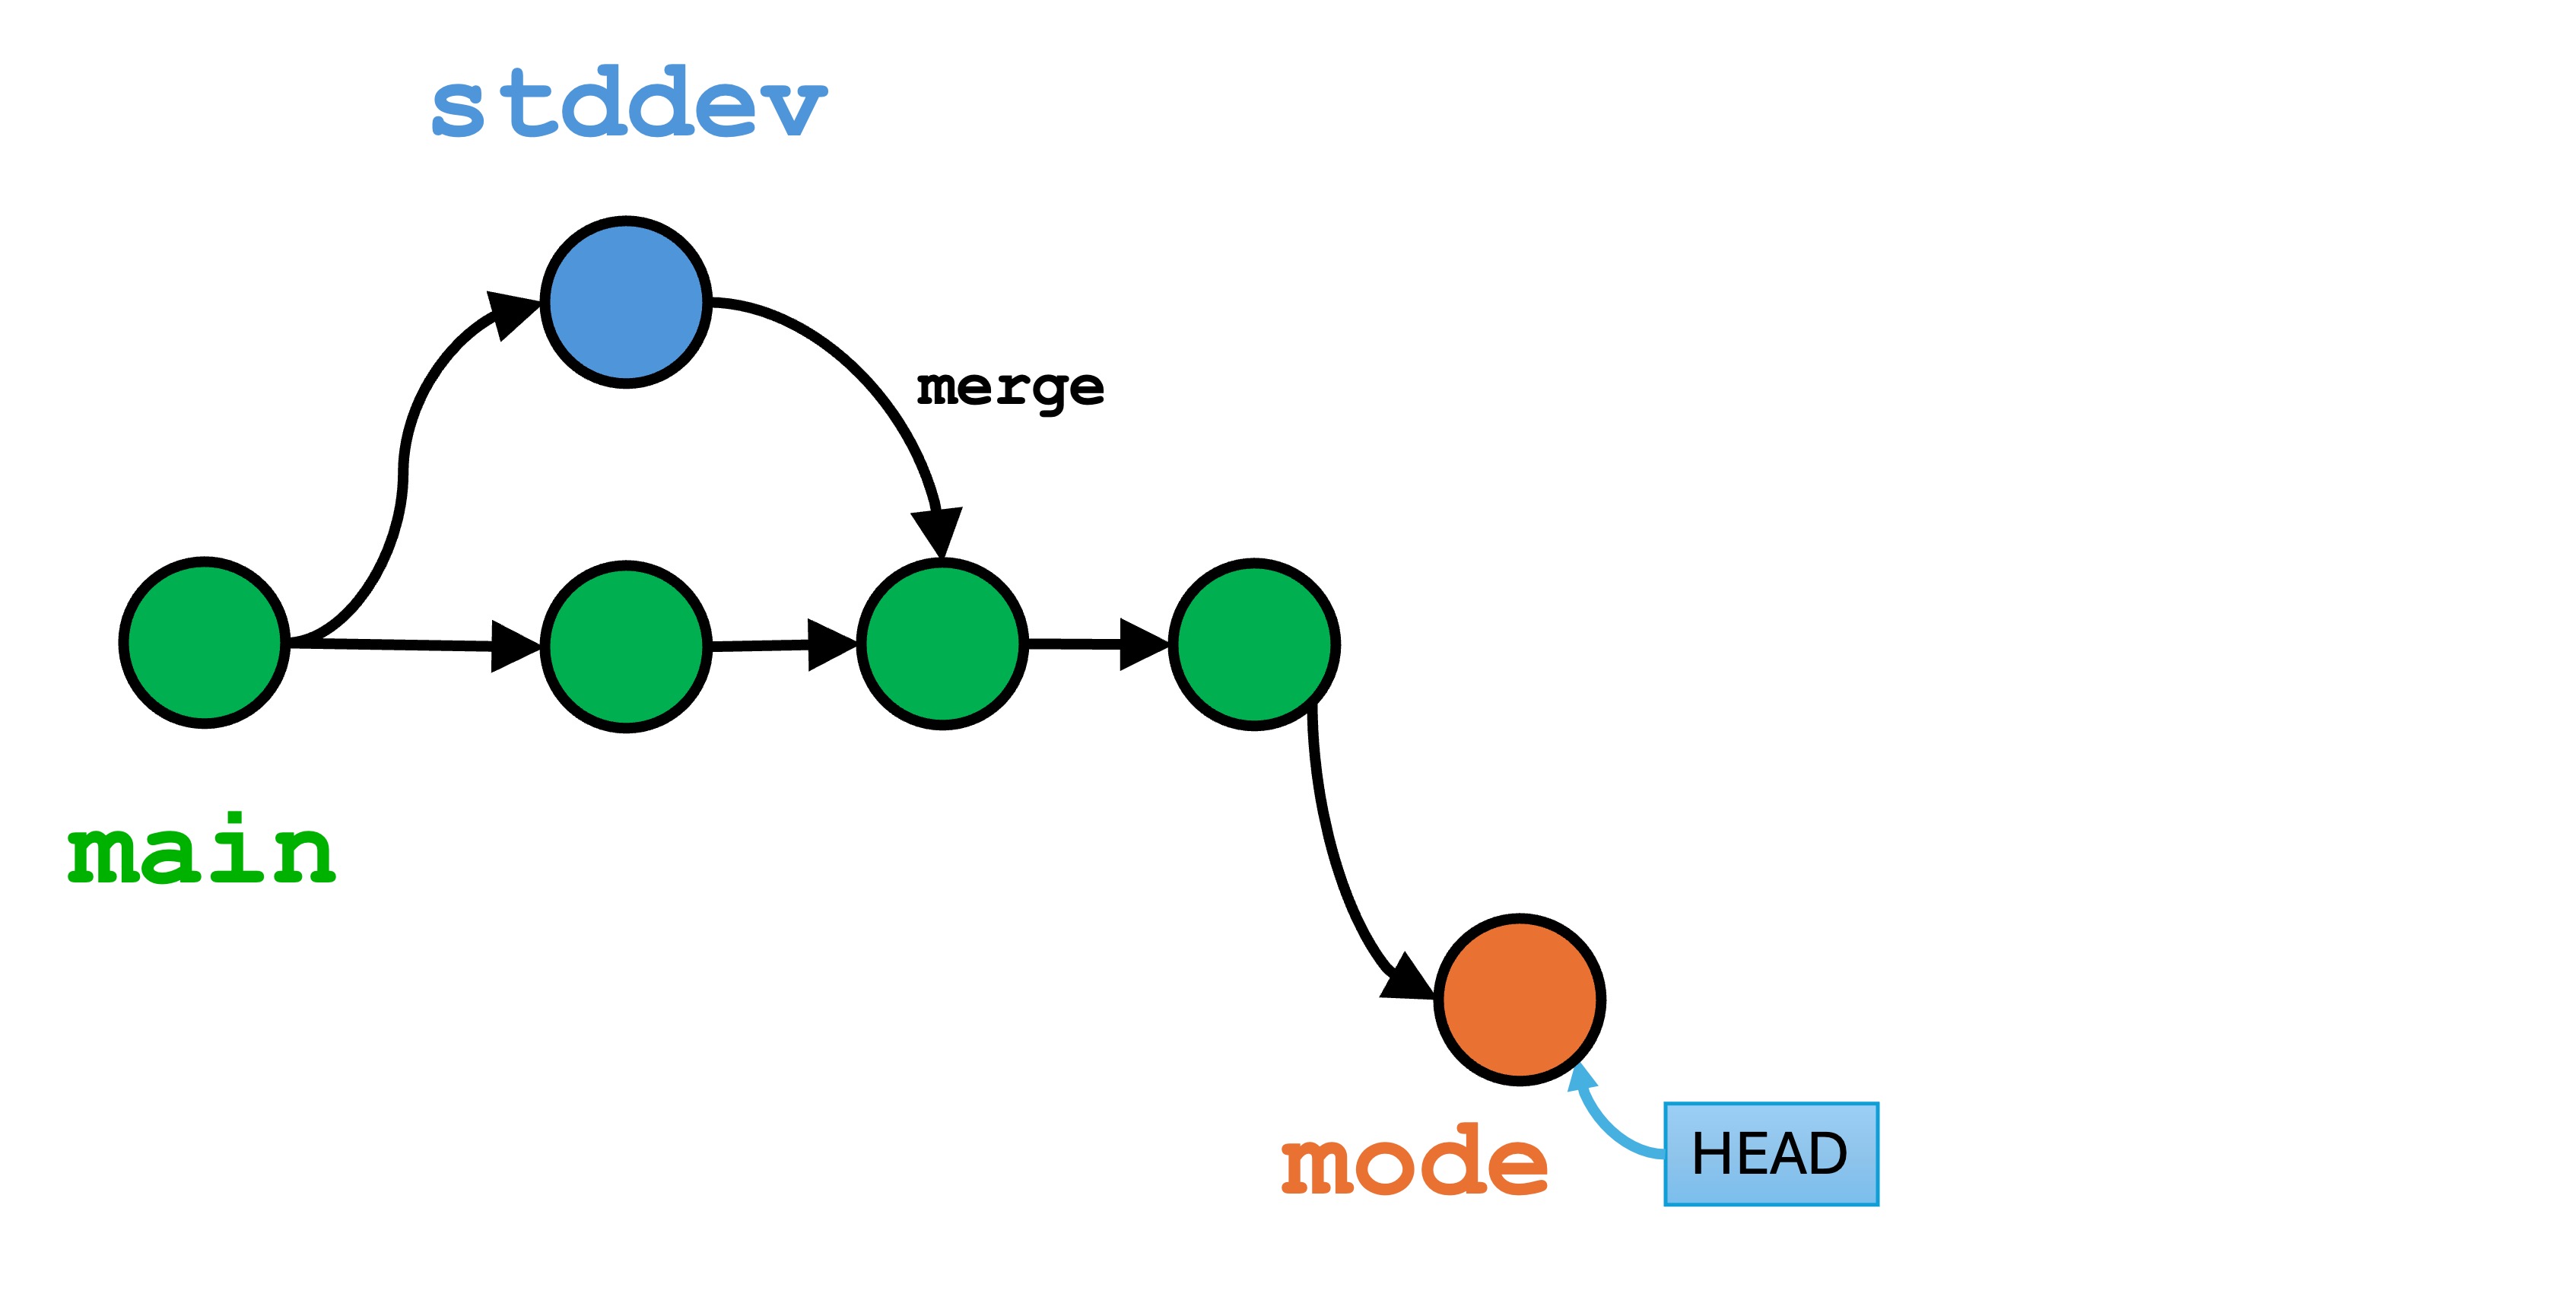
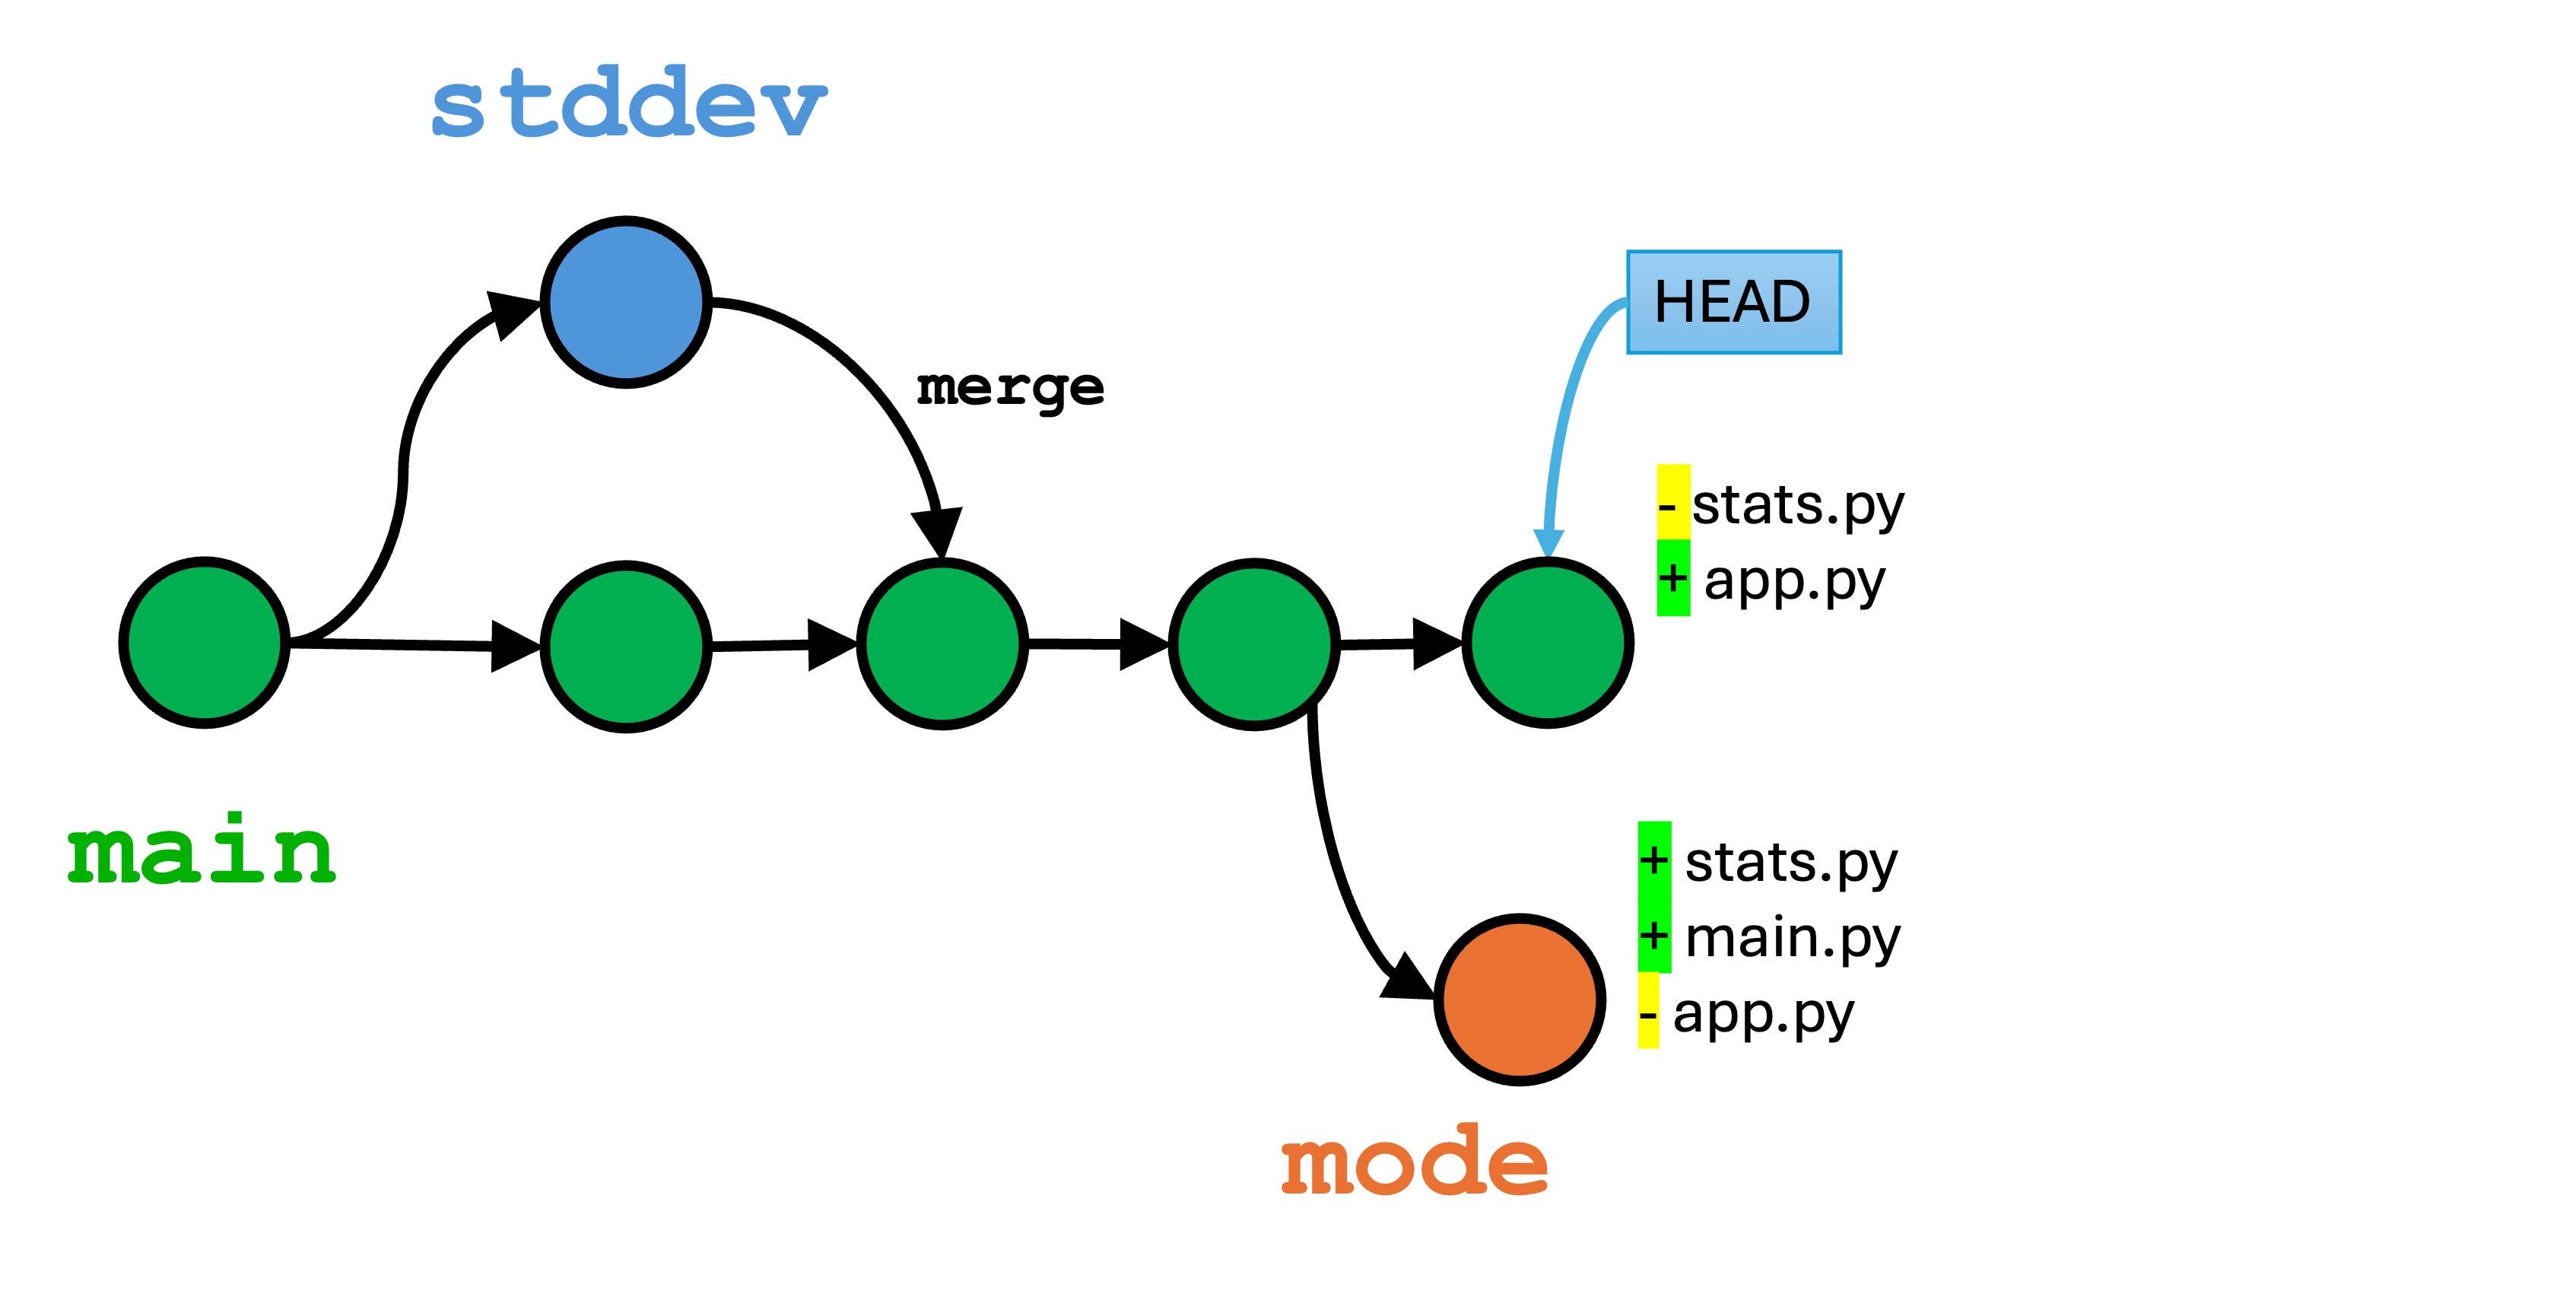
Create a new file
In the main branch, create the file app.py with the following:
So we now have conflicting, concurrent changes in main that will cause a problem with the changes in the mode branch.
Resolving merge conflicts in multiple files
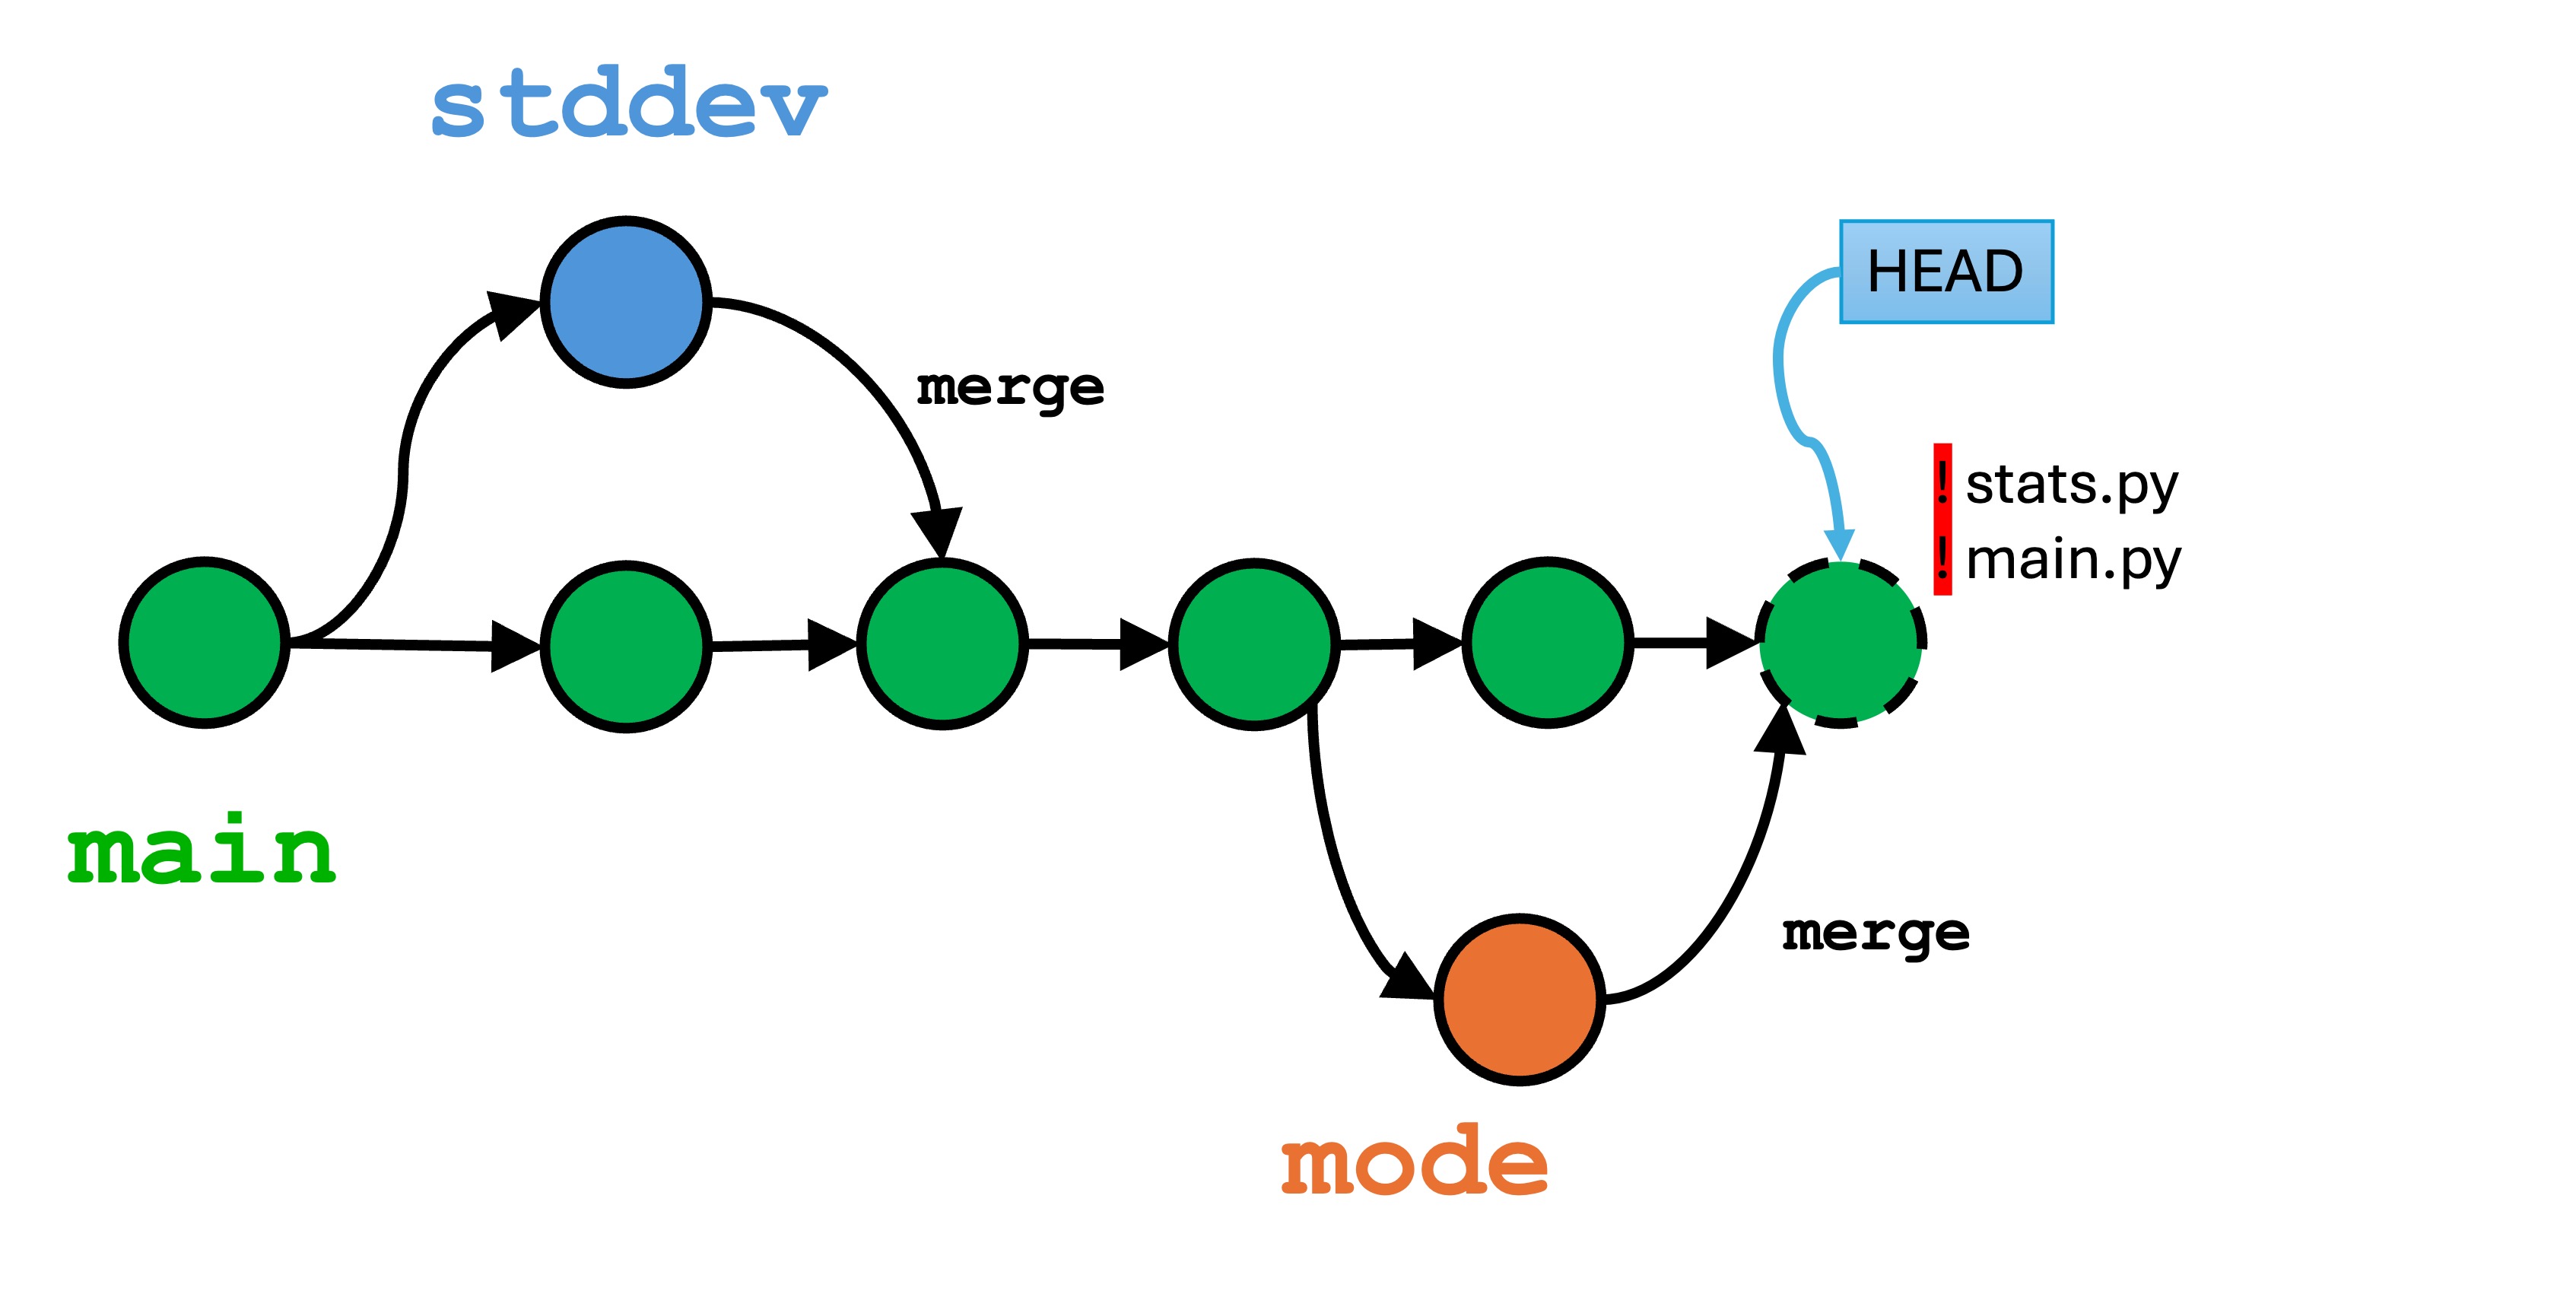
Now, let’s create and deal with the inevitable merge conflicts:
git switch main
git merge mode to merge the mode branch into main.
Both the Terminal and Visual Studio Code will indicate that you have conflicts in multiple files. You simple need to deal with them one at a time.
First, let’s open main.py. Notice how the rename happened automatically from app.py to main.py. If you’re unhappy with this change, simply right-click and rename it back.
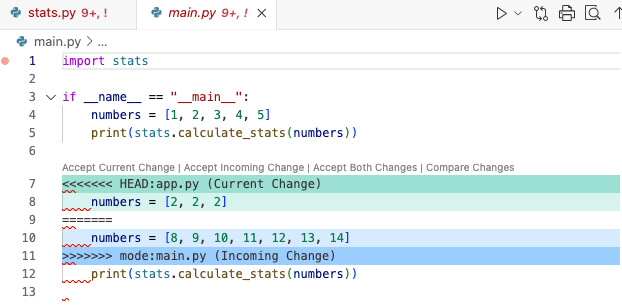
Let’s look first at main.py:
We have a conflict because the sample lines were changed concurrently. Remember the process:
Edit the code to the be way you like
Remove the special Git characters
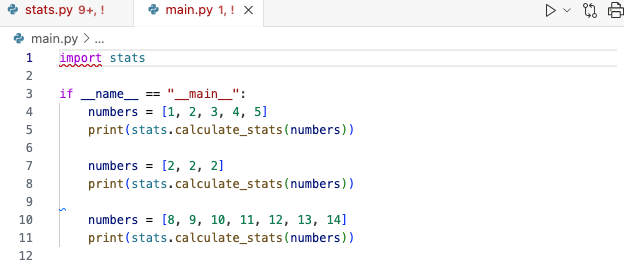
I like more samples, so edit the file to keep both numbers and print them both out. Your final result should look like this:
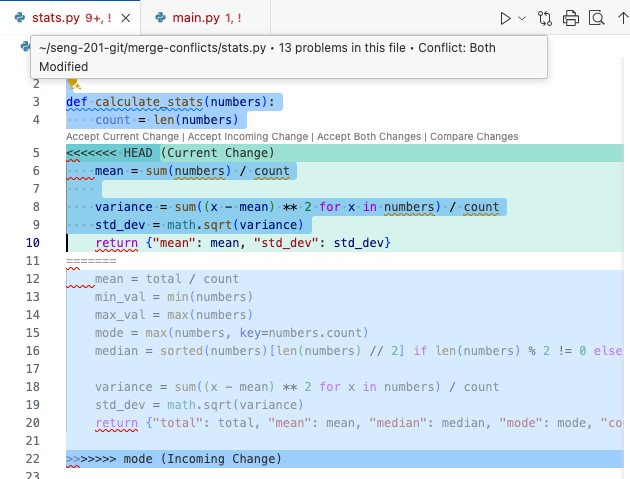
Now let’s go to stats.py, which looks like this:
Visual Studio Code provides you with some shortcuts for resolving merge conflicts:
Accept Current Change: Keep only the changes in main.
Accept Incoming Change: Keep only the changes in stddev
Accept Both Changes: Keep all the changed lines from both branches.
Compare Changes: Provide another text view of the changes.
Resolve in Merge Editor: I recommend skipping this.
In this case, I decide that I don’t care at all about the median and mode any more. I just want to keep the streamlined version.
Click on the “Accept Current Change” link. You will see only the changes to main (the HEAD) are kept, and all incoming changes from mode are discarded.
P.S. If you make a mistake, remember that all you’re doing is editing text files at this point. Just hit CTRL+Z/CMD+Z to undo.
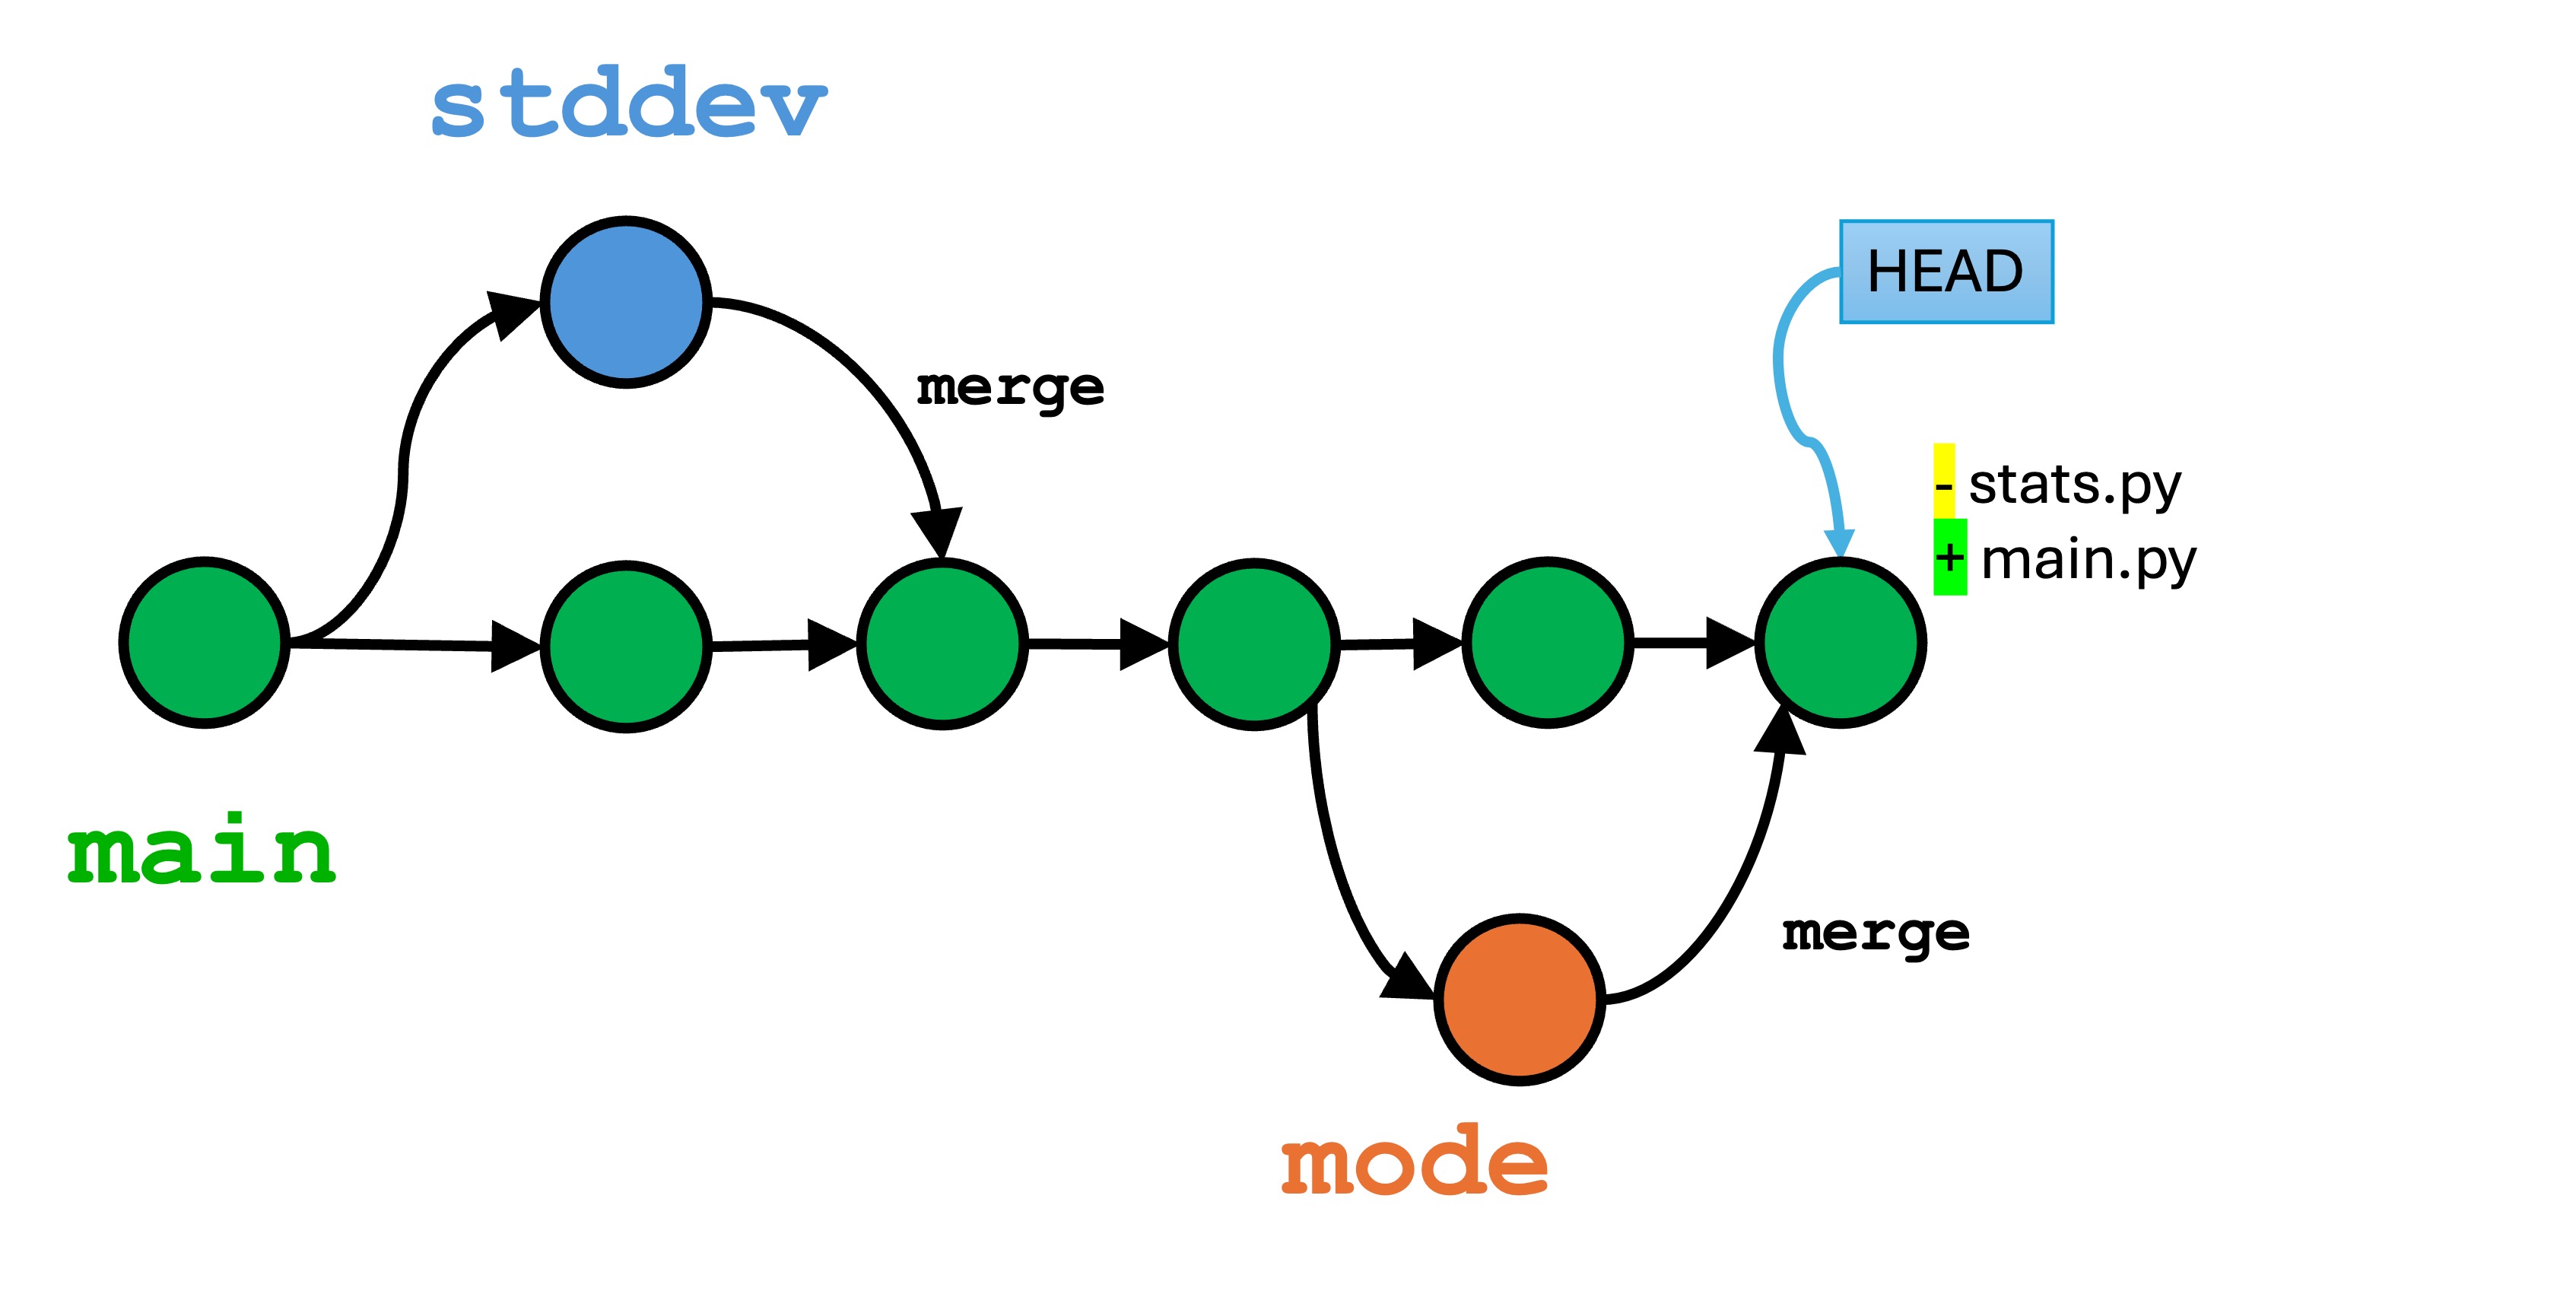
Finally, make sure all your files are saved, stage, and commit the changes. Our final branch history looks like this:
Summary
Merge conflicts don’t have to be scary, but they can be annoying.
Keeping your commits in all branches small and incremental will make merging easier.
The process for resolving merge commits is:
Look for the conflicting changes and decide what to do.
remove the Git special characters.
Save, stage, and commit the merge conflict resolution.
Take your time with merge conflicts. Just quickly hitting “Accept Incoming Changes” or “Accept Current Changes” without a thought is what gets you in trouble.
This may mean you manually edit the code, and that’s not a bad thing.
I strongly encourage you to avoid GUI-based merge editors, of which there are a few, until you master the process. It’s just text editing. Editing the code manually will help ensure each decision you make is intentional and easy to undo in the text editor. Once you have mastered merging manually, then feel free to move onto the GUI programs.
Knowledge Check
What causes a merge conflict in Git?
Suppose you want to merge a branch named bug-fix into the main branch. What git command do you run to perform the merge?
How can you identify merge conflicts using Git commands?
Describe the purpose of the conflict markers <<<<<<<, =======, and >>>>>>>.
(True/False) You can have multiple conflicting regions in a single file?
(True/False) You can have multiple files with conflicts?
Suppose the branch delicious is created from the main branch. The file cheese.py exists in both branches. cheese.py is editing in the delicious branch, and deleted in the main branch. Will there be a merge conflict if main is merged into delicious? Will there be a merge conflict if delicious is merged into main?
What are the three steps to resolving a merge conflict?
What rule of thumb will make merging easier in the long run?
7 - Remote repos
Sharing your version history through a server
Remote repositories in Git are repositories stored elsewhere than on your computer, usually on a site like GitHub or a private enterprise server for your company. Remote repositories have a few key purposes:
Remote repositories are the mechanism by versions can be shared between computers, e.g., between a lab and home computer or between the computers of multiple teammates collaborating on code.
Remote repos maintain a copy of your version control history so that if disaster strikes your computer, you have a backup of your project.
Remote repositories are a hub to which multiple local repositories are linked. They function the same as a local repo, but the user takes extra steps to share changes with the remote and to retrieve changes, perhaps made by teammates, from the remote.
7.1 - Scenario 1 - Sharing a new project
You make a new project on your computer that you want to save to GitHub
Scenario: You are on your computer. You make a new project and begin working. You decide you want to keep the project under version control with Git.
Create the local repo and save an initial version
Create a new directory called remote-sample in your seng-201/ directory.
Open the remote-sample/ directory in Visual Studio Code.
Create a file named test.py. Put some code in there, like print("We are going to share our new repository")
Run git init to create a local repository.
Now stage and commit the changes.
You now have one version in the local repository, and the main branch (as well as the HEAD) are pointing to that version. I have left the INDEX and the HEAD out of the illustrations since we will not need them for this lab.
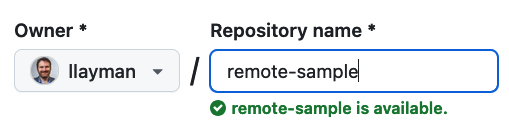
Find and click the green button to Create a New Repository:
On the “Create a new repository” form, enter remote-sample for the Repository name:
Leave all the rest of the options as-is.
Click the green Create repository button at the bottom.
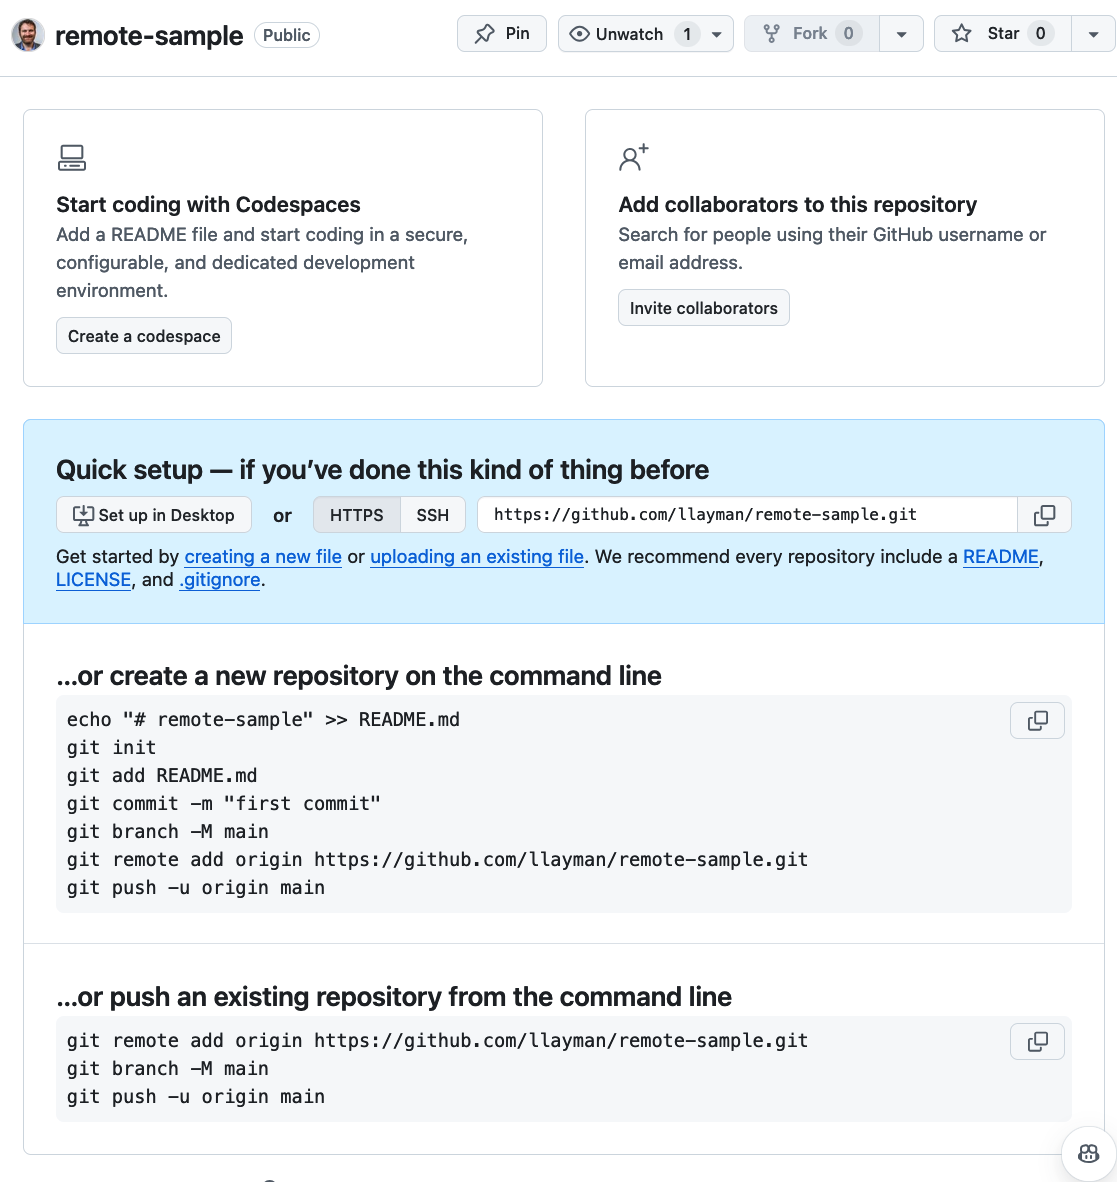
You will see a page that looks like this:
Make a note of the URL in your browser bar. Your repo can be accessed from this address.
Leave the browser window open. We will return to it in a minute.
Public vs. Private Repos: You have the choice to make your repo Public or Private when creating it, and you can change this setting later.
Public repos are visible on the Internet. Anyone can view the website and checkout your code. Only you can commit code however.
Private repos are only visible to you when signed in. Only you can checkout and commit to the repo.
You can control more finely if you want specific users to have read or write access to your repo through the Settings tab on the GitHub repo website.
Connecting the local repo to the remote repo
We have created a local repo with git init and created a “bare” remote repo using the GitHub website, but the two are not yet connected!
On your GitHub page in the browser, you have a section that looks like the following:Copy that code for your repo and paste it into the Terminal. Run those instructions in the Terminal.
You should see output similar to the following:
Enumerating objects: 3, done.
Counting objects: 100% (3/3), done.
Writing objects: 100% (3/3), 260 bytes | 260.00 KiB/s, done.
Total 3(delta 0), reused 0(delta 0), pack-reused 0To https://github.com/llayman/remote-sample.git
* [new branch] main -> main
branch 'main'set up to track 'origin/main'.
That means you are good and your local repo is connected to the remote repo on GitHub.
If you see an error like this:
error: src refspec main does not match any
error: failed to push some refs to 'https://github.com/llayman/remote-sample.git'
You forgot to git add and git commit your first version.
Viewing the remote repo
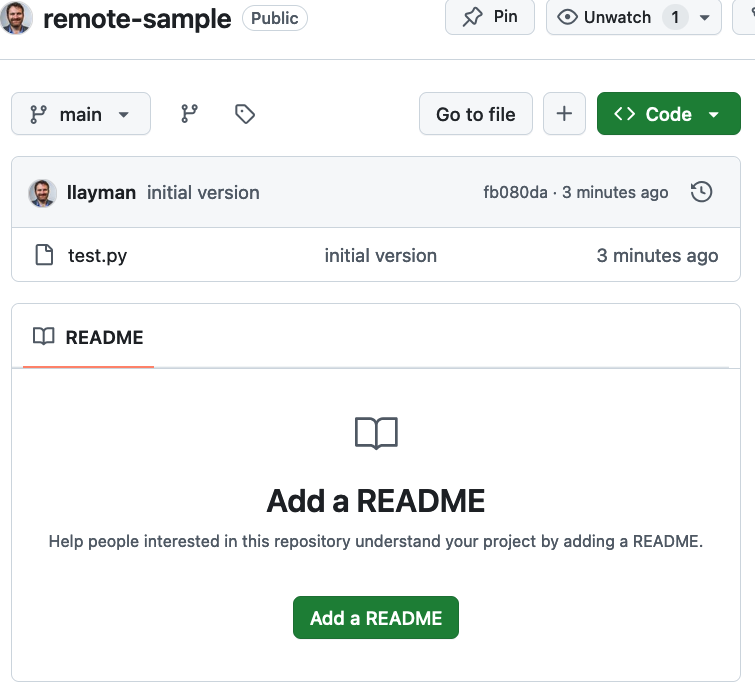
Refresh the GitHub page in your web browser. You should see something like this now:
This is GitHub’s rendering of your remote repository! In Git, the remote repo looks just like the local repo on your computer. This is just how GitHub chooses to display it.
You can click on test.py to see the code.
Note that we are in the main branch as indicated in the top left dropdown.
You can click on the commit version, e.g., fb080da, to see all the changes in the most recent commit.
You can click on the history-clock icon next to the version name to see the main branch’s version history. There’s only 1 version right now.
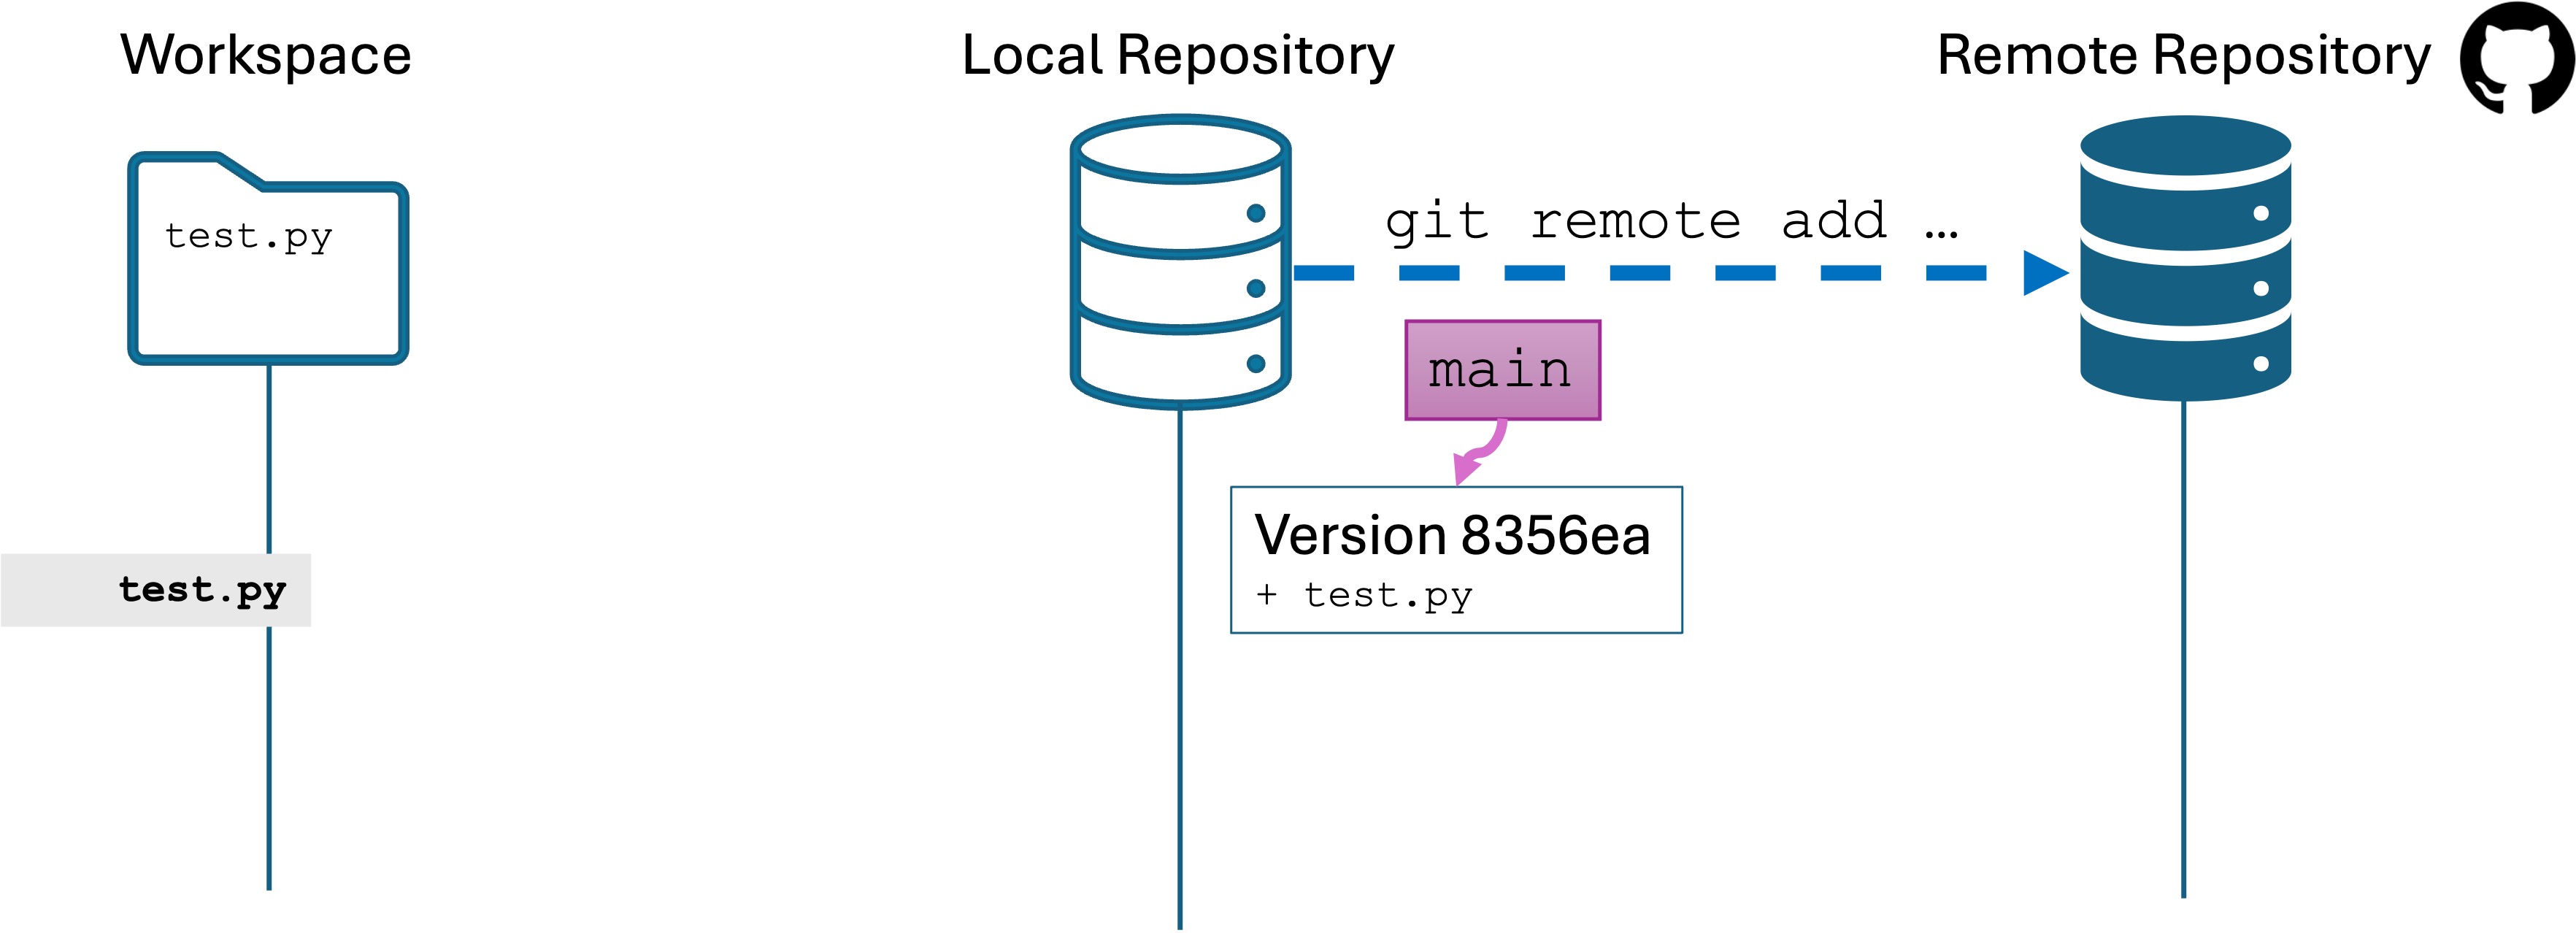
Understanding the commands
You pasted three separate commands in the Terminal.
git remote add is what actually create a link between your local repo and the remote repository. Creating the remote repo link does not automatically share any version history or changes.
git branch -M main made sure the name of your default branch was main as opposed to master.
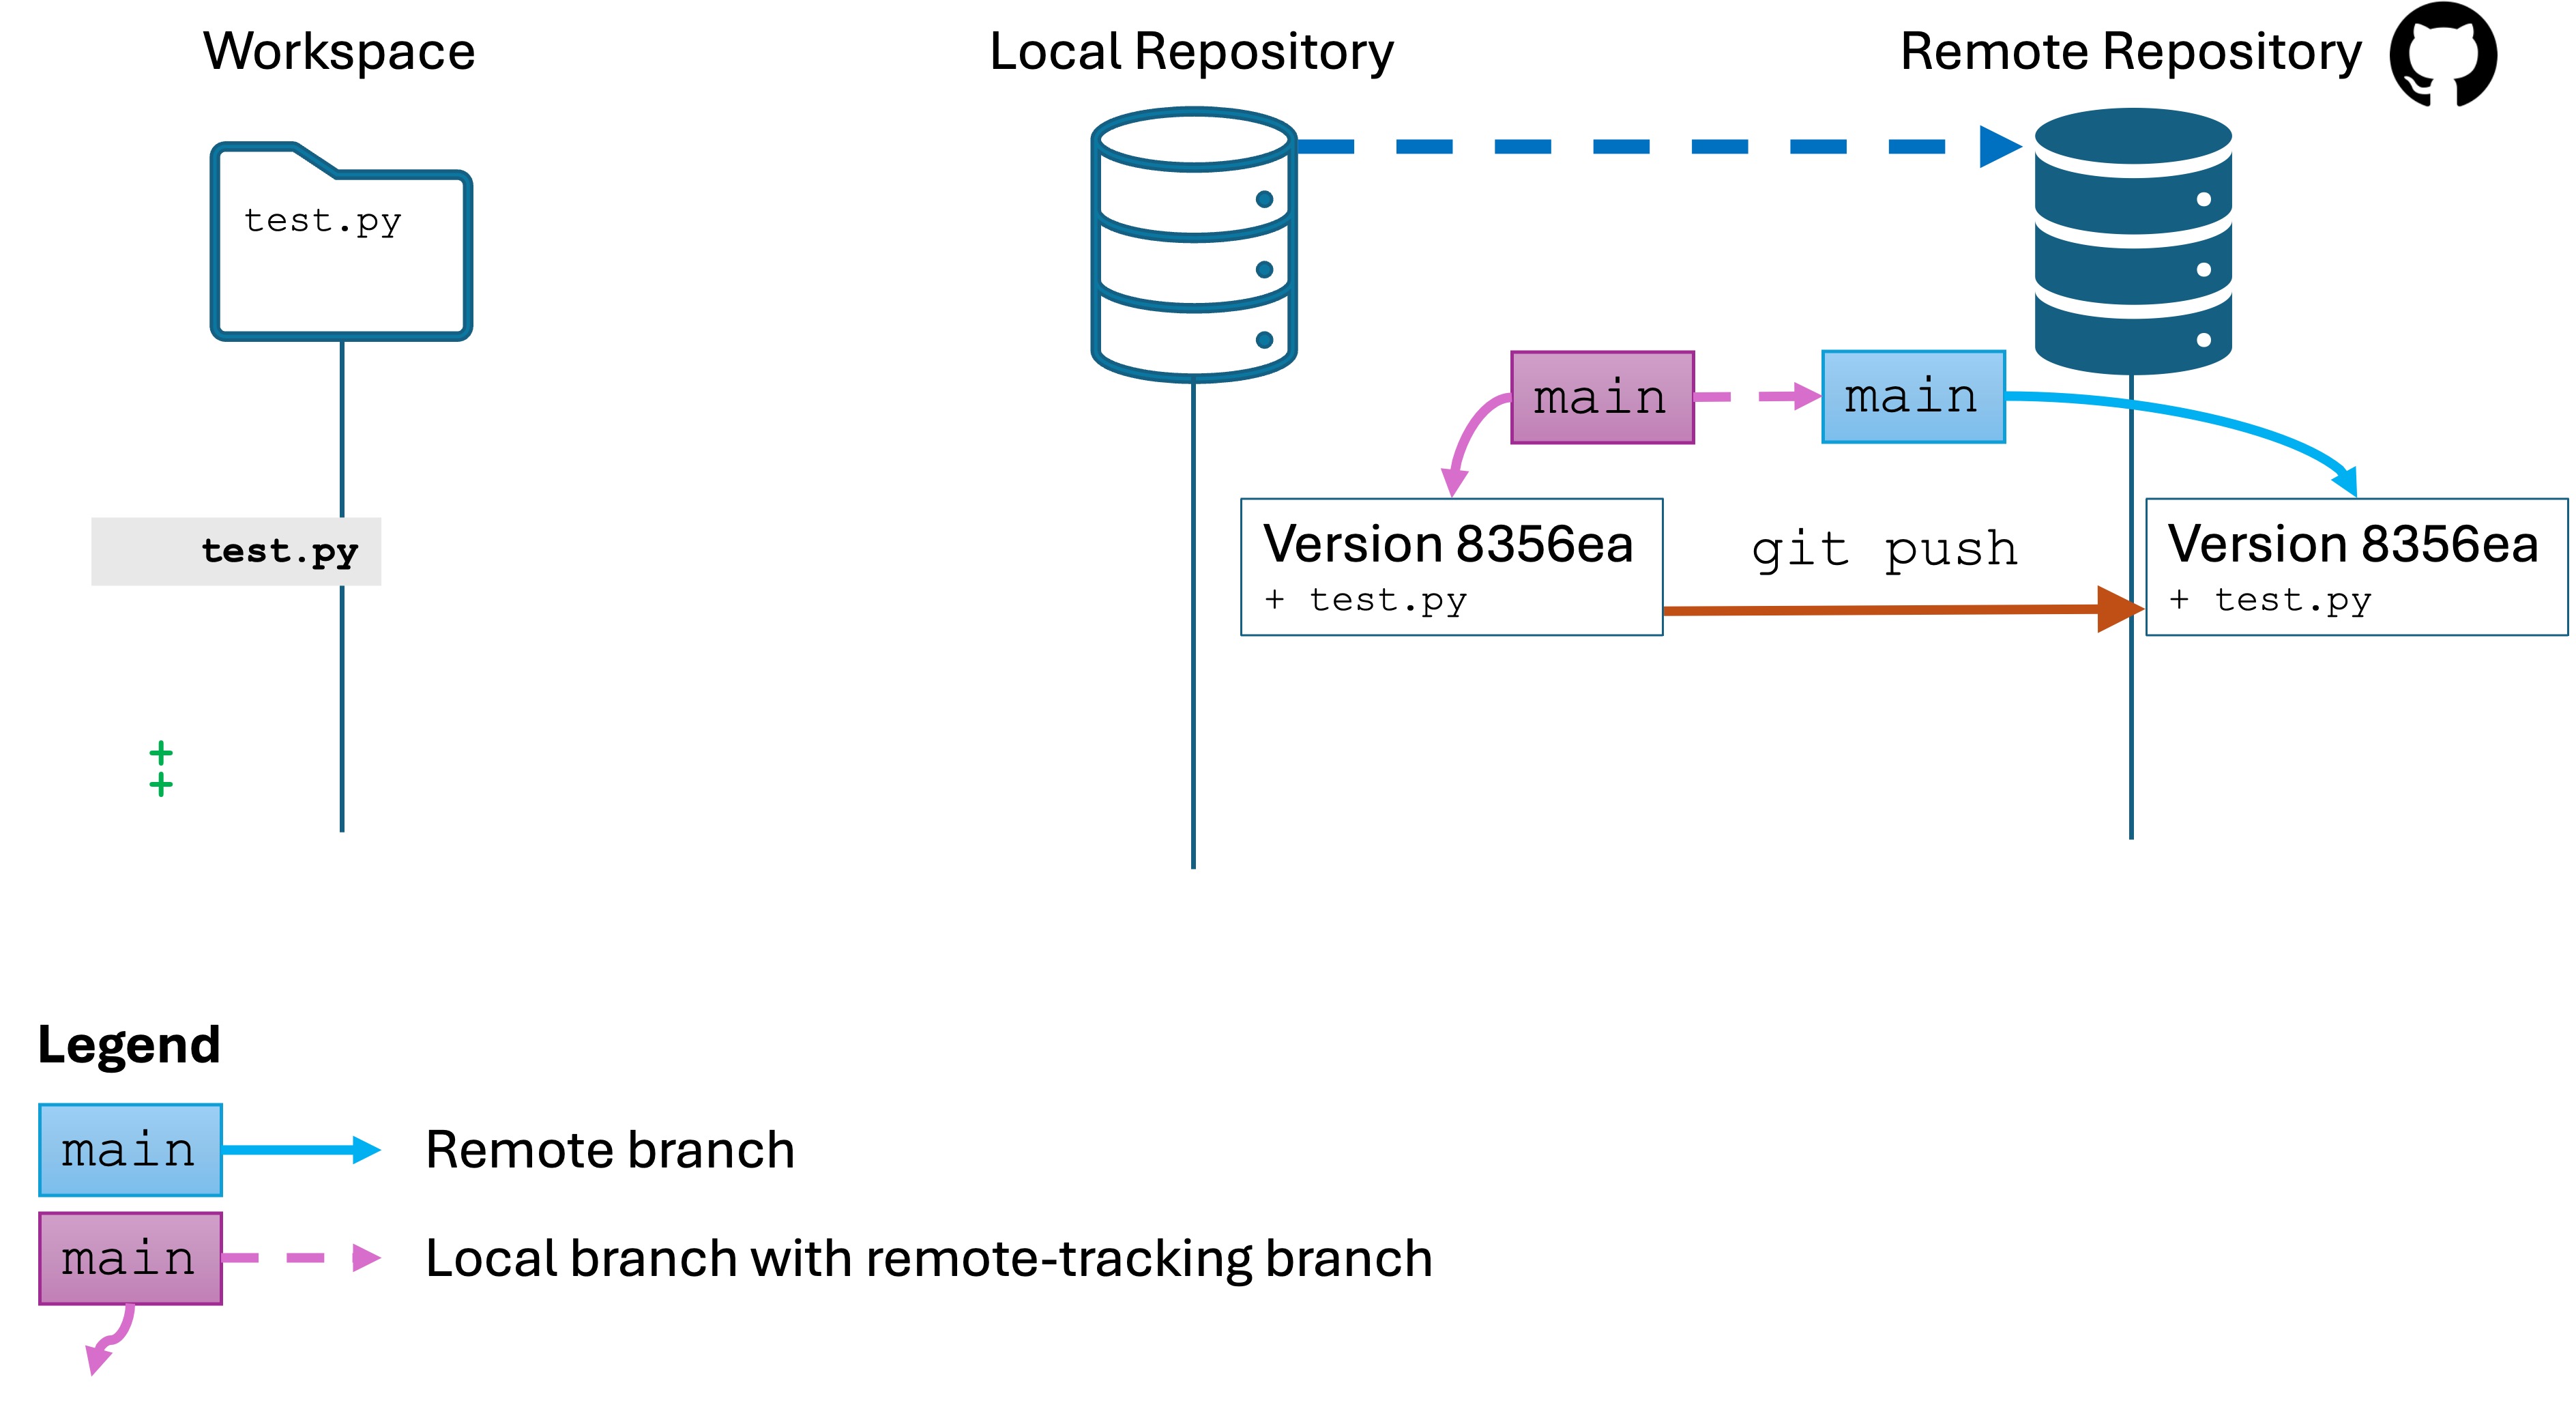
git push is what shared the version history from your local repo to the remote repo:
A few things happened to the repo state during this process.
Your local repo now has a notion of an “upstream” remote repo that it is linked to.
The version history of your local repo was pushed to the remote repo, including the branch name main.
The remote repo on GitHub now has the entire version history of the main branch, and knows which version main refers to.
Again, the remote repo is behaves exactly the same as your local repo internally. It’s just that it saved to a GitHub server, and you need to run an additional command, git push to share your changes with the remote repo.
Knowledge Check
(Question) What is the purpose of running git init?
(Question) How do you connect a local Git repository to a remote repository?
(Question) Explain the function of git remote add.
(Challenge) Create a local repository and link it to a newly created GitHub remote repository.
(Challenge) Stage, commit, and push an initial version of a project to a remote repository, verifying success through the GitHub interface.
7.2 - git push
Manually sending changes from the local to the remote
We showed in Scenario 1 that the git push command was necessary to share the version history from the local repo to the remote repo.
Sending changes to and pulling changes from the remote repo is always manual, just like staging, committing, and merging are. This is a good thing because it allows you to decide when to share changes or integrate changes from your teammates.
Let’s illustrate the sharing process.
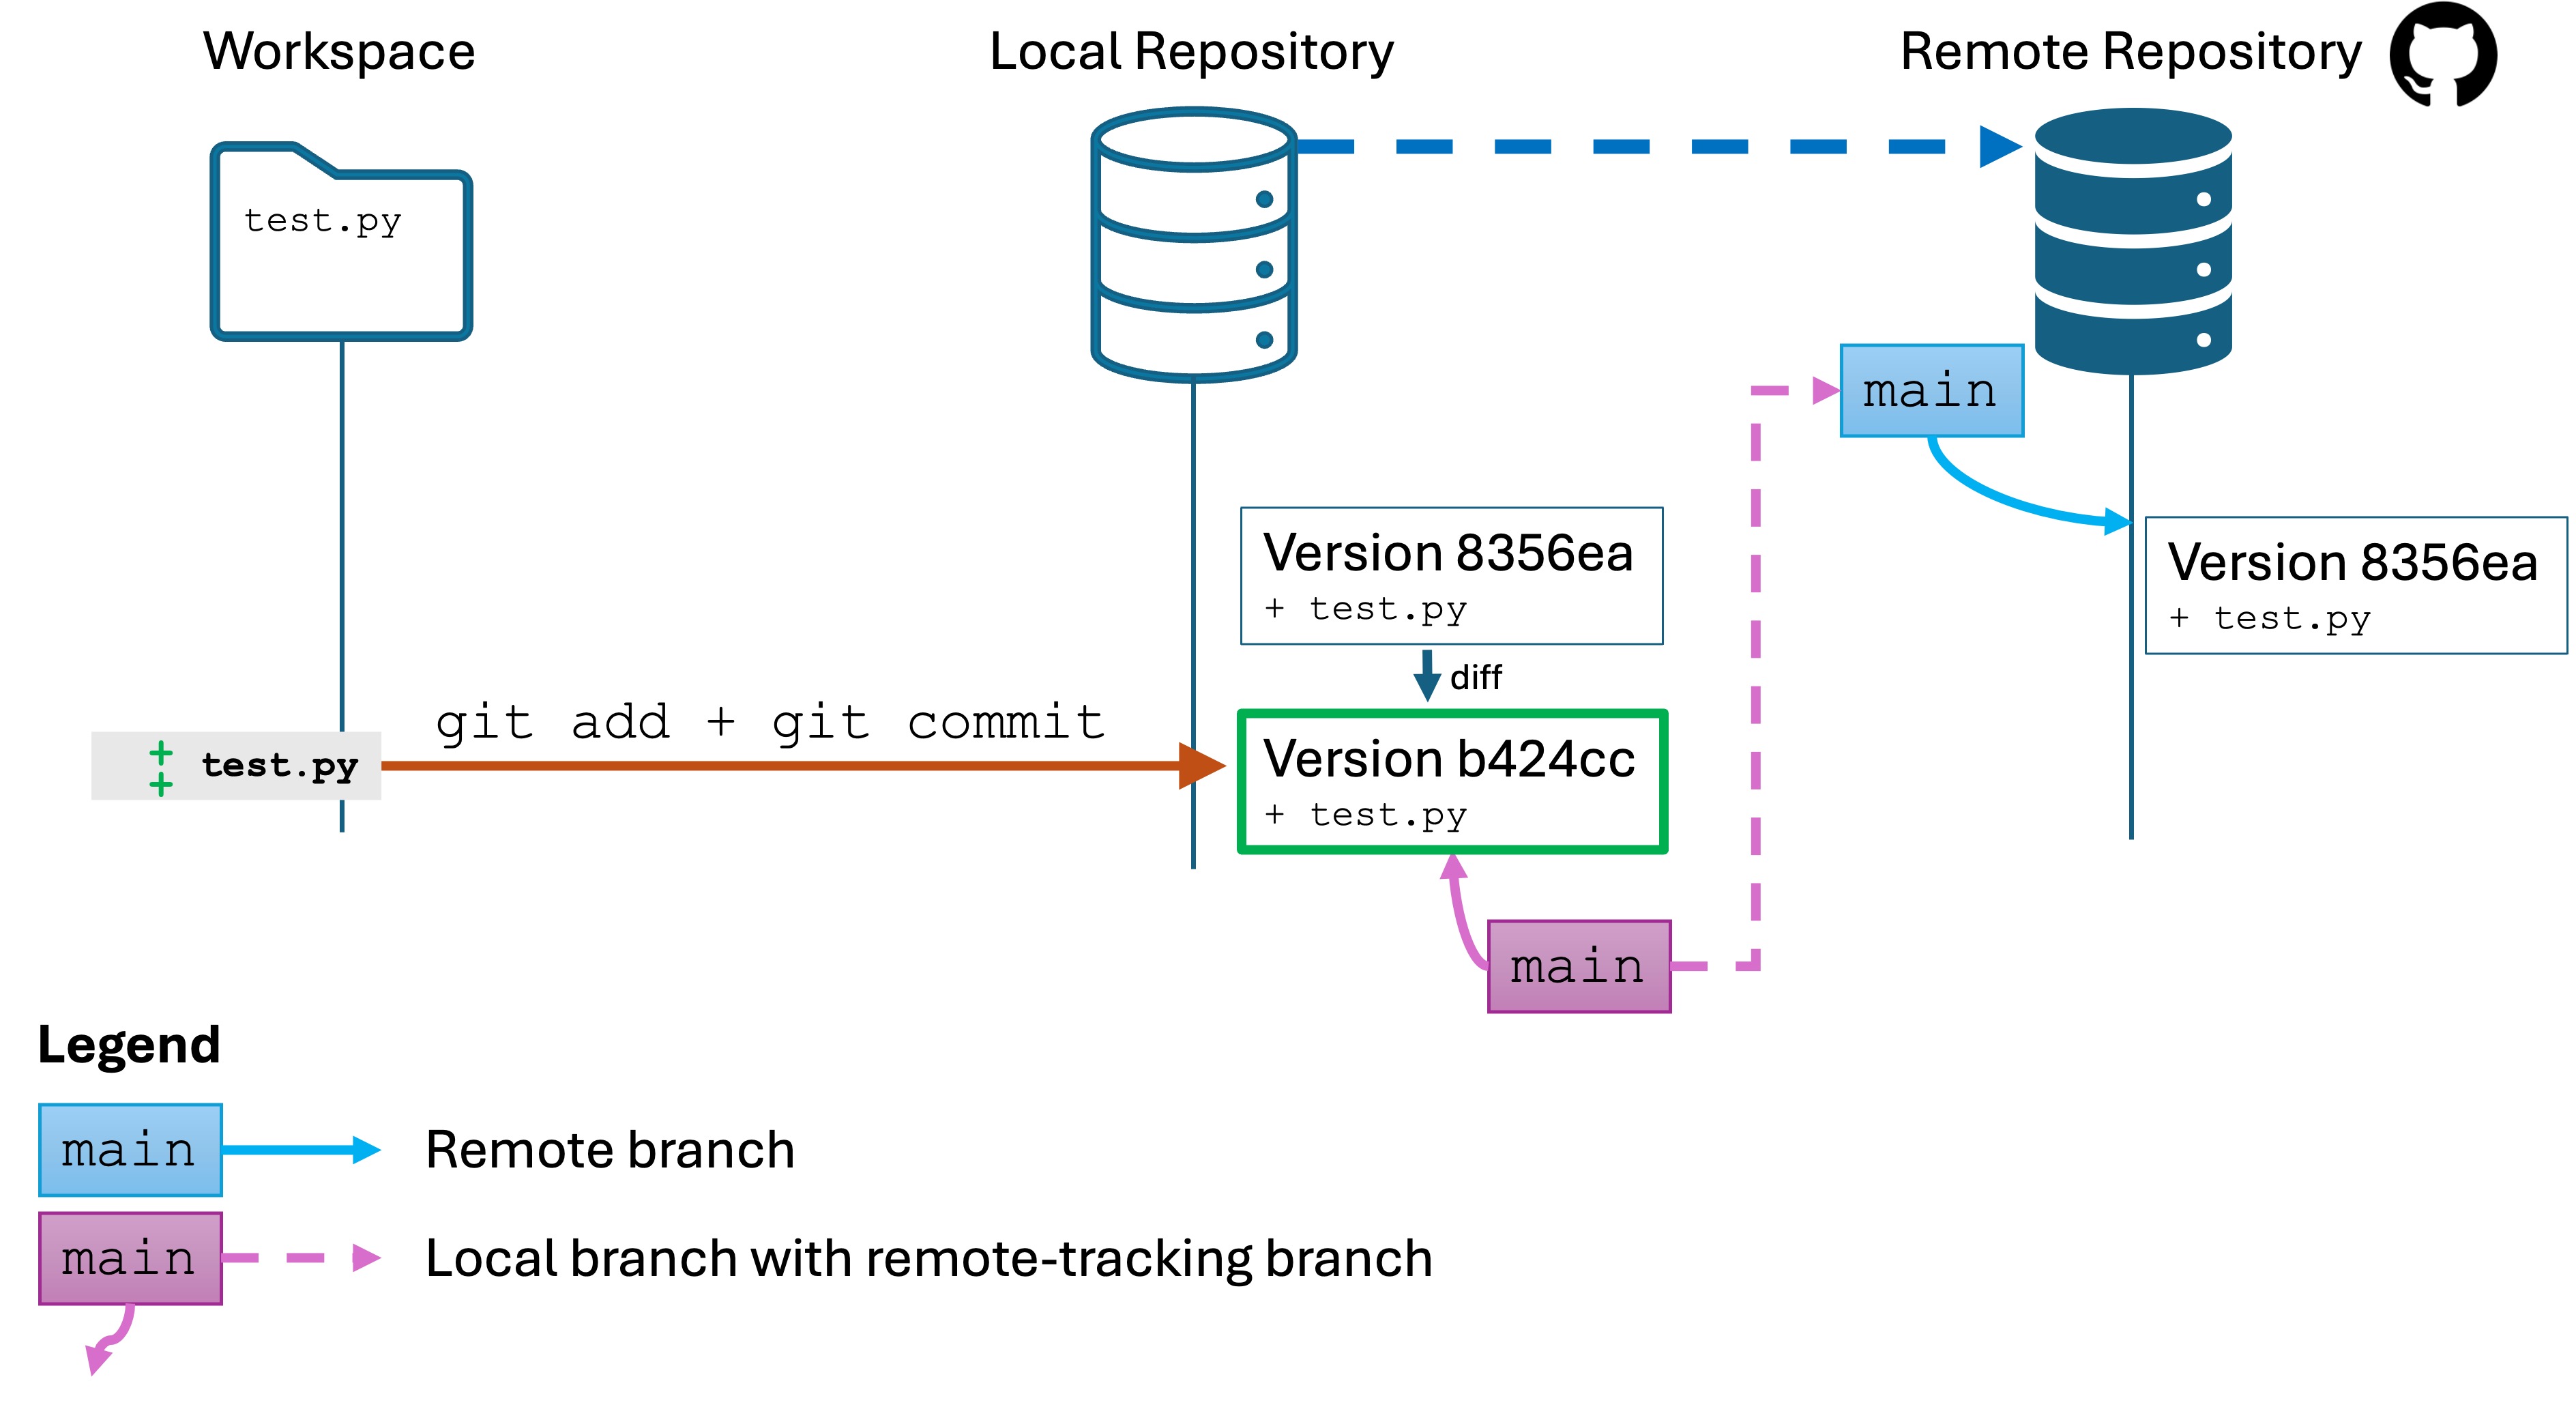
Create a second version
Edit your test.py file. Make a change to the code. What is up to you.
Save the file, stage, and commit your change.
Run git log
The repos now look like this:
Your git log clearly shows the new version saved to the local repo.
However, open your remote repository’s GitHub page in your browser. You will see that it is still showing the previous version. Your local main branch is linked to the remote main branch, but the latter is not up-to-date.
Again, sharing with and retrieving from the remote requires a manual command.
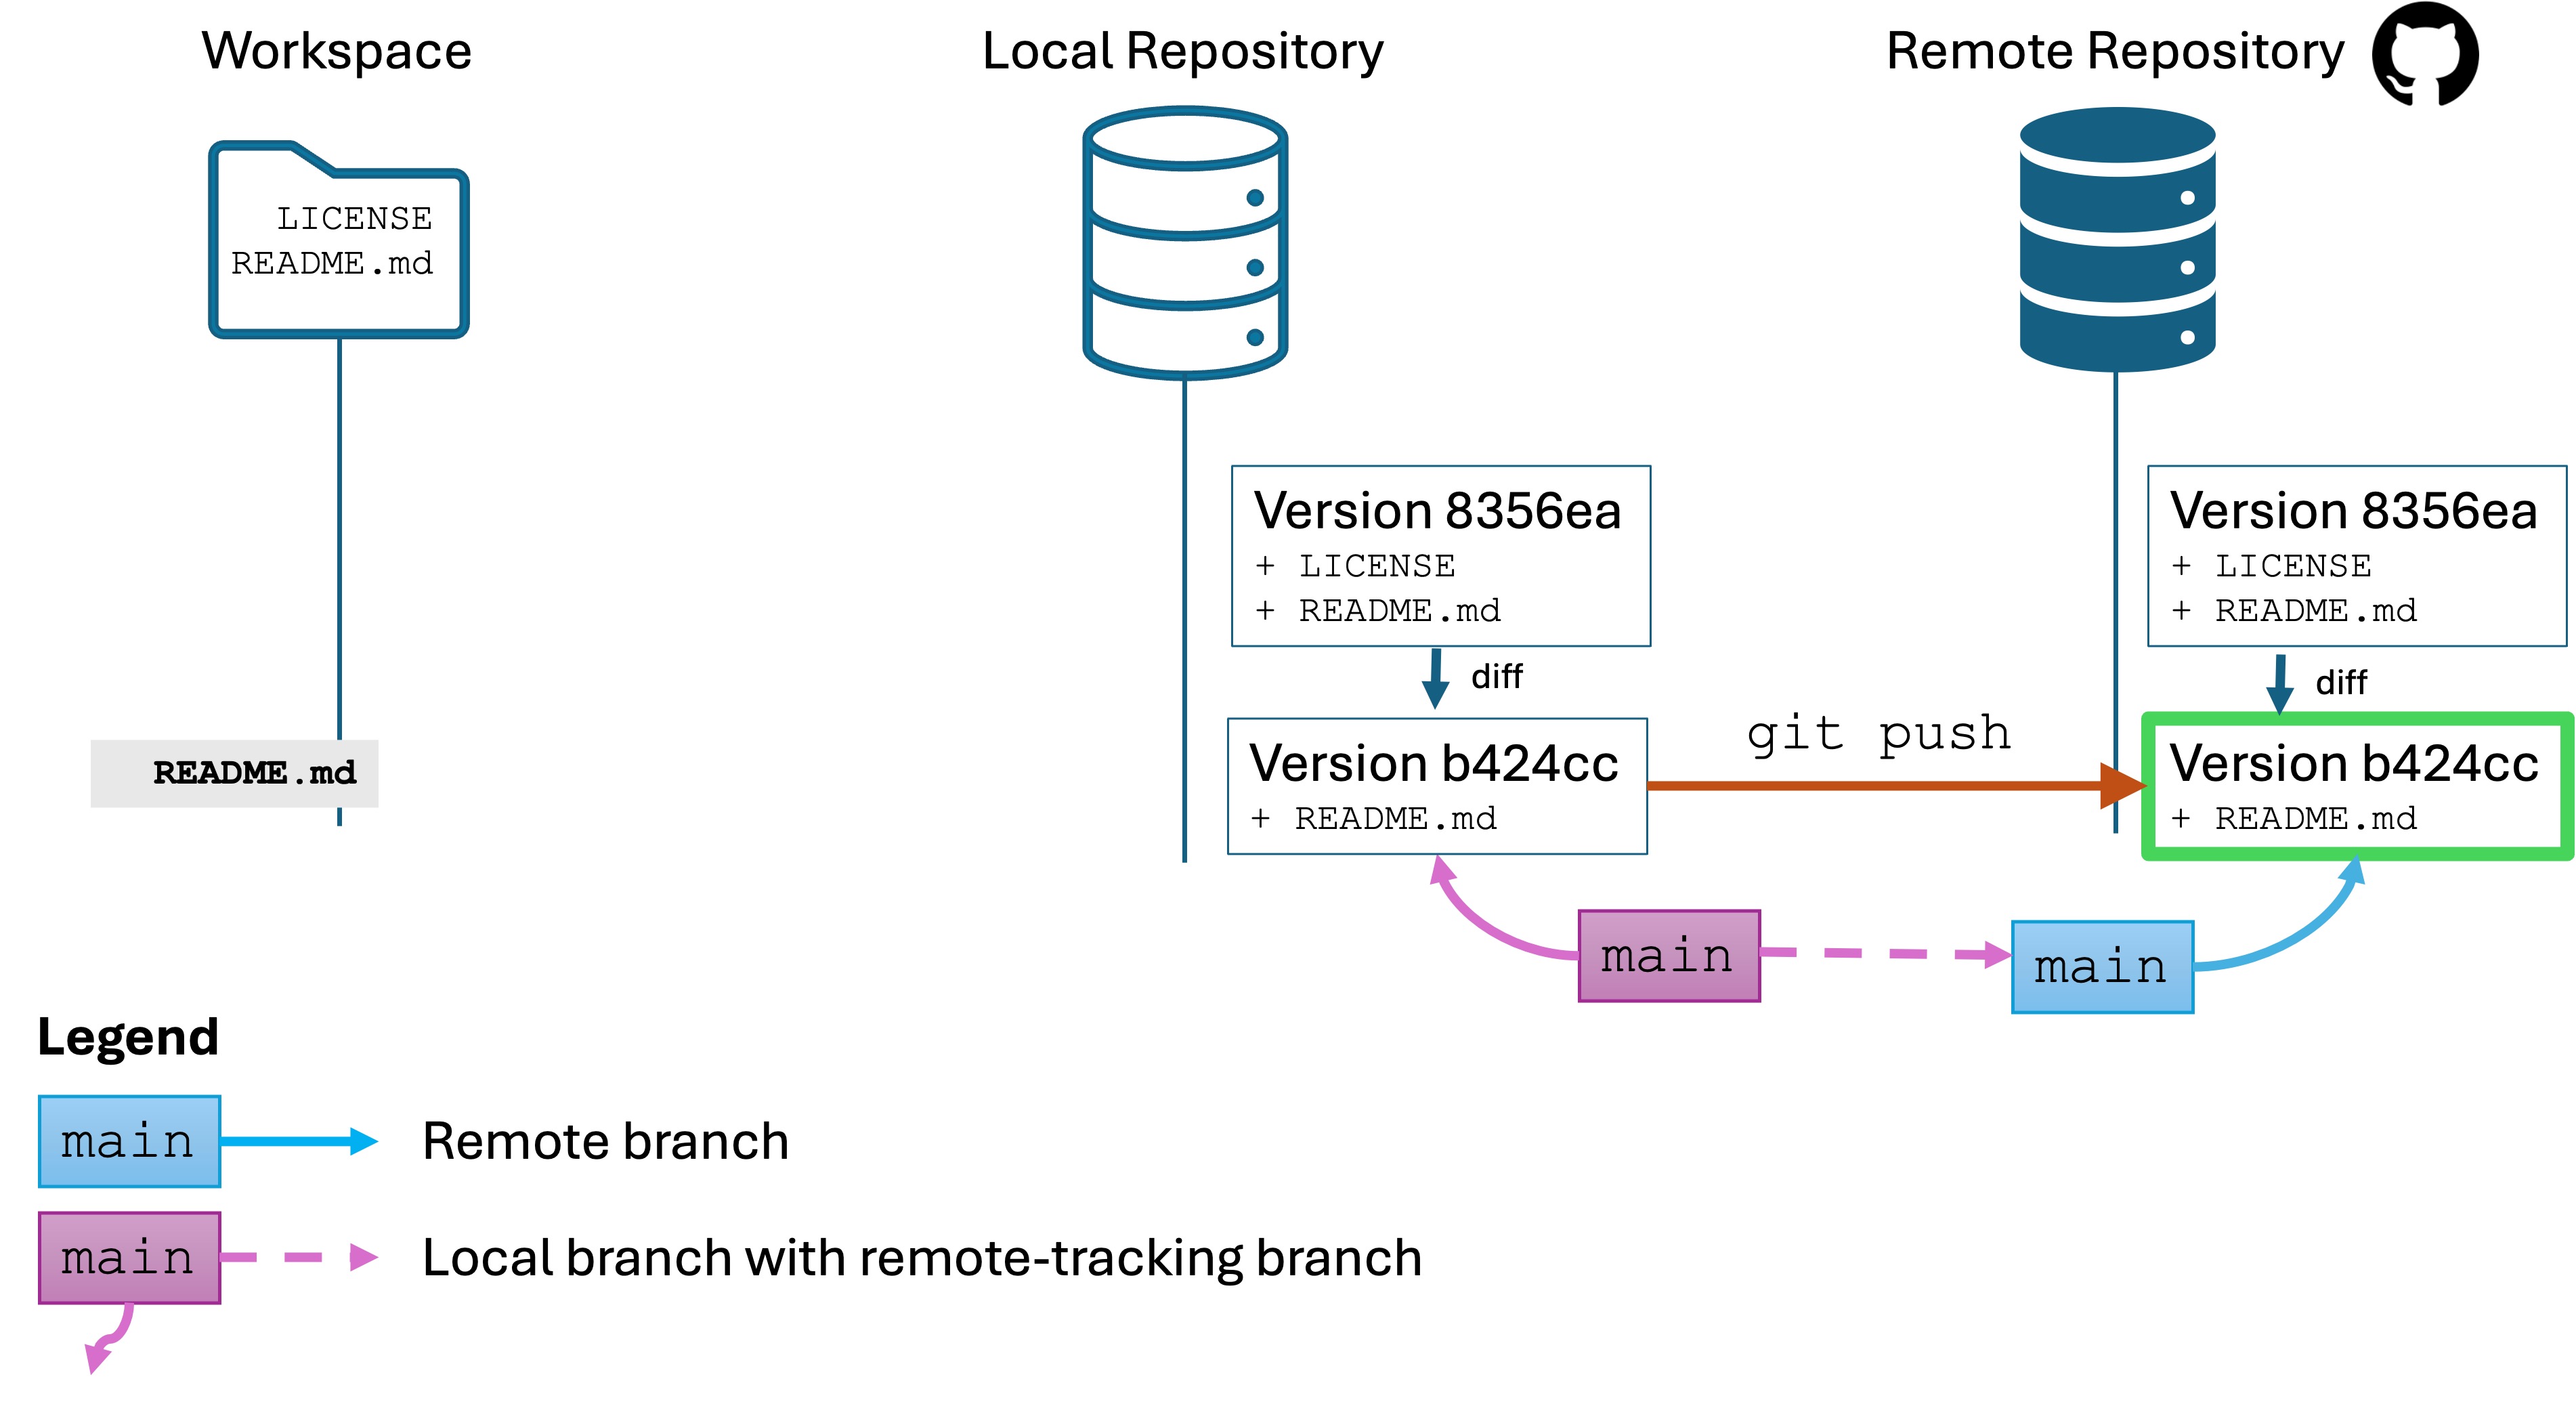
git push
Run the command git push. This sends any changes to your local repo to the remote.
Refresh the GitHub page in your browser, and you will see that the version name and the content of test.py are updated to the latest version. You will also see two versions now in the commit history.
Now everything is up to date!
Running git push always runs on the active branch, which is main in our case. Suppose you have two local branches, main and rand. If you have parallel commits to in multiple branches, you will either need to need to checkout and git push each branch , or run git push --all.
Knowledge Check
(Question) What does the git push command do?
(Question) Why is sending and pulling changes from the remote repository a manual process?
(Question) How does the local main branch stay linked to the remote main branch?
(Question) What happens if there are changes in the remote branch that are not present in your local branch before you push?
(Question) How can you verify that your push was successful?
(Challenge) Make a change to a file in your local repository, commit it, and then push it to the remote repository.
(Challenge) View the commit history and confirm changes appear both locally and on the remote.
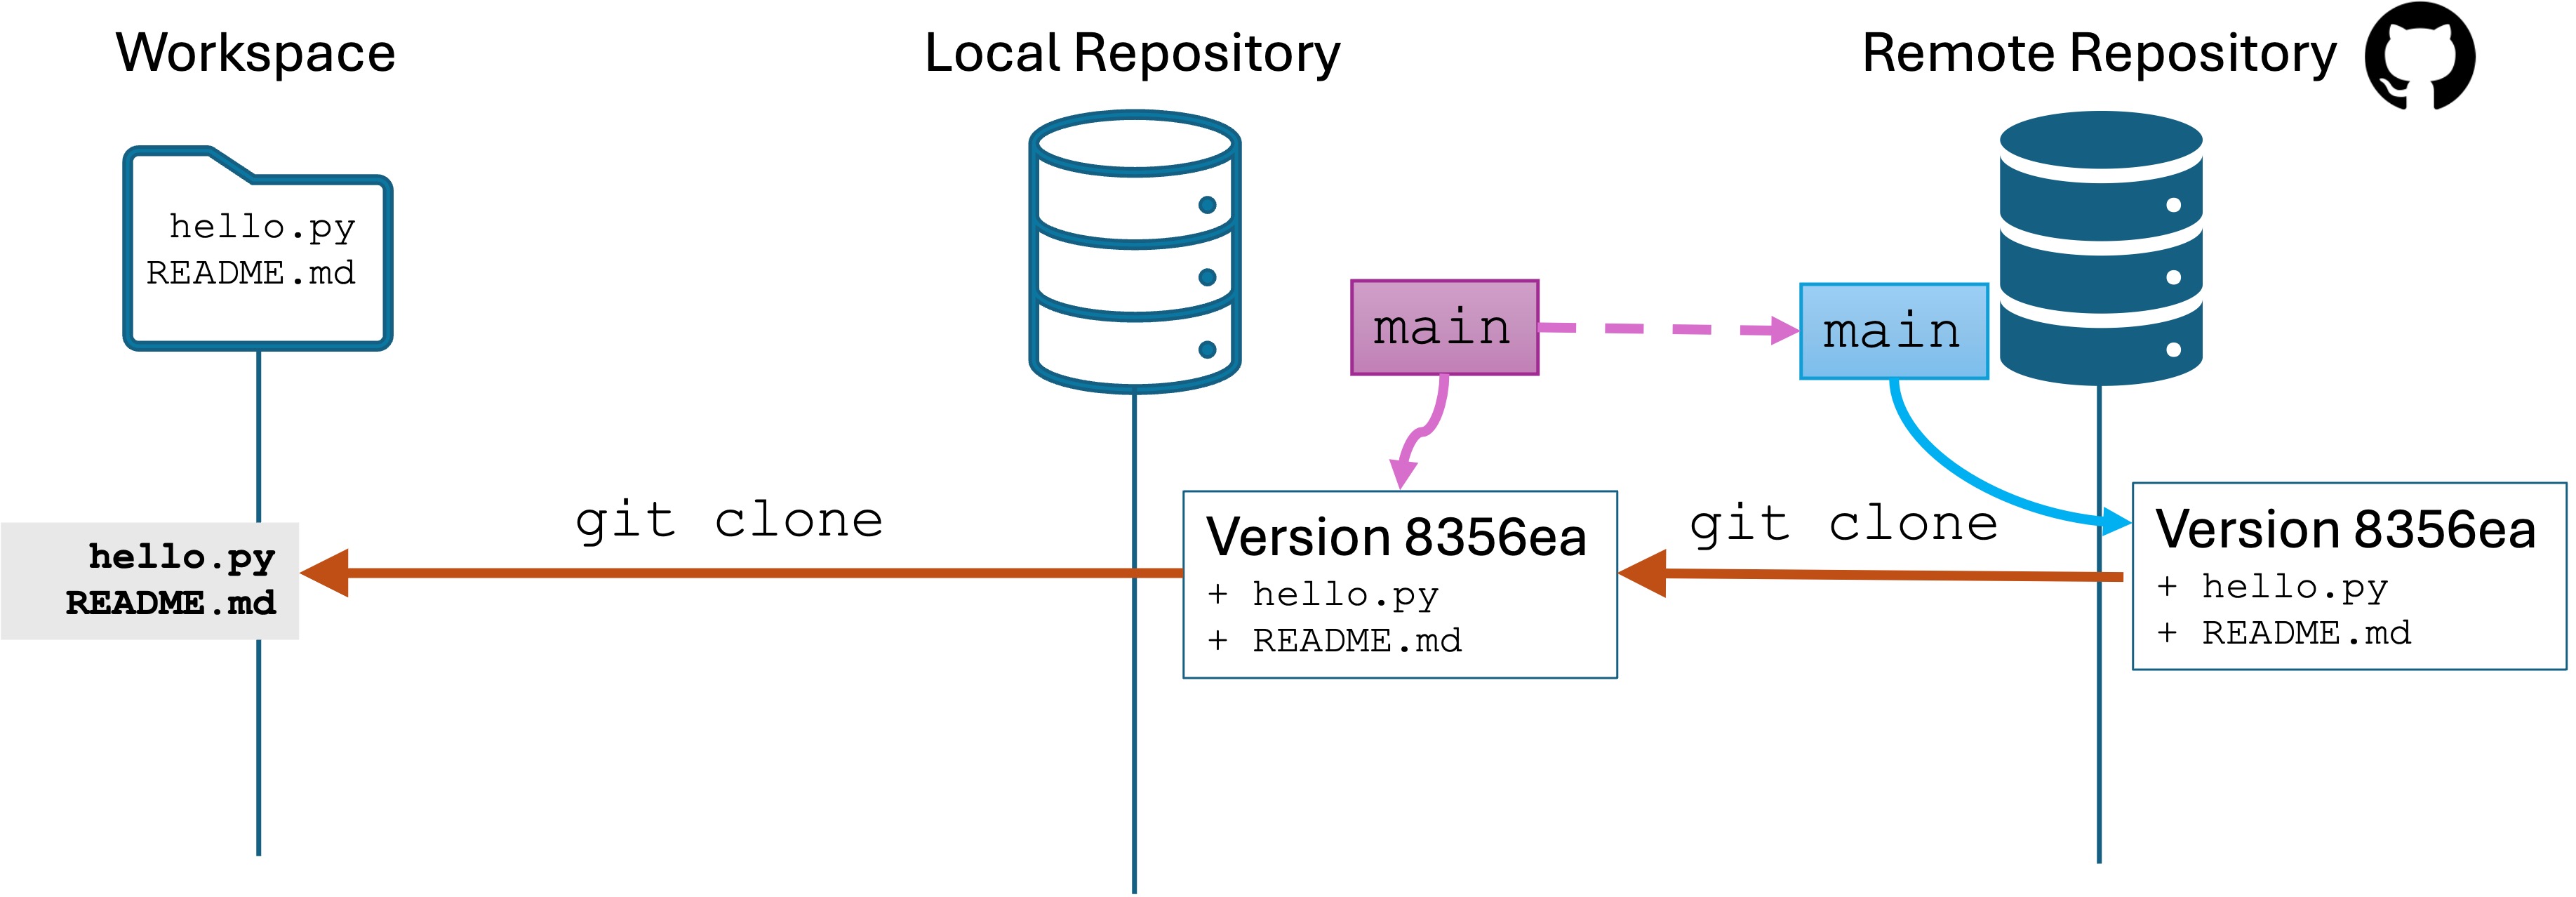
7.3 - Scenario 2 - Clone an existing project
The remote already exists and you want the project
Scenario: A remote repository already exists, and you need a copy of the version history on your computer. You could be a part of a team working on the same project, or maybe you created a new project in lab and you need to check it out from your home computer.
git clone
We already ran through this scenario when setting up Assignment 5 in class. I put a sample repository on GitHub, and you “cloned” it in class.
Let’s start a new project to illustrate the process.
In your Terminal, navigate to your seng-201/ directory.
When you clone, it will create a new subdirectory for you. So you need to be in the parent of where you want the workspace to live. We want to be in seng-201/ for this example.
Run git clone https://github.com/llayman/git-remote-clone
You will also have a new subdirectory named git-remote-clone inside seng-201/.
What happened?
git clone went to the target URL looking for a repo. It found it, and made a copy of the version history on your local computer in the git-remote-clone/ subdirectory.
Git created a local copy of the main branch, which is linked to the remote main branch
Git checked out the main branch into the workspace folder git-remote-clone/.
You are now ready to open git-remote-clone/ in Visual Studio Code or other editor and start working. You edit, stage, commit, make branches, and push as usual.
Do not edit the files yet. Leave them in their initial version to illustrate the next lab.
Knowledge Check
(Question) What does the git clone command do?
(Question) How does git clone handle creating a subdirectory for the repository?
(Question) After cloning, what branch is typically checked out in your local copy?
(Question) Does git clone also copy files into your workspace?
(Question) How is the local main branch linked to the remote main branch after cloning?
(Challenge) Clone an existing repository to your local machine and verify the directory structure.
(Challenge) Open the cloned project in an editor and review its initial state without making changes.
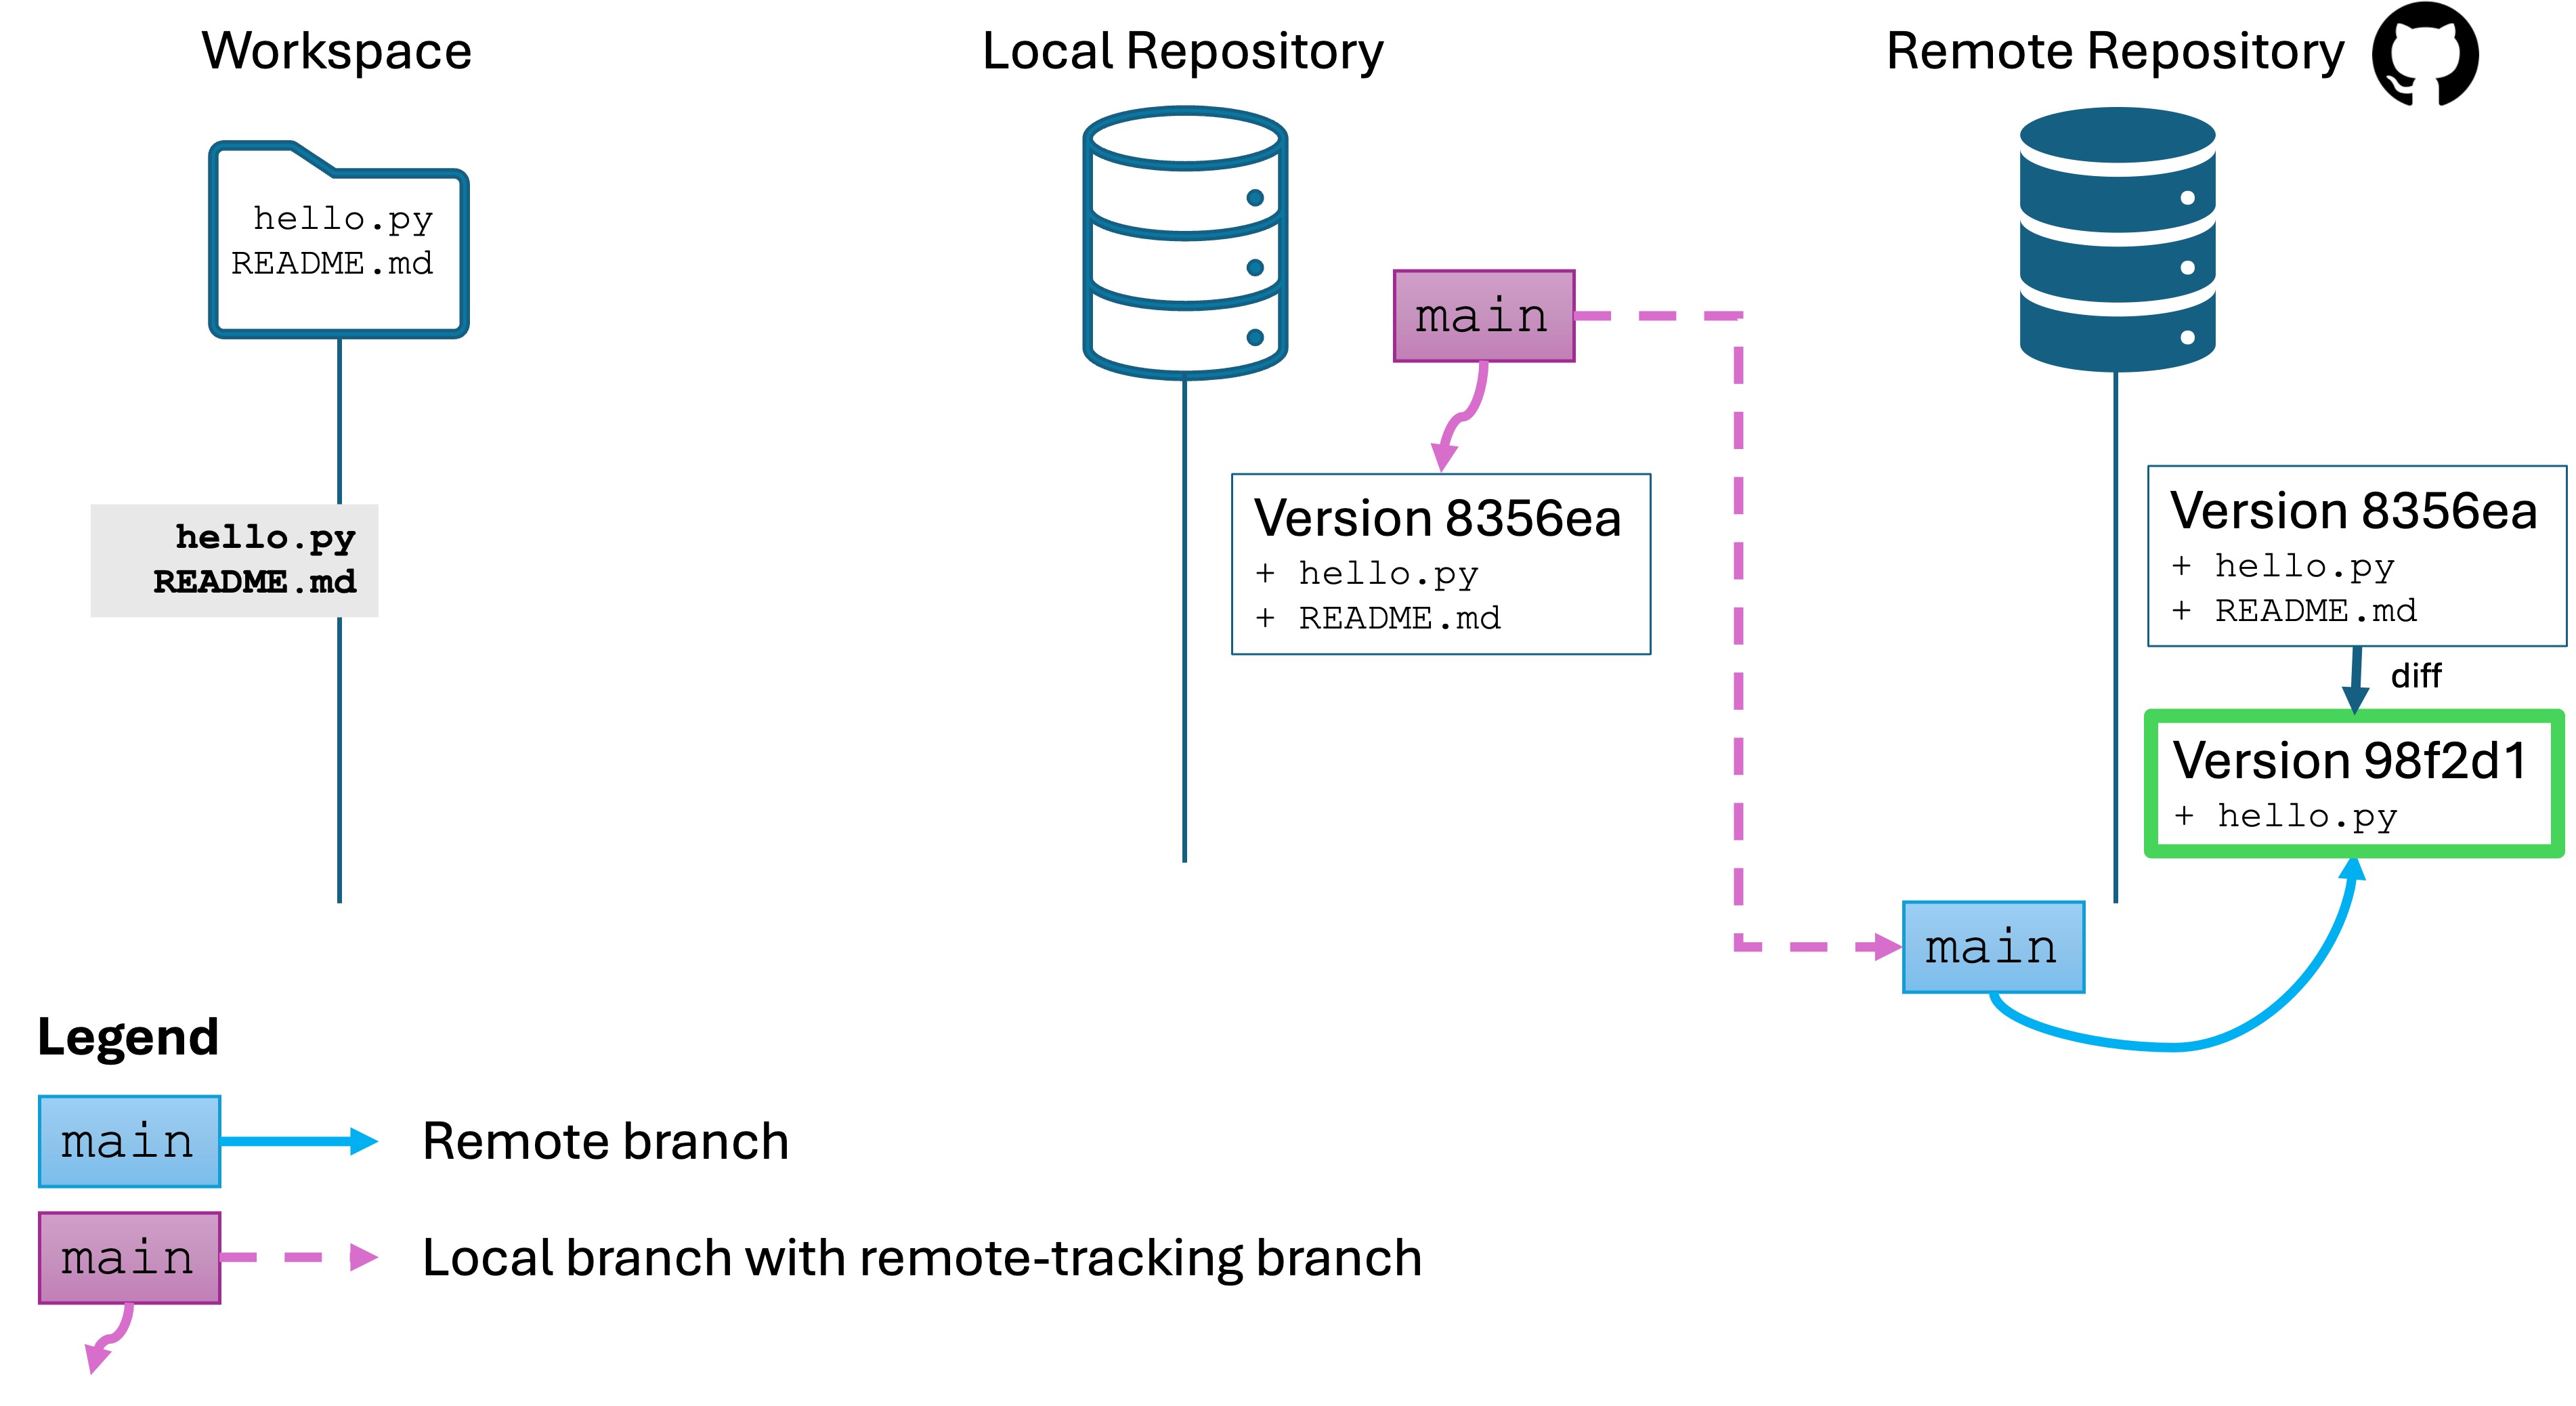
7.4 - Scenario 3 - Retrieving changes
Manually retrieving sending changes from the remote to the local
Scenario: Your started work on an assignment in the computer lab and pushed your changes to the remote. You went home and cloned the repo, worked some more, then pushed your changes to the remote. Now you are back in lab, and you need to get the latest changes from the remote. Or, perhaps a teammate pushed changes to the remote and you need to retrieve them.
Remote changes
I will make some changes to and push them, so the repos now look like this:
The remote repo has a new version, but your local repo is not up-to-date. You need to manually retrieve the changes. This is a good thing! You don’t want changes to automatically be applied whenever someone else on your team sends them to the remote repo. They could conflict!
Super important point
Before you retrieve changes from the remote, you almost always want to either:
Stage and commit any unsaved changes you have.
Undo, reset, or discard any uncommitted changes you have.
Ideally, you should have a “clean” workspace before you retrieve changes. It will make life easier on you.
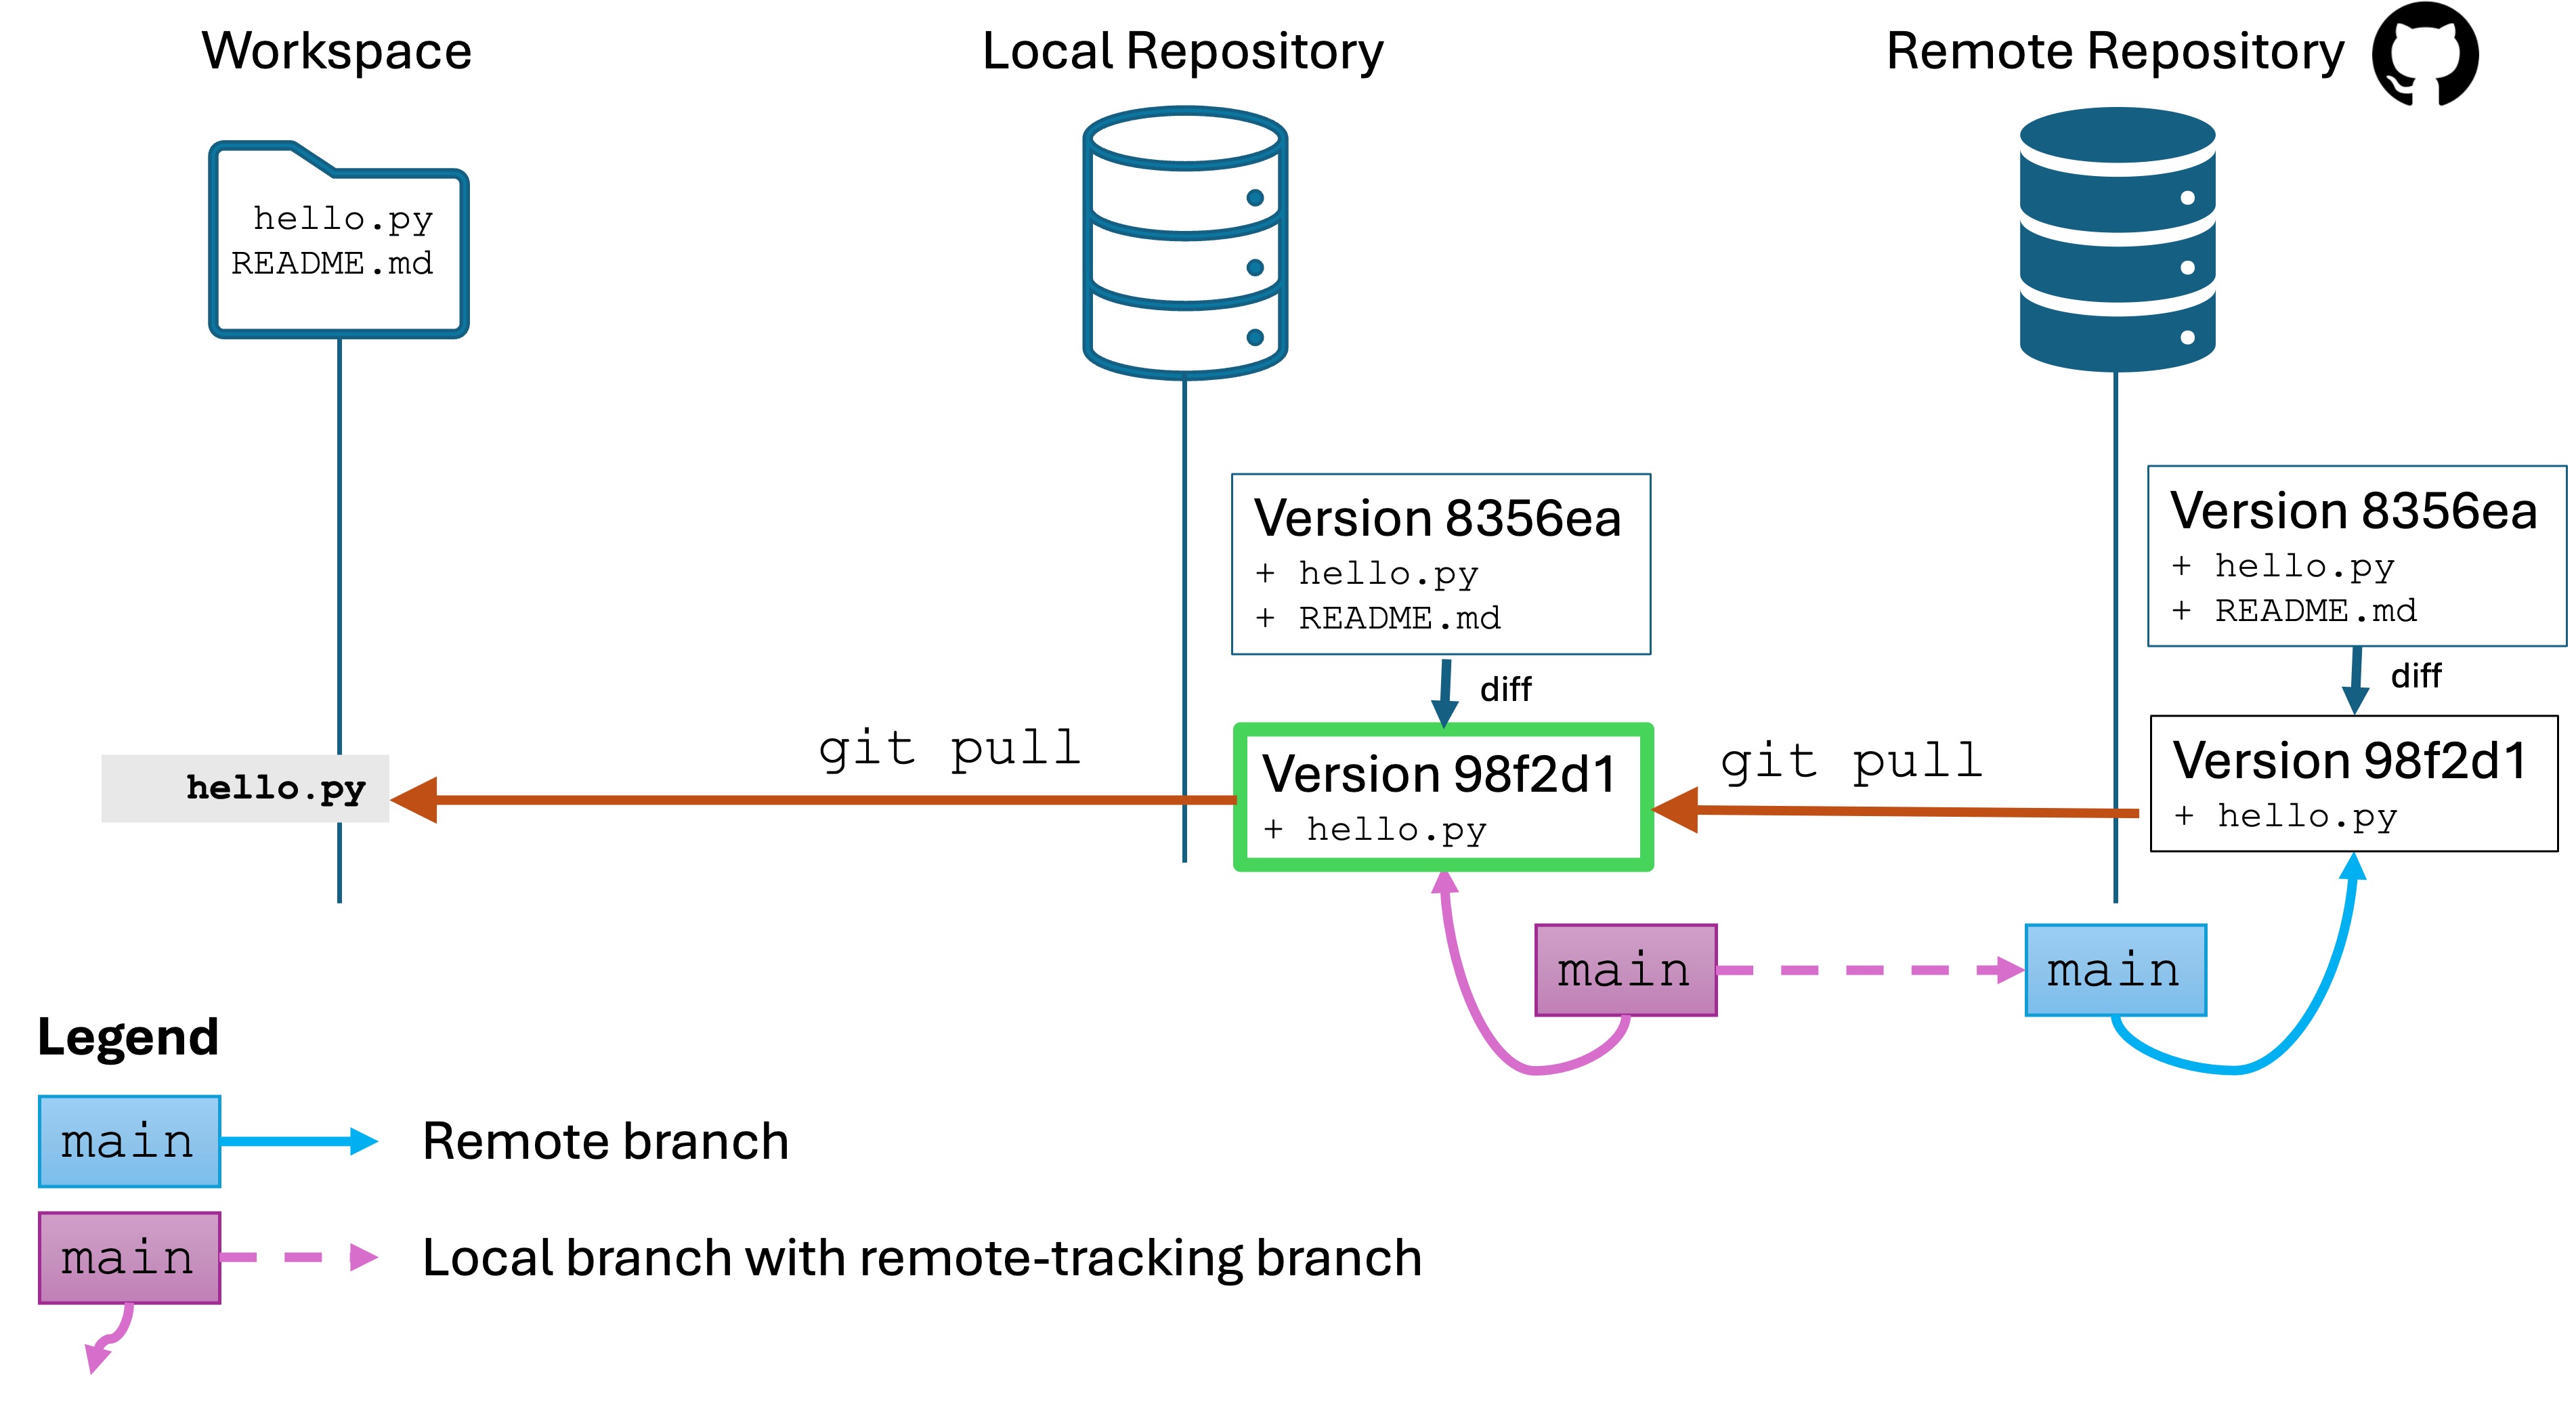
git pull
Run the command git pull. A few things happen:
The changes from the remote repository on the active branch, main, are fetched and integrated into your local repo.
Any changes are automatically merged into your workspace. This is why we wanted our workspace to be “clean.”
You now have the most recent version of main in your workspace. you are ready to edit it, commit, and push as usual.
Concurrent changes to the local and the remote
All of this is relatively straightforward when you are the only one working on a project. The version history of branches remains somewhat linear: you are the only one committing, pushing, and pulling, so you are always (probably) working on the latest version.
Life gets considerably more challenging when you have a team of developers all pushing and pulling from the same repo. If you commit a change to main to your local repo, but then Bob pushes a new version of main to the remote repo, what happens when you try to push or pull? Git will protect us from losing work, but we will likely end up with merge conflicts.
Team coordinator through Git remote repos can be smooth if we follow a good process. We will discuss this next.
Knowledge Check
(Question) What does the git pull command do?
(Question) Why is it important to have a “clean” workspace before running git pull?
(Question) What happens if there are conflicting changes on the local and remote repositories when using git pull?
(Challenge) Create a scenario where you make changes locally and have conflicting changes on the remote repository. Use git pull and resolve any conflicts.
(Challenge) Demonstrate how to ensure your workspace is clean before pulling changes.
7.5 -
Scenario 1: Sharing a new project
Do GitHub CLI setup
[WORKSHEET] run through 1-3
create remote-sample/ and open in Visual Studio Code
Create test.py. print(“We are going to share our new repository”)
git init
git add . + git commit
Create a “blank remote repo”. Go to github.com, new, remote-sample as name
Show “success” page
Comment on public vs. private
copy the “…push an existing repository from the command line”
View the remote repo in the browser
[WORKSHEET] run through 4-6
Subsequent versions
test test.py
add and commit
git log. Point out local repo vs. remote repo
[WORKSHEET] add local main and remote main to pg 2 top picture
git push
[WORKSHEET] add 2nd version to remote, update main refs, label git push arrow


 next to the version name to see the