Branching and Merging, Part 1
Class video
Introduction
One of Git’s main features is branching: the ability to create parallel timelines in version history, and then merge them together later.
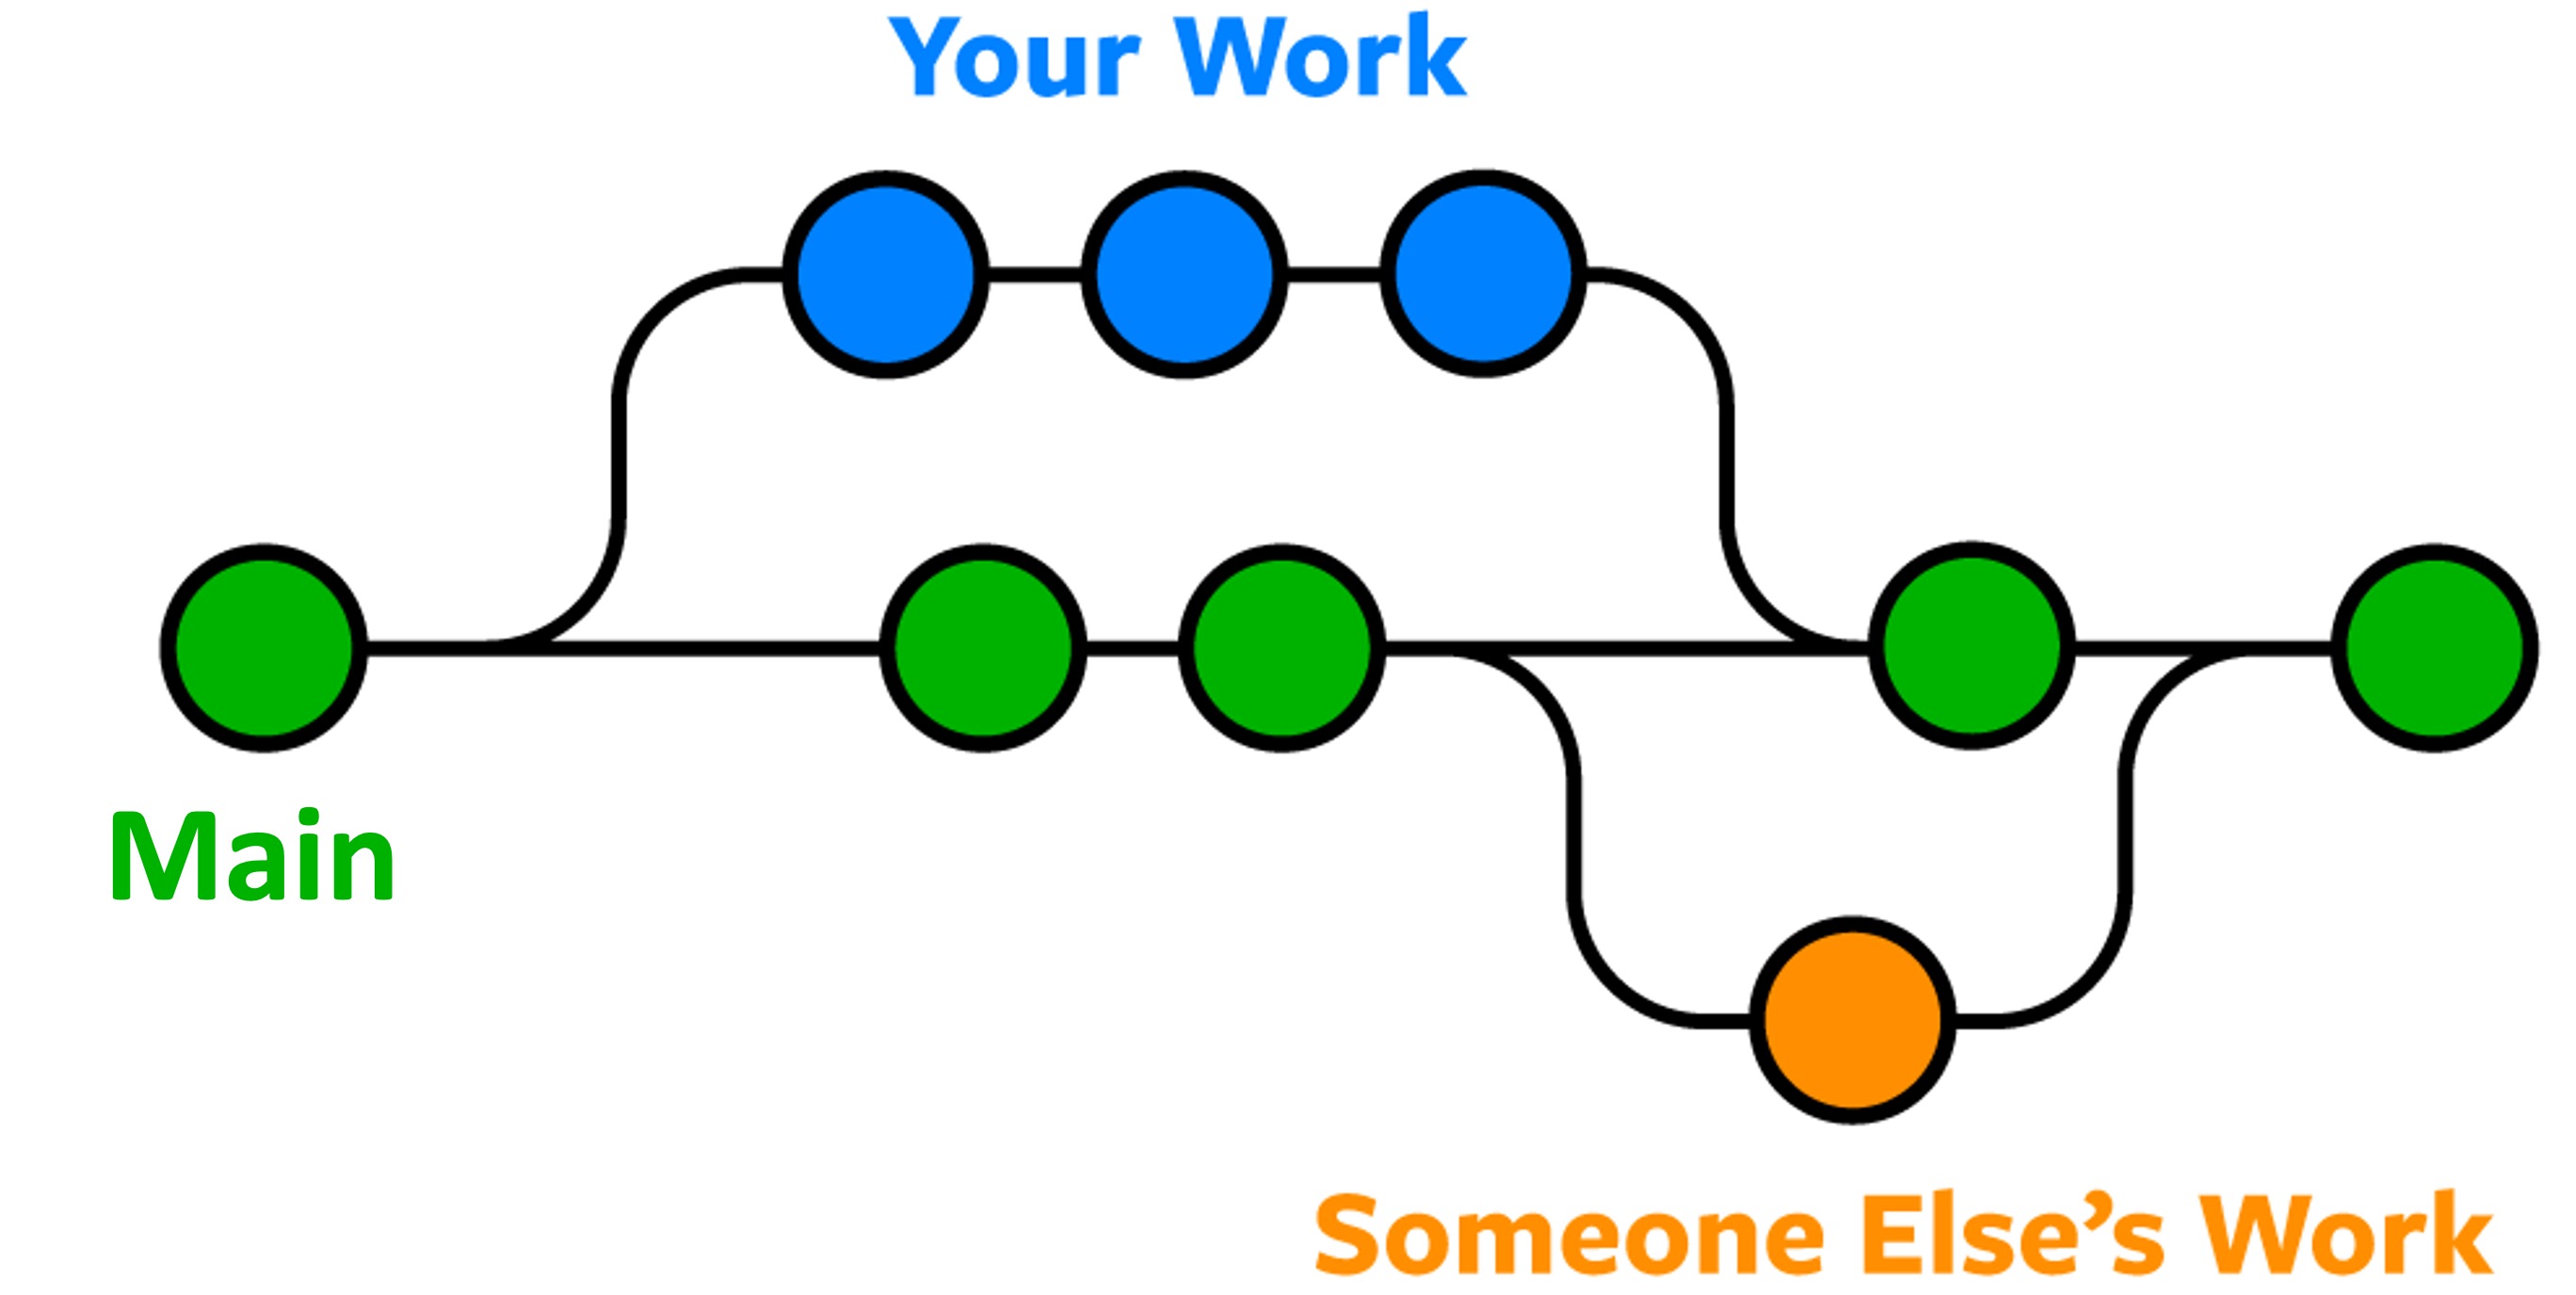
The circles in the illustration represent versions. The lines indicate different branches. We will build a similar diagram below while introducing branching concepts.
Why branching? It allows version histories to be a little dirty, or only incrementally complete. Then we share when we’re happy and done.
This feature is essential for working on a team, and also by yourself to preserve a “clean” main branch while updating functionality in parallel.
The active branch
Git has a notion of the active branch, which is the branch you are currently committing to. So far, you have only been committing to the main branch in our examples.
The main branch
Let’s create a new project:
- Create a directory
git-branchingin yourseng-201/directory. - Change into the
git-branchingdirectory and rungit initto initialize a new Git repo. - Create the file
app.pywith the following content:def main(): print("Welcome to the main branch!") if __name__ == "__main__": main() - Run
git add . - Run
git commit -m "first version"
Every Git repository has a default branch called main (or master prior to July 2020). This branch is created for you when you run git init.
In the Terminal window, you may see the text (main) in the command prompt indicating that main is the active branch:

Your IDE also displays the active branch in the bottom left: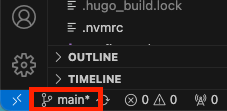
Most software groups treat the main branch as the place where only robust, finished, shippable code lives. You are not allowed to commit directly to main in many organizations. Instead, the expectation is that you work in a different branch and integrate with main when finished and approved.
Committing directly to main is fine for small personal projects that you don’t expect anyone else to use or that won’t live long. Most short class assignments fall into this category.
But, you should use branches for any other scenario, even if working by yourself!
What is a branch?
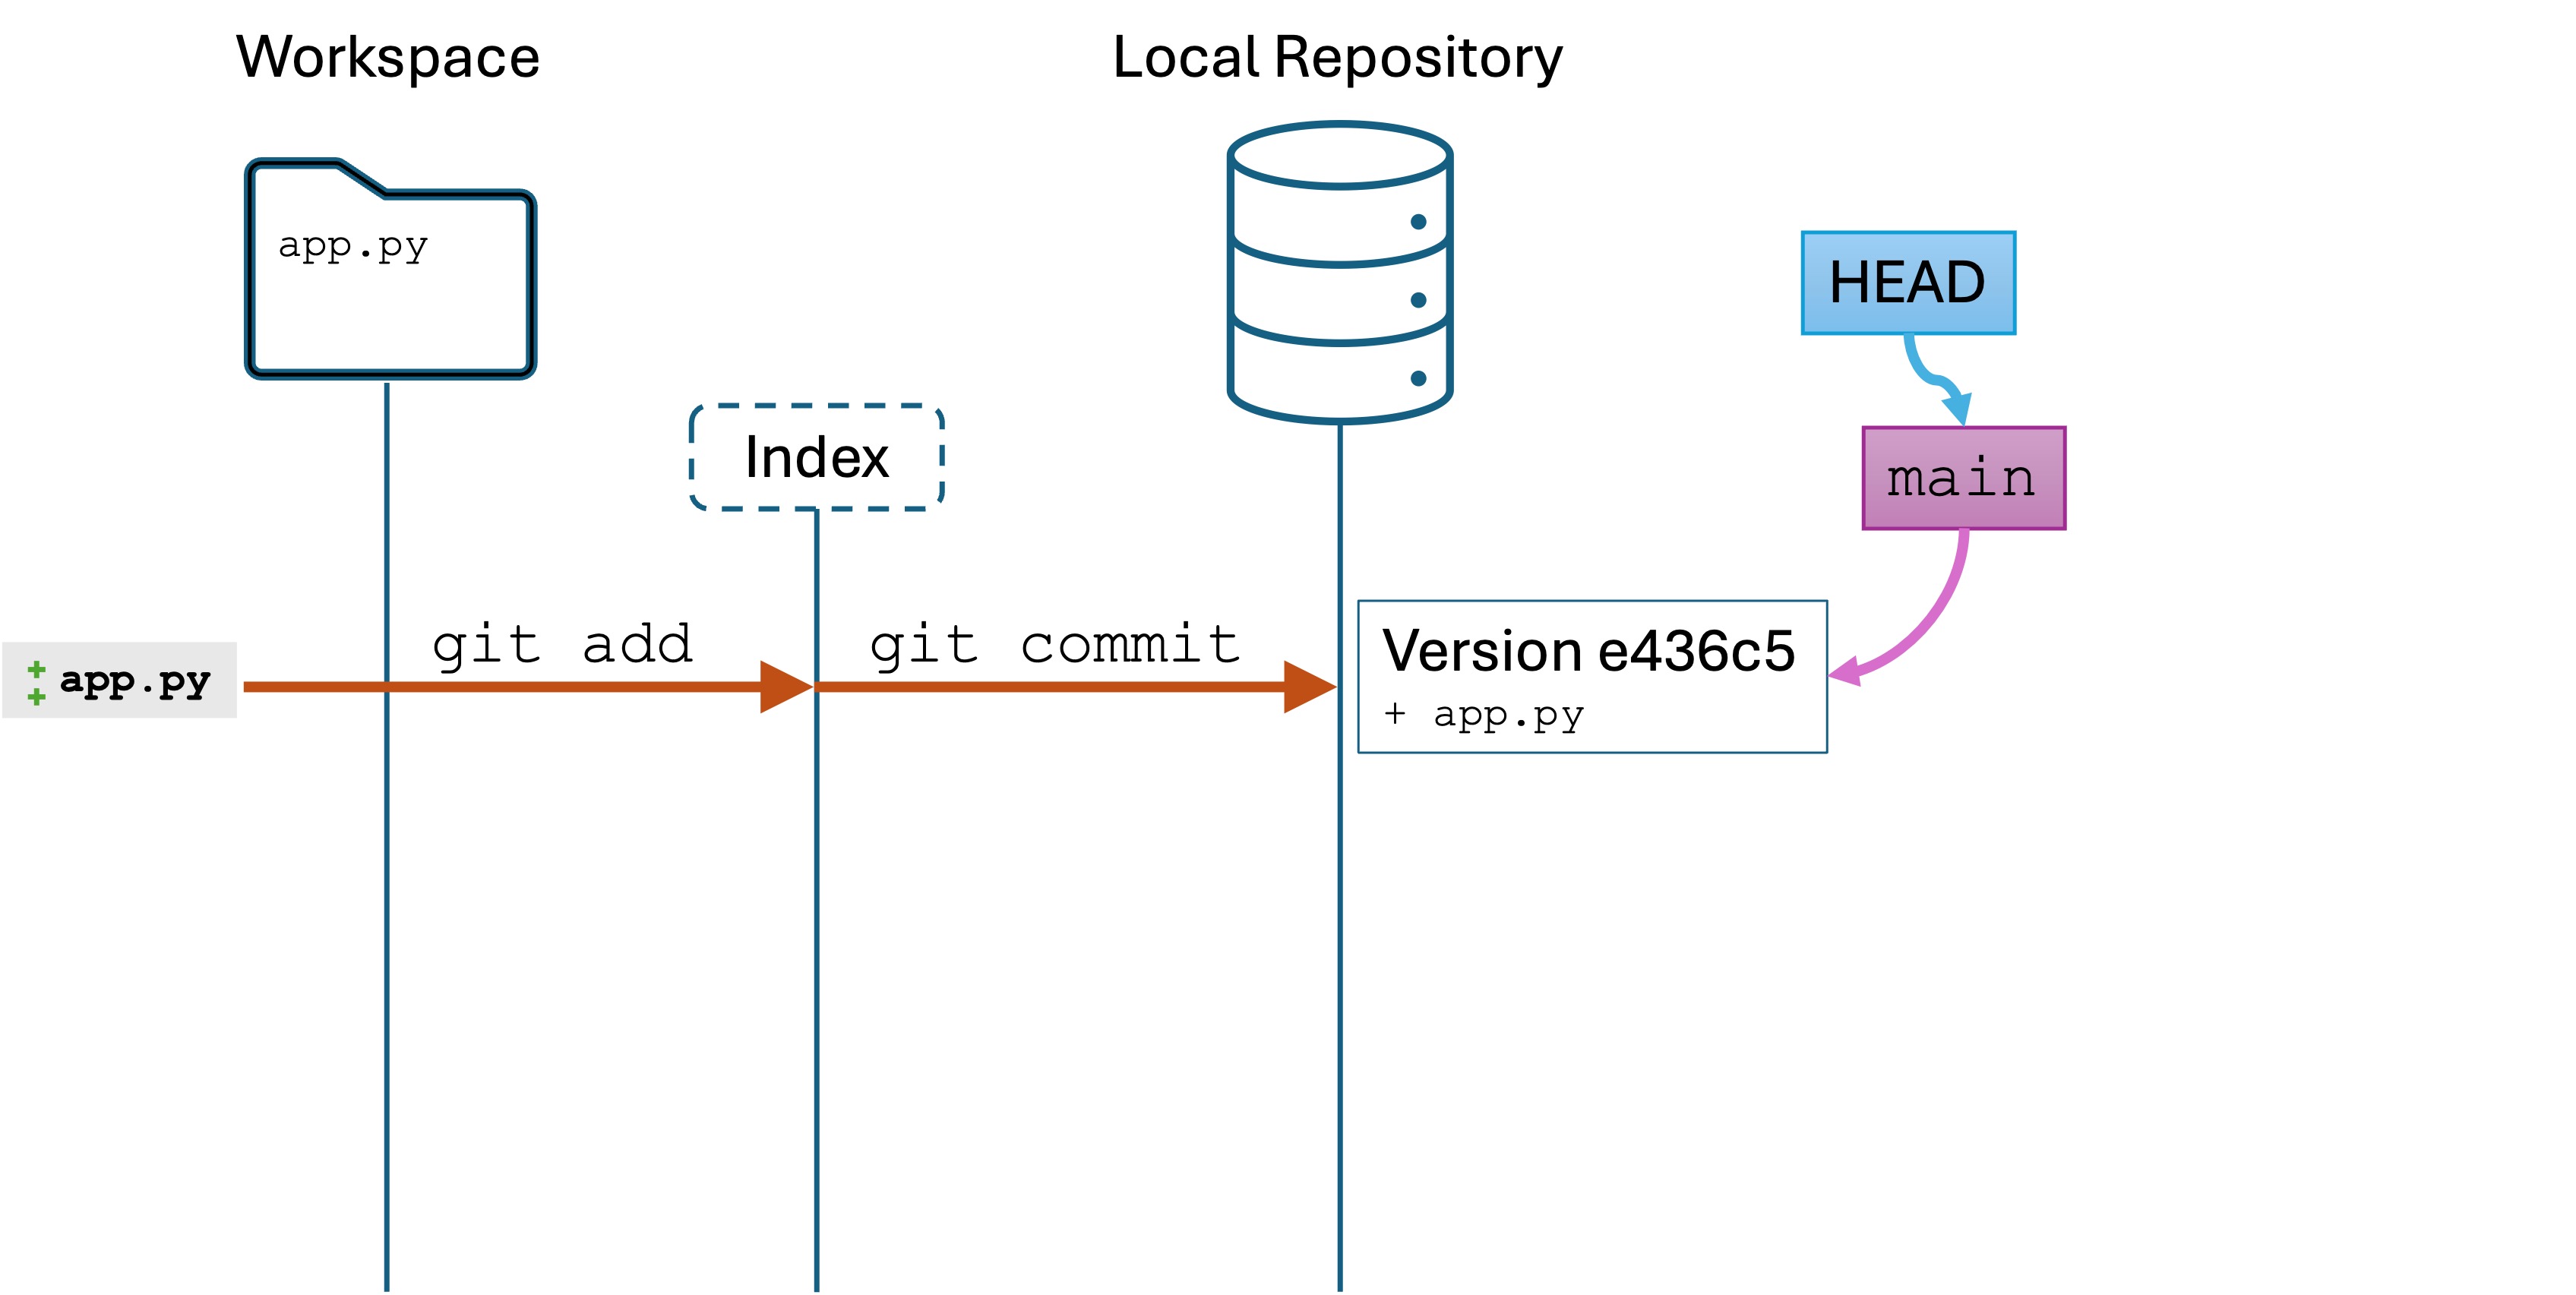
Remember how we said that the special variable HEAD in Git is a pointer or reference to a specific version in the commit history? Usually, the HEAD is pointing to the most recent version of the active branch.
Branches, including the main branch, are additional named variables that point to a specific version. When you run git init, creates a named main variable that points to a specific version. When you make your first commit, main will point to the first version in your repository:

To branch or not to branch
Before you create a branch, you must decide what to do with any unstaged and staged changes.
When you create a new branch, un-committed changes (unstaged and staged) are brought into the new branch. This is often desirable.
Suppose you start working on code and you realize “this is more complicated than I thought and going to take a lot of effort.” You can move these changes to a new branch, and the version history of your current branch will be unchanged.
You may also want to save all your currently unstaged and staged changes to the active branch. You have three options:
- If you have no changes in the working directory, then you’re good to create a new branch.
- Stage and commit changes if you want to create a new version in the active branch.
- Create a new branch if you want your staged and unchanged changes to appear in the branch, but you want the old branch, e.g.,
main, to be unchanged for now. - You can also undo those changes using
git resetor something similar..
You decide what’s best.
Creating a new branch
Run the command git switch -c feature-1. You will see something similar to:

You have created a new branch named feature-1, and you have set the active branch to feature-1. The switch -c command tells the HEAD to point to feature-1, which makes feature-1 the active branch.
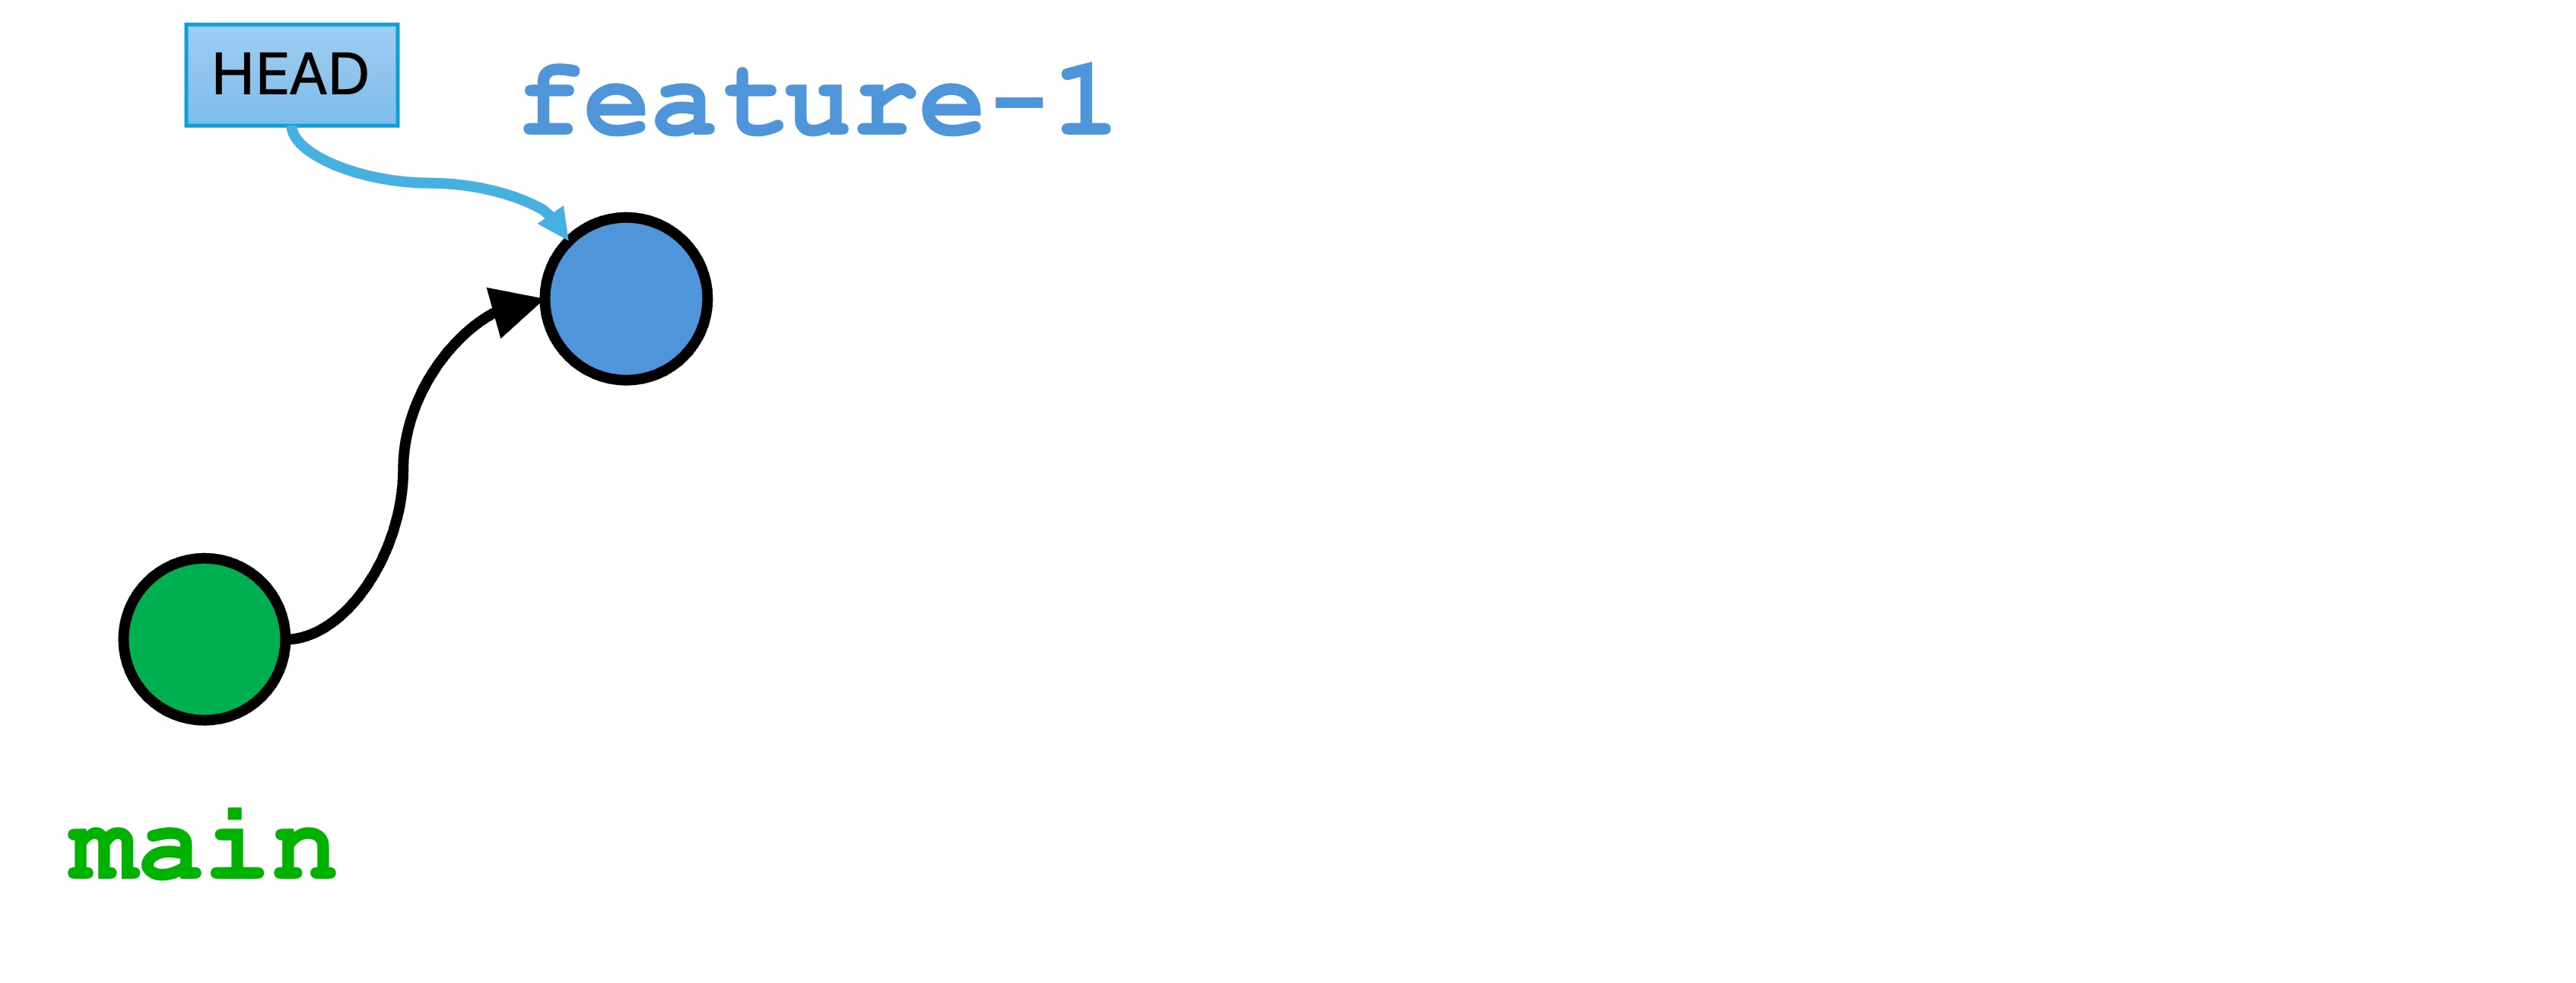
This means any committed changes will be saved to the version history of feature-1 but not to main. Your workspace state looks like the following:
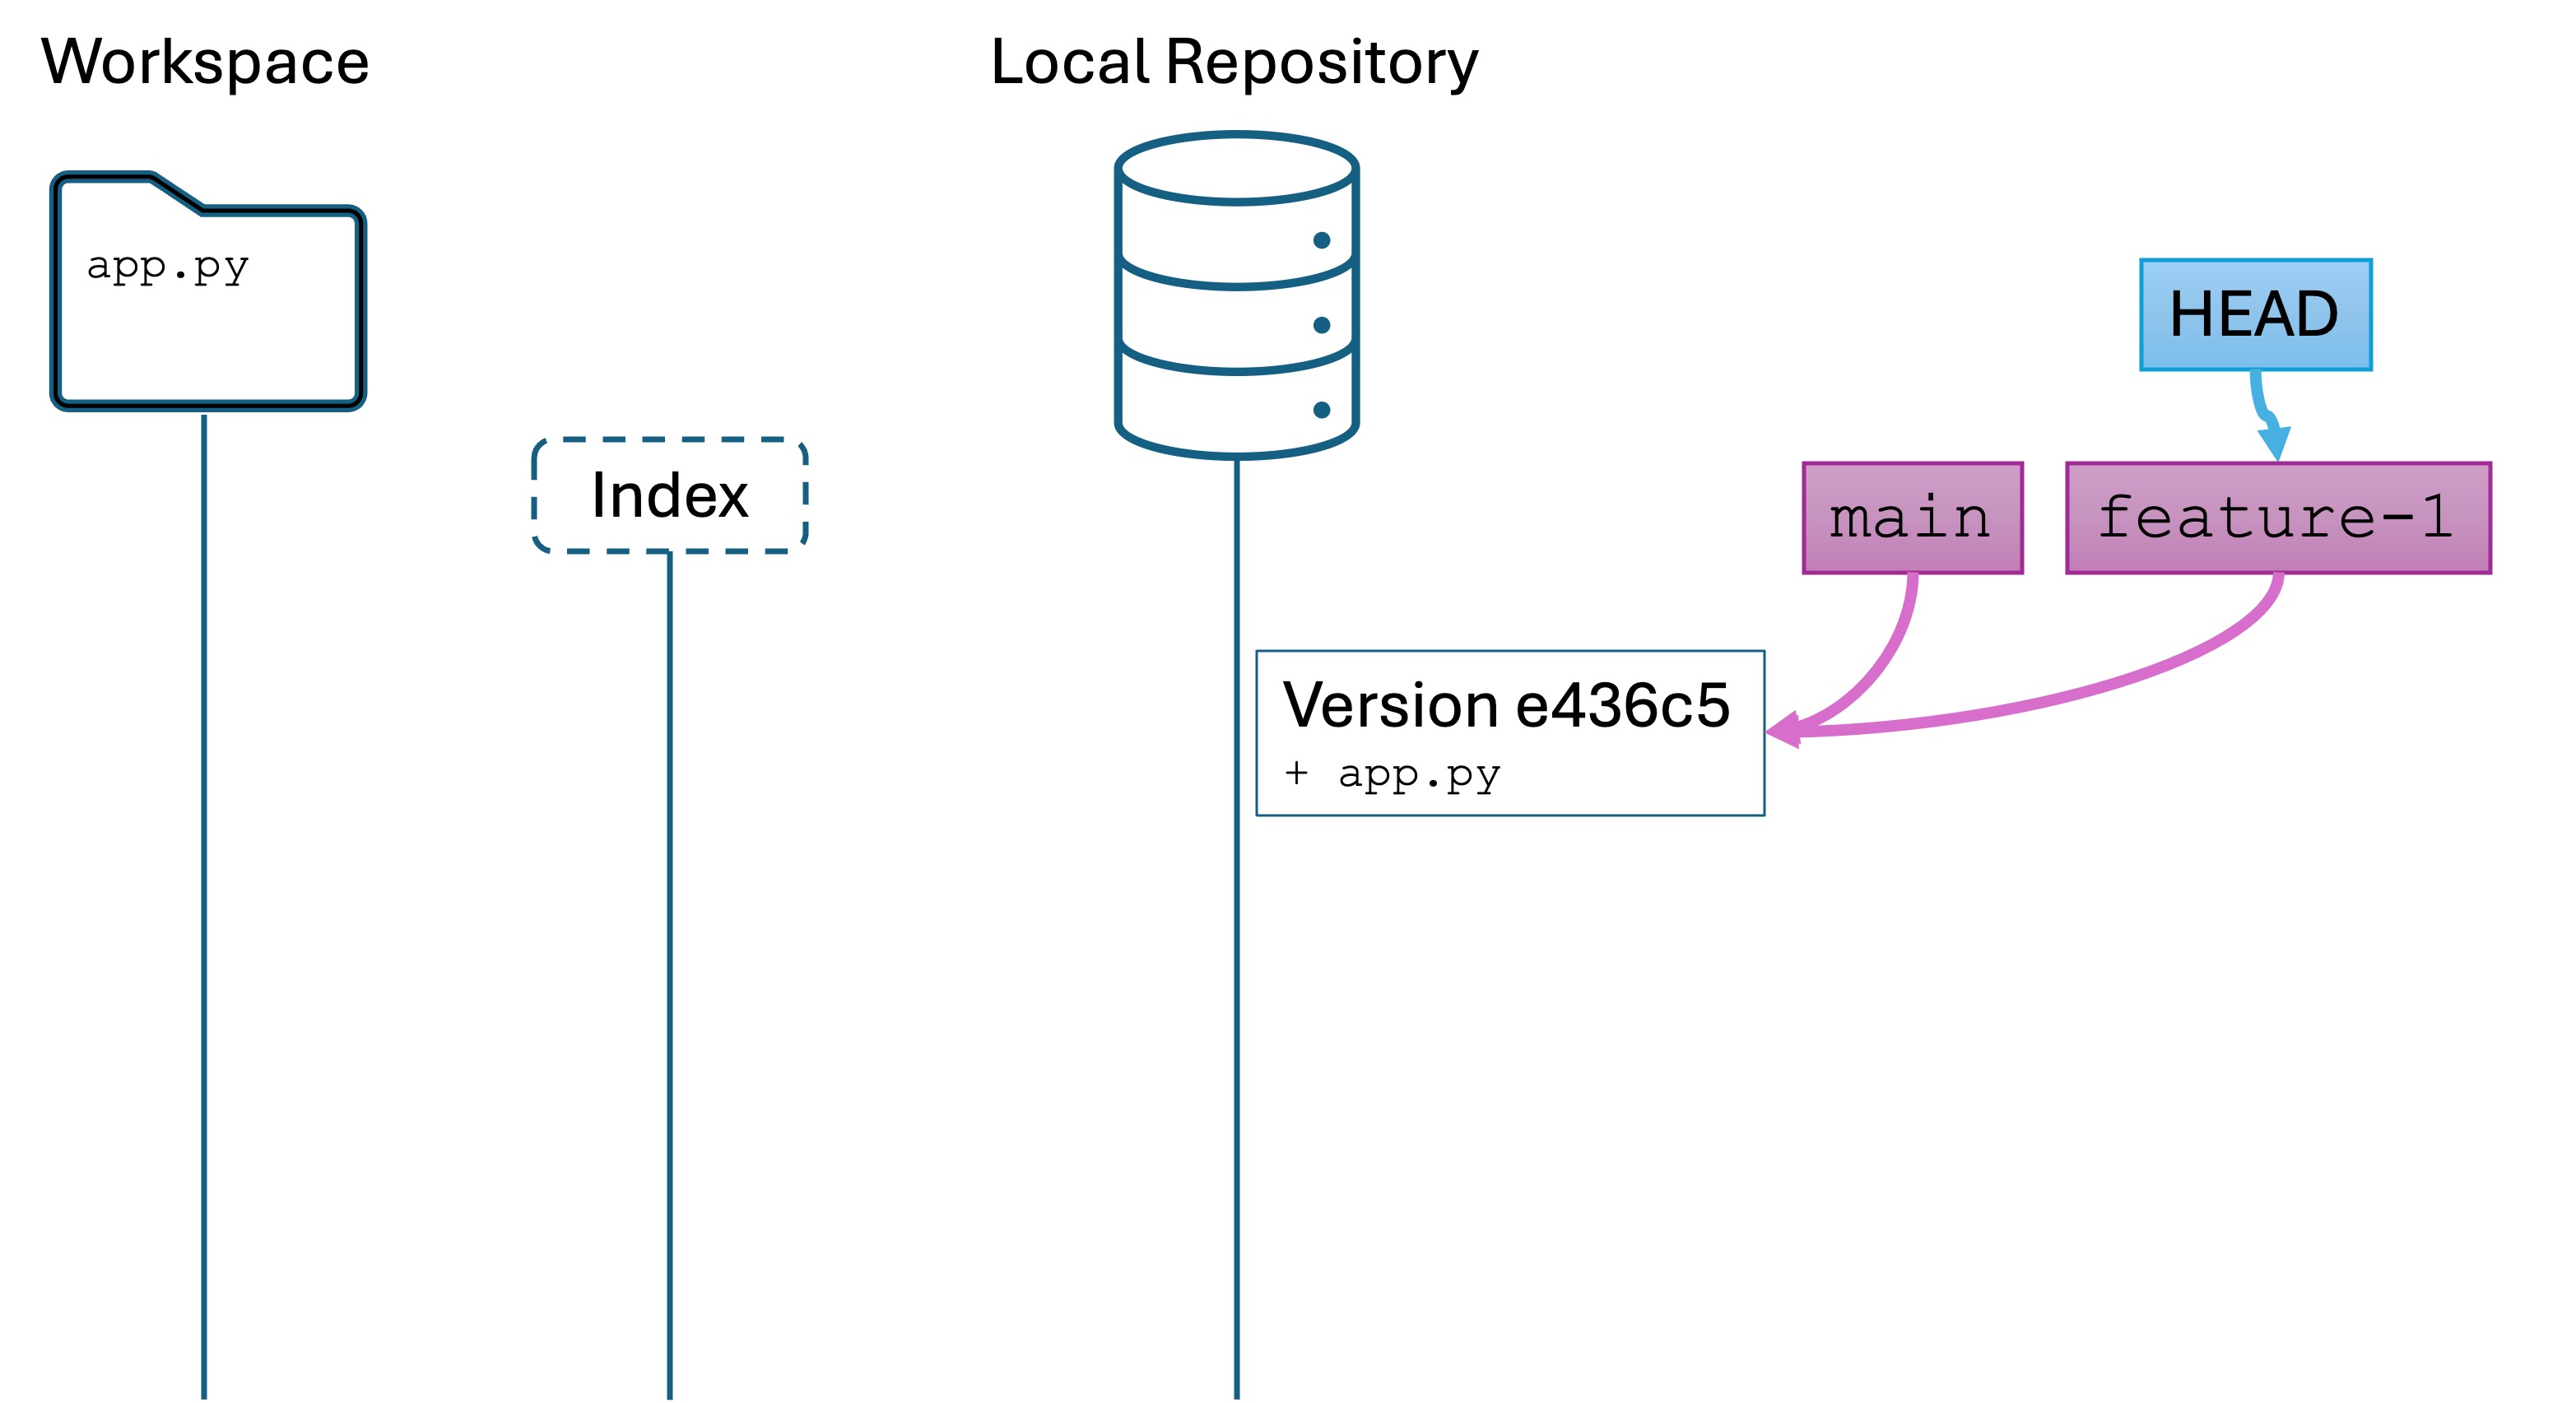
We have not yet committed a new version, so all three variables are pointing the first version.
Remember: Why do we want to use branches? It allows version histories to be a little dirty, or only incrementally complete. Then we share when we’re happy and done. This feature is essential for working on a team, and also by yourself to preserve a “clean” main branch while updating functionality in parallel
Committing a new version to the branch
Change app.py to the following:
def main():
    print("Welcome to the main branch!")
    feature_1()

def feature_1():
    print("Feature 1 activated!")

if __name__ == "__main__":
    main()
Add and commit the change:
git add app.py
git commit -m "Add feature 1 function"
Run git log, and you will see something like this:
commit 89c5985701b1a6b188d1c23fef3b0196dd17b34e (HEAD -> feature-1)
Author: Lucas Layman <laymanl@uncw.edu>
Date:   Tue Oct 29 11:29:37 2024 -0400

    Add feature 1 function

commit e436c51cd2760e9ef0d49a65472a404044c2d3c0 (main)
Author: Lucas Layman <laymanl@uncw.edu>
Date:   Tue Oct 29 11:19:05 2024 -0400

    first version
You are looking at the version history of the feature-1 branch. Note that the history is based on the first version from main.
Conceptually, our branch history looks like this:
The local repository looks like this: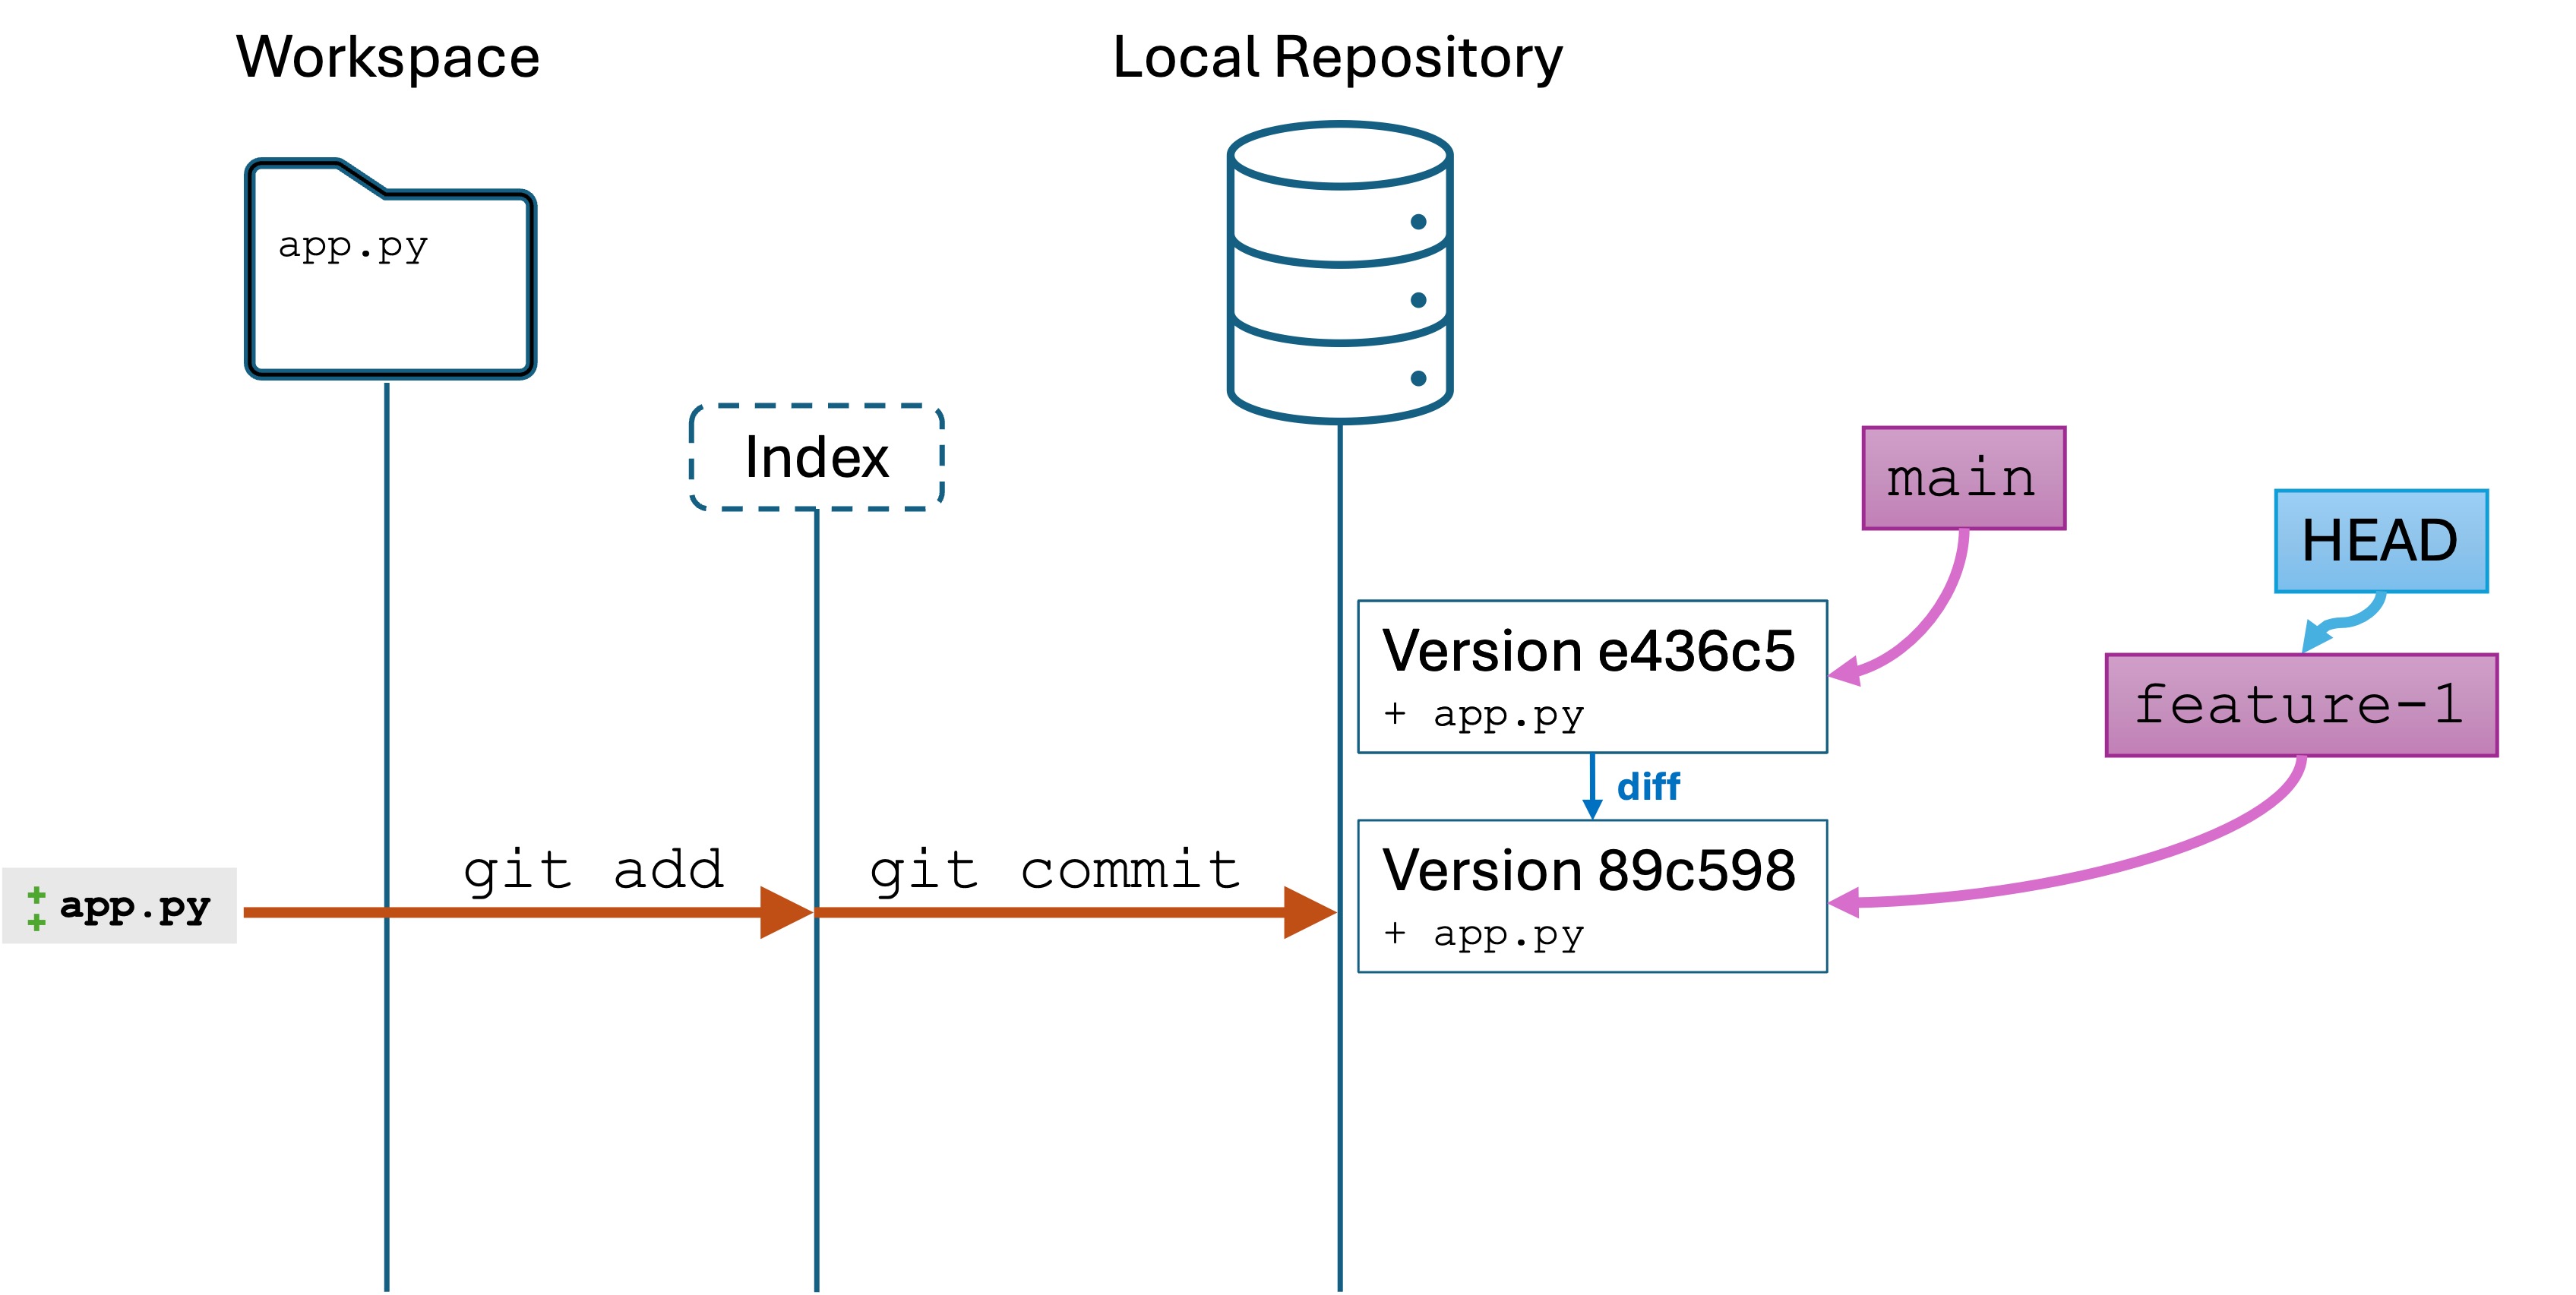
A second commit
Let’s make another change and commit it to the feature-1 branch. Do the following the following code:
- Replace
app.pywith the following:import random def main(): print("Welcome to main!") feature_1() def feature_1(): print("Feature 1 activated!") print(f"Your random number is {random.randint(1,100)}.") if __name__ == "__main__": main() git add .git commit -m "adding random number generation"
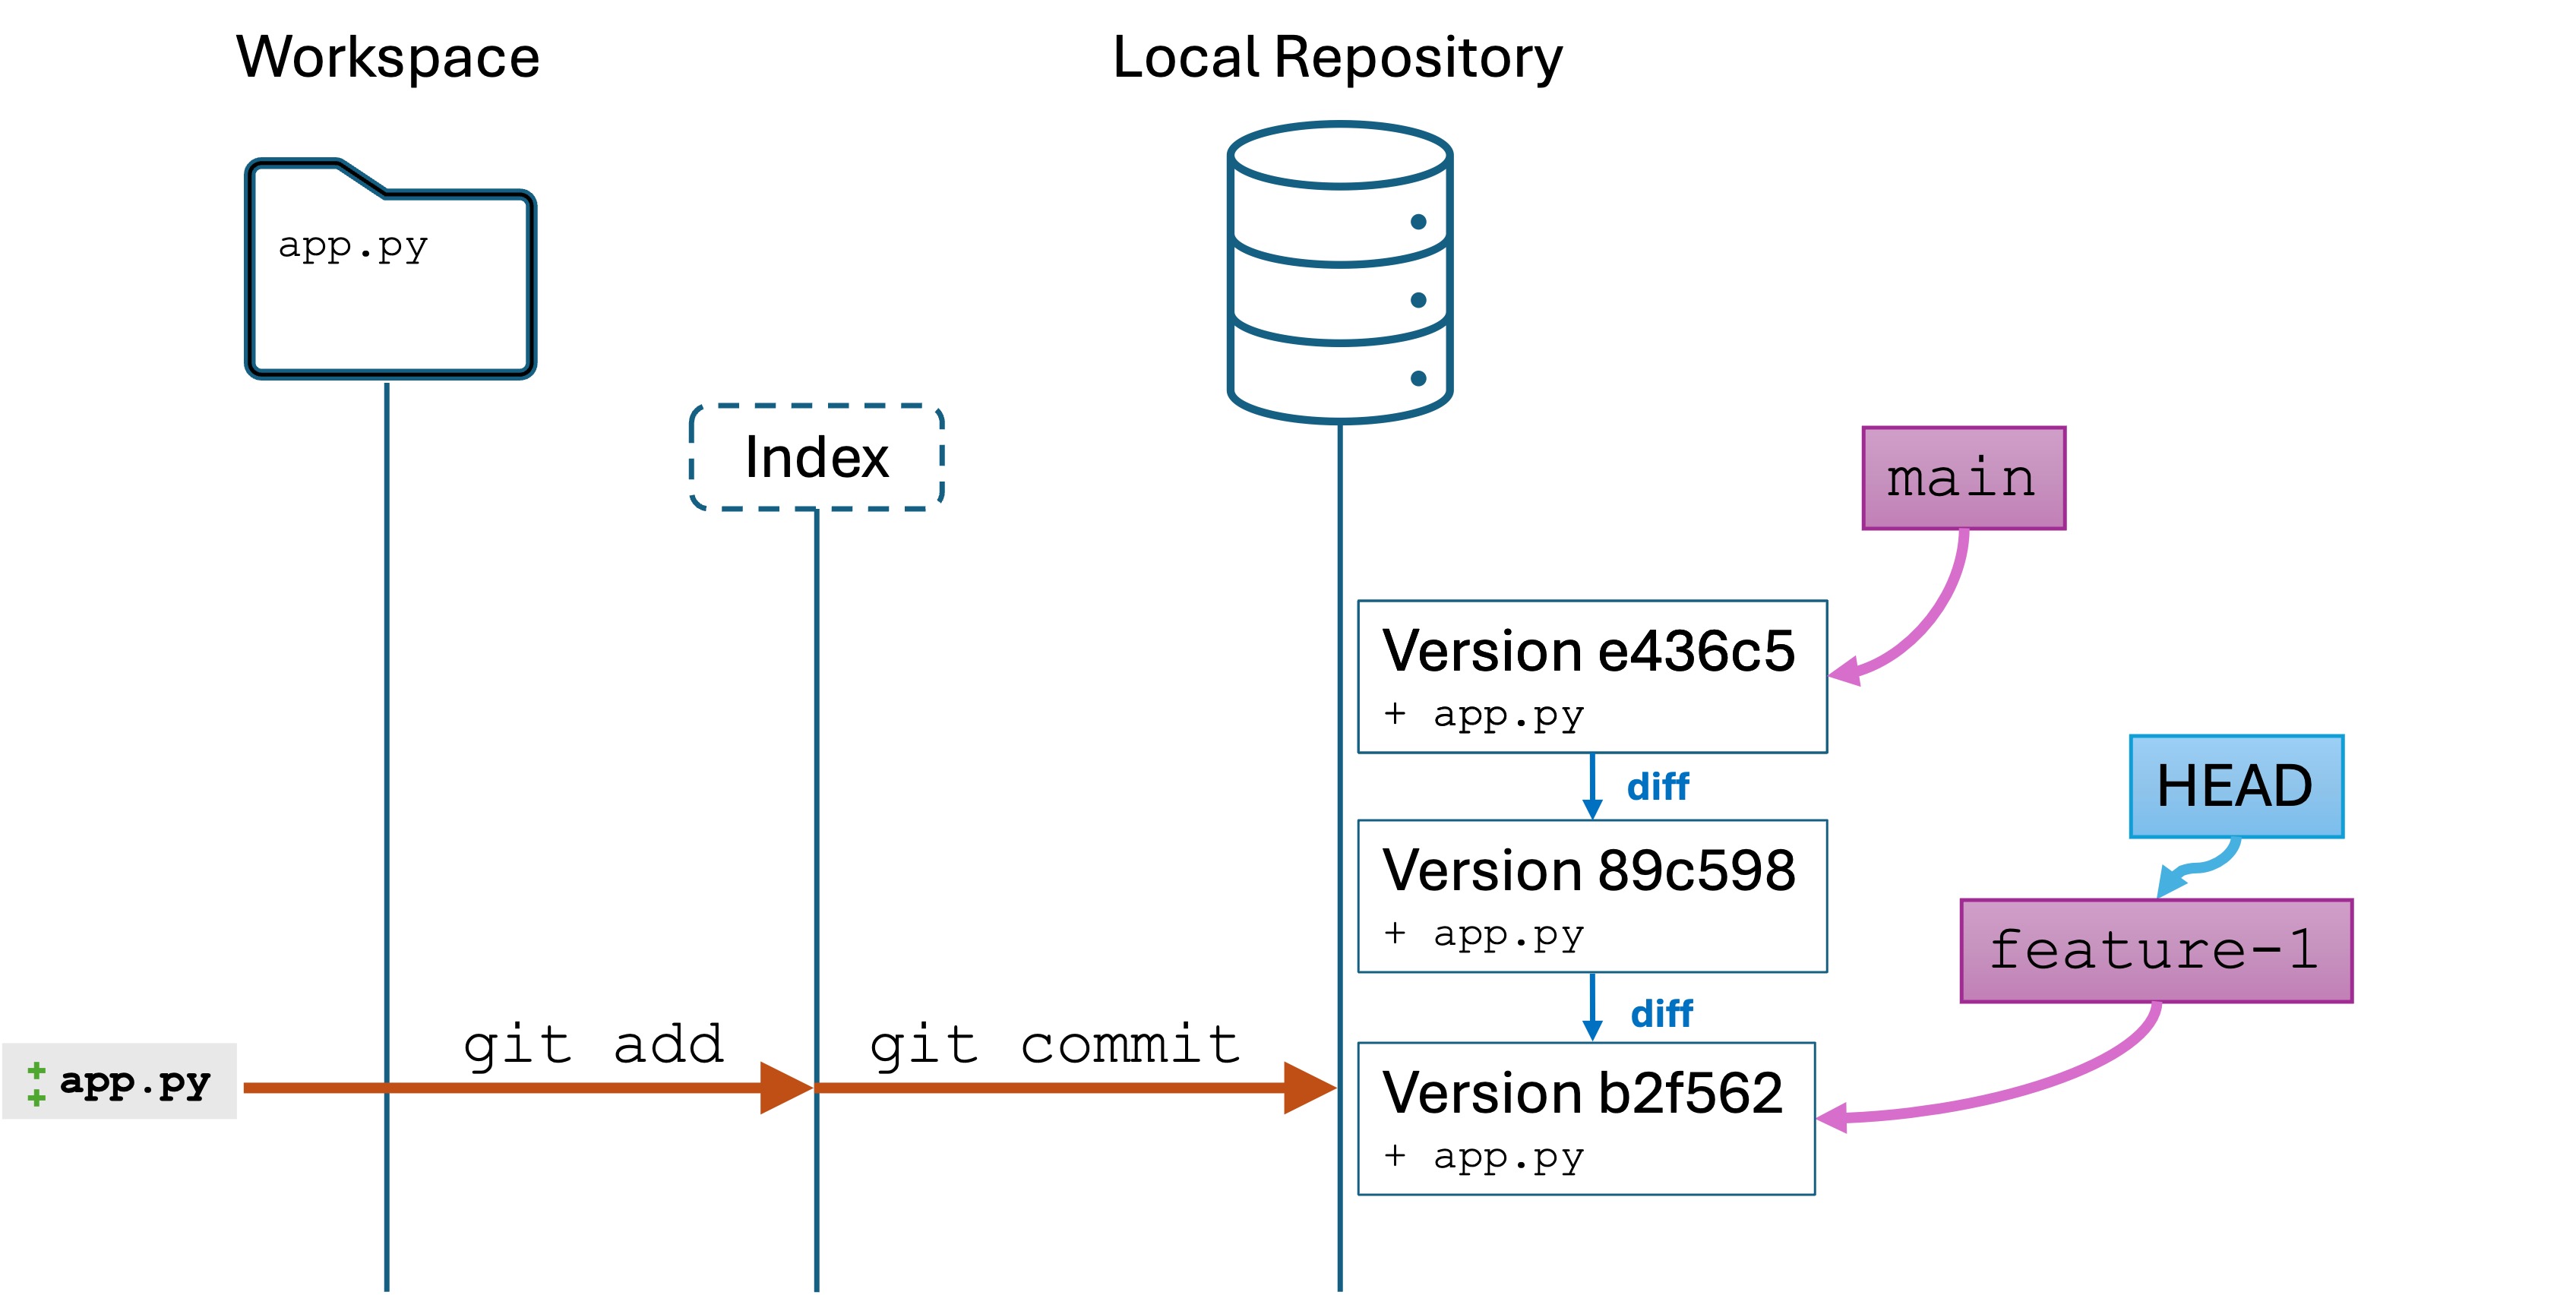
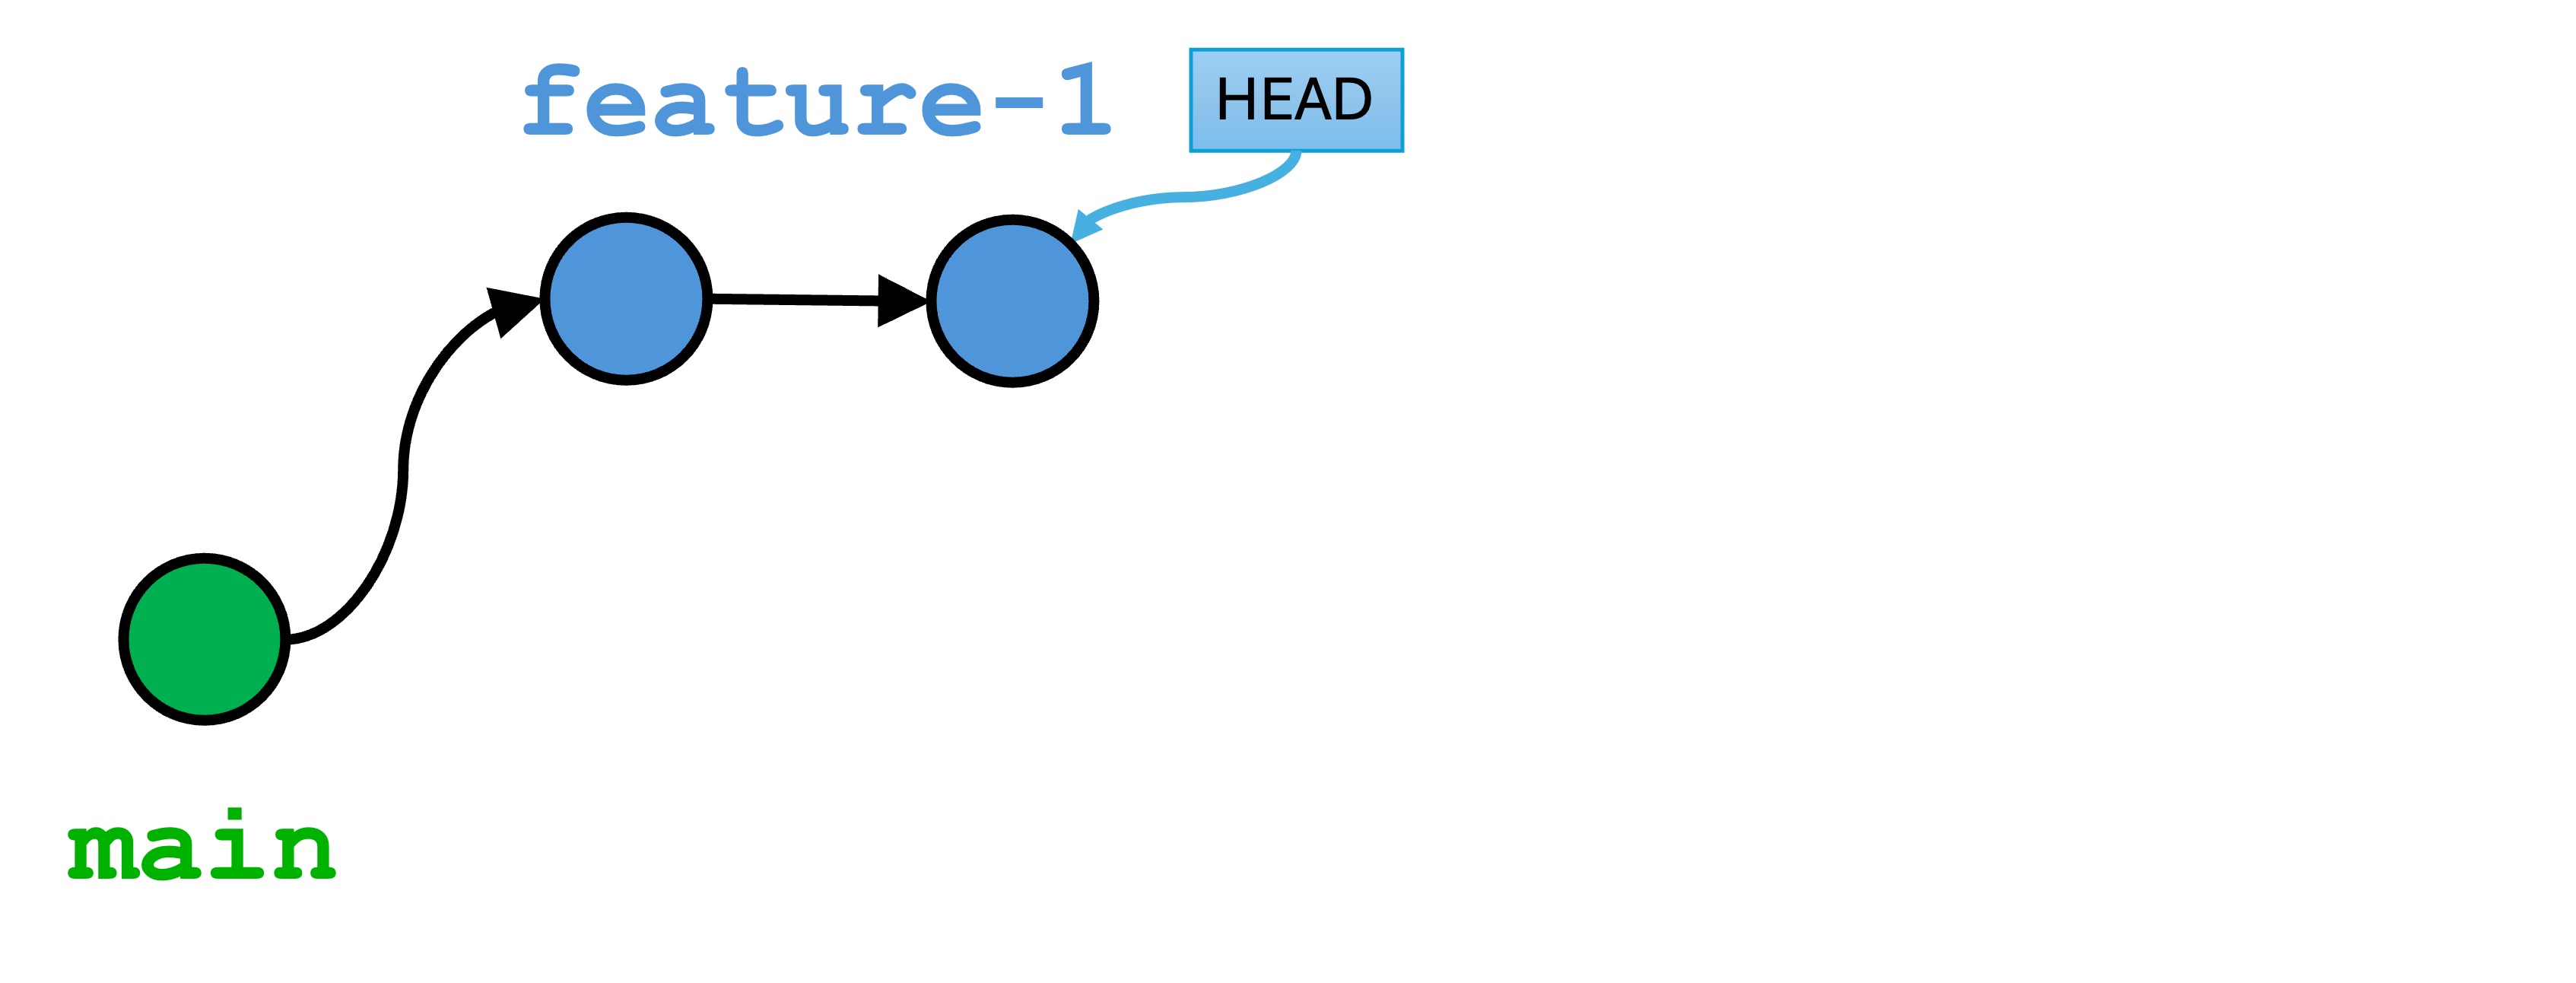
We now have two new versions in our feature-1 branch. Our repo and branch history look like this:
Switching between branches
Run the command
git switch main to switch back to the main branch. Notice there is no -b.
Question: What happens to the code in your IDE?
You should see that the contents of app.py are replaced with the contents as they were in the first version. Here is the current state of the repo:
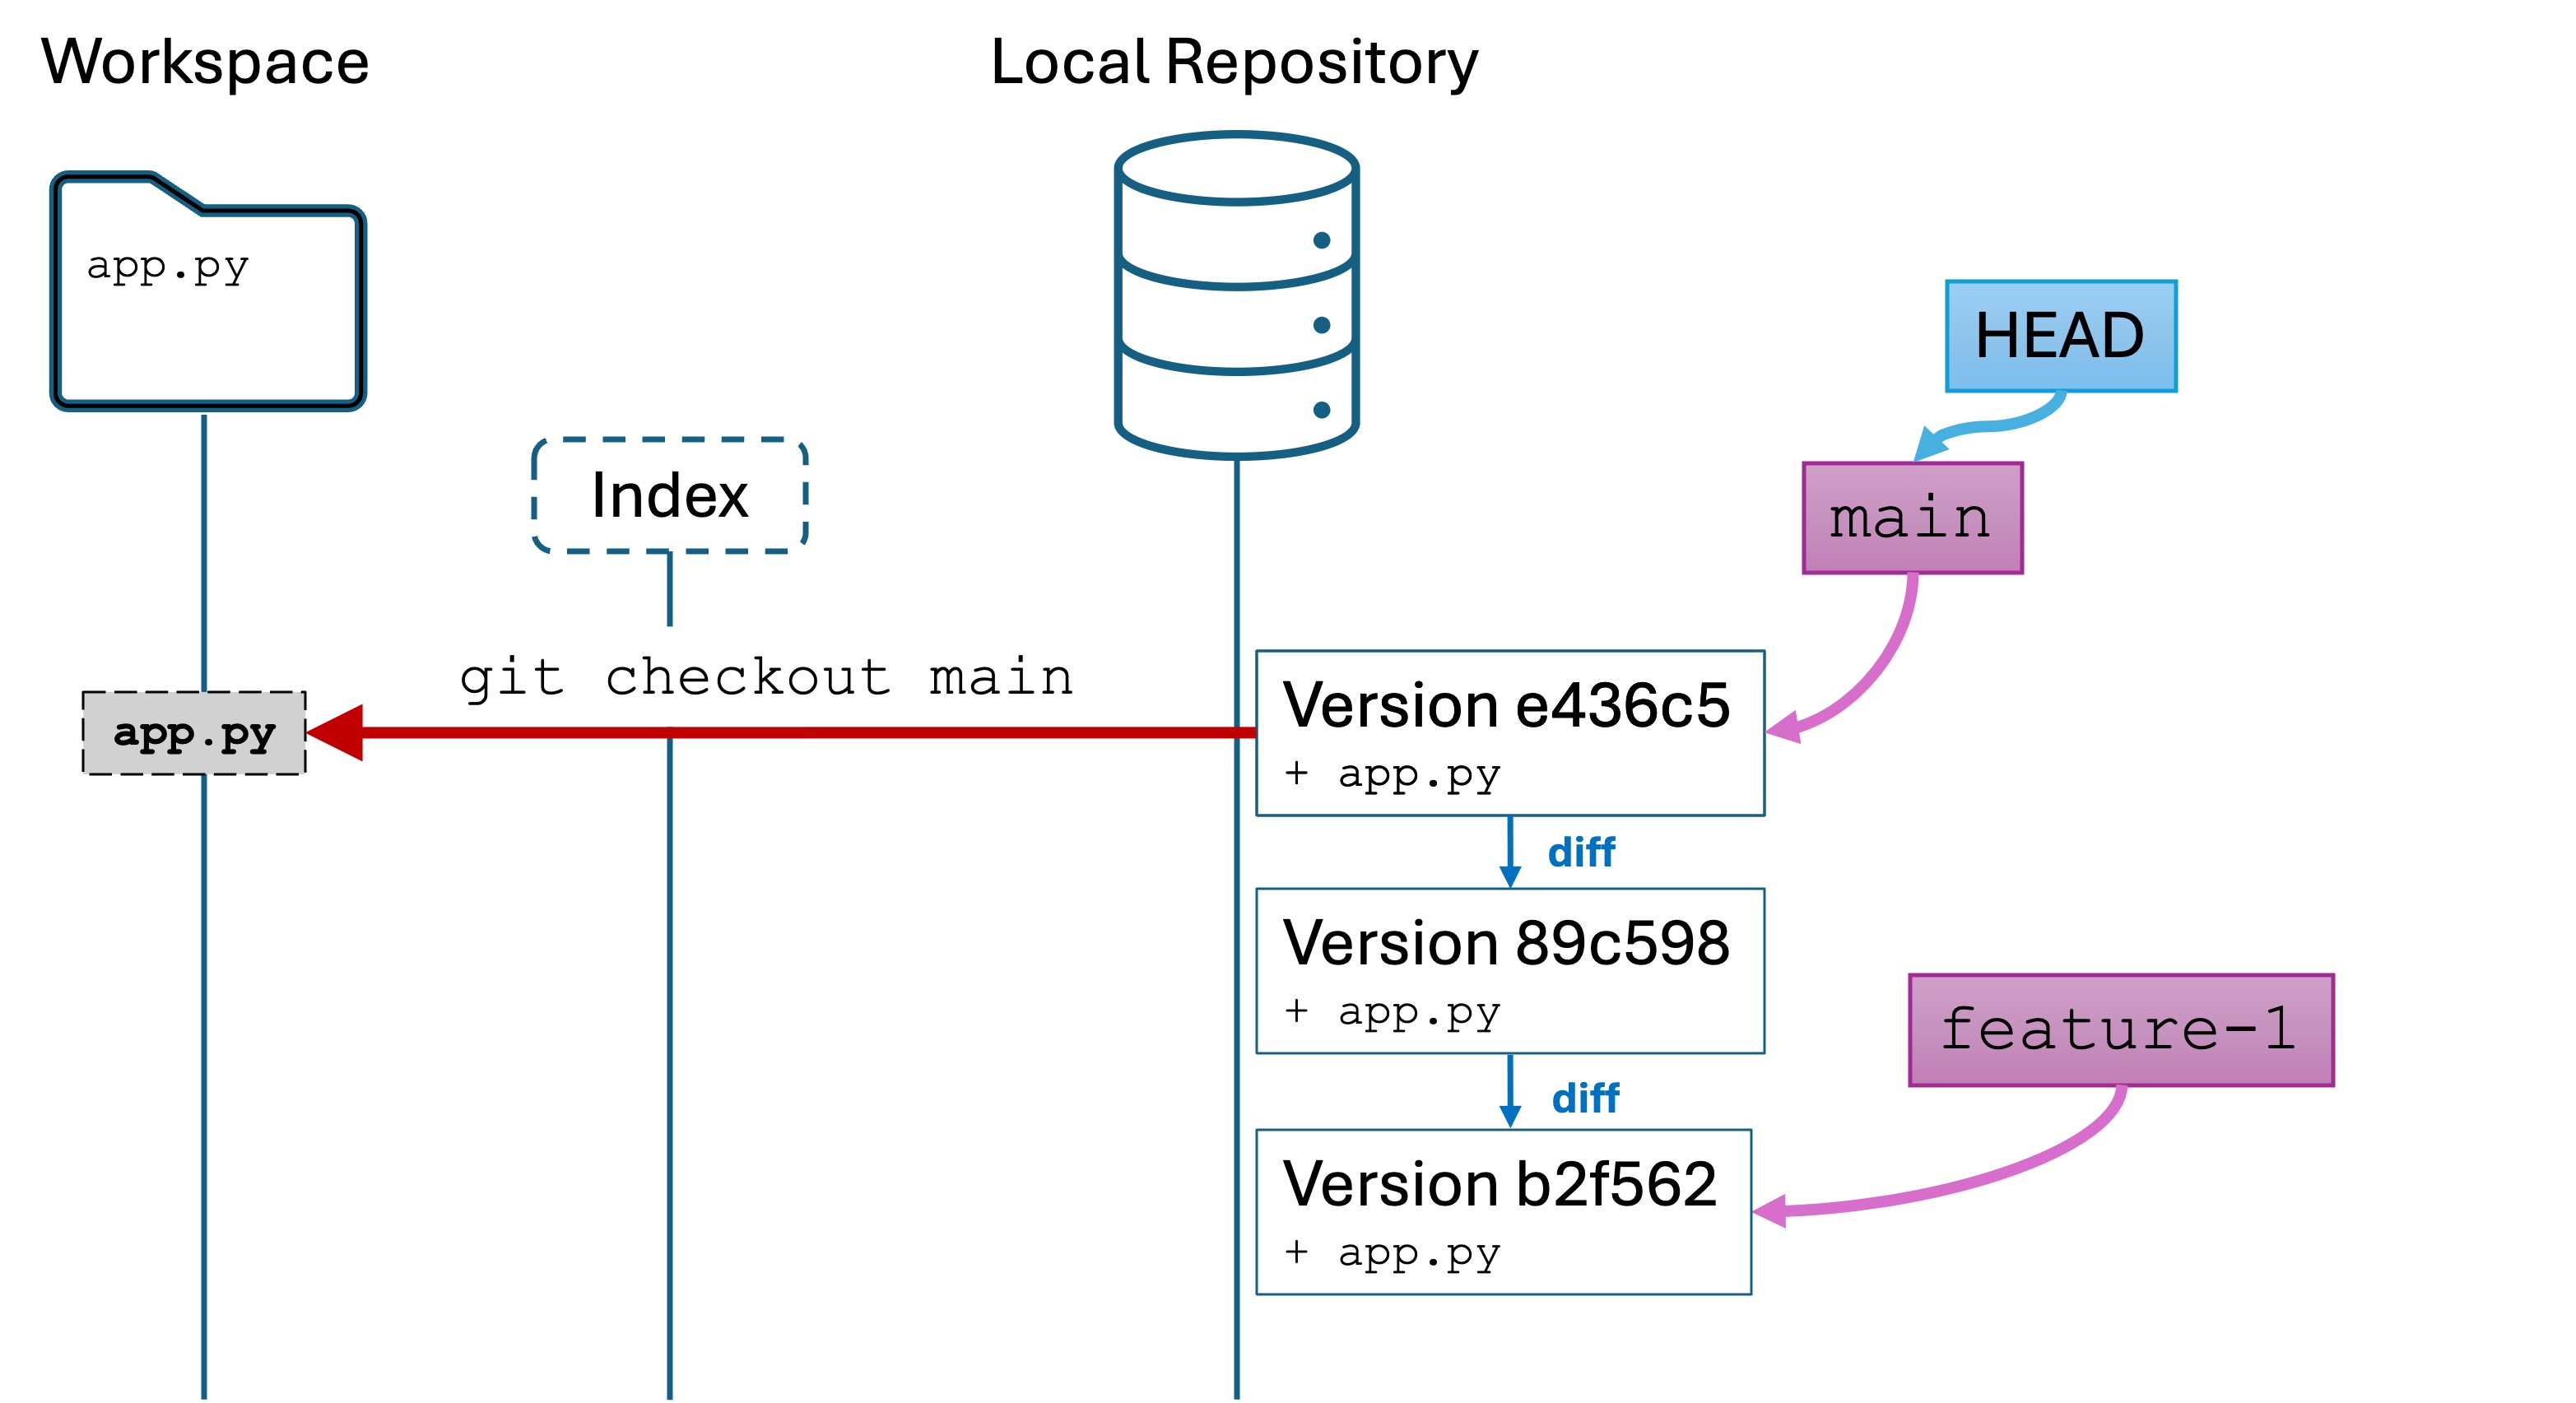
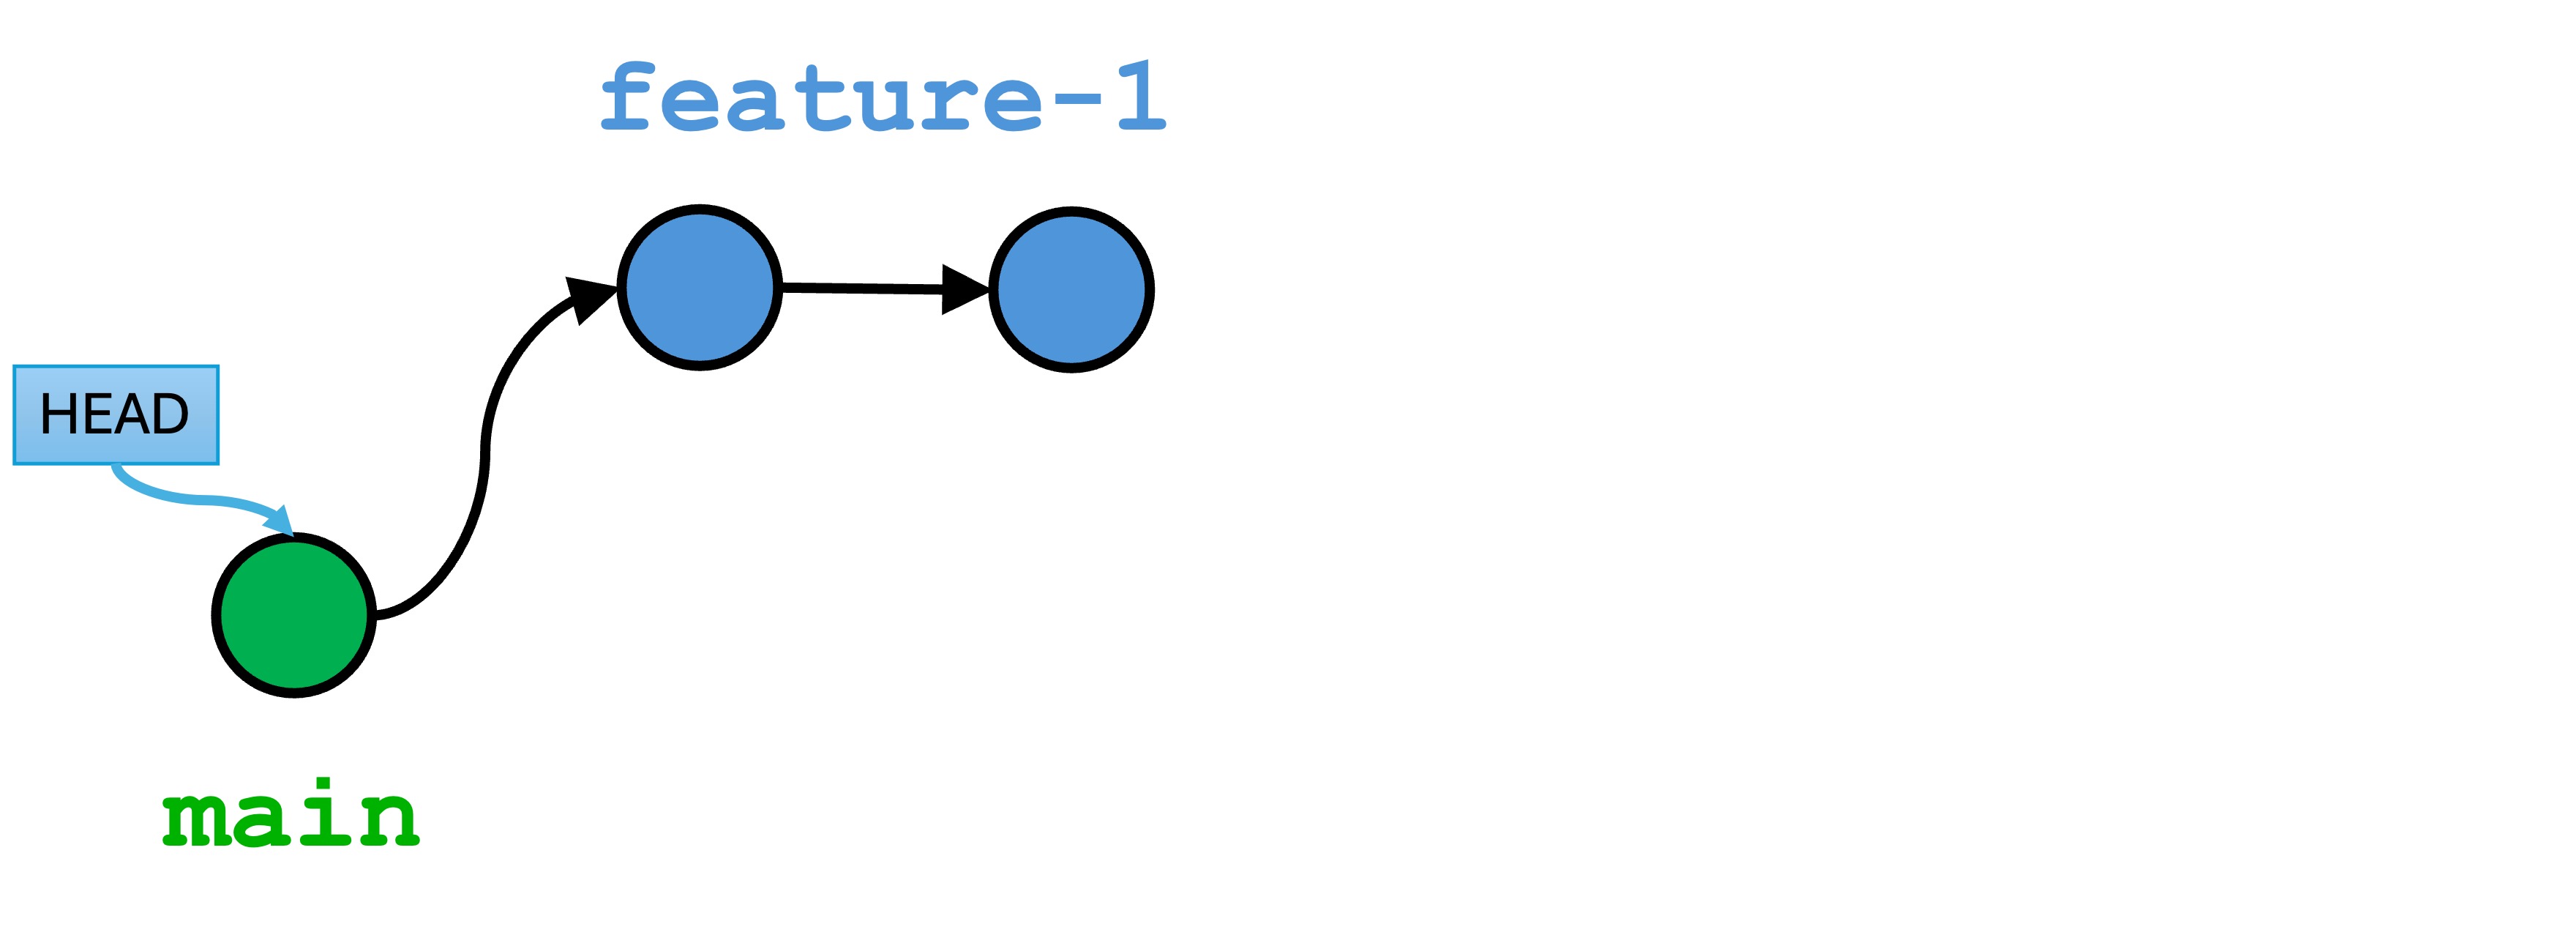
Several things happened:
switchtellsHEADto point to the same version as themainvariable. This makes themainbranch the active branch again.- Git replaces the contents of the workspace with the files as they were at the
mainversion. feature-1is unaffected. The version committed tofeature-1is still in the local repository, so we can go back to the files at that version by checking out thefeature-1branch.
Exercise: Switch to feature-1 to verify that all your changes have been saved in that branch. Switch back to main when you are done.
Merging
Our repo reflects the most common use case for branches: you work on something in a branch for a while, you make it perfect, and you are now ready to bring your work into main. Remember, main should only contain clean, complete, “good” code.
You want now to merge your feature-1 branch into the main branch. Merging is the process of combining the histories of two branches.
Run the following:
git switch mainto ensure thatmainis the active branch.git merge feature-1to merge the feature-1 versions intomain
You will see output similar to:
(3.12.2) ➜  git-branching git:(main) git merge feature-1
Updating e436c51..b2f5622
Fast-forward
 app.py | 9 ++++++++-
 1 file changed, 8 insertions(+), 1 deletion(-)
You will also see that your IDE’s editor contents for app.py contain all the changes from the most recent version of feature-1. Run the git log command and you will see that HEAD, main, and feature-1 all point to the most recent version from feature-1.
Here is the state of our repo: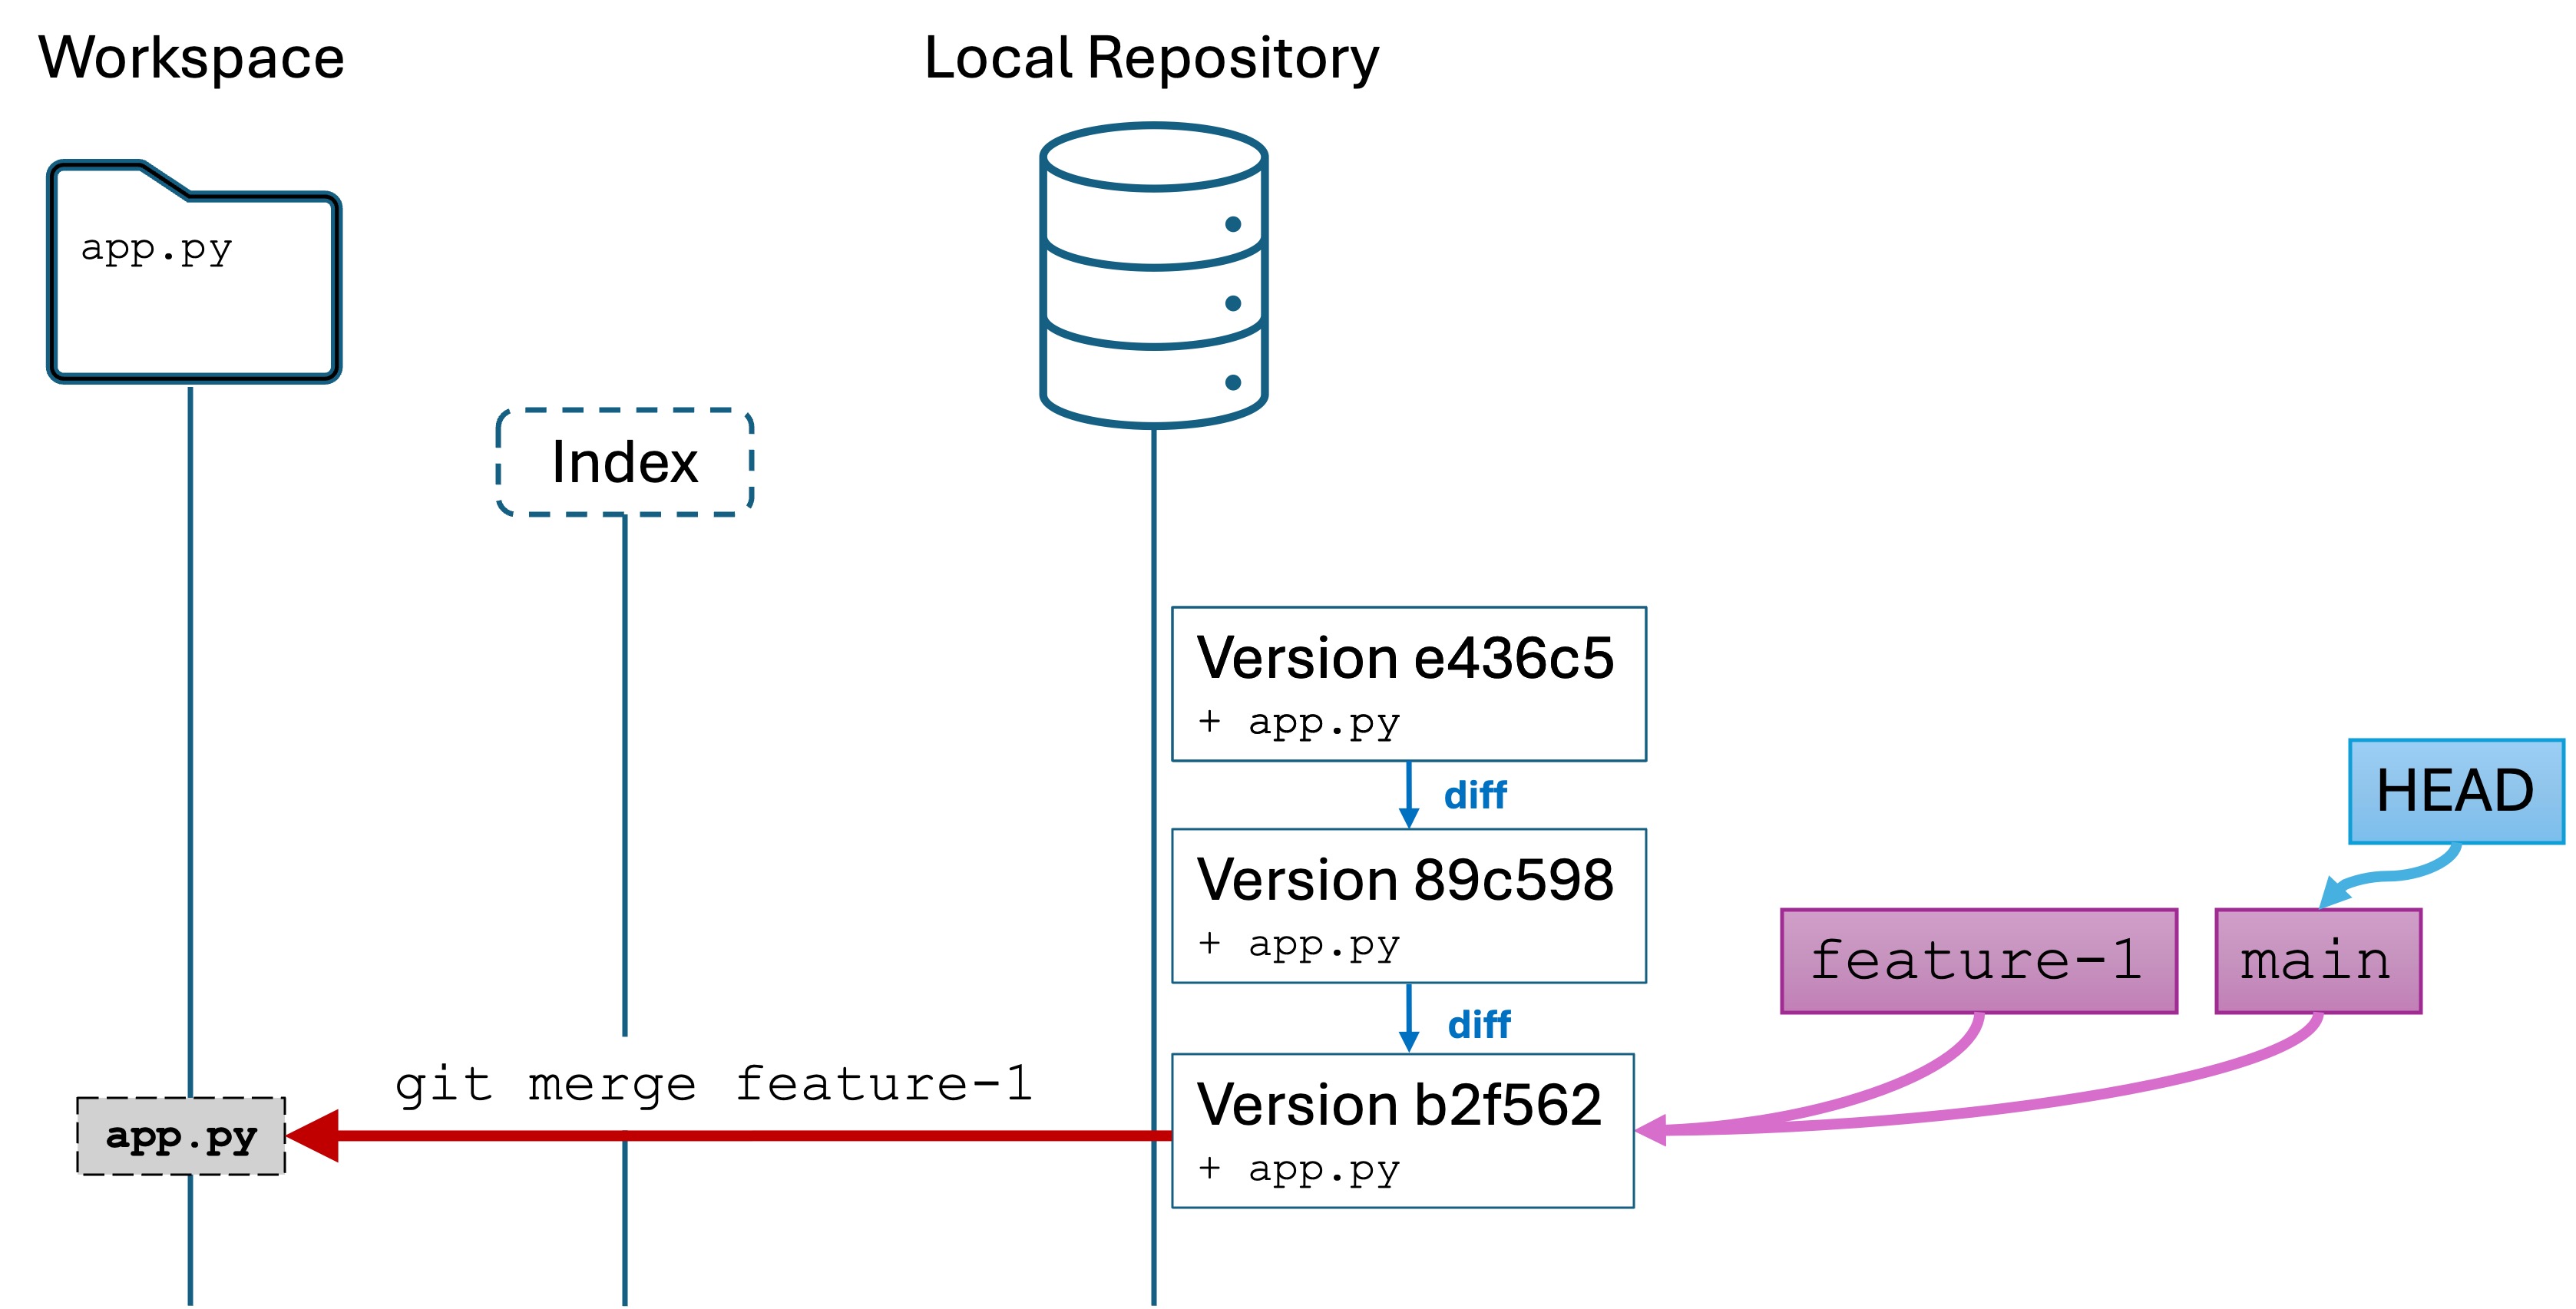
Conceptually, we have created a new version of main that includes all the changes from the feature-1 branch. I say conceptually because have not actually created a new version in the repo, but have updated the main variable to point to the same version as feature-1.
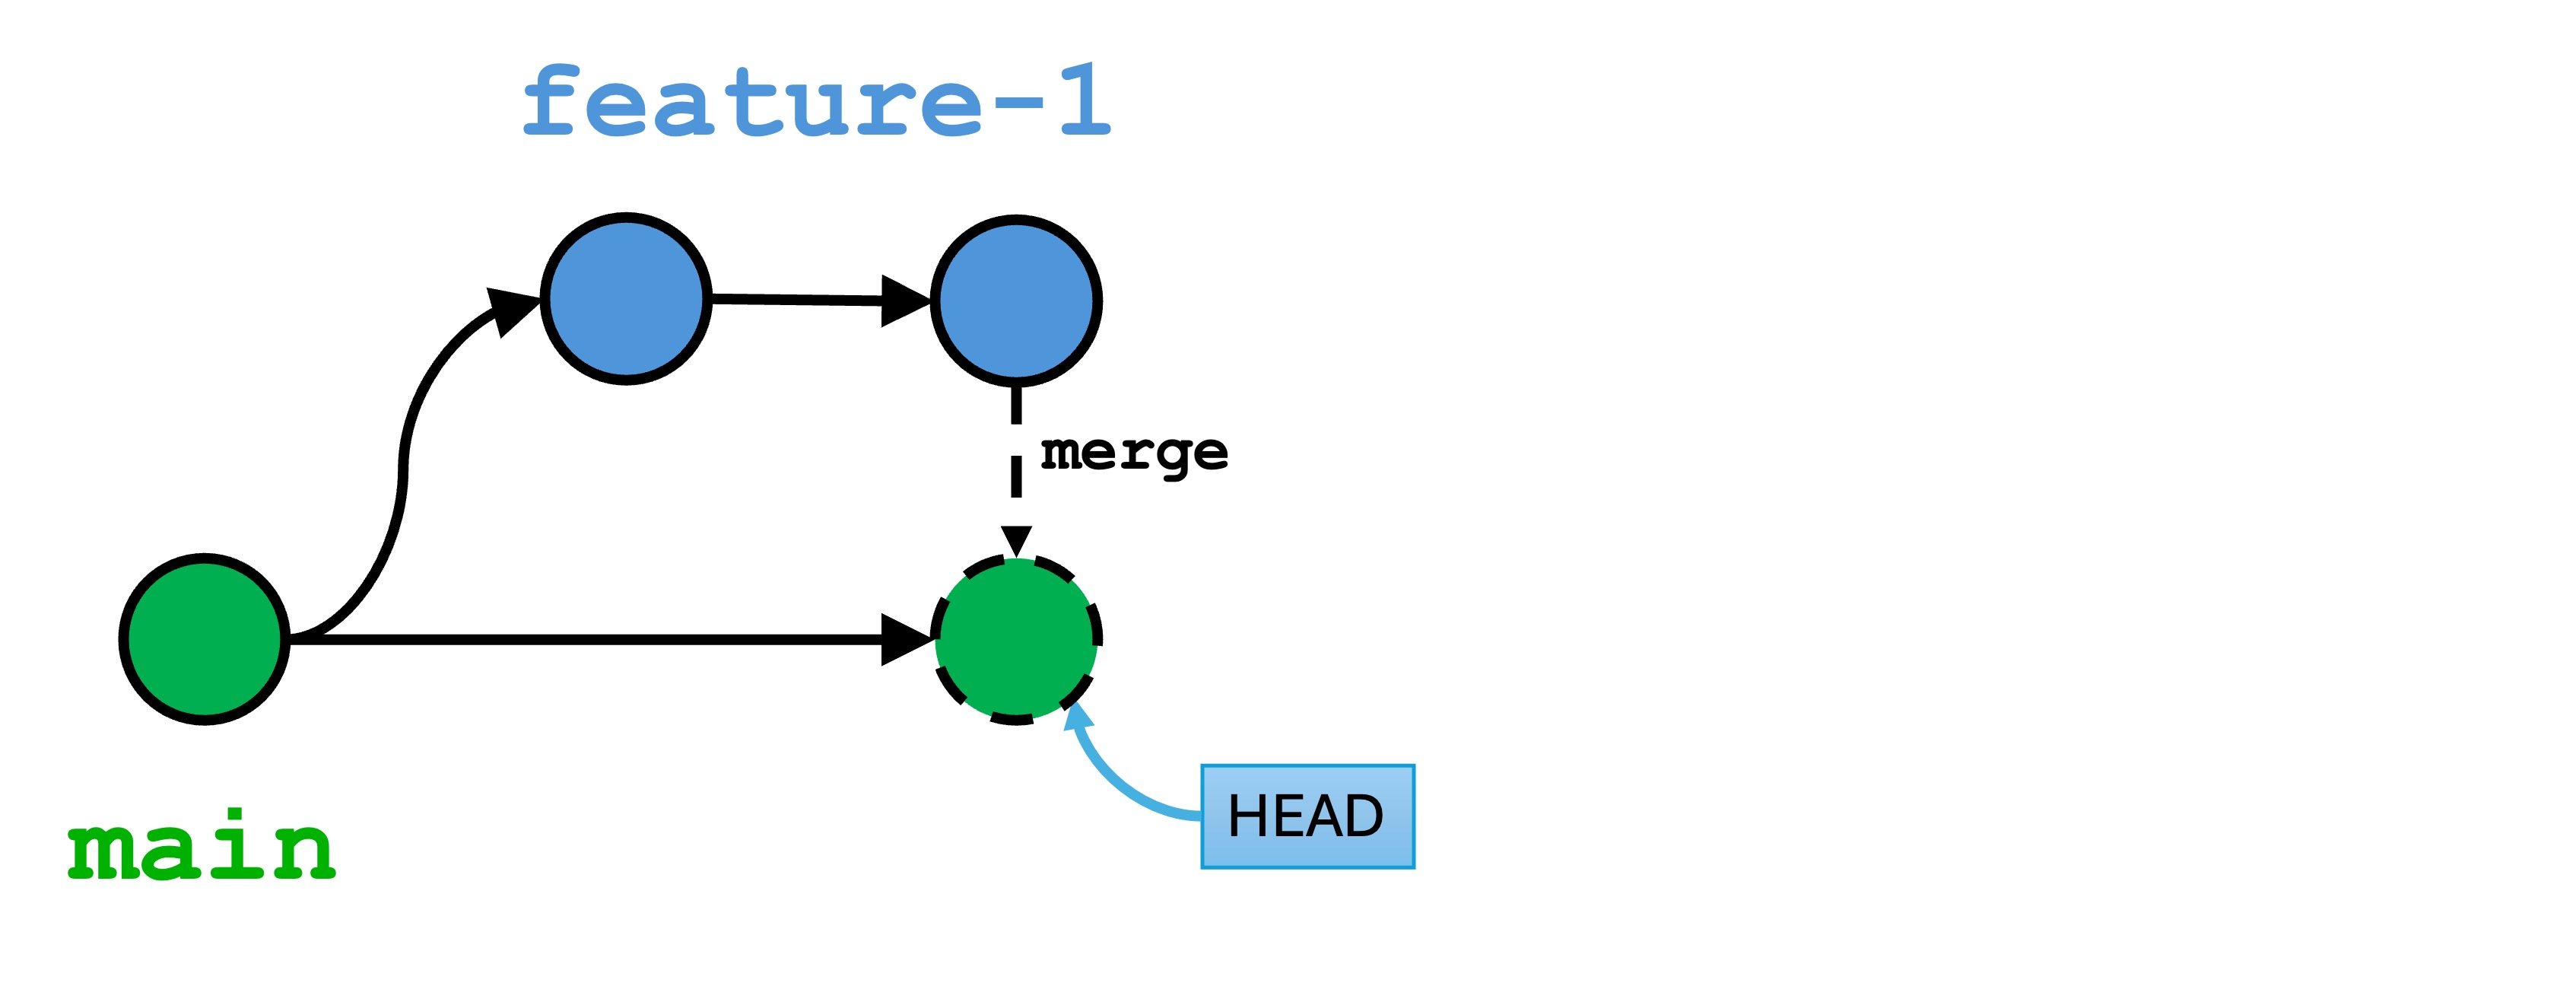
The feature-1 branch is still alive and well, and we can check it out and code against it. How does merging work?
- Find most recent common ancestor: Git first identifies the most recent common ancestor (base commit) of the two branches. This is where both branches diverged from each other. In the illustration, this was the first commit
e436c5. - Analyze changes: Git then looks at the changes that have been made in both branches since that common ancestor.
- Apply Changes:
- If the changes are non-conflicting (meaning they don’t overlap), Git automatically combines them. This is what happened here.
- If there are conflicting changes (meaning the same parts of a file have been modified differently in each branch), Git pauses and marks the conflicts. You’ll need to resolve these conflicts manually before completing the merge.
- (Sometimes) Create a Merge Commit: Once all changes are applied, Git creates a new commit (called a “merge commit”) on the active branch. This merge commit has two parents—one from each branch being merged—and represents the integration of both sets of changes.
- I say “sometimes” because in cases where
mainhas not changed, like in this lab example, a merge commit onmainis not created.mainis simply “fast-forwarded” (that is the actual Git term) to the latest version offeature-1by moving themainpointer. - However, if changes were made to both
mainandfeature-1, we would see a merge commit.
- I say “sometimes” because in cases where
In our case, we had a non-conflicting merge. This is the best case scenario. In a real project involving multiple engineers editing the same parts of code, you will very likely have conflicting changes.
We will discuss handling merge conflicts in the next lab.
Exercise
- Create a new
practicebranch. - Make at least three separate commits to the
practicebranch. Add code of your choosing. It can be trivial or non-trivial. You can modify existing lines or delete then. Follow the rules of good commit behavior:- Commit early and often, but only commit working code. Comment out code that has syntax or semantic errors.
- Write a concise, descriptive commit message.
- Merge the
practiceinto themainbranch. - Make a commit to the
mainbranch. - Merge the
mainbranch into thepracticebranch
Summary and Key Commands
Git enables you to create branches, and switch between them. When you switch branch, Git replaces the contents of your working directory with the most recent version in the branch. The version history of all branches are kept separately in the local repository. This allows you to work on different things in parallel.
- Create a new branch:
git switch -c [name] - Switch between branches:
git switch [name] - Merge
[branch-name]into the active branch:git merge [branch-name]
Knowledge Check
- Question: What is the purpose of branching in Git, and why is it useful?
- Question: What are two ways that you can identify the active branch you are currently working in?
- Question: What is the name of the default branch created when you initialize a new Git repository?
- Question: When you change the code in a branch, is
mainaffected? - Question: Briefly describe what the special
HEADvariable in Git refers to. - Question: Suppose you make have three branches:
main,dev, andrelease. Fill in the blank: the branch names are __________________ inside Git that point to specific _____________________ in the repository. - Question: When you run
git switch feature-1, you are making the _____________ variable point to the ________________ variable. - Challenge: Create a new Git project, create and switch to a new branch, and modify a file with a new feature. Commit the change to this branch.