Term Project - Milestone 1
Project Milestones
| Due | Title |
|---|---|
| Term Project Description | |
| March 16 | Milestone 1: Prototypes, User Flow Diagram, and Starter Code (this page) |
| March 23 | Milestone 2: Primary and Secondary Display |
| April 6 | Milestone 3: Authentication and Cloud Data |
| April 27 | Milestone 4: Minimum Viable Product |
| May 7 | Final deliverables |
Objectives
- To create prototypes of your application’s screens and a user flow diagram.
- To initialize your GitHub repository with a starter project.
Collaboration
Work with your project partner(s), if any, on this assignment.
Due
Sunday, March 16 @ 11:59pm via GitHub.
Instructions
Part 0: Accept the GitHub Classroom Assignment
- Follow this link to GitHub: https://classroom.github.com/a/u2GKD8cn.
- Select your name from the list.
- The next screen talks about teams:
- If you are working alone, create a team named
proj-<lastname>using your last name, e.g.,proj-jones - If you are working in a pair:
- The first person to sign up should create a team named
proj-<lastname1>-<lastname2>e.g.,proj-smith-jones - The second person to sign up should click “Join” on the appropriate team from the list.
- The first person to sign up should create a team named
- If you are working alone, create a team named
- Click “Accept the assignment” on the next page. Use the URL of your repository to clone it to your computer.
Part 1: Prototyping
First, review the required functionality on the Term Project Description page.
Brainstorm how the screens of your app will look. Focus on user functionality – DO NOT WORRY ABOUT IMPLEMENTATION DETAILS. Sketch how each screen will look, and focus on functionality and not stylistic elements. Think about the following as you are sketching:
- What information should the app provide or display?
- How does the user accomplish their task?
- What feedback does the system provide?
- Your screens have a “Big Action”, view sites, favorite a sit, select a specific site. Think carefully about what happens a) when The Big Action is successful, b) why and when the Big Action could/should fail, c) what happens next after the Big Action.
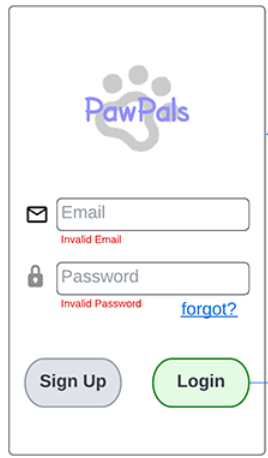
You are not locked in to your design. The important thing is to think about how your app will be organized, and to have good discussions with your partner (if any) about what the app does, not how it will do it or exactly how it will look. An example of a Login screen is below:
Rubric
You will add the items below to Wiki page of your GitHub project. Refer to the basic syntax for formatting a GitHub Wiki page and adding images to a GitHub Wiki page.
- A legible prototype of each screen in your application except the “About” screen.
- For each screen, identify which parts of the interface the user can interact with (i.e., buttons, scrollbars, navbar). You may annotate the image itself or put comments in the Wiki page immediately below the image.
- Your prototypes must, combined, show all of the required functionality in Term Project Description.
Part 2: User Flow Diagram
Show the flow of screens the user sees as they navigate through your app. Draw these on a sheet of paper or use a charting tool.
- Draw a box for each screen in your app and write the screen’s name in or above the box.
- Draw a line between Screens if a user can navigate from one screen to the other in some way.
- Label each line with the action that navigates between the activities, e.g., “Clicks Save”, “Logout Button”, “Create New Button”
You may combine the User Flow Diagrams and Prototypes if using a tool such as Miro or Figma, but you must upload the separate screen prototypes and user flow diagram separately to your Wiki.
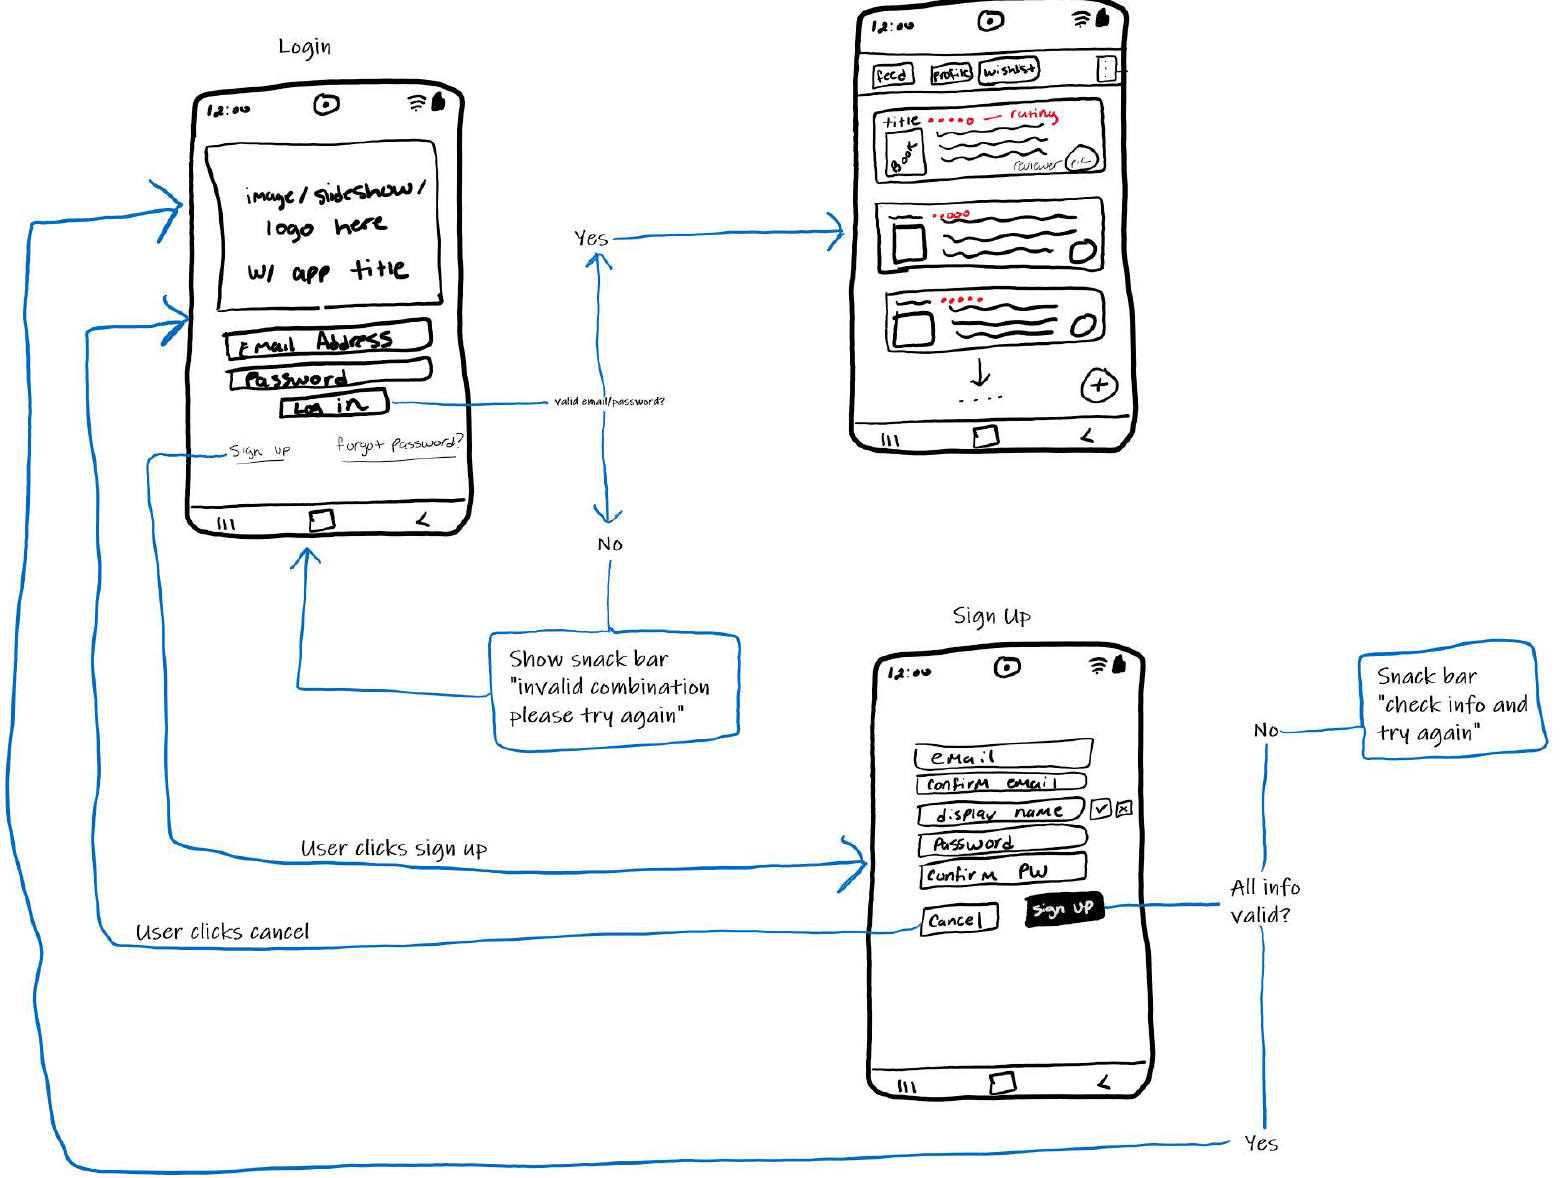
Below is an excerpt of a completed User Flow Diagram:
Rubric
Upload the completed User Flow Diagram to your GitHub Wiki page and ensure it is being displayed on the Wiki.
- All prototype screens are present in the diagram.
- All navigation lines and screens are correctly labeled.
- The user flow diagram must be clear and legible on the Wiki page.
Part 3: Project Starter Code
- Clone the
term-projectcode from Part 0 to your computer. - Create two screens for your app:
- (Partner 1 completes this) the Home/Welcome screen. It must contain an AppBar displaying the title of the app.
- (Partner 2 completes this) An About screen that displays a Text widget with a statement like “This app was created by Partner 1 and Partner 2.”
- (Either partner) Create a Button (or other widget) that navigates from the Home screen to the About screen.
- Commit and Push your content. Ensure that all team members can run the project.
Rubric
- The required elements are present.
- The commit history must show that (a) the individuals completed their assigned screen, and (b) that the changes were submitted using git, not browser upload. A partner who does not fulfill (a) and (b) will receive no credit on the assignment.
Submission
- Parts 1-2 must be displayed on your team’s GitHub wiki page.
- Part 3 must be committed and pushed to the GitHub repo.