Assignment 3 - Stateful Widgets
Due
Sunday, February 16 @ 11:59pm via GitHub
Objectives
- To practice Row and Column layouts
- To gain more experience defining Stateful widgets.
Collaboration
This assignment may be completed in pairs. Both partners receive the same grade. You are assigned to the same teams as Assignment 2. Contact me if you wish to change your team.
Setup
Accept the assignment on GitHub
- Follow this link to GitHub: https://classroom.github.com/a/g1AJ7EbN.
- The next screen talks about teams. Sign up for the same team from ASsignment 2, which includes teams of 1.
- Click “Accept the assignment” on the next page.
- The next page will say “You accepted the assignment…” Click on the link to your team’s assignment repository – bookmark this page. If you are the first person to accept the assignment on your team, you will have to refresh the page a few times before the link appears as GitHub takes a second to create the repository.
Check out the code in VSCode
- In VSCode, go to File Menu -> New Window. You should see an “empty” copy of VSCode pop open.
- Click the Explorer icon on the left.

- Click the Clone Repository button. Paste in the URL of the GitHub repository. Hit Enter. You may need to enter your GitHub email and password.
- A file browser will pop up and ask you where to clone the repositroy on your local machine. Select the folder where you are keeping your Flutter projects.
- VSCode will clone the code from GitHub to your machine. A pop-up will appear asking if you would like to open the cloned repository – click ‘Open’.
- Click on the Explorer Pane icon to see the Flutter project files. Open
lib/main.dart. - A pop-up should prompt you to “Run pub get”. Do this. If no pop-up, open the Command Palette (View -> Command Pallette), and search for and run “pub get”.
- You are now ready to work on the project. You must follow the GitHub workflow when working on this assignment. It is extremely important if you work on a team or if you use multiple computers.
Instructions
You have a skeleton of a Flutter app already provided for you.
There is a PlaceHolder widget in each of ScreenOne-ScreenFour. Delete this widget and replace it with the widget(s) that are required to achieve the UIs described below.
- Do not edit the HomeScreen widget.
- You must test your application on a phone (real or emulated).
- Your solutions must follow the additional instructions and constraints described for each Screen to earn full credit.
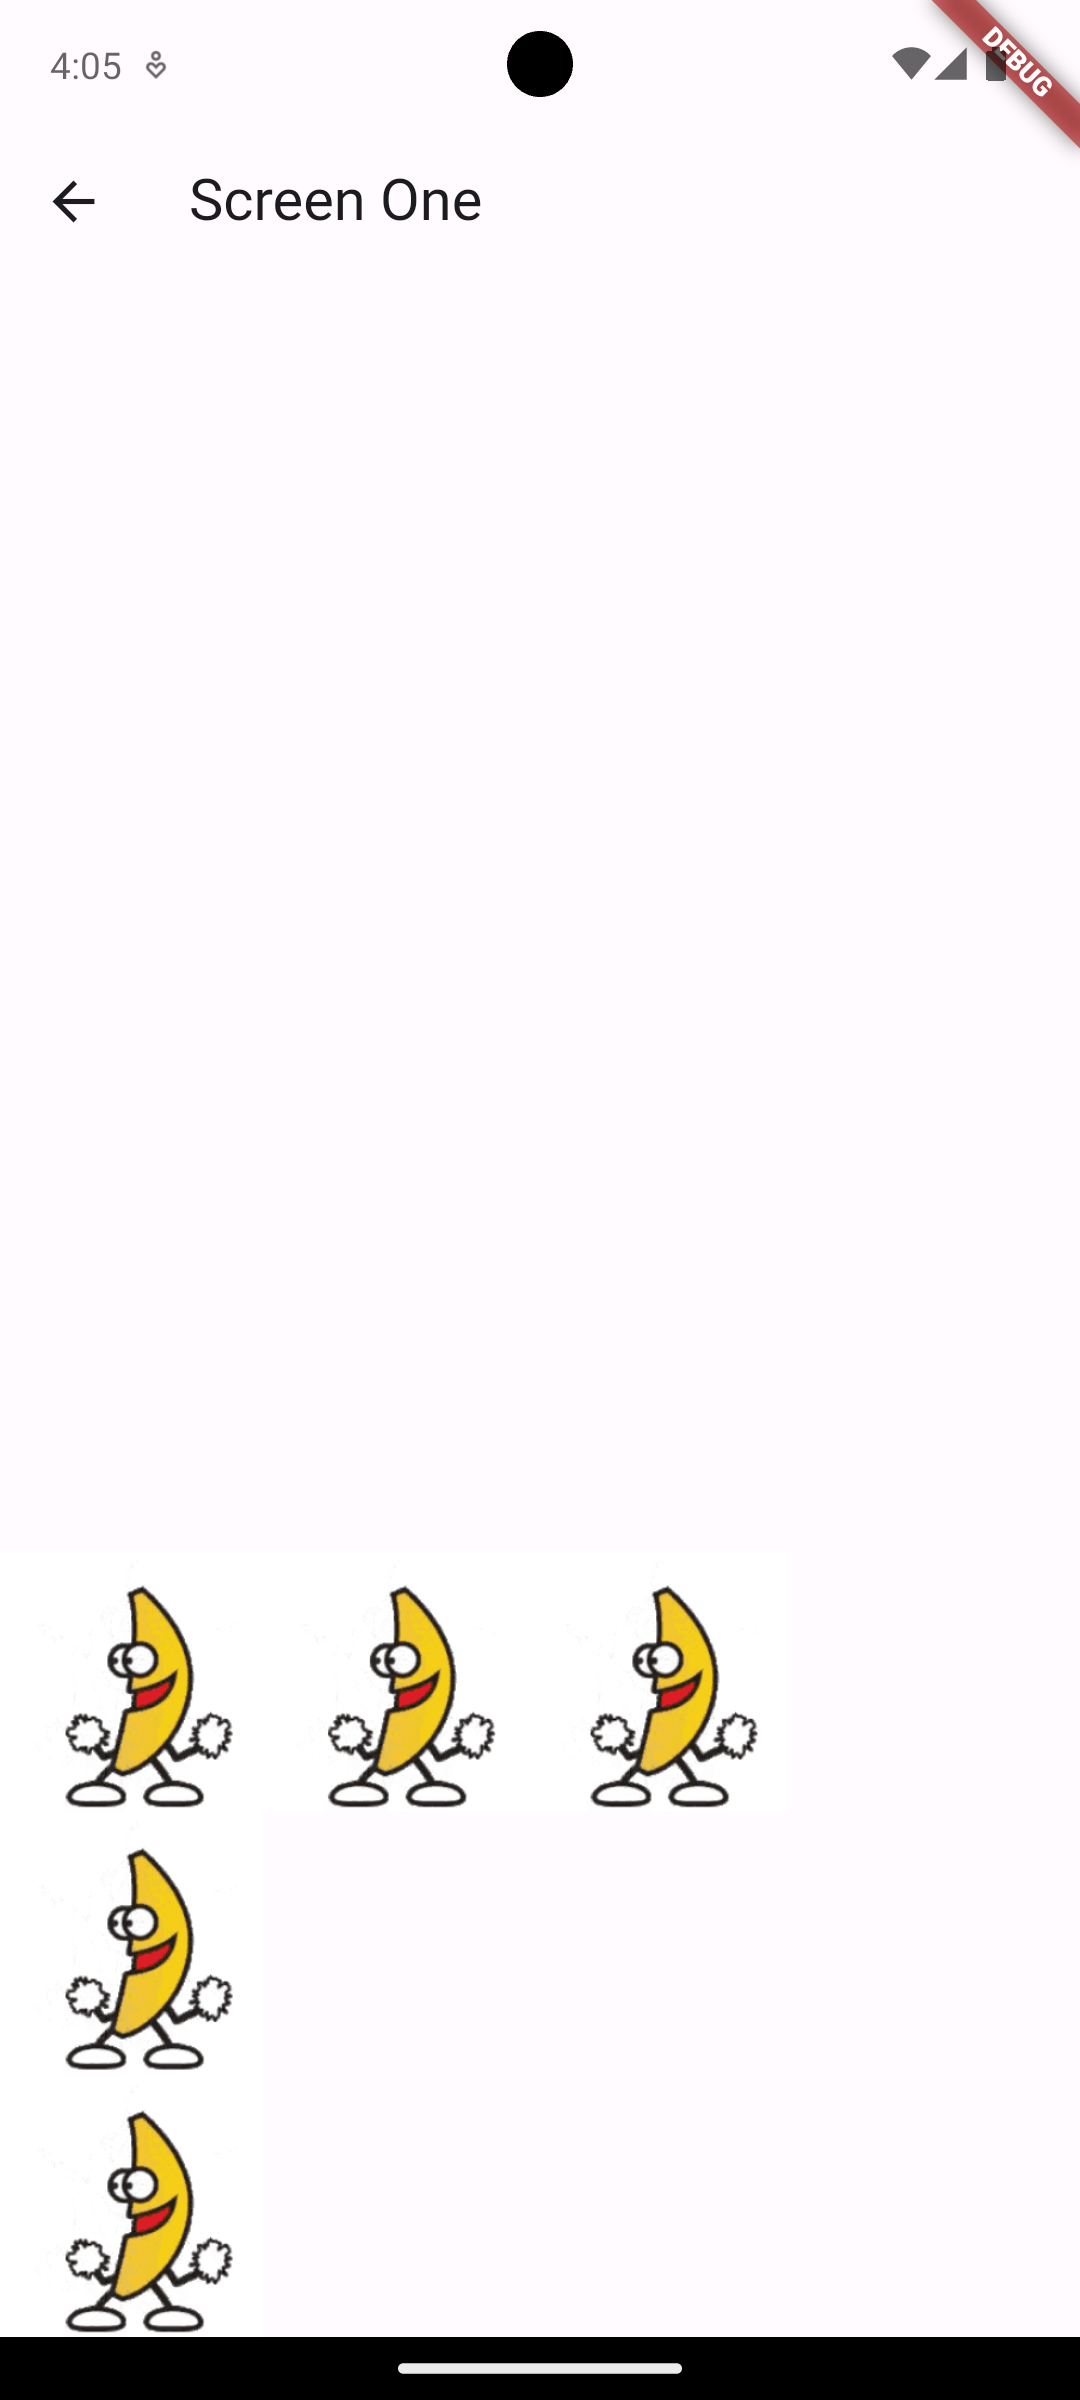
Screen One - Rows and Columns
- Achieve the layout below using only Row, Column, and Image widgets.
- The bananas are as close together as possible.
- The row of bananas is not in the vertical center of the screen, but rather “on top” of the stack of bananas
- There is more than one way to achieve this look.
- The banana is provided in
assets/images/banana.gif. Limit the width of each banana to 100px.
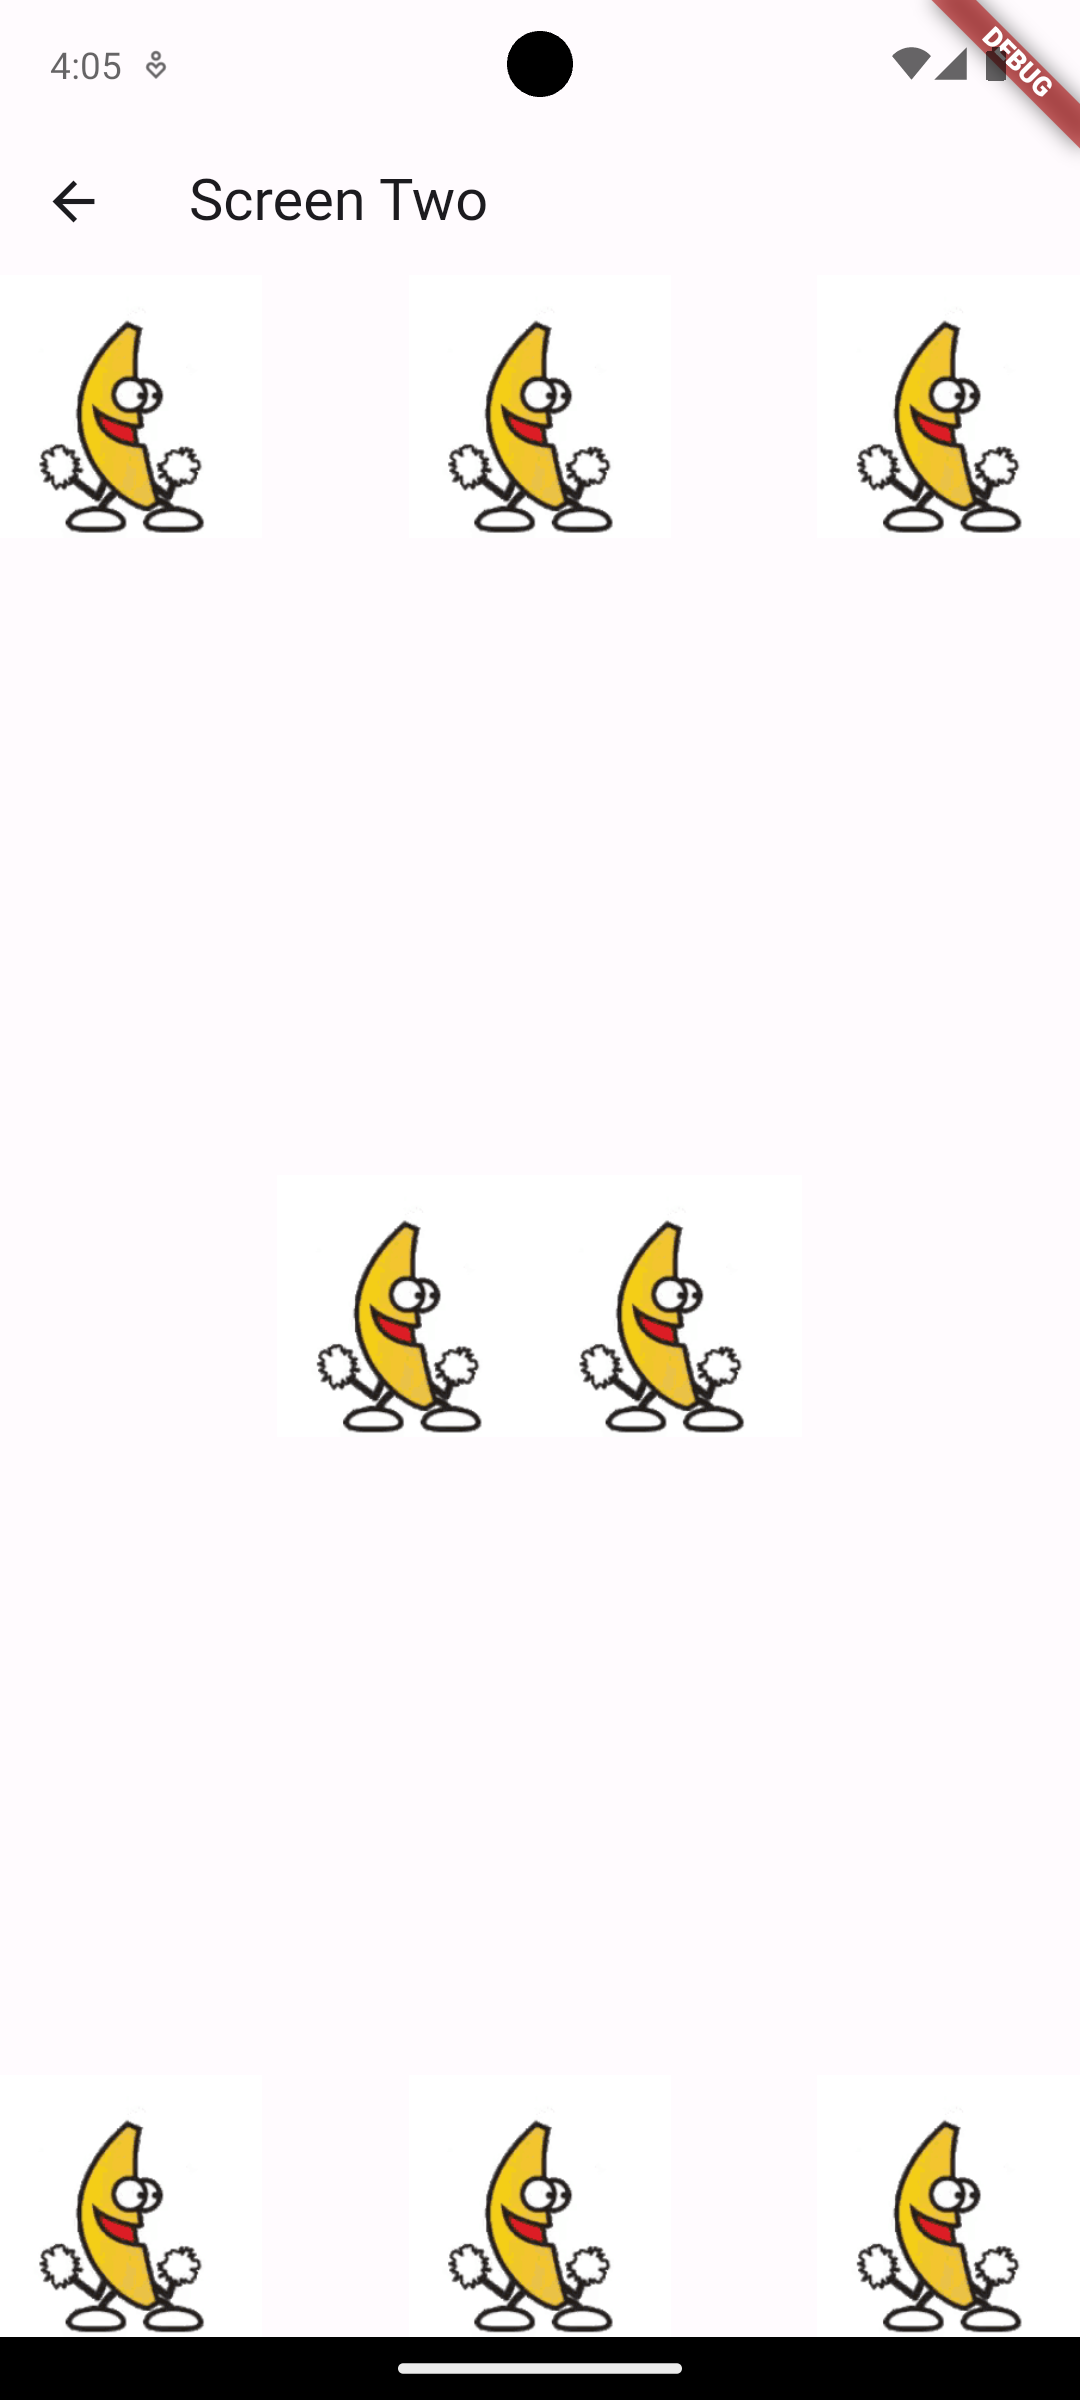
Screen Two - More Rows and Columns
- Achieve the layout below using only Row, Column, and Image widgets.
- The banana is provided in
assets/images/banana.gif. Limit the width of each banana to 100px.
Screen Three - Buttons and States
- Create a custom StatefulWidget that holds all of your needed widgets, and replace the PlaceHolder with your custom widget.
- Reproduce the UI below using ElevatedButtons, Text, and a Column.
- Pressing the “Press Me” button increments the counter, pressing “Reset” resets it to zero.
Screen Four - Image Swapper
You will define a custom widget that swaps between two pictures when the user clicks on the image. The two images in the screen sample below are in the assets/images folder. You may use them or add your own.
- Define your own widget named
ImageSwapperthat extendsStatefulWidget. - Define your
ImageSwapperconstructor to take two required parameters that are of typeStringand store them in class variables.- These String parameters are image files you want to swap between. You may not hard code the asset names into your
ImageSwapperwidget. They must be passed as constructor arguments from theScreenFourwidget (they are hardcoded there). - Your constructor call in the ScreenFour widget should look something like
ImageSwapper(imageOne: "assets/images/astley.webp", imageTwo: "assets/images/banana.gif")
- These String parameters are image files you want to swap between. You may not hard code the asset names into your
- You can achieve this UI using only the Image, GestureDetector, and Center widgets.
- Hint #1: Recall that
Stateclass methods can access their parent widget’s class variables through thewidgetkeyword. - Hint #2: the
buildmethod is like a regular function. It can have more code in it before thereturnstatement. Put code inside thebuildmethod to decide which image to draw.
Extra Credit - Image Swapper Deluxe
- Instead of your ImageSwapper swapping between two images, have it take a non-empty list of filenames and iterate through the list on each click.
- Reaching the end of the list must cycle back to the beginning.
- Your solution must work for any non-empty list of valid filenames; you may not hardcode the length.
- Add more images to the project to demonstrate your solution.
Submission
Commit and push (synchronize) your completed code to GitHub.