Stateful Widgets
- Code along
- Stateless vs. Stateful Widgets
- StatefulWidget example
- Why not make everything a stateful widget?
- Key Takeaways
- Resources:
Code along
Stateless vs. Stateful Widgets
Flutter widgets are one of two types: stateless or stateful. All widget classes in Flutter inherit from either the StatelessWidget or StatefulWidget classes.
A stateless widget is one that does not change after it is first drawn on the screen. It is effectively immutable once rendered. Text, Padding, and BoxDecoration are all examples of stateless widgets. You can configure their style and content in the code, but once they are showing on the screen, they are not able to be changed.
A stateful widget is one that changes due to some user interaction or a data updating behind the scenes, like a private message arriving from the cloud. All StatefulWidgets have an associated State class. The State class is what manages the state, and by “state” we usually mean class variables that get updated in response to a button press or other user input. When creating a StatefulWidget we include code that updates some state (class variables usually), and invoke a specific function called setState() that tells Flutter to re-build the StatefulWidget using the new class data.
Flutter has several built-in stateful widgets. Checkboxes that show a checkmark or not depending on user taps are a simple example. Other built-in StatefulWidgets include radio buttons, sliders, tooltips, and even the base MaterialApp and Scaffold classes.
StatefulWidget example
Let’s build a simple app with a custom StatefulWidget. Suppose you’re working on an app that shows pictures of pets, and you can upvote or downvote that pet. Sounds dumb, but I’ve seen worse.
Creating a new project
Let’s build a new project from scratch.
- Open the VSCode Command Pallete (Control+Shift+P or Command+Shift+P) and do Flutter: New Project. Call the project
rate_my_pet. - Delete everything in
main.dart - Paste in the following:
import 'package:flutter/material.dart';

void main() {
  runApp(MaterialApp(title: "Rate My Pet", home: HomeScreen()));
}
Using VSCode templates for StatelessWidgets
The blueprints for all custom classes that extend StatelessWidget or StatefulWidgets are the same. VSCode can type out the blueprint for you.
- Below your
main()method (which is broken currently), type the charactersstleand you will see a tooltip. Select the “Flutter Stateless Widget” option: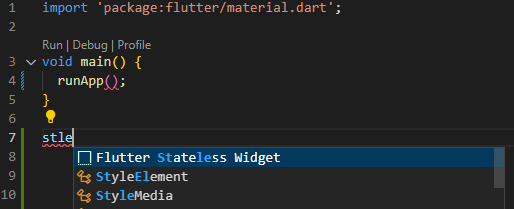
- The widget’s class name will be highlighted. Type
HomeScreenas the class name and VSCode will substitute it. - FYI, you can select any variable, class, or method and hit F2 and VSCode will rename it for you.
- Your code should now look like this:
import 'package:flutter/material.dart';

void main() {
  runApp(MaterialApp(title: "Rate My Pet", home: HomeScreen()));
}

class HomeScreen extends StatelessWidget {
  const HomeScreen({super.key});

  @override
  Widget build(BuildContext context) {
    return Container();
  }
}
Aside: the const constructor
Note the constructor line const HomeScreen({super.key}); You have undoubtedly been getting warnings from VSCode that you should “prefer const with constant constructors”. Here is one such “const constructor”.
What’s the point const? Well, it’s a performance optimization. Building widgets is expensive computationally. The concept of “constants” goes back to the early days of programming languages. Think of them as hard-coded values in your program. The Dart language compiler optimizes how such constants are stored and looked up when the program is actually running. Many of Flutter’s built-in Stateless widgets have const constructors because the const optimization that Dart does really adds up.
We will talk about “keys” in a later lab. For now, just leave the const HomeScreen({super.key}); as it is.
You can make that annoying warning on the runApp() line go away by putting const in front of the MaterialApp() constructor call:
runApp(const MaterialApp(title: "Rate My Pet", home: HomeScreen()));
Finishing the HomeScreen StatelessWidget
Let’s put in the code we need to create a basic app with an appbar. In the app, we’ll show a cute pet and its name. We need to add the pet’s image to our project as described in the Image Assets lab:
- Create the folder
assets/images/in your project’s root directory. - Download pug.jpg and place it in that new folder.
- Edit
pubspec.yamland change theassets:section to the following:# To add assets to your application, add an assets section, like this: assets: - assets/images/pug.jpg # - images/a_dot_ham.jpeg - Use the following code for your
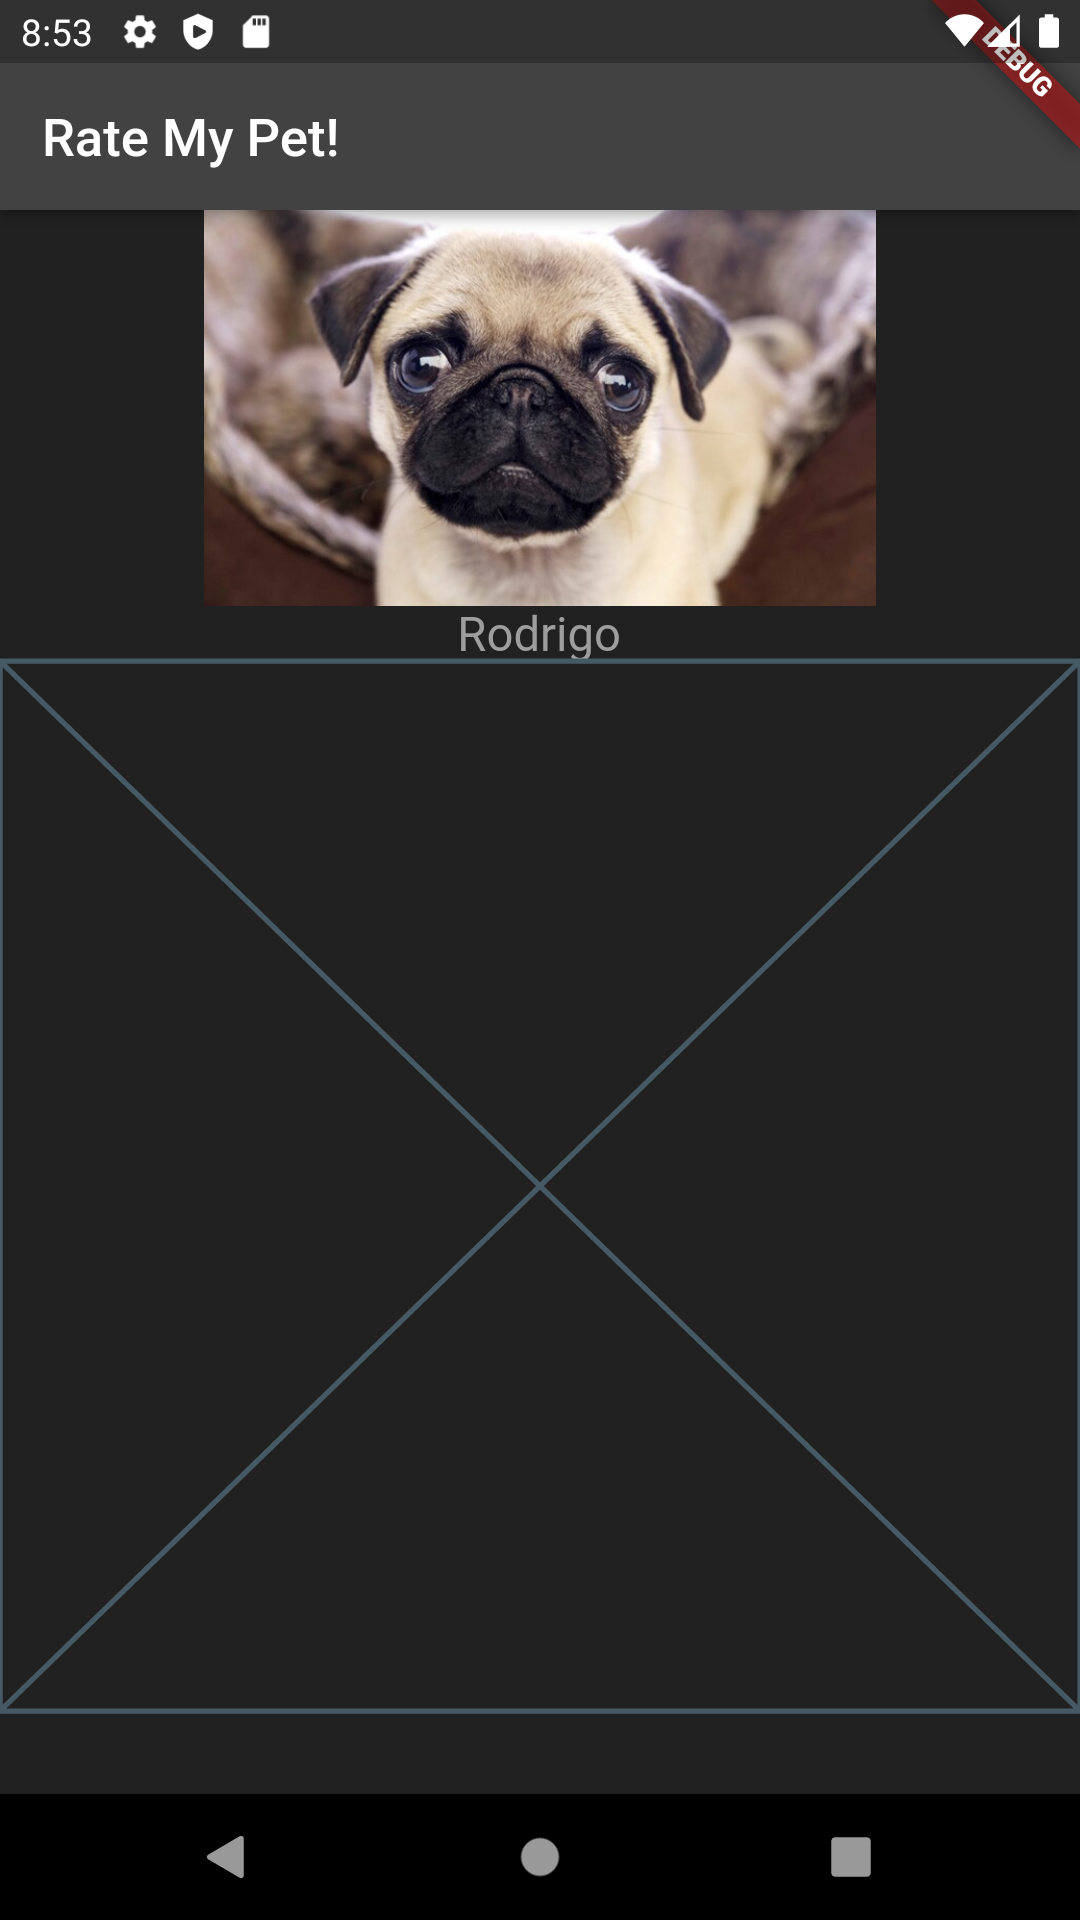
main.dart:import 'package:flutter/material.dart'; void main() { runApp(const MaterialApp(title: "Rate My Pet", home: HomeScreen())); } class HomeScreen extends StatelessWidget { const HomeScreen({super.key}); // This is a "constant" (const) constructor. @override Widget build(BuildContext context) { return Scaffold( appBar: AppBar( title: const Text("Rate My Pet!"), // Using the Text widget's const constructor backgroundColor: Colors.grey[800], foregroundColor: Colors.white, ), backgroundColor: Colors.grey[900], body: Column( children: [ Image.asset("assets/images/pug.jpg", width: 256), Text( "Rodrigo", style: TextStyle(color: Colors.grey[500], fontSize: 18), ), const Placeholder(), //This draws an x on the screen to indicate I plan to put something there. ], )); } }
Important Note: The pattern above is very common in Flutter. A MaterialApp widget is provided to runApp(), and this one MaterialApp widget is the framework on which all other widgets are built. We define a separate widget to function as the “home screen”. It will be extremely useful to encapsulate each logical “screen” in your app into its own widget, i.e., home screen, login screen, profile screen, etc. Doing so will make navigating between screens easy. We will cover multi-screen apps and navigation between screens very soon.
Your screen should look like this:
Adding a Stateful widget and it’s State class
We will add some buttons to let the user upvote or downvote our pet and show the current vote tally every time a button is pressed. To do this, we will create our own Stateful widget composed of built-in widgets.
- Go a few lines below the closing/ending curly brace of
HomeScreenand typestf. You will get a tooltip with a template “Flutter Stateful Widget”. Select that.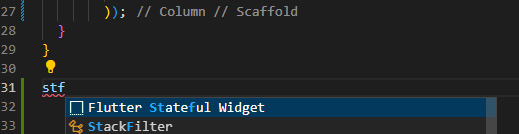
- The new widget’s class name will be selected. Change it to
VotingWidget. - You should see that two new classes have been created: one that extends
StatefulWidgetand one that extendsState<VotingWidget>.
You may be asking “Why are there two classes instead of one like with StatelessWidgets?” If you’re not asking that, skip to the next paragraph. The short answer is that all Widgets in Flutter are immutable by design. The immutability helps the building/rendering of widgets into elements on the screen to be as fast as possible. However, the whole point of StatefulWidgets is to be able to change their contents, i.e., to be mutable. But that’s not in the cards. So, the build() method of the Stateful widgets is extracted into the State class, which is where we will do the work of specifying what the widget looks like.
Important notes on the Stateful widget and it’s State class
VotingWidgetoverrides thecreateState()method, and all that does is return a new_VotingWidgetState.- We don’t need to modify the
VotingWidgetitself; we will do all the work in the_VotingWidgetStateclass. - The
build()method of the_VotingWidgetStatestate class is where you compose the widgets to display. - You can define additional parameters in
VotingWidgetconstructor like can for Stateless widgets. This allows you to pass additional arguments to the widget. - Any class variables of the StatefulWidget are accessible by using the special
widgetvariable in the State class. - Defining a new stateful widget type always entails creating a class
X extends StatefulWidgetand a classY extends State<X>.- The names of
XandYare up to you, but the convention is what we have in the screenshot. Xmust overridecreateState()Ymust overridebuild()
- The names of
Adding buttons and a counter
Okay, finally time to build our widget.
- First, change the
const Placeholder()line in your HomeScreen widget’sbuild()method toconst VotingWidget()so we’re actually drawing our new Stateful widget on the screen. You won’t see anything other than the dog and its name for now. -
Paste or type in the following code for your
_VotingWidgetState:class _VotingWidgetState extends State<VotingWidget> { int count = 0; // build() methods must return some sort of Widget. // That widget can be composed of many children. @override Widget build(BuildContext context) { // We return a Row. The Row has three children: the minus button, the count, and the plus button return Row(mainAxisAlignment: MainAxisAlignment.center, children: [ IconButton( icon: const Icon(Icons.remove_circle), // minus sign icon iconSize: 30, color: Colors.amber, onPressed: () {}, // work to do here ), Text( "$count", style: const TextStyle(color: Colors.amber, fontSize: 18), ), IconButton( icon: const Icon(Icons.add_circle), //plus sign icon iconSize: 30, color: Colors.amber, onPressed: () {}, // work to do here ) ]); } }
Run your app. You should see the following:
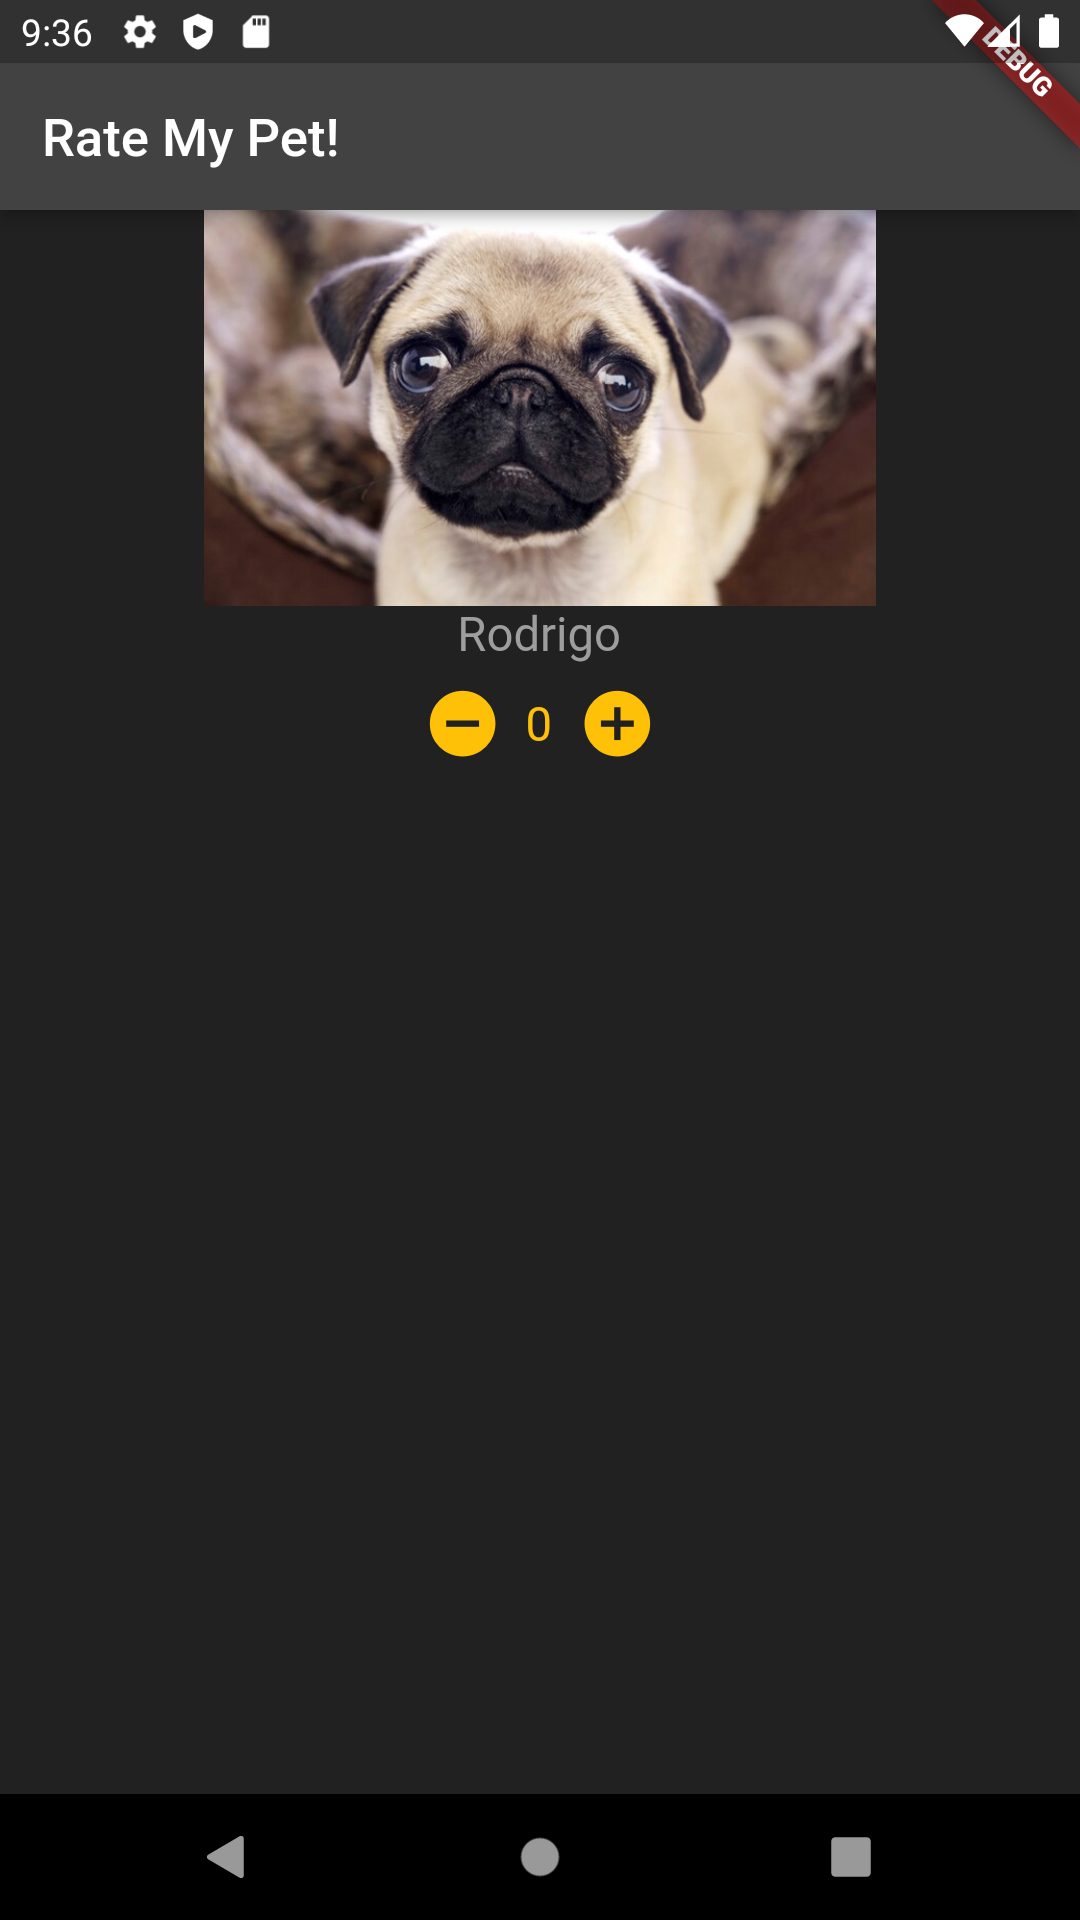
Let’s explain this:
- We will use variable
int count = 0;in the_VotingWidgetStateclass to track the number of votes for the dog. This is the “state” that we care about. There is nothing special about this variable other than its value is used when ourTextwidget is rendered. You can have more than one state variable. - The
Rowwidget is what the method returns. The Row widget is composed of three children. - The minus button and the plus button are IconButtons. Right now, they don’t do anything other than look nice.
- The
Textwidget displays the value of thecountclass variable (the state).countis initialized to 0 so that is what you see. This is a key element of a StatefulWidget – some part of the widgets in the thebuildmethod must depend on the value(s) of the class variable(s).
Pressing the - or + buttons currently does not do anything. We are not updating the state. We need to write logic for that.
Updating the state and the widget on button press
The IconButton constructor has a parameter called onPressed. This parameter takes as its value a function (yes, you can pass functions as values in Dart) that will execute when the user presses the button.
If the concept of passing a function as an argument hurts your brain, you’re not alone. Think of it as passing a sheet of paper with a set of instructions on it. You’re telling the button “perform these instructions when you get pressed”. Once you can get comfortable with that concept, you have taken a huge leap is a programmer. But don’t stress about it – you’ve got time.
Right now, our IconButtons have an argument that looks like onPressed: () {},. The () is where function parameters would go, and the {} are where the function body goes. The functions you pass to onPressed have no parameters, hence the empty (). Dart still needs the empty () to know that you are passing a function. Inside the {} is where we write the code that updates the state and tells Flutter to redraw the widget.
Replace your _VotingWidgetState class to the following:
class _VotingWidgetState extends State<VotingWidget> {
  int count = 0;
  // build() methods must return some sort of Widget.
  // That widget can be composed of many children.
  @override
  Widget build(BuildContext context) {
    // We return a Row. The Row has three children: the minus button, the count, and the plus button
    return Row(mainAxisAlignment: MainAxisAlignment.center, children: [
      IconButton(
        icon: const Icon(Icons.remove_circle), // minus sign icon
        iconSize: 30,
        color: Colors.amber,
        onPressed: () {
          setState(() {
            count--;
          });
        }, // work to do here
      ),
      Text(
        "$count",
        style: const TextStyle(color: Colors.amber, fontSize: 18),
      ),
      IconButton(
        icon: const Icon(Icons.add_circle), // plus sign icon
        iconSize: 30,
        color: Colors.amber,
        onPressed: () {
          setState(() {
            count++;
          });
        }, // work to do here
      )
    ]);
  }
}
The only things we have changed are that we now specify two anonymous functions that are passed to the onPressed: parameter of the IconButtons. They are anonymous functions because they don’t have a name – only code. The code we pass will only be executed when the button is pressed.
Again, think of the anonymous function as a recipe to be executed when the button is pressed. What does this recipe say to do? It says “call this other function setState(), which takes as a parameter yet another anonymous function that changes the count variable. Ugh. Thanks Flutter.
setState() is the other key element of a stateful widget. This method is inherited from the StatefulWidget class and tells Flutter to re-draw the widget. Re-drawing means that build is called again. Because the Text widget uses the current value of count, the re-drawn Text widget will contain the updated count value. The count++; and count--; statements increment and decrement the count variable respectively. These statements appear inside the anonymous function that is the parameter to setState(). This is Flutter’s convention - put the code that actually changes the state in this call. Why does this look so horrible? Because the Flutter devs hate you probably… But, if you can keep your parentheses and curly braces straight, you’ll get the hang of it eventually.
And now the fun part! Click the buttons! If everything is done properly, you should see the counter change on the screen when you press the buttons. There is a logical flaw in the implementation in that the counter can go below 0, and it is left as an excercise to the reader to fix that flaw by writing a simple if-statement to not decrement below 0. Or don’t fix it – maybe you really hate Rodrigo.
Why not make everything a stateful widget?
The main reason is performance. Asking a widget to create an element, and then to actually draw the pixels on the screen is much more computationally expensive than your typical code. Flutter can optimize around the fact that Stateless widgets won’t change once on the screen. With a Stateful widget, Flutter may have to redraw that widget and all its children multiple times.
Key Takeaways
- Defining a new stateful widget type always entails creating a class
X extends StatefulWidgetand a classY extends State<X>.- The names of
XandYare up to you, but the convention is what we have in the screenshot. Xmust overridecreateState()Ymust overridebuild()
- The names of
- Your StatefulWidget class (X) must override the
createState()method, and all that method should do is return a new State class (Y). - The
build()method of the State class (Y) is where you compose the widgets to display. - The State class (Y) must have one or more class variables that get updated in response to user interaction. These class variables are the eponymous “State”.
- the
build()method of the State class (Y) somehow uses the state class variables in its widgets. - some code, like the onPressed function of the IconButton, must call
setState()to update the state class variable(s) and trigger Flutter to re-draw the widget.setState()is inherited by the state class – you do not define it. - Here is the completed main.dart code. You also need to add the picture and set up image assets as described above.
Resources:
- Flutter Official Video - How Stateful Widgets are Used Best