Firebase - Per App Configuration
- Objectives
- Prerequisites
- Boilerplate
- First, create a new project using the Firebase Console
- Second, run flutterfire configure
- Third, add Firebase libraries to the app
- Final Reminder
Objectives
- To configure Firebase for use in an app
Prerequisites
You must complete the Firebase Tool Installation on your machine before this step. The Firebase tools only need to be installed and configured once per computer you use.
Boilerplate
Create a new project called flutter_firebase_example and paste the following into main.dart:
import 'package:flutter/material.dart';

void main() {
  runApp(const MaterialApp(title: "Firebase Example", home: HomeScreen()));
}

class HomeScreen extends StatelessWidget {
  const HomeScreen({super.key});

  @override
  Widget build(BuildContext context) {
    return const Placeholder();
  }
}
First, create a new project using the Firebase Console
Apps must be individually configured to use Firebase. That means that each app you create (say, the example app and your term project), you must go through these steps.
- Go to https://console.firebase.google.com and select the option to Create a New Project
- Give your project a name and accept all the Terms if needed. Note the name you chose.
- Use the default project settings.
- Firebase will show a loading screen when you are finished. The project will take a few seconds to create.
Second, run flutterfire configure
- Using the Terminal in Visual Studio Code, run the command
flutterfire configure.- Note: You can also use your system Terminal/Command Prompt, but you will need to
cdinto the project directory before running any commands. - Mac troubleshooting: IF you encounter an exception with “in ‘require’: cannot load such file – xcodeproj (LoadError)”, run the command
sudo gem install xcodeprojfrom the command line. Enter your login password when prompted.
- Note: You can also use your system Terminal/Command Prompt, but you will need to
- If at any point you mess up, hit Control+C to cancel.
- Use the arrow keys to select the name of hte project you just created; the greater-than sign indicates your current selection.
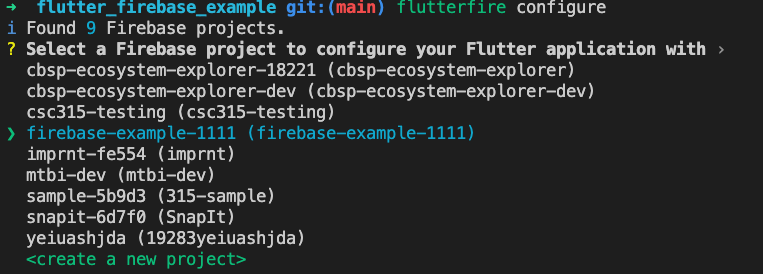
- Hit Enter at the next prompt to accept the default platforms to support.

- It will take a while to process. When it is finished, you will see something like the following:
 Firebase configuration file lib/firebase_options.dart generated successfully with the following Firebase apps:

 Platform  Firebase App Id
 web       1:217651222249:web:ec62325ac557c30af5c278
 android   1:217651222249:android:798c3ae32d2ef648f5c278
 ios       1:217651222249:ios:3aa01e44fdb04f04f5c278
 macos     1:217651222249:ios:3aa01e44fdb04f04f5c278

 Learn more about using this file and next steps from the documentation:
 > https://firebase.google.com/docs/flutter/setup
These steps created a new Firebase project in the cloud for your app to use, and then configured your source code to talk to the cloud. The Firebase CLI created a configuration file named firebase_options.dart in the lib/ directory and changed content in your native folders.
In your browser, go to https://console.firebase.google.com and select the project you created. You will see a dashboard with a lot of content. At the top of the dashboard you should see several “apps” – these are your Flutter app, one for each platform in your project (android, ios, macos, web, windows).

Remember, Flutter’s cross-platform framework translates your Dart code into native code that is unique to each platform. From the Firebase cloud’s perspective, each native application is a separate entity. So, each separate platform app has been added to the Firebase project to give them permission to use your Firebase project.
Third, add Firebase libraries to the app
Next, we need to add Firebase libraries to our Flutter project that will let us write Dart code to communicate with our Firebase project in the cloud.
- Using the Terminal in Visual Studio Code, open the integrated Terminal window and run
flutter pub add firebase_core. This adds firebase dependencies to yourpubspec.ymlfile. - In
main.dart, add the following imports to the top:import 'package:firebase_core/firebase_core.dart'; import 'firebase_options.dart'; - In
main.dart, change the main() function to the following:void main() async { runApp(const MaterialApp(title: "Firebase Example", home: HomeScreen())); await Firebase.initializeApp( options: DefaultFirebaseOptions.currentPlatform, ); }
The extra code in main() essentially tells your app to read that firebase_options.dart file so that the Firebase Dart libraries know how to communicate with your Firebase project.
Our app is now ready and able to talk to Firebase. We are now ready to add individual Firebase capabilities to the app. We will start with Firebase Authentication.
Final Reminder
You need to do this setup for each project where you use Firebase.