Firebase - Authentication
- Objectives
- Prerequisites
- Introduction
- Enabling Firebase Authentication services for a project
- Add the Firebase Authentication libraries to your project
- Adding a Login Screen
- Important concept: asynchronous calls
- Calling FirebaseAuth to log in asynchronously
- Add a user via Firebase Console
- Get information about the current user
- Logging out
- Completed code
- Creating a Signup Screen
Objectives
- To add Firebase Authentication services to an existing app
- To create a simple login page
Prerequisites
You must complete the Firebase Tool Installation and Firebase App Configuration.
Introduction
Authentication is the act of verifying a user’s identity. The most common mechanism for doing so in software is an identifier (like a username or email) and a password.
Firebase Authentication is a web service that handles requests to sign up new users with an email and password, check login credentials, or do the “Login with XService” functionality for you. This is immensely useful because secure authentication logic can be challenging and requires setting up a database to track the user information. Firebase Authentication does that for you.
In Flutter, you interact with Firebase Authentication by using a Dart class. You don’t have to worry about the particulars of network transmissions or storing data in a database. However, you do have to handle errors, such as incorrect username and password combinations.
The basic email + password authentication combo is sufficient for your Term Project.
Enabling Firebase Authentication services for a project
We must first add Firebase Authentication to our project and configure it for use before we write any code that leverages this service.
- Go to https://console.firebase.google.com and login if needed.
- Select the Firebase project you want to use.
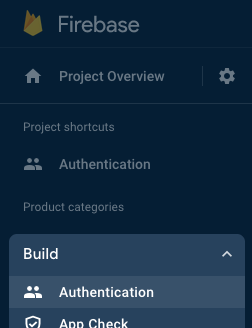
- You will see the Firebase project home screen. Click the big Authentication card, or select the “Build” menu from the left and then Authentication.
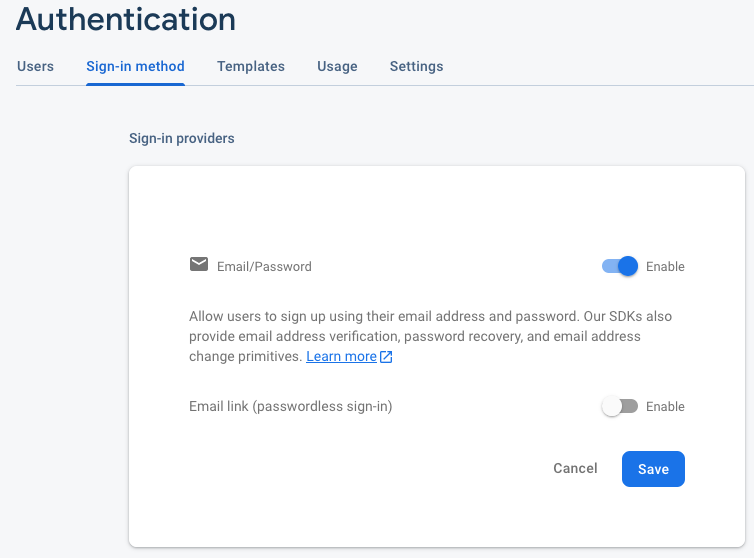
- Click the “Get started” button near the top of the Authentication screen.
- Click the “Email/Password” button.
- Toggle the “Enable” button on the Email/Password line. Click Save.
Your Firebase project now supports basic Email/Password signup and login. Your Firebase project will handle the creation and tracking of individual users in your system, which is an essential first step to keeping tracking of user’s data, like favorites, high scores, messages, etc.
Next, we need to use this service in our Flutter app.
Add the Firebase Authentication libraries to your project
- Go to the Visual Studio Code integrated Terminal.
- Run
flutter pub add firebase_auth - Run
flutterfire configure. You will be prompted to overwrite the config files. The Flutter team recommends that you runflutterfire configureevery time that you add a firebase library to your project.
These steps add the necessary Dart libraries that provide a FirebaseAuth class that allow us to communicate with Firebase Authentication with convenient methods like loginWithEmailAndPassword() and signUpWithEmailAndPassword(). The libraries also exposes a User object that allows us to easily reference our app’s unique users.
Adding a Login Screen
We will create a login screen that uses Email+Password authentication. We can use a Flutter Form to create the textinput fields and do some validation for us. You can learn more about Forms in the (Optional) Forms lab.
Paste the following code into main.dart:
class LoginScreen extends StatefulWidget {
const LoginScreen({super.key});
@override
State<LoginScreen> createState() => _LoginScreenState();
}
class _LoginScreenState extends State<LoginScreen> {
String? email;
String? password;
String? error;
final _formKey = GlobalKey<FormState>();
@override
Widget build(BuildContext context) {
return Scaffold(
body: Padding(
padding: const EdgeInsets.all(16),
child: Form(
key: _formKey,
child: Column(
mainAxisAlignment: MainAxisAlignment.center,
children: [
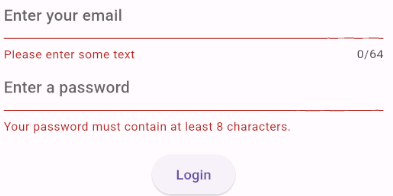
TextFormField(
decoration:
const InputDecoration(hintText: 'Enter your email'),
maxLength: 64,
onChanged: (value) => email = value,
validator: (value) {
if (value == null || value.isEmpty) {
return 'Please enter some text';
}
return null; // Returning null means "no issues"
}),
TextFormField(
decoration:
const InputDecoration(hintText: "Enter a password"),
obscureText: true,
onChanged: (value) => password = value,
validator: (value) {
if (value == null || value.length < 8) {
return 'Your password must contain at least 8 characters.';
}
return null; // Returning null means "no issues"
}),
const SizedBox(height: 16),
ElevatedButton(
child: const Text('Login'),
onPressed: () {
if (_formKey.currentState!.validate()) {
// TODO: Everything is valid. Try to login using Firebase Authentication.
}
}),
if (error != null)
Text(
"Error: $error",
style: TextStyle(color: Colors.red[800], fontSize: 12),
)
],
),
),
),
);
}
}
Now, change the main() method to load the LoginScreen when the app starts rather than the HomeScreen:
import 'package:firebase_core/firebase_core.dart';
import 'package:flutter/material.dart';

import 'firebase_options.dart';

void main() async {
  WidgetsFlutterBinding.ensureInitialized();
  await Firebase.initializeApp(options: DefaultFirebaseOptions.currentPlatform);
  runApp(const MaterialApp(title: "Firebase Example", home: HomeScreen()));
}
This is a lot of code, to set up the Form:
- There is a Scaffold but no AppBar. We don’t need app bar navigation or other actions.
- There are two TextFormFields: one for email and one for password. Each field has a simple validator.
- There is a Login button that checks the form for validation errors.
- The Login button currently does not try to contact Firebase Authentication. We will do that in a second.
Note the error state variable that holds a String, and a corresponding Text widget below the Login button to display this variable. We will need this to handle issues where authentication fails, such as when the user enters an email that doesn’t exist in the system, or the email and password entered do not match.
Important concept: asynchronous calls
Flutter supports the concept of asynchronous calls, and many Firebase library methods are asynchronous, so we need to introduce that concept.
Programming languages like Dart, Python, and Java all provide support for synchronous and asynchronous execution. Synchronous execution is what you are used to. Your Dart/Python/Java program runs in a process managed by the operating system, and that process has a single thread of execution. Execution proceeds from start to finish. The single thread is typically called the main thread. Think of a thread as a block of code instructions that execute together. Again, probably every program you have every written is single-threaded, meaning it only has a main thread.
Asynchronous execution is when your program has multiple threads. You still write one batch of source code, but the code contains instructions that spawn additional threads. Why would you do this? Well, some code can take a long time to execute. For instance, reading data from a file or communicating over a network takes a comparatively long time (hundreds of milliseconds or longer) compared to simple instructions like if-checks or appending to a list (microseconds).
There are occasions where you would like those long-running instructions to take place in the background and not interrupt other logic. For example, the code that displays your app’s GUI runs on your app’s main thread. As a user, we expect that GUI interactions are very fast, and that key presses, button presses, and the like update the GUI instantly. Imagine your app displays images from the internet (say Instagram), and some of these images are many megabytes in size. Downloading 100MB of image files will take at least a few seconds on a mobile phone.
If your source code had the image downloading logic on the main thread, where the GUI also runs, what would the user experience? The GUI would freeze while the code performing the image download completes. This is bad. No one likes a frozen screen.
So what do you do? Use asynchronous execution to put that image-downloading code in a background thread. The background thread is managed separately by the operating system, it does it’s own thing and, most importantly, does not block the execution of the main thread. The background thread will then often notify the main thread when it has finished executing, and often provides some data back to the main thread to use, e.g., a list of image files that have been downloaded to disk. The main thread handles the notification and can update the GUI seamlessly, e.g., by drawing all the Image widgets to display the pictures.
Dart has built-in support for asynchronous calls. The key Dart concepts for asynchronous calls are:
- the
asynckeyword - this keyword goes at the end of a method signature to indicate that a function can be executed asynchronously. - the
awaitkeyword - goes in the program code to tell Dart to “await” for anasyncfunction to return a result. - the
Future<T>class - a Future is a data type that represents a value that will be available when anasyncfunction finishes running.
We will use these concepts in many upcoming labs.
Calling FirebaseAuth to log in asynchronously
The Firebase Authentication Dart library uses asynchronous calls to perform login, signup, and other functions. These functions involve making calls over the Internet to the Firebase cloud, which, while generally fast to human eyes, is painstakingly slow in computing terms.
First, we need to import the Firebase Auth library into our source code. Add the following to the top of main.dart:
import 'package:firebase_auth/firebase_auth.dart';
Next, we are going to write an asynchronous function that will be called by our Login button to invoke the Firebase Authentication login using our form data.
Add the following method inside your _LoginScreenState class after the build() method:
void tryLogin() async {
    try {
      // The await keyword blocks execution to wait for
      // signInWithEmailAndPassword to complete its asynchronous execution and
      // return a result.
      //
      // FirebaseAuth with raise an exception if the email or password
      // are determined to be invalid, e.g., the email doesn't exist.
      final credential = await FirebaseAuth.instance
          .signInWithEmailAndPassword(email: email!, password: password!);
      print("Logged in ${credential.user}");
      error = null; // clear the error message if exists.
      setState(() {}); // Trigger a rebuild

      // We need this next check to use the Navigator in an async method.
      // It basically makes sure LoginScreen is still visible.
      if (!mounted) return;

      // pop the navigation stack so people cannot "go back" to the login screen
      // after logging in.
      Navigator.of(context).pop();
      // Now go to the HomeScreen.
      Navigator.of(context).push(MaterialPageRoute(
        builder: (context) => const HomeScreen(),
      ));
    } on FirebaseAuthException catch (e) {
      // Exceptions are raised if the Firebase Auth service
      // encounters an error. We need to display these to the user.
      if (e.code == 'user-not-found') {
        error = 'No user found for that email.';
      } else if (e.code == 'wrong-password') {
        error = 'Wrong password provided for that user.';
      } else {
        error = 'An error occurred: ${e.message}';
      }


      // Call setState to redraw the widget, which will display
      // the updated error text.
      setState(() {});
    }
  }
A few things of note:
- Read the code comments carefully for an explanation of what’s going on.
- The
FirebaseAuthclass provides us with access to all of the Firebase Authentication service methods we will need. FirebaseAuth.instanceis the actual Dart object we make the method calls on. For those of you who have had Software Engineering, this is a Singleton.
Finally, we want to invoke this method when the user clicks the Login button and the login form is valid. Update the contents of your button’s onPressed property like so:
if (_formKey.currentState!.validate()) {
  tryLogin();
}
Try using the login form. You should see some updated error messages about invalid email.
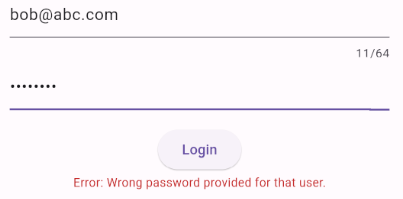
That error message is coming from the Firebase Authentication service. Hooray! This is what we want.
You get this message because there are no users in our system. Let’s add one manually.
Add a user via Firebase Console
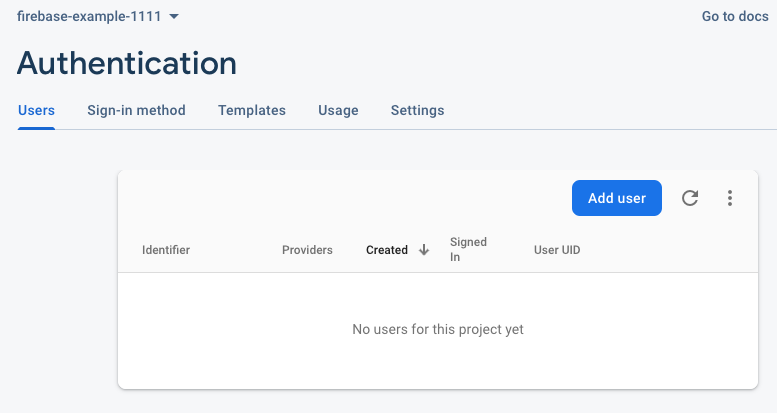
Go to the Firebase Console for your project in the web browser and select the Authentication shortcut (Build -> Authentication). You should see an empty users lists.
Click the “Add User” button. Type in an email address (made up) and a password with at least 8 characters that you will remember.
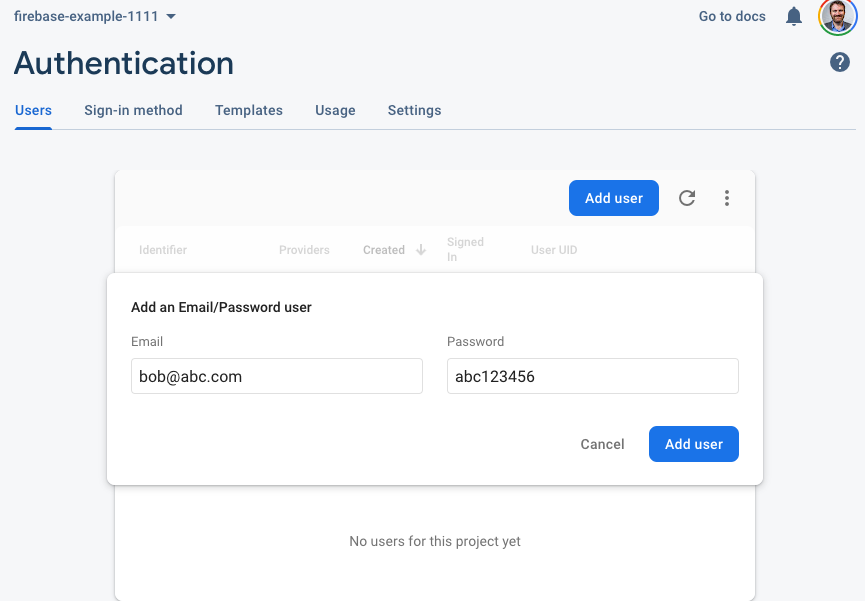
Once done, you should see a new user in your list. Note the “User UID” column. This is a unique value automatically created by Firebase Authentication that will uniquely identify users in your system.
Get information about the current user
Okay, we have Login logic done, but we’re not really doing anything with it. Currently, on successful login, we automatically navigate the user to the HomeScreen. Let’s update the HomeScreen widget to show something:
class HomeScreen extends StatelessWidget {
  const HomeScreen({super.key});

  @override
  Widget build(BuildContext context) {
    return Scaffold(
        appBar: AppBar(title: const Text("Welcome")),
        body: Center(
          child: Text("Welcome ${FirebaseAuth.instance.currentUser?.email}"),
        ));
  }
}
We show a simple Text widget that accesses FirebaseAuth.instance.currentUser. Only one user at a time can be logged into an app using FirebaseAuth, and the variable FirebaseAuth.instance.currentUser will have a reference to that User object. If no one is logged in, this variable will be null.
Now, try to Login with the email address and password you created in the previous section. You should see the following Welcome message:

Hooray! We have collected the user’s entered email and password from the form, transmitting that information over the Internet to the Firebase Auth service, gotten a response, and shown feedback to the user.
Congratulations, you have written an app that uses a cloud service! Your employers will be impressed!
Logging out
Notice that our AppBar does not have a Back button – this is because we pop()’d the navigation stack before navigating to the Welcome screen. We don’t want the user hitting back and signing in again.
Instead, we want to provide Logout functionality. FirebaseAuth helps us with this as well. We’ll add a Logout button and make the necessary calls to log the user out of Firebase Auth and return them to the Login Screen.
Change your HomeScreen to the following:
class HomeScreen extends StatelessWidget {
  const HomeScreen({super.key});

  @override
  Widget build(BuildContext context) {
    return Scaffold(
      appBar: AppBar(title: const Text("Welcome")),
      body: Center(
        child: Column(
          mainAxisAlignment: MainAxisAlignment.center,
          children: [
            Text("Welcome ${FirebaseAuth.instance.currentUser?.email}"),
            ElevatedButton(
              onPressed: () {
                // signOut() doesn't return anything, so we don't need to await
                // for it to finish unless we really want to.
                FirebaseAuth.instance.signOut();

                // This navigator call clears the Navigation stack and takes
                // them to the login screen because we don't want users
                // "going back" in our app after they log out.
                Navigator.of(context).pushAndRemoveUntil(
                    MaterialPageRoute(
                        builder: (context) => const LoginScreen()),
                    (route) => false);
              },
              child: const Text("Logout"),
            )
          ],
        ),
      ),
    );
  }
}
Congratulations! You now have Logout functionality that signs out the user and takes them back to the Login screen. Note that we use a new Navigator method that clears the navigation stack when a user logs out – we don’t want them “going back” into our app without signing in first.
Completed code
Here is the completed main.dart.
Creating a Signup Screen
Creating a page to allow a user to sign up with an Email+Password is similar. Most of the time, such a form has an email field, a password field, and a “repeat password” field to ensure you didn’t type something incorrectly.
Furthermore, Firebase Authentication has a method called createUserWithEmailAndPassword() that is nearly identical to the signInWithEmailAndPassword() method used for Login. Great!
Personally, I think it is more intuitive and easier to implement to keep the LoginScreen and a SignInScreen separate.
So, as an exercise, the steps for creating a SignUp screen are:
- Create a new screen widget following the template of the LoginScreen.
- Add another TextFormField for “repeat password”
- When the “SignUp” button is pressed, you need to add another condition that checks to see if the Password and RepeatPassword fields are the same. If not, display an error by setting the
errorclass variable. - Instead of
tryLogin(), createtrySignup()that is very similar but makes use of createUserWithEmailAndPassword() - You will also need to give the user a way to access the SignUp page, perhaps from the LoginPage via a Button or a Text widget wrapped in a GestureDetector.