Cloud Firestore - Introduction and Creating Data
- Objectives
- Prerequisites
- Code-a-long
- Introduction
- Add Firestore to your project through the Firebase console
- Adding data through the web console
- Adding data to the Firestore from Flutter
- Writing data to the Firestore programmatically
- Conclusion
- Completed code
- Other Resources
Objectives
- To understand the general capabilities of the Cloud Firestore
- To enable the Cloud Firestore for an app project
- To view and add data through the Firestore web console
- To write Flutter code that adds data to the Firestore programmatically
Prerequisites
You must complete the following prior to this lab:
Code-a-long
Introduction
Firebase’s Cloud Firestore is a NoSQL cloud database. It lives inside the Firebase project console, just like Firebase Authentication does. Firestore is ideal for creating and sharing data used by thousands or millions of your app’s users at once.
Databases in general are simply software systems that specialize in storing and searching data. The data are typically the “primitive” types you are familiar with in programming: strings, numbers, booleans, and the like. But many databases are capable of storing more complicated data, like lists, images, geopoints, and more.
If you are familiar with databases from school, most likely you have experience with relational or SQL databases, like MySQL, Postgres, MSSQL, or Oracle. Cloud Firestore is a NoSQL database. It does not have relational database concepts like foreign keys, tables, or JOINs.
The best way to think of the Cloud Firestore is that it stores documents. Think of documents as analogous to a Dictionary in Python, a Map in Java, or JSON objects. Documents are a collection of key-value pairs that represent some entity in your system, e.g., a Person, a Site, a TinderMatch, or a JournalEntry.
So what can you do with the Firestore? Like any database, it excels at the CRUD operations: create, read, update, and delete data.
Let’s start by setting up the Cloud Firestore for a project, and then we will explain more how it stores data.
Add Firestore to your project through the Firebase console
First, we need to enable the Firestore for your project. Go to https://console.firebase.google.com, select your project, and do the following:
-
Select Build from the left menu -> Firestore Database
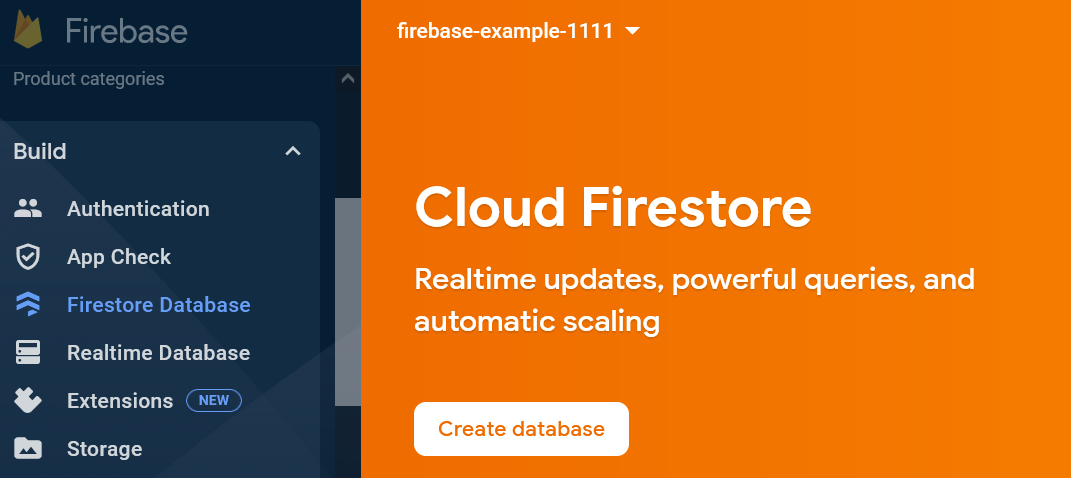
- Click ‘Create Database’
- Select ‘Start in production mode’. This will keep your data secure. You can select ‘Start in test mode’ if you are very early in your app development and do not have a notion of users or logins.
- Select a Cloud Firestore location. Pick something geographically close to you.
-
Finally, click Enable. Your Firestore database will take a moment to be created, then you will see a screen like this:
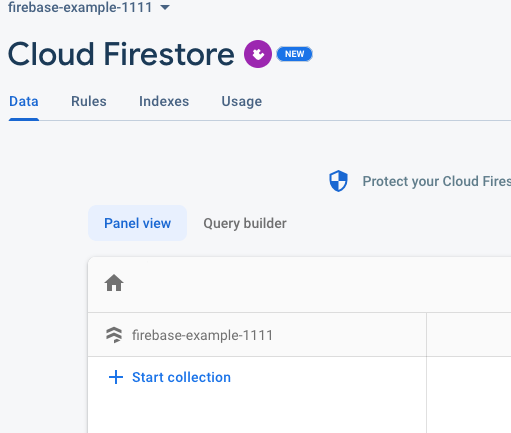
We now have an empty database ready to use.
Security Rules
One final step is to update the security rules for the Firestore. The security rules specify who can modify which database entries. You can read more here if you are interested.
- Click on the “Rules” tab.
- In the text area, change the contents to the following:
service cloud.firestore { match /databases/{database}/documents { match /{document=**} { allow read, write: if request.auth != null; } } } - Click the “Publish” button.
We are now good to go. Users logged into our app can read and write data to the Firestore, but anonymous internet strangers from other apps and websites cannot.
Adding data through the web console
We can add data either through the web console, or programmatically from an app. We’re going to add some simple starter data through the web console.
The Firestore organizes data into collections. We need at least one collection in which to store data. Collections should be named the thing they represent. We’re going to create a People collection.
When we create our collection, we must also create our first document. A document is the basic unit of the Firestore. Documents store key-value pairs, much like a Python Dictionary or a Java Map. The key is a string and is the variable name, and the value is a primitive value like a number, a string, a boolean, or a datetime. Our People collection will have multiple documents representing individual persons.
Each document must have a unique id. In database terms, this is the “primary key”. This unique identifier is used in searching and other functions. You can specify your own key, or let Firestore generate one for you. It doesn’t matter which you choose. But, if you specify your own key, it must be unique within the collection.
- Click “+ Start collection”.
- In the pop-up, enter
Peoplein the Collection ID box. Click Next.- Very Important Note: Firestore is case-sensitive, so
People!=people.
- Very Important Note: Firestore is case-sensitive, so
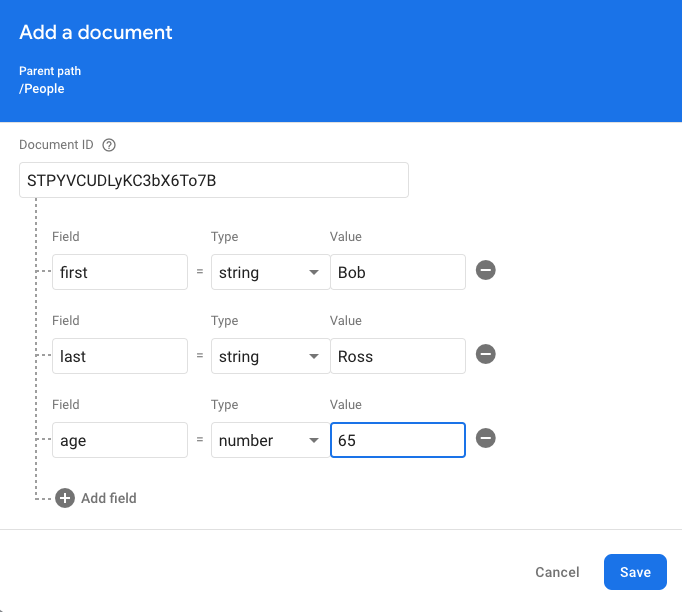
- The subsequent pop-up prompts you to create a document.
- Click the “Auto-ID” text label to generate an automatic id.
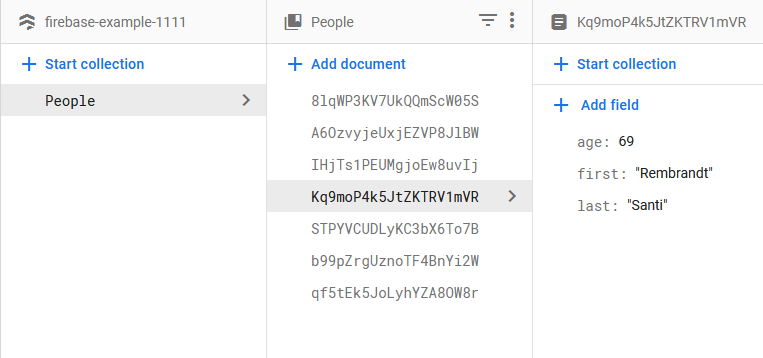
- Set the Field to “first”, Type to “string”, and Value to “Bob”
- Click the + symbol to add a second field. Set Field to “last”, Type to “string”, and Value to “Ross”
- Click the + symbol to add third field. Set Field to “age”, Type to “number”, and Value to “65”
- Click Save
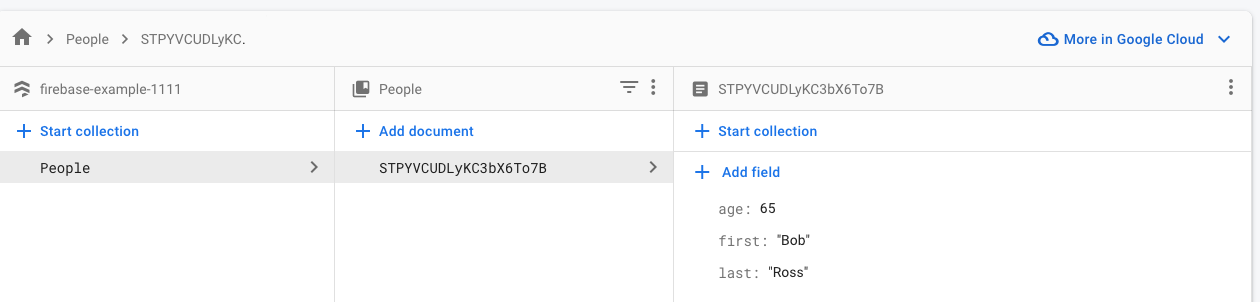
After you click Save, you should see the new Collection and Document appear in the screen. Try adding another Document by clicking “+ Add document” in the center pane.
You may have noticed several options in the Type dropdown. These are the data types Firestore supports. They are fairly limited, and you cannot store things like images.
Documents in a collection do not need to have the same fields. Every document can be different. But, from an app development perspective, it will be beneficial for each Document in a collection to have the same fields names and types.
Adding data to the Firestore from Flutter
Adding and viewing Firestore data through the web console is excellent for debugging and setting up some initial data to test. Of course, this is not scalable, and your app will be generating data you want to share and save. So you need to be able to add it programmatically from your Flutter app.
Fortunately, there is a library for that.
We will continue with the example application from the Firebase Authentication lab. Again, you must have authentication working in your app to read/write data from the Firestore thanks to the security rules.
Adding Firestore libraries to a project
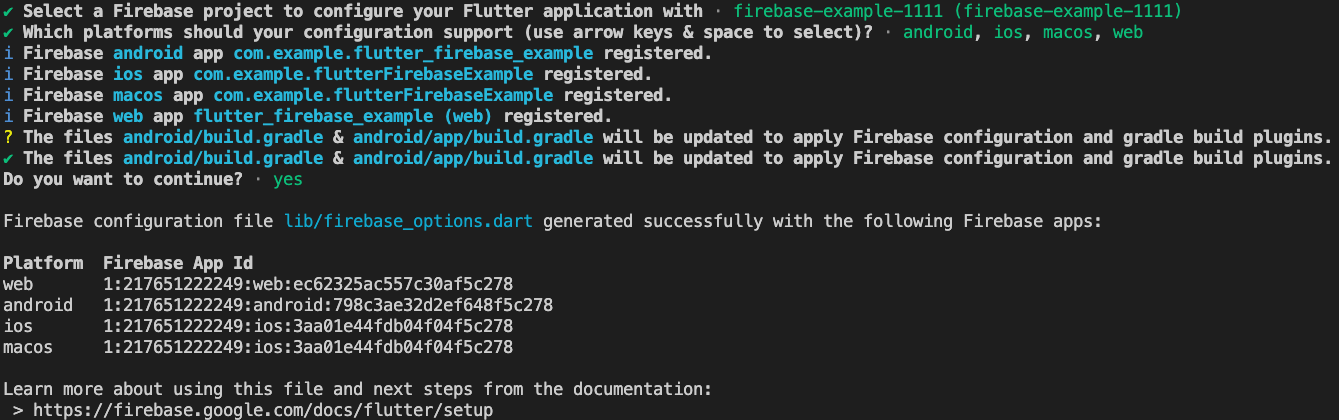
First, we need to add the Cloud Firestore libraries to our project, and then run flutterfire config to ensure our app is configured to talk to the Firebase cloud properly.
- Open your firebase example project in VSCode.
- In the VS Code Terminal, run
flutter pub add cloud_firestore flutterfire configure flutter pub get - Use the arrow keys to select your example project from the list, then hit Enter.
- Hit Enter to keep the platform selection.
- Select ‘yes’ for if asked to overwrite ` lib/firebase_options.dart`.
Android changes
We have heretofore ignored the android/, ios/, etc. folders. We need to make a change to one of these folders now. Cloud Firestore libraries only work with Android v19 and above, whereas Flutter is backward compatible to Android v16. We need to tell Android the minimum version we support is 19.
- Open the file
android/app/build.gradle- be careful, there are two build.gradle files. Make sure you are opening the right one. - Look for the line
minSdkVersion flutter.minSdkVersion - Change it to
minSdkVersion 21
We should now be good to write Firestore code and test it on an Android emulator.
Adding a new screen and a Data model
Let’s add some code to our app to get it ready for communicating with the Firestore.
FirestoreAddScreen widget
First, let’s add a new screen widget that will demo our Firestore functionality. Create a new file in the lib/ directory named firestore_add.dart. Paste in the following code:
import 'package:flutter/material.dart';
import 'person.dart';
import 'package:cloud_firestore/cloud_firestore.dart';

class FirestoreAddScreen extends StatefulWidget {
  const FirestoreAddScreen({super.key});

  @override
  State<FirestoreAddScreen> createState() => _FirestoreAddScreenState();
}

class _FirestoreAddScreenState extends State<FirestoreAddScreen> {

  @override
  Widget build(BuildContext context) {
    return Scaffold(
      appBar: AppBar(title: const Text("Add data to Firestore")),
      body: Center(
        child: ElevatedButton(
          onPressed: () => generateAndAddPerson(),
          child: const Text("Generate and add a person"),
        ),
      ),
    );
  }

  void generateAndAddPerson() async {
    // TODO
  }
}
Adding a Person data model
In object-oriented programming, it’s a good idea to encapsulate complex data objects, like the notion of a “Person”, in a class. We will create a Dart class to represent our idea of a Person in our app.
In the lib/ folder, create the file person.dart and paste in the following code:
import "dart:math";

class Person {
  Person({required this.first, required this.last, required this.age});

  final String first;
  final String last;
  int age;

  /// Static generate a random person object from a preset list of names.
  static Person getRandomPerson() {
    final List<String> firstNames = [
      'Leonardo',
      'Bob',
      'Raphael',
      'Filippo',
      'Pablo',
      'Rembrandt'
    ];

    final List<String> lastNames = [
      'da Vinci',
      'Ross',
      'Santi',
      'Brunelleschi',
      'Picasso',
      'van Rijn'
    ];

    final random = Random();
    var first = firstNames[random.nextInt(firstNames.length)];
    var last = lastNames[random.nextInt(lastNames.length)];
    var age = random.nextInt(100);

    return Person(first: first, last: last, age: age);
  }
}
Note that this class is not a Widget. It is a simple class for holding related data. We can create many instances of this Person class to represent different people with different names and ages.
Updating the HomeScreen to go to the FirestoreAddScreen
Third, let’s add a button to our app’s HomeScreen (not the LoginScreen) that will navigate us to this new widget.
- Add the following import statement to
main.dartimport 'firestore_add.dart'; - Replace the HomeScreen widget in
main.dartwith the following:
class HomeScreen extends StatelessWidget {
  const HomeScreen({super.key});

  @override
  Widget build(BuildContext context) {
    return Scaffold(
      appBar: AppBar(title: const Text("Welcome")),
      body: Center(
        child: Column(
          mainAxisAlignment: MainAxisAlignment.center,
          children: [
            Text("Welcome ${FirebaseAuth.instance.currentUser?.email}"),
            OutlinedButton(
                onPressed: () => Navigator.push(
                      context,
                      MaterialPageRoute(
                        builder: (context) => const FirestoreAddScreen(),
                      ),
                    ),
                child: const Text("Firestore - Add Data")),
            ElevatedButton(
              onPressed: () {
                // signOut() doesn't return anything, so we don't need to await
                // for it to finish unless we really want to.
                FirebaseAuth.instance.signOut();

                // This navigator call clears the Navigation stack and takes
                // them to the login screen because we don't want users
                // "going back" in our app after they log out.
                Navigator.of(context).pushAndRemoveUntil(
                    MaterialPageRoute(
                        builder: (context) => const LoginScreen()),
                    (route) => false);
              },
              child: const Text("Logout"),
            )
          ],
        ),
      ),
    );
  }
}
Writing data to the Firestore programmatically
Our FirestoreAddScreen is necessarily a Stateful widget. Much like with Firebase Authentication, we need to make a call to the Firestore library asynchronously, the library does the actual data transmission to the Firestore for us, and then gives us a result (which could be an error), and we have to do something with the result.
In our example app, we want to create Person data and save it to the Firestore, much like we did through the web console.
How you create the raw data is up to you. You could get it from a Form, like we did on the LoginScreen. Maybe the data is calculated and produced by some algorithm.
For this example, we don’t really care how the data is created in our app. For simplicity’s sake, I have added the static method Person.getRandomPerson() to quickly generate a random Person instance with data that I will put in the Firestore.
You will notice the FirestoreAddScreen has an ElevatedButton that, when pressed, invokes a method called generateAndAddPerson(). It is in this method where we will create our data and send it to the Firestore. You can call Firestore methods from anywhere in your code, but in this case, we want to attach it to a button press.
First, we need to import the Dart library into our source code. Add the following line at the top of firestore_add.dart:
import 'package:cloud_firestore/cloud_firestore.dart';
To call the Firestore programmatically, we need a reference to the Firestore collection (“People”) we want write to or read from. Add the following class variable to _FirestoreAddScreenState:
  // This reference allows us to work with our People collection in the Firestore.
  // The collection string must match the collection name in the Firestore exactly.
  final peopleRef = FirebaseFirestore.instance.collection('People');
Think of the peopleRef object as our communication path to the Firestore collection. It will handle network calls and all sorts of other things for us.
To write data to the Firestore collection, we need to call peopleRef.add(...). But what parameter do we give it? add() expects an instance of the Map class. Remember how I said that you should think of Documents in Firestore as similar to a Python dictionary or a Java map? Dart also has a notion of a Map which is a set of key-value pairs like in those other languages.
Creating a new Document in the Firestore is a matter of giving add() a map where the Map keys will be the Document’s fields, the Map values will be the Document’s fields’ values, and the Document’s field types are inferred from the Map values’ types.
Let’s add a convenience method to our Person class to return a Map version of a Person instance’s data. Paste the following method inside your Person class in person.dart:
  /// A utility method to convert our Person class into a Map
  /// with the same values. The Firestore library expects a Map.
  Map<String, Object?> toMap() {
    // The { } create a Map object, much like { } in Python creates a dictionary
    // This method creates and immediately returns the map.
    return {
      'first': first,
      'last': last,
      'age': age,
    };
  }
Aside: You may be asking yourself, why create a Person class at all? Why not just use a Map from the beginning to store data? A fair point. The main reason is that the Person object has nice named variables that can be type-checked, whereas Maps do not. The type-checking that comes with the Person class is very handy for things like auto-complete and making sure you’re referencing variables that actually exist. Embrace type checking. It helps you detect and prevent errors.
Okay, now, let’s add() our data. Change the generateAndAddPerson() method to the following:
  void generateAndAddPerson() async {
    try {
      Person p = Person.getRandomPerson();
      // This call transmits the data to the Firestore.
      // the 'await' call blocks execution until something comes back from the network.
      // the DocumentReference is a pointer to the Document in the cloud that was created.
      DocumentReference doc = await peopleRef.add(p.toMap());

      // Show a success message with the document ID.
      if (!mounted) return;
      ScaffoldMessenger.of(context).showSnackBar(
        SnackBar(content: Text('Success! Added ${doc.id}')),
      );
    } on FirebaseException catch (e) {
      // Something went terribly wrong
      if (!mounted) return;
      ScaffoldMessenger.of(context).showSnackBar(
        SnackBar(content: Text('Something went wrong! ${e.message}')),
      );
    }
  }
There are a few things of note in this code:
- We use
awaitto block the asynchronous execution until theadd()method returns. It’s making network calls, which to a computer, are very slow. add()returns a DocumentReference. Much likepeopleRefis a pointer/conduit to the “People” collection in the Firestore, this DocumentReference is a pointer/conduit to the Document you just created in the Firestore.- The code is wrapped in a
try-onblock to catch exceptions that might occur. Firestore can throw exceptions if there is no network connection (Airplane mode) or the Firestore security rules prevent the user from adding data. - The result of the action is shown in a pop-up Snackbar to the user. Currently, we just display the auto-id created by the Firestore for the new document. We could easily adjust our Stateful FirestoreAddScreen to show a Text widget as well by setting a state variable, calling
setState(), and ensuring the Text widget appears in thebuild()method.
Open your Firestore database in the web console. You should now see several new entries with new data! One new entry for every time you click the button.
Try this: Have the web console visible while you press the button in your emulator or phone. You should see the new data appear in real time in the web console!
Conclusion
Congratulations! Your app is now saving data to the cloud. You now have the capacity for your app’s users to create and share data with one another because anyone using your app will be connected to your Firestore. What’s more, you could have a million users all writing data at once and the Firestore can handle it, and you do not have to change a single line of code. Of course, Google will start charging you a hefty sum for that!
I know that was a lot of setup, but the actual adding of data is only a few lines of code. The rest of the setup will make expanding on our functionality much easier.
Right now, we’re just adding data. In the next lab, we will demonstrate how to display data from the Firestore.